Connect Kolide to Entra
With Kolide’s Entra integration, you can:
- Import your Microsoft Entra Users and Groups
- Protect the Kolide admin dashboard with Entra authentication
- Enable your users to sign into Kolide Device Trust protected apps with their Google credentials
In this guide, we will walk you through the exact steps to securely integrate Kolide with your existing production Entra instance and enable it.
Minimum Requirements
Before we can start the process, we first need to ensure you have everything needed to successfully integrate Kolide. Please check the following requirements before you get started.
You must have Entra with a P1 license
Kolide’s Entra support requires External Auth Methods, which are only available for accounts using the P1 plan or higher.
In addition, the Entra ID administrator account you use to set up the integration will require the following access permissions and roles:
- Application Administrator
- Authentication Administrator
- Authentication Policy Administrator
- Conditional Access Administrator
- Groups Administrator
- Guest-user logins
- Cross-tenant users
- External authentication methods for Azure Government Cloud
You must be part of the Kolide Multi-IdP Beta
This feature is not currently available to all Device Trust customers. To verify that you have it enabled, go to https://app.kolide.com/x/settings/my/profile/edit and under Admin Settings, if you have an item called Identity Providers then you are all set. If instead, you have an item called Identity & Access, you will need to ask Kolide support to enable the feature.
Step 0: Activate your Kolide Account
If you haven’t already, you will need to sign into the administrative dashboard of Kolide via magic link authentication.
- Go to the Kolide Sign-in page (https://app.kolide.com/signin)
- Enter your email address
- When prompted, go to your email provider and click the magic link.
- Accept the 1Password Extended Access Management Terms and Conditions
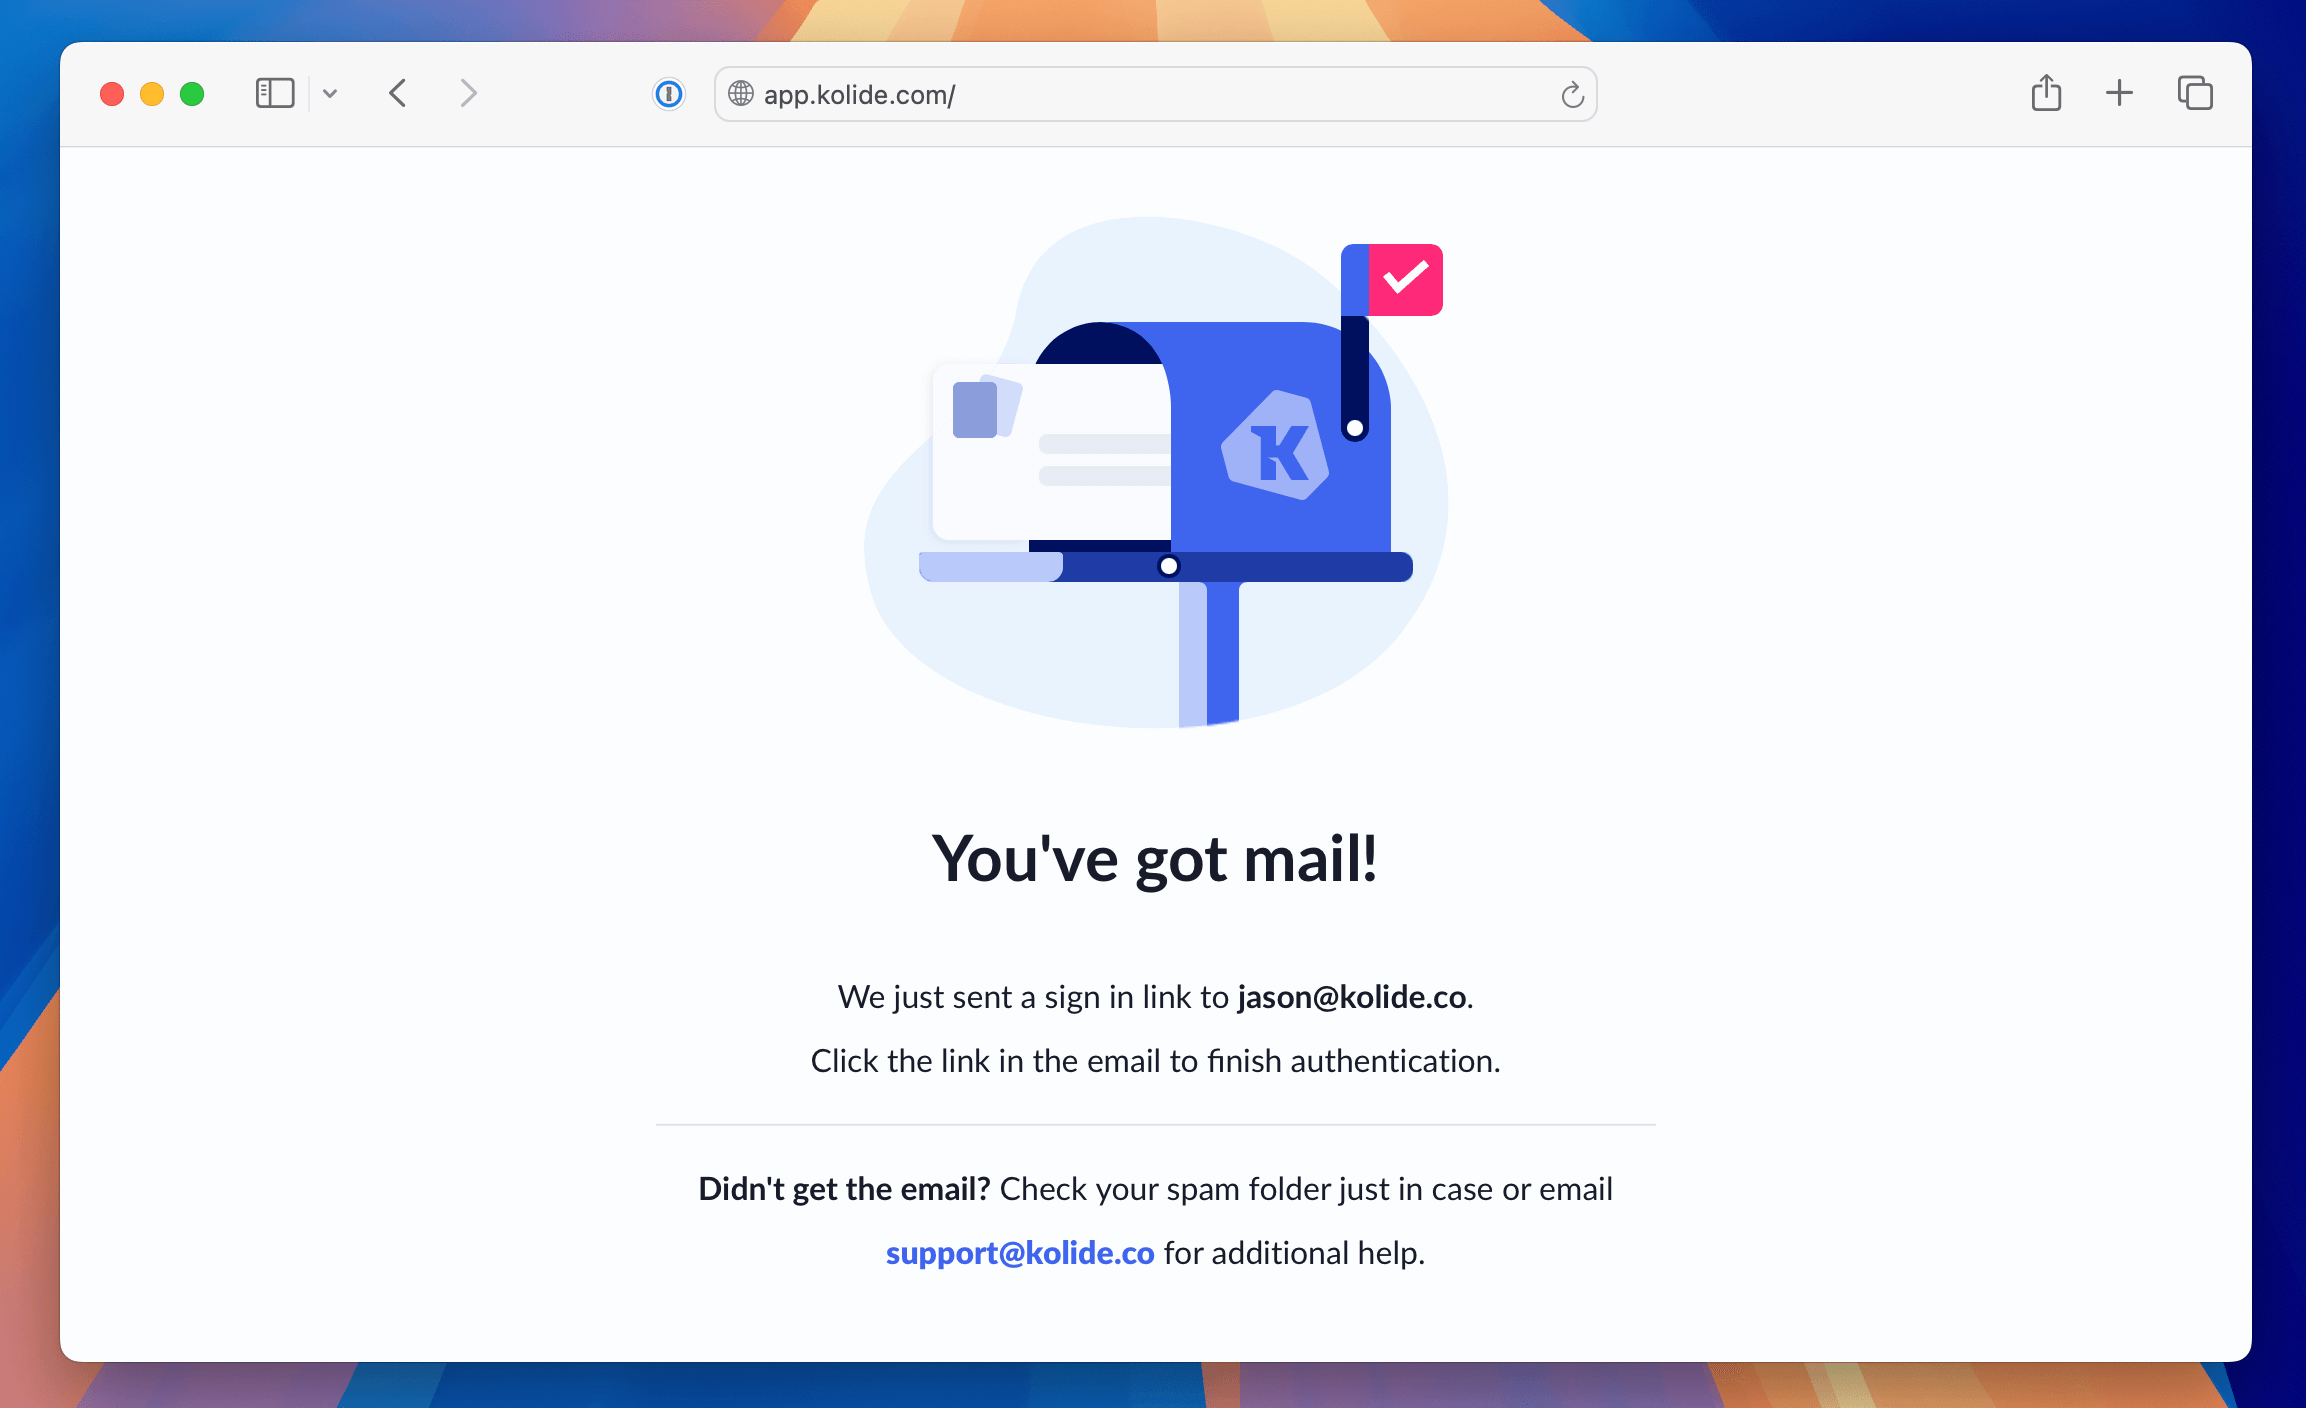
If you do not see the prompt to check your email, please contact support.
Step 1: Configure the external authentication method
Create a Kolide Device Trust enabled group in Entra ID for testing
To test the implementation and make sure it works the way you want it to, first create a Kolide-enabled group with test users.
Open two browser windows side-by-side. In one window, sign in to Kolide.
In the second window, sign in to Microsoft Entra admin center.
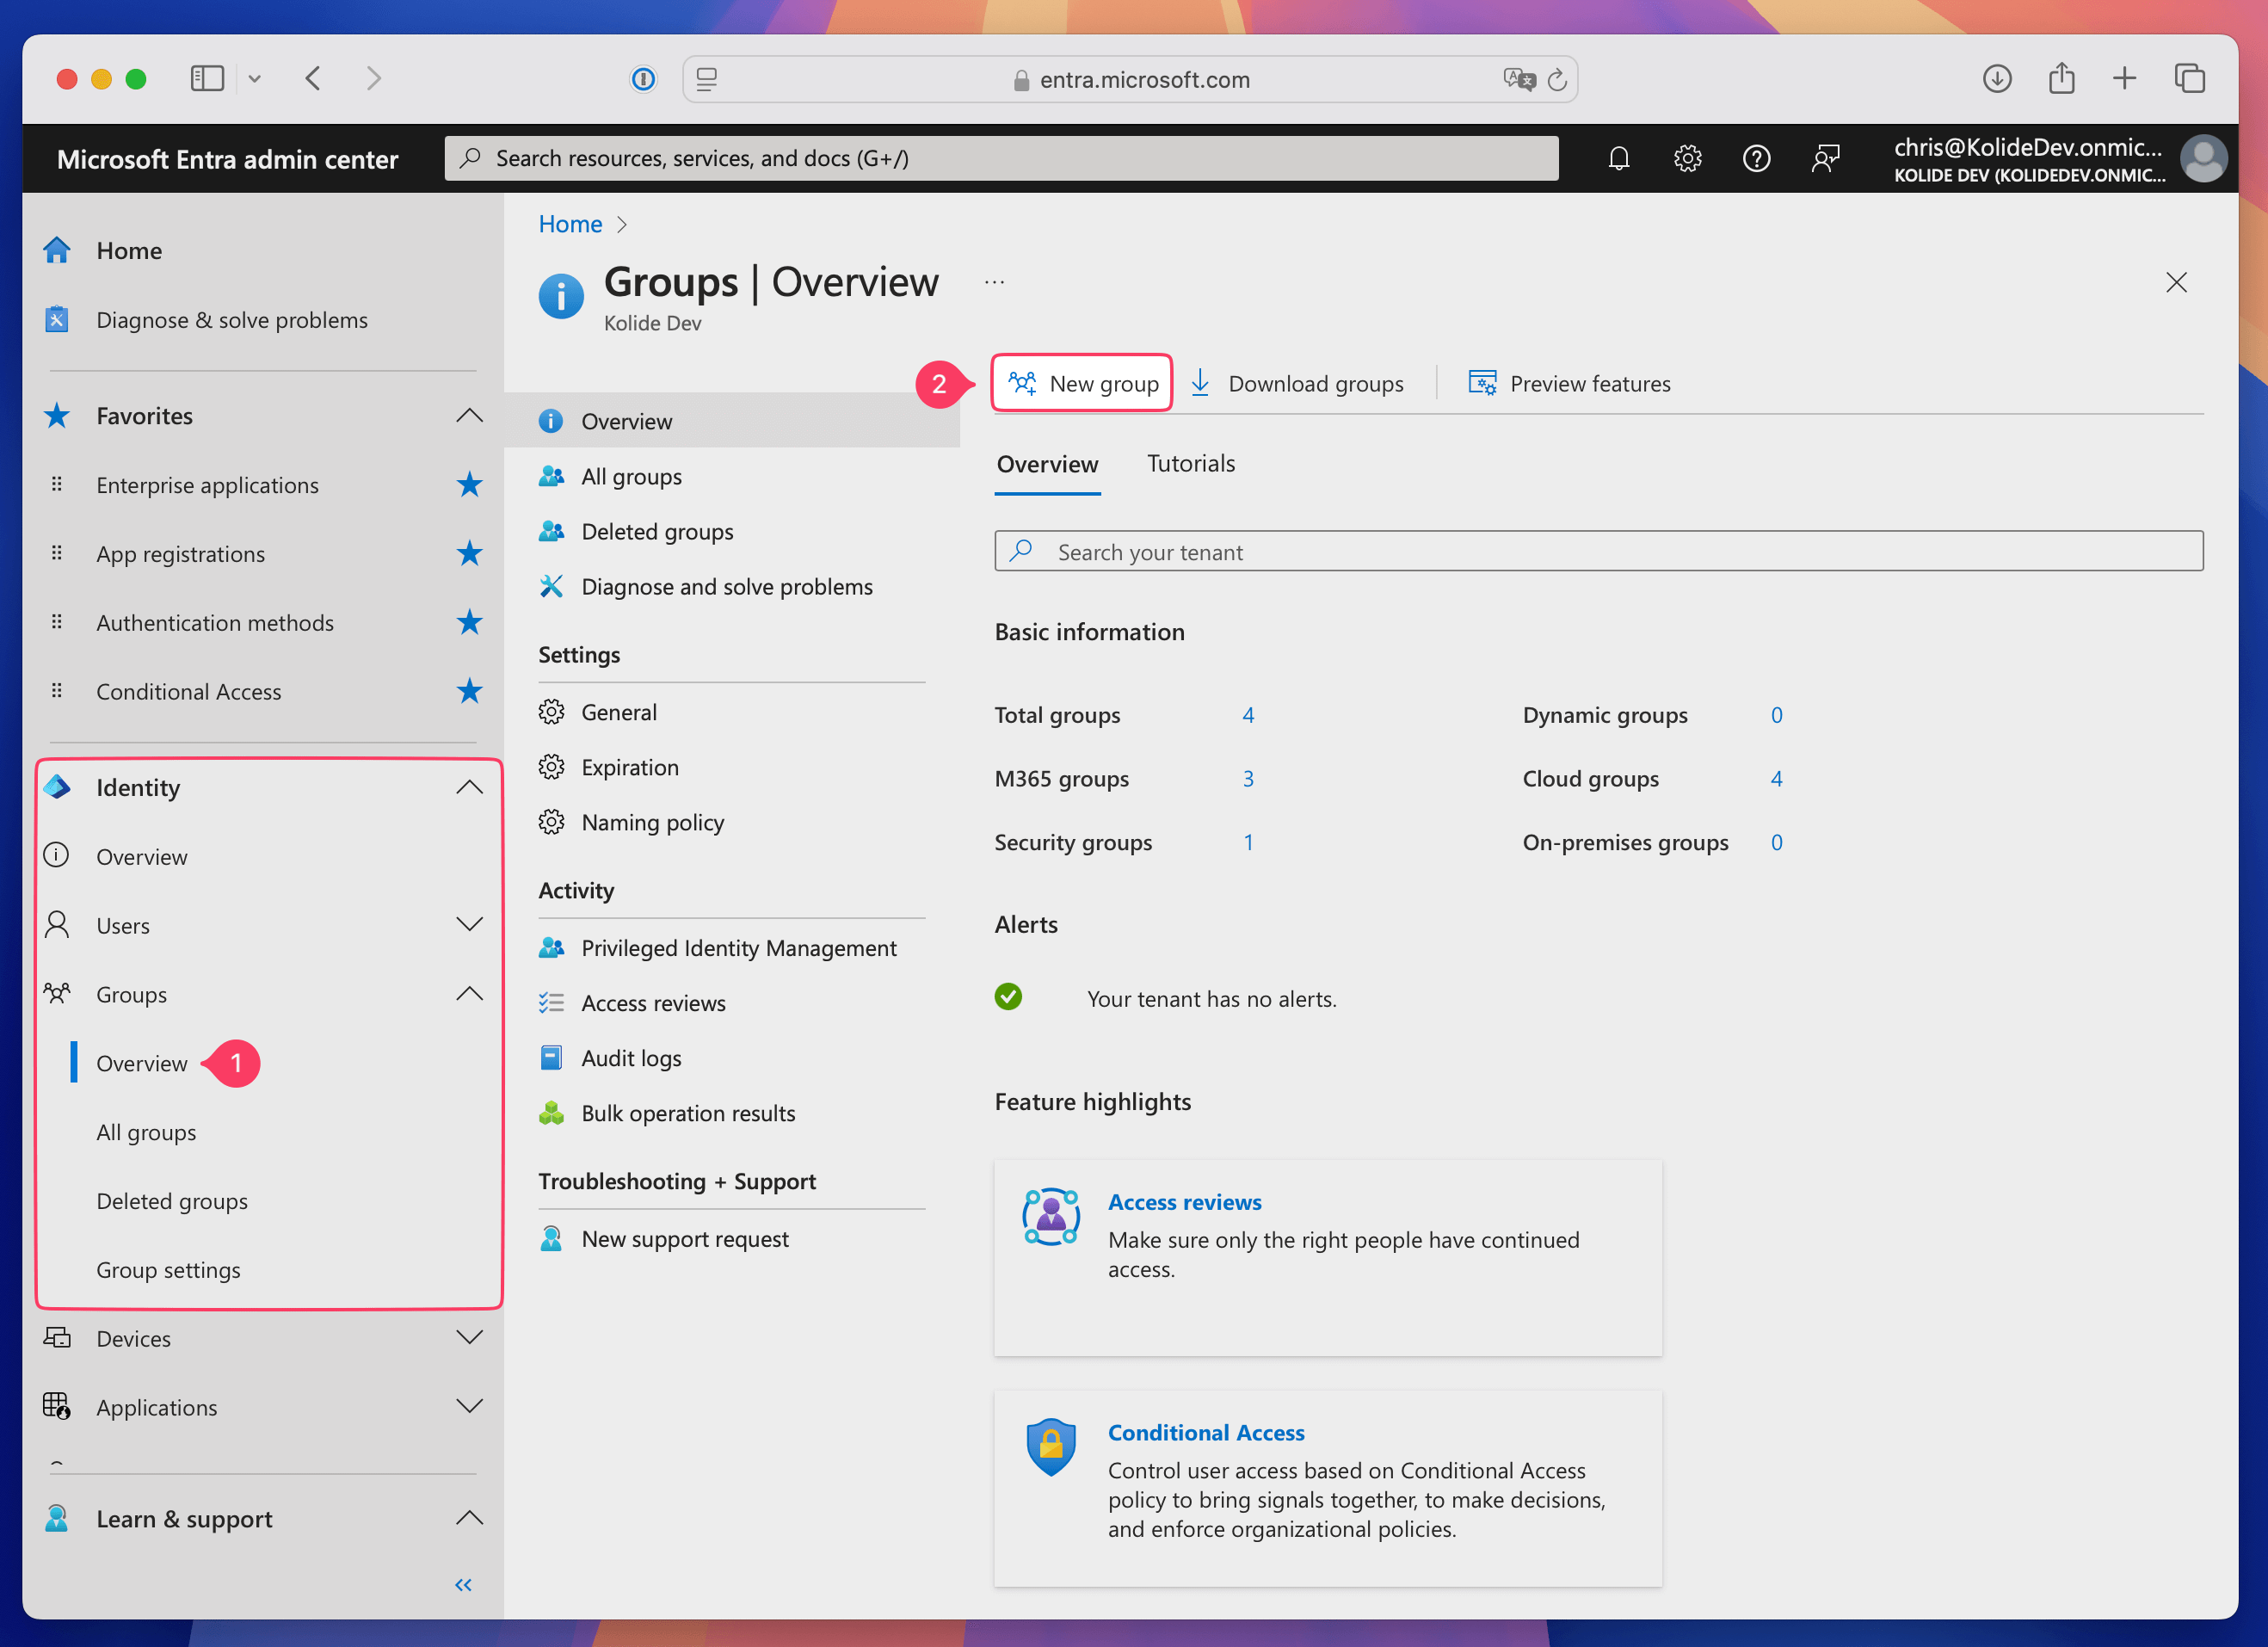
In the Entra admin window, select Identity > Groups in the sidebar, then select New group.
-
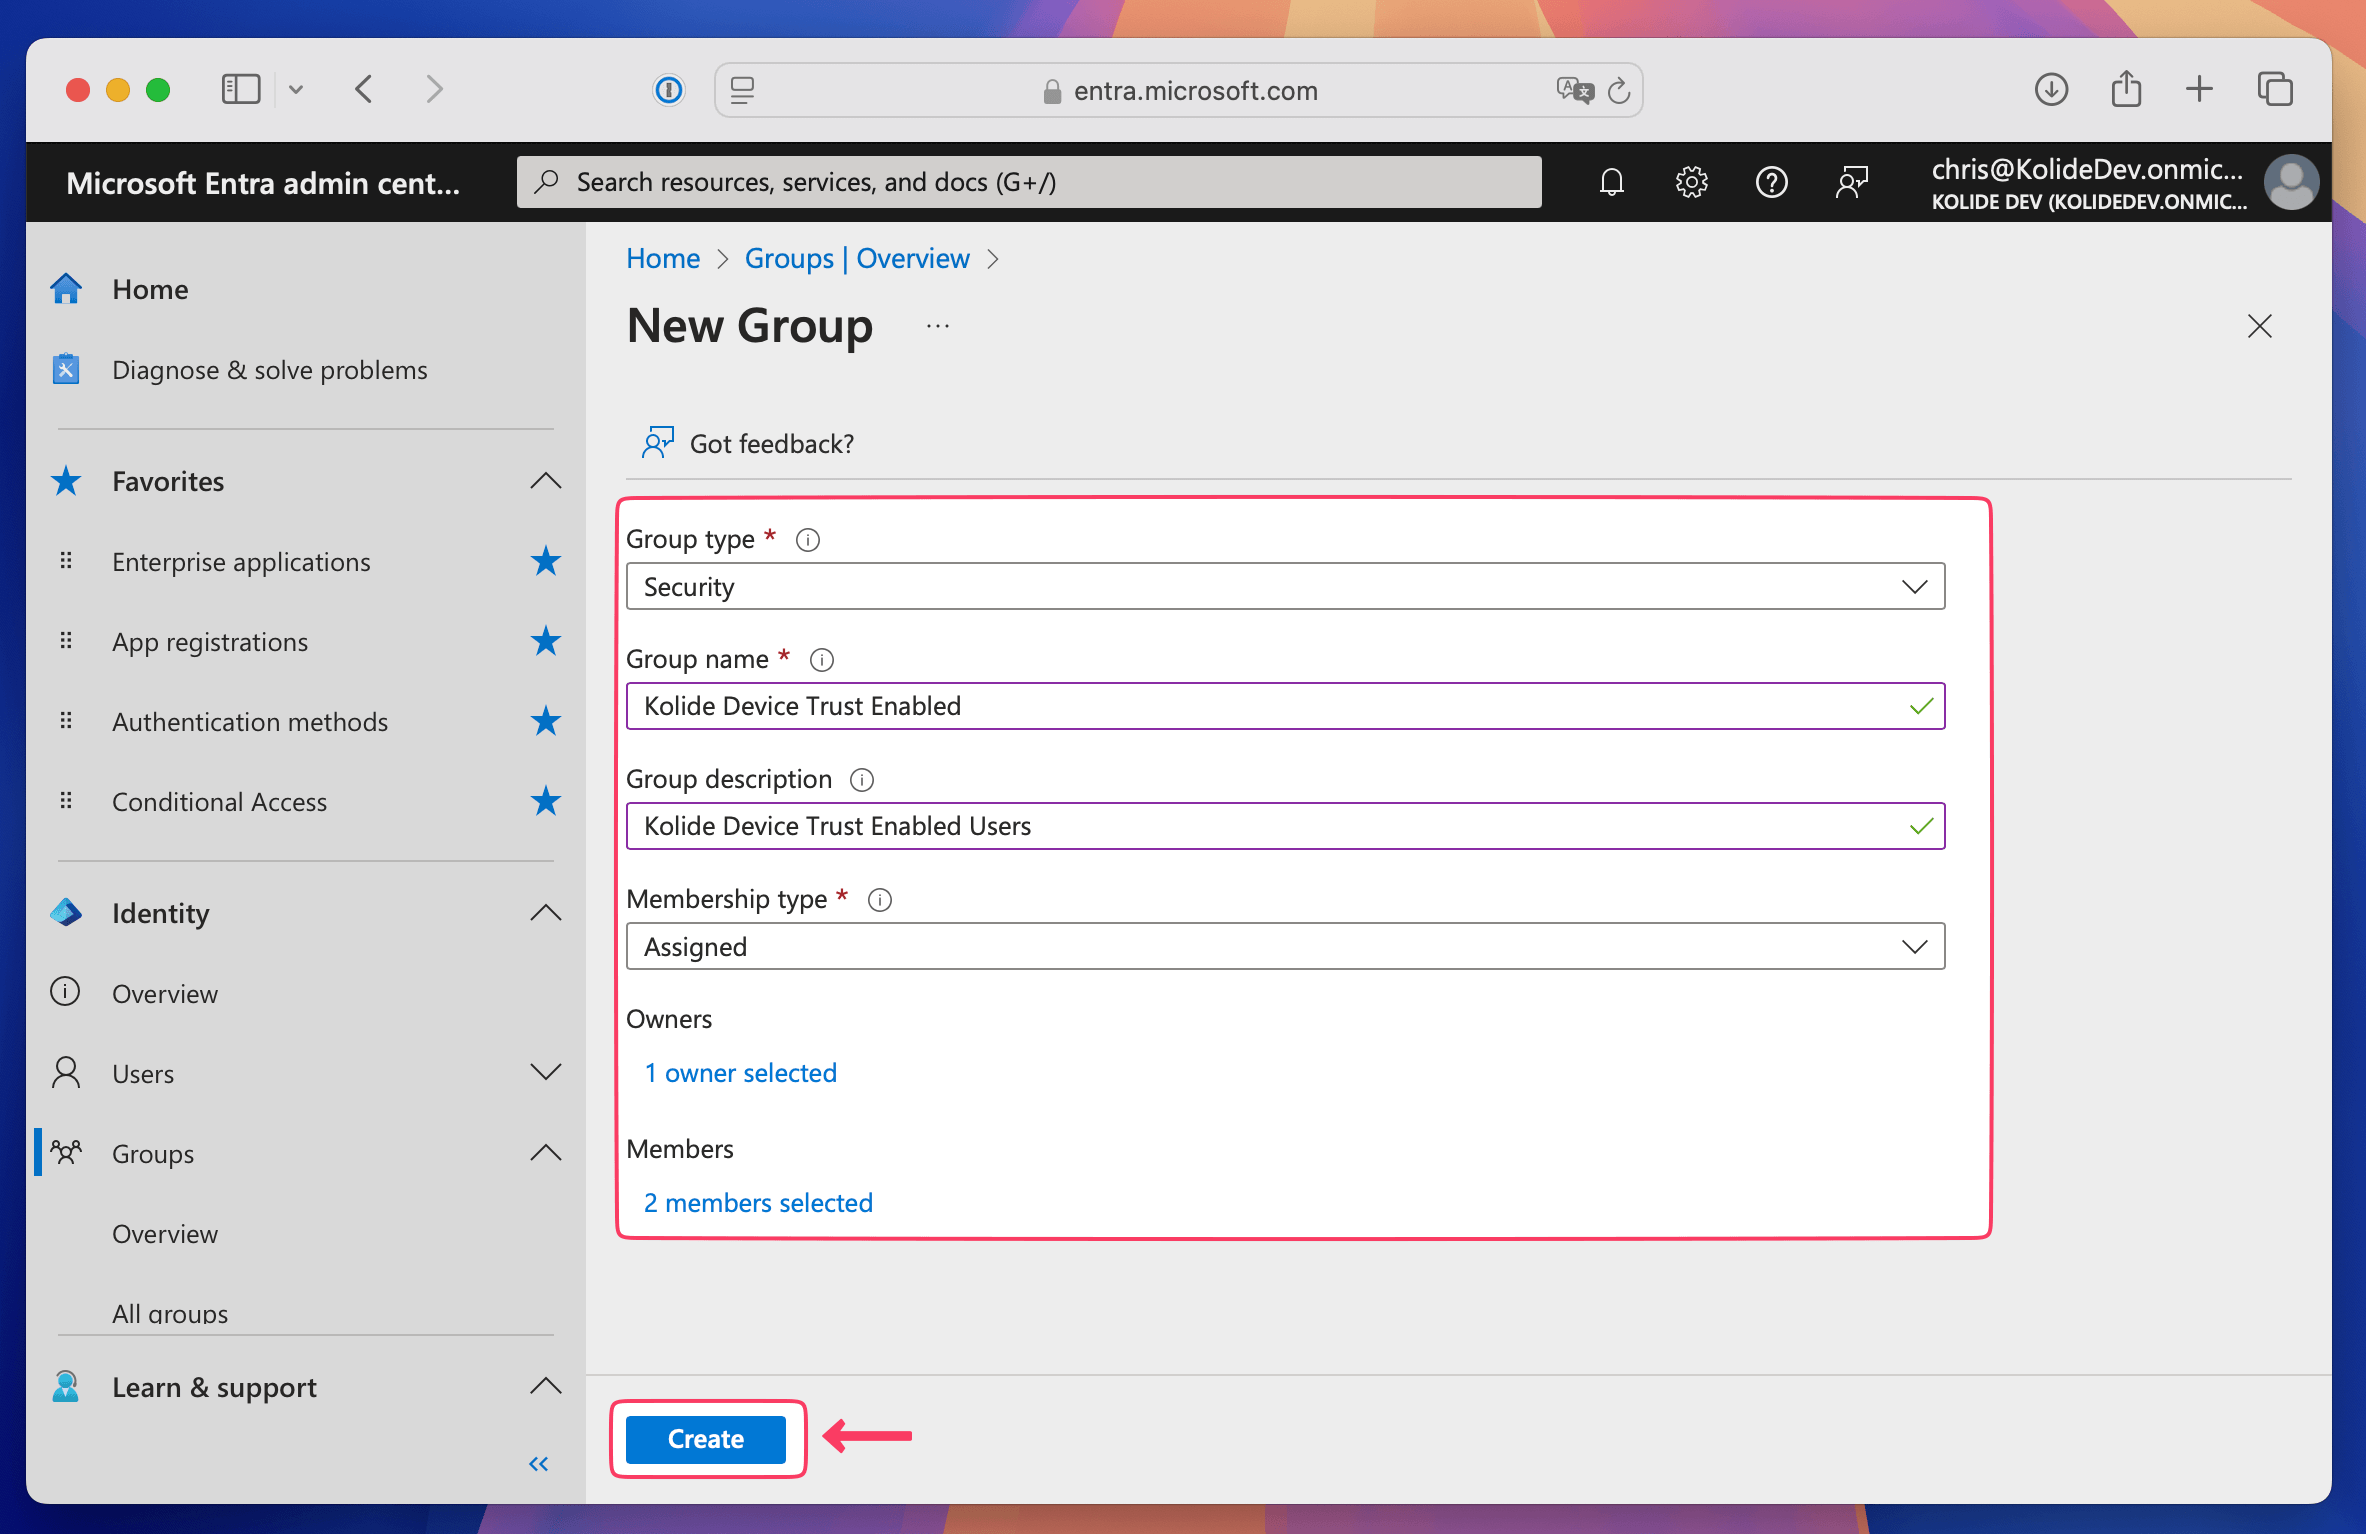
Fill out the fields, including:
- Group type: Select Security.
- Group name: Enter the name “Kolide Device Trust Enabled”.
- Group description: Enter a description of the group. For example: “Kolide Device Trust Enabled Users”.
- Membership type: Choose Assigned.
- Owners: Choose your group owners.
- Members: Choose your test users.
When done, click Create.
Set up an App Registration and External Authentication Method for Kolide Device Trust
Copy and paste the Tenant ID
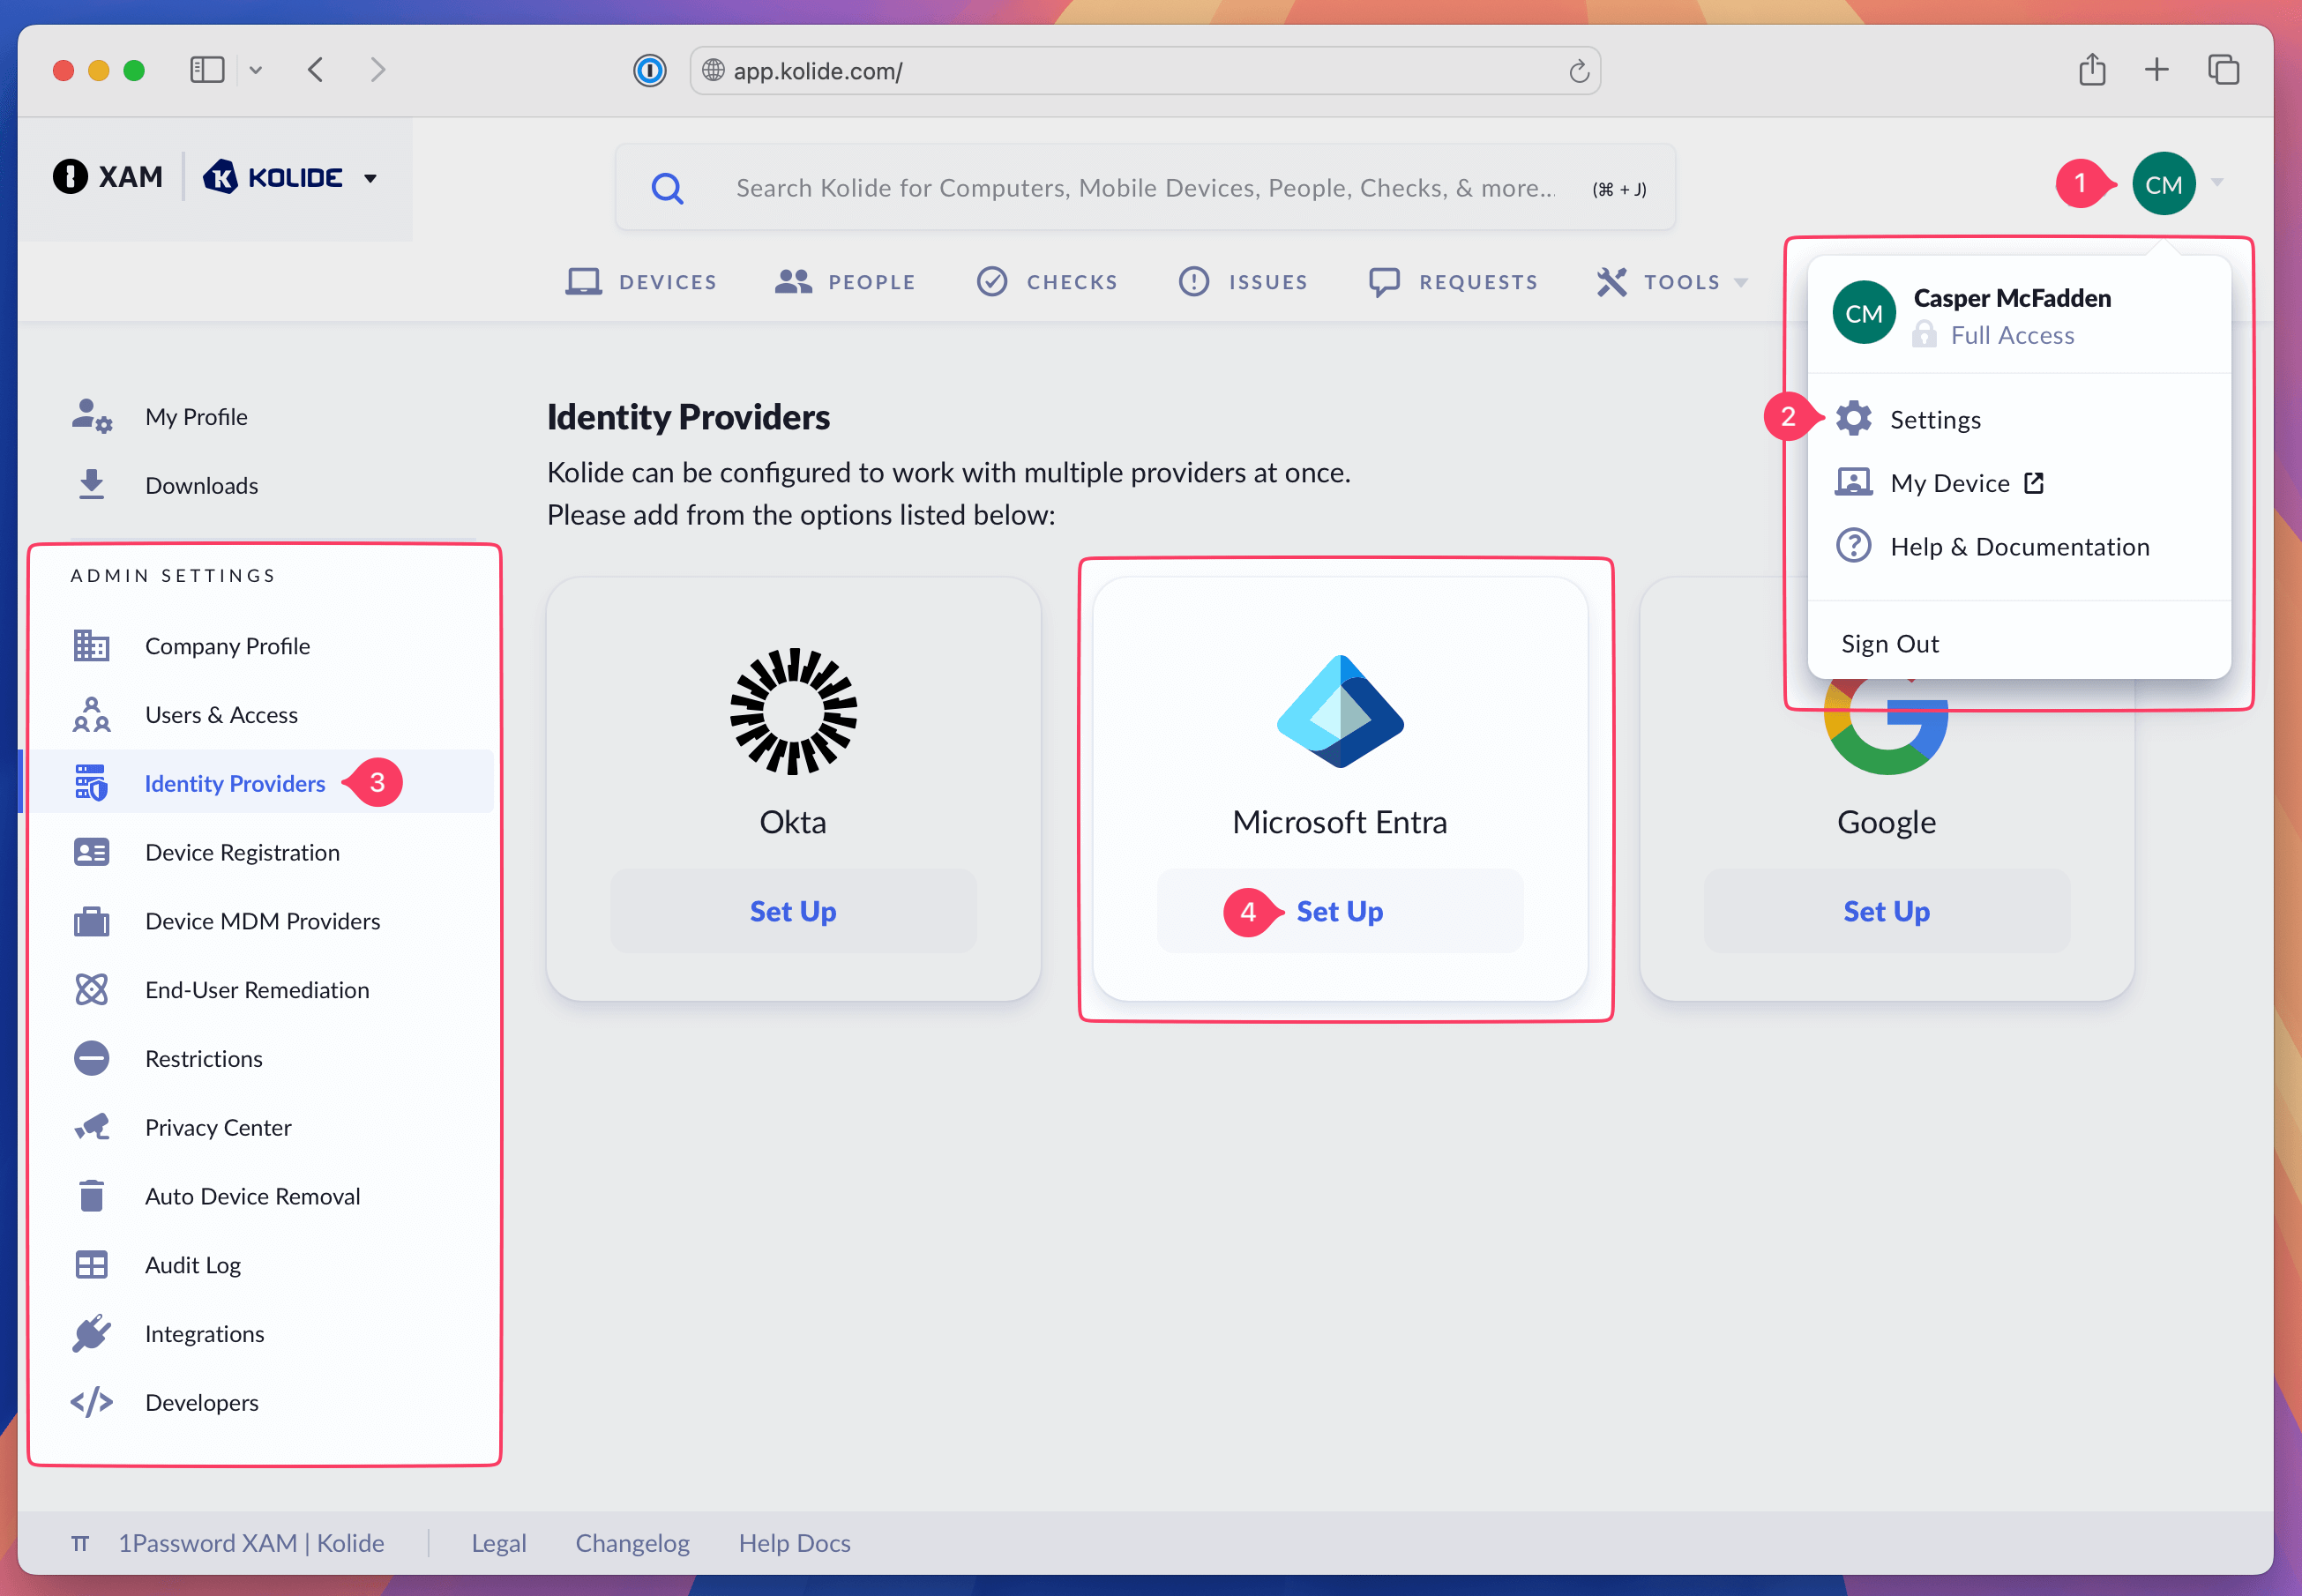
Sign in to https://app.kolide.com.
Click the avatar in the upper-right.
Click Settings.
In the left-hand navigation menu, click Identity Providers.
Under Entra, click Set Up.
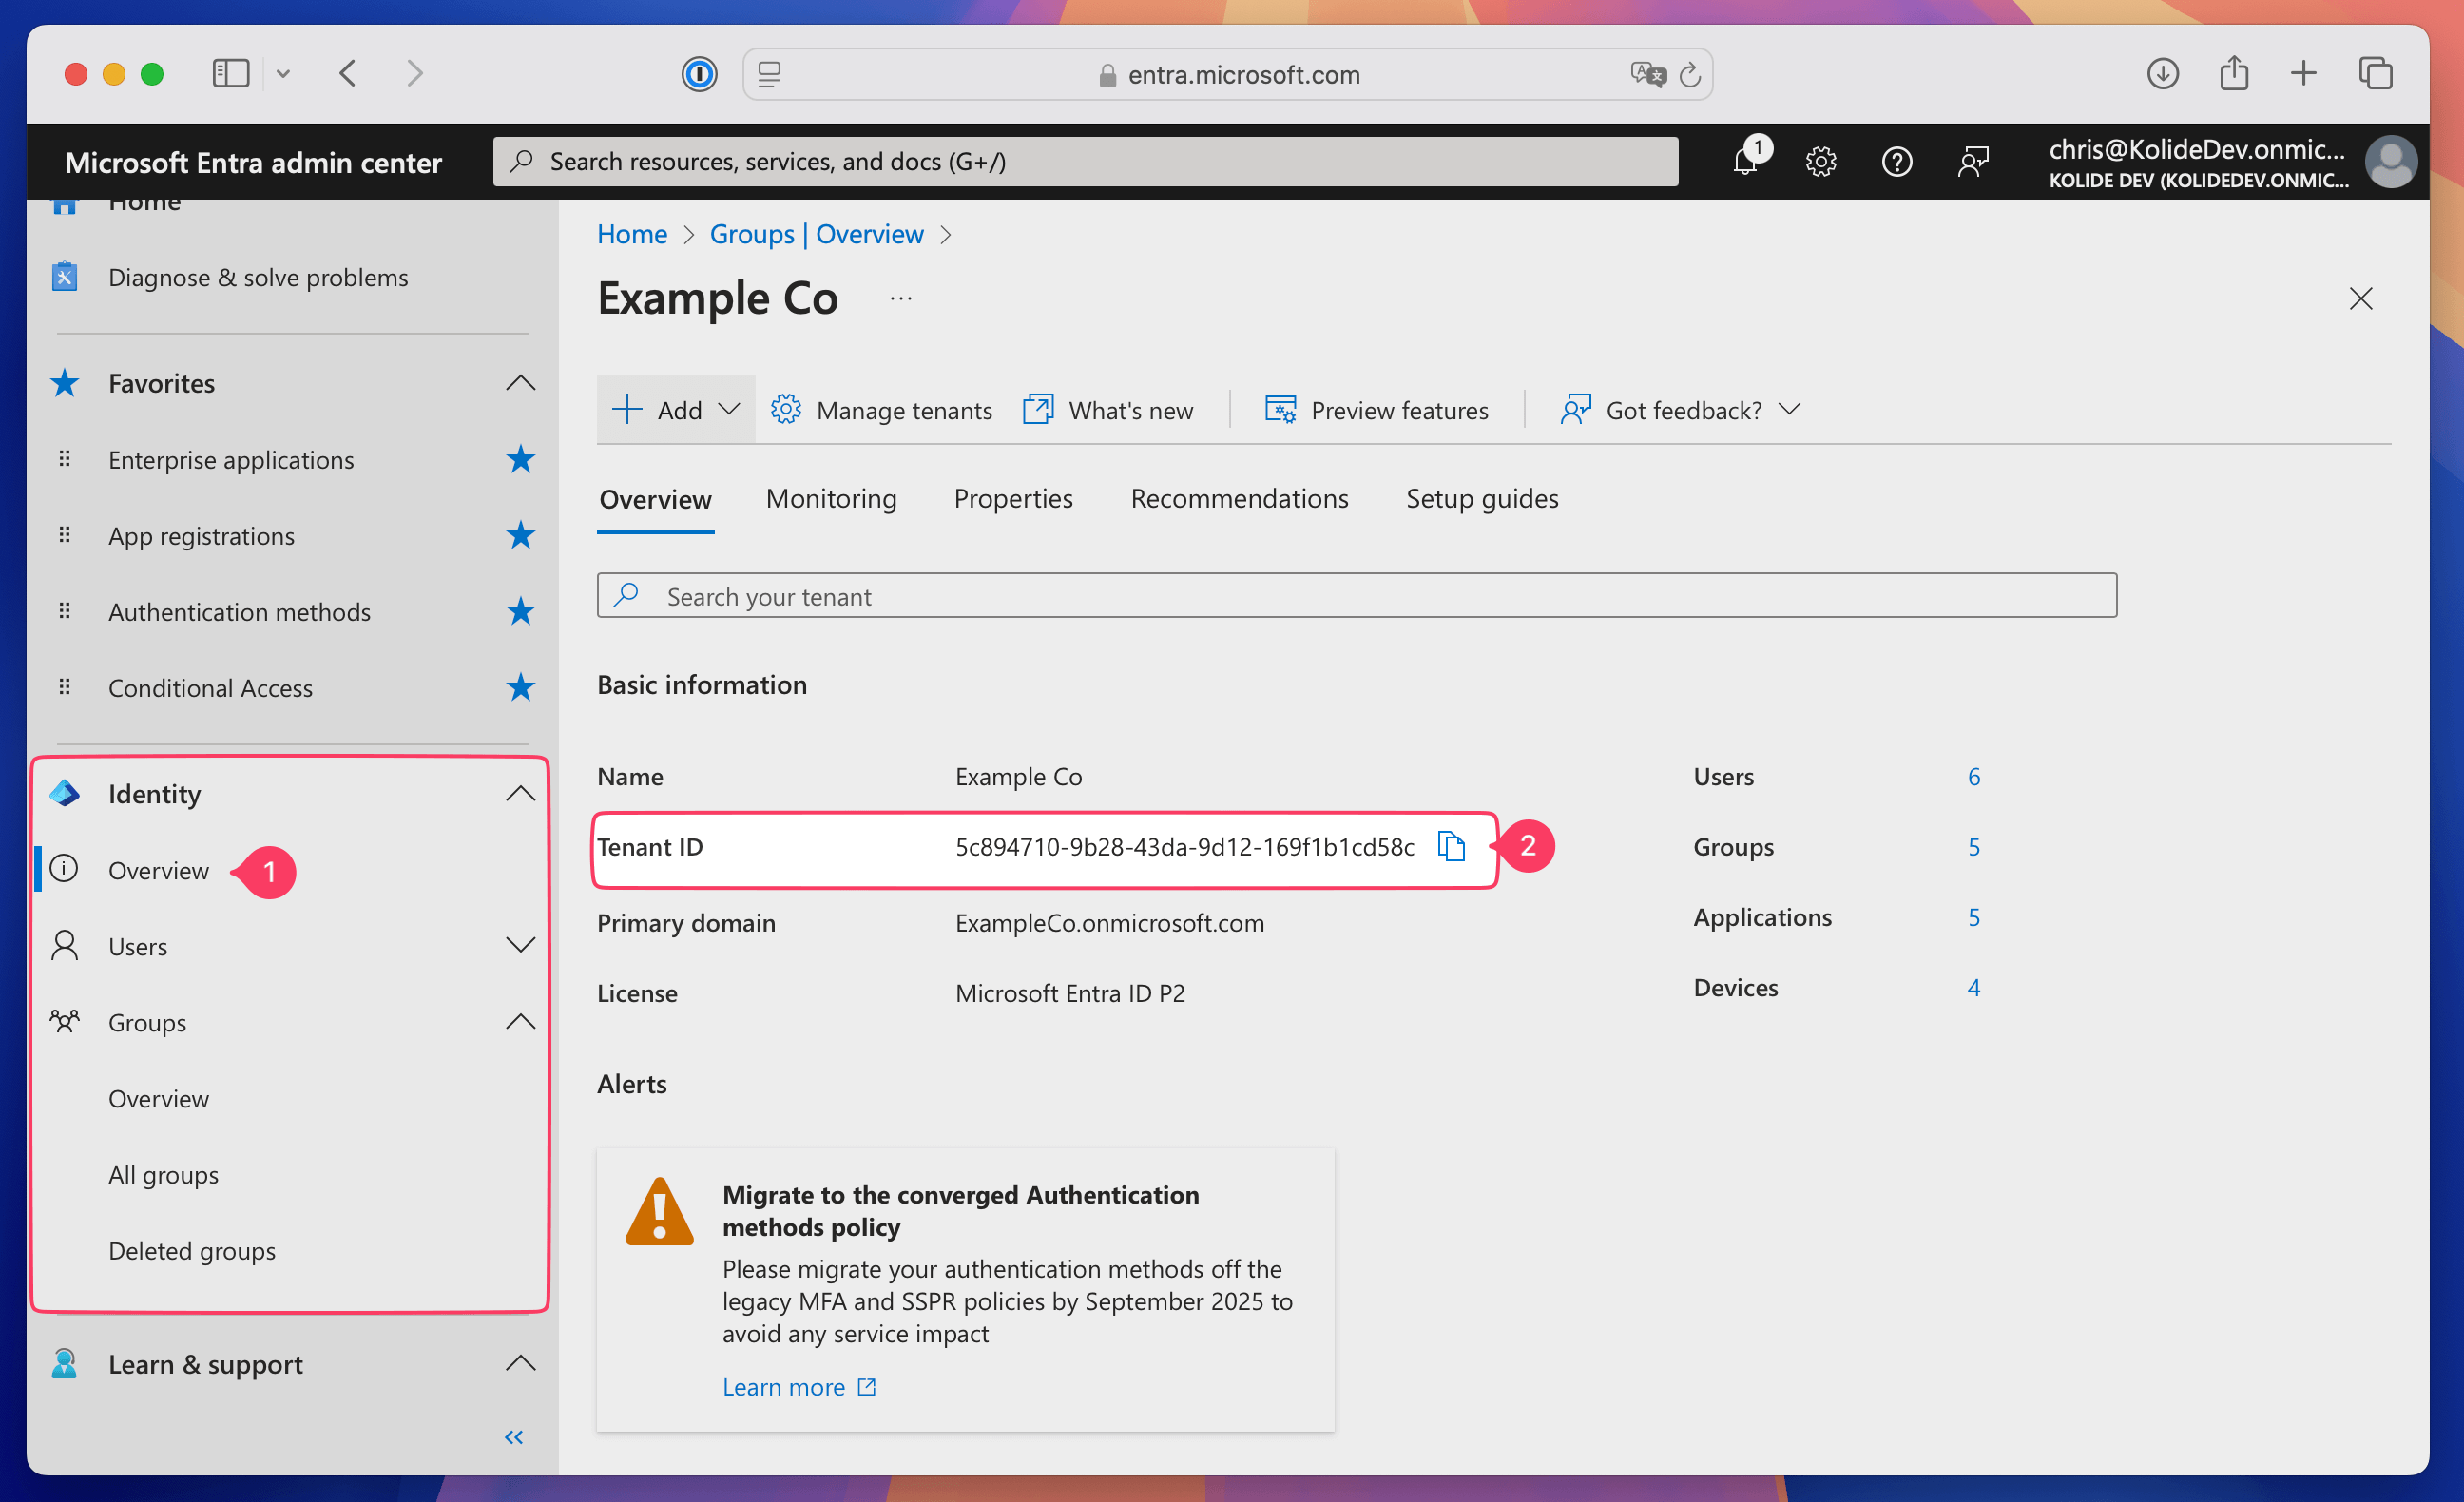
In the other tab, open Microsoft Entra admin center, find your organization’s Tenant ID, and select Identity > Overview in the sidebar.
Copy the Tenant ID.
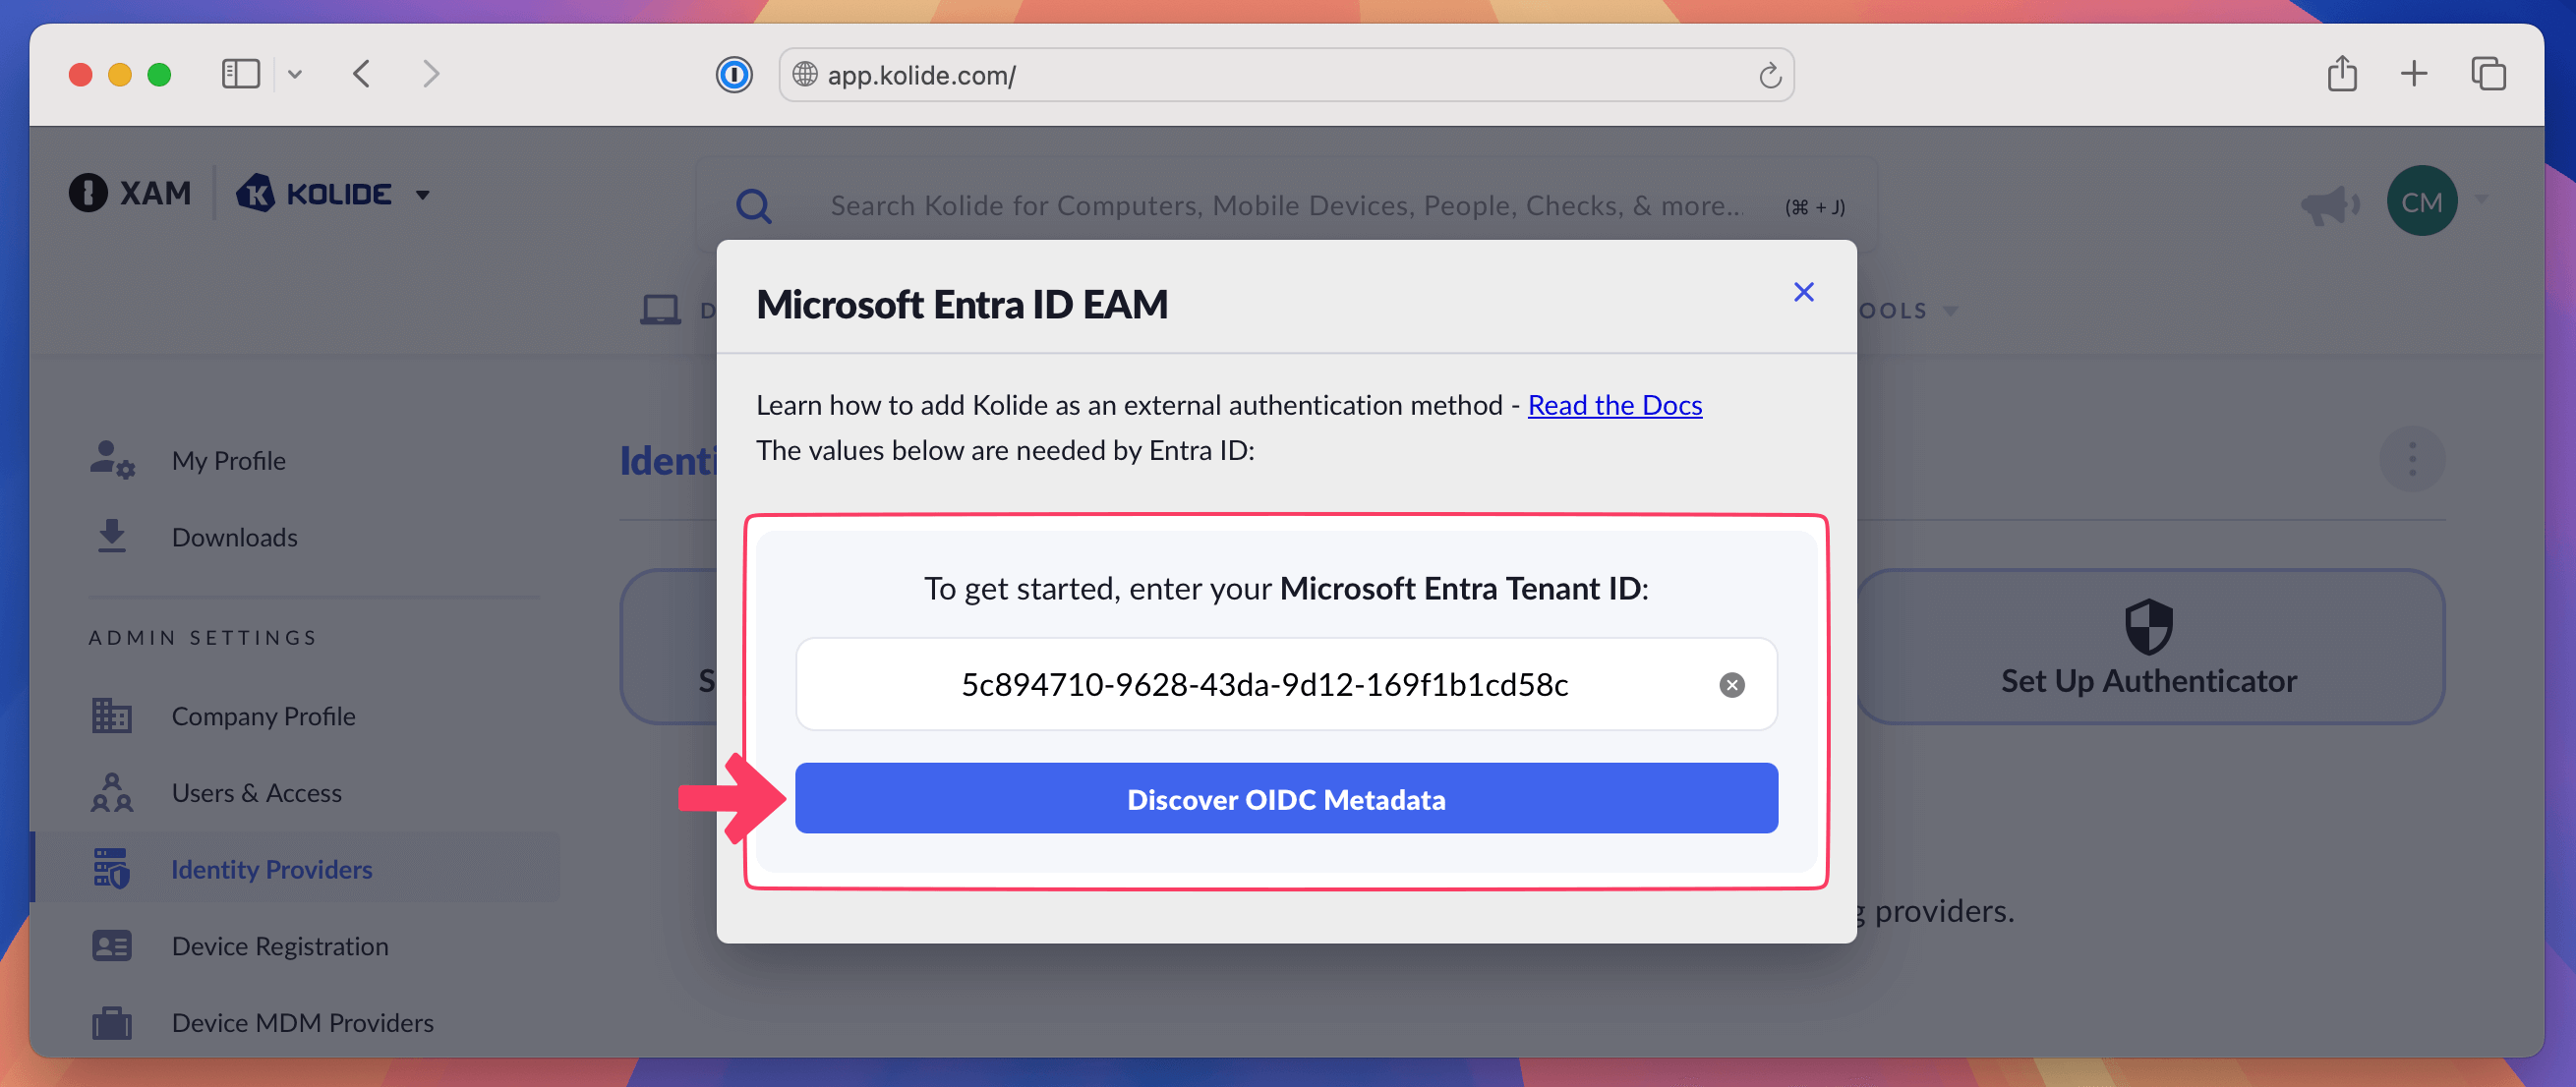
Back in Kolide, click Set Up Authenticator and paste the Tenant ID into the form, then click Discover OIDC Metadata.

The information will populate into Kolide.
Register the app in Entra ID
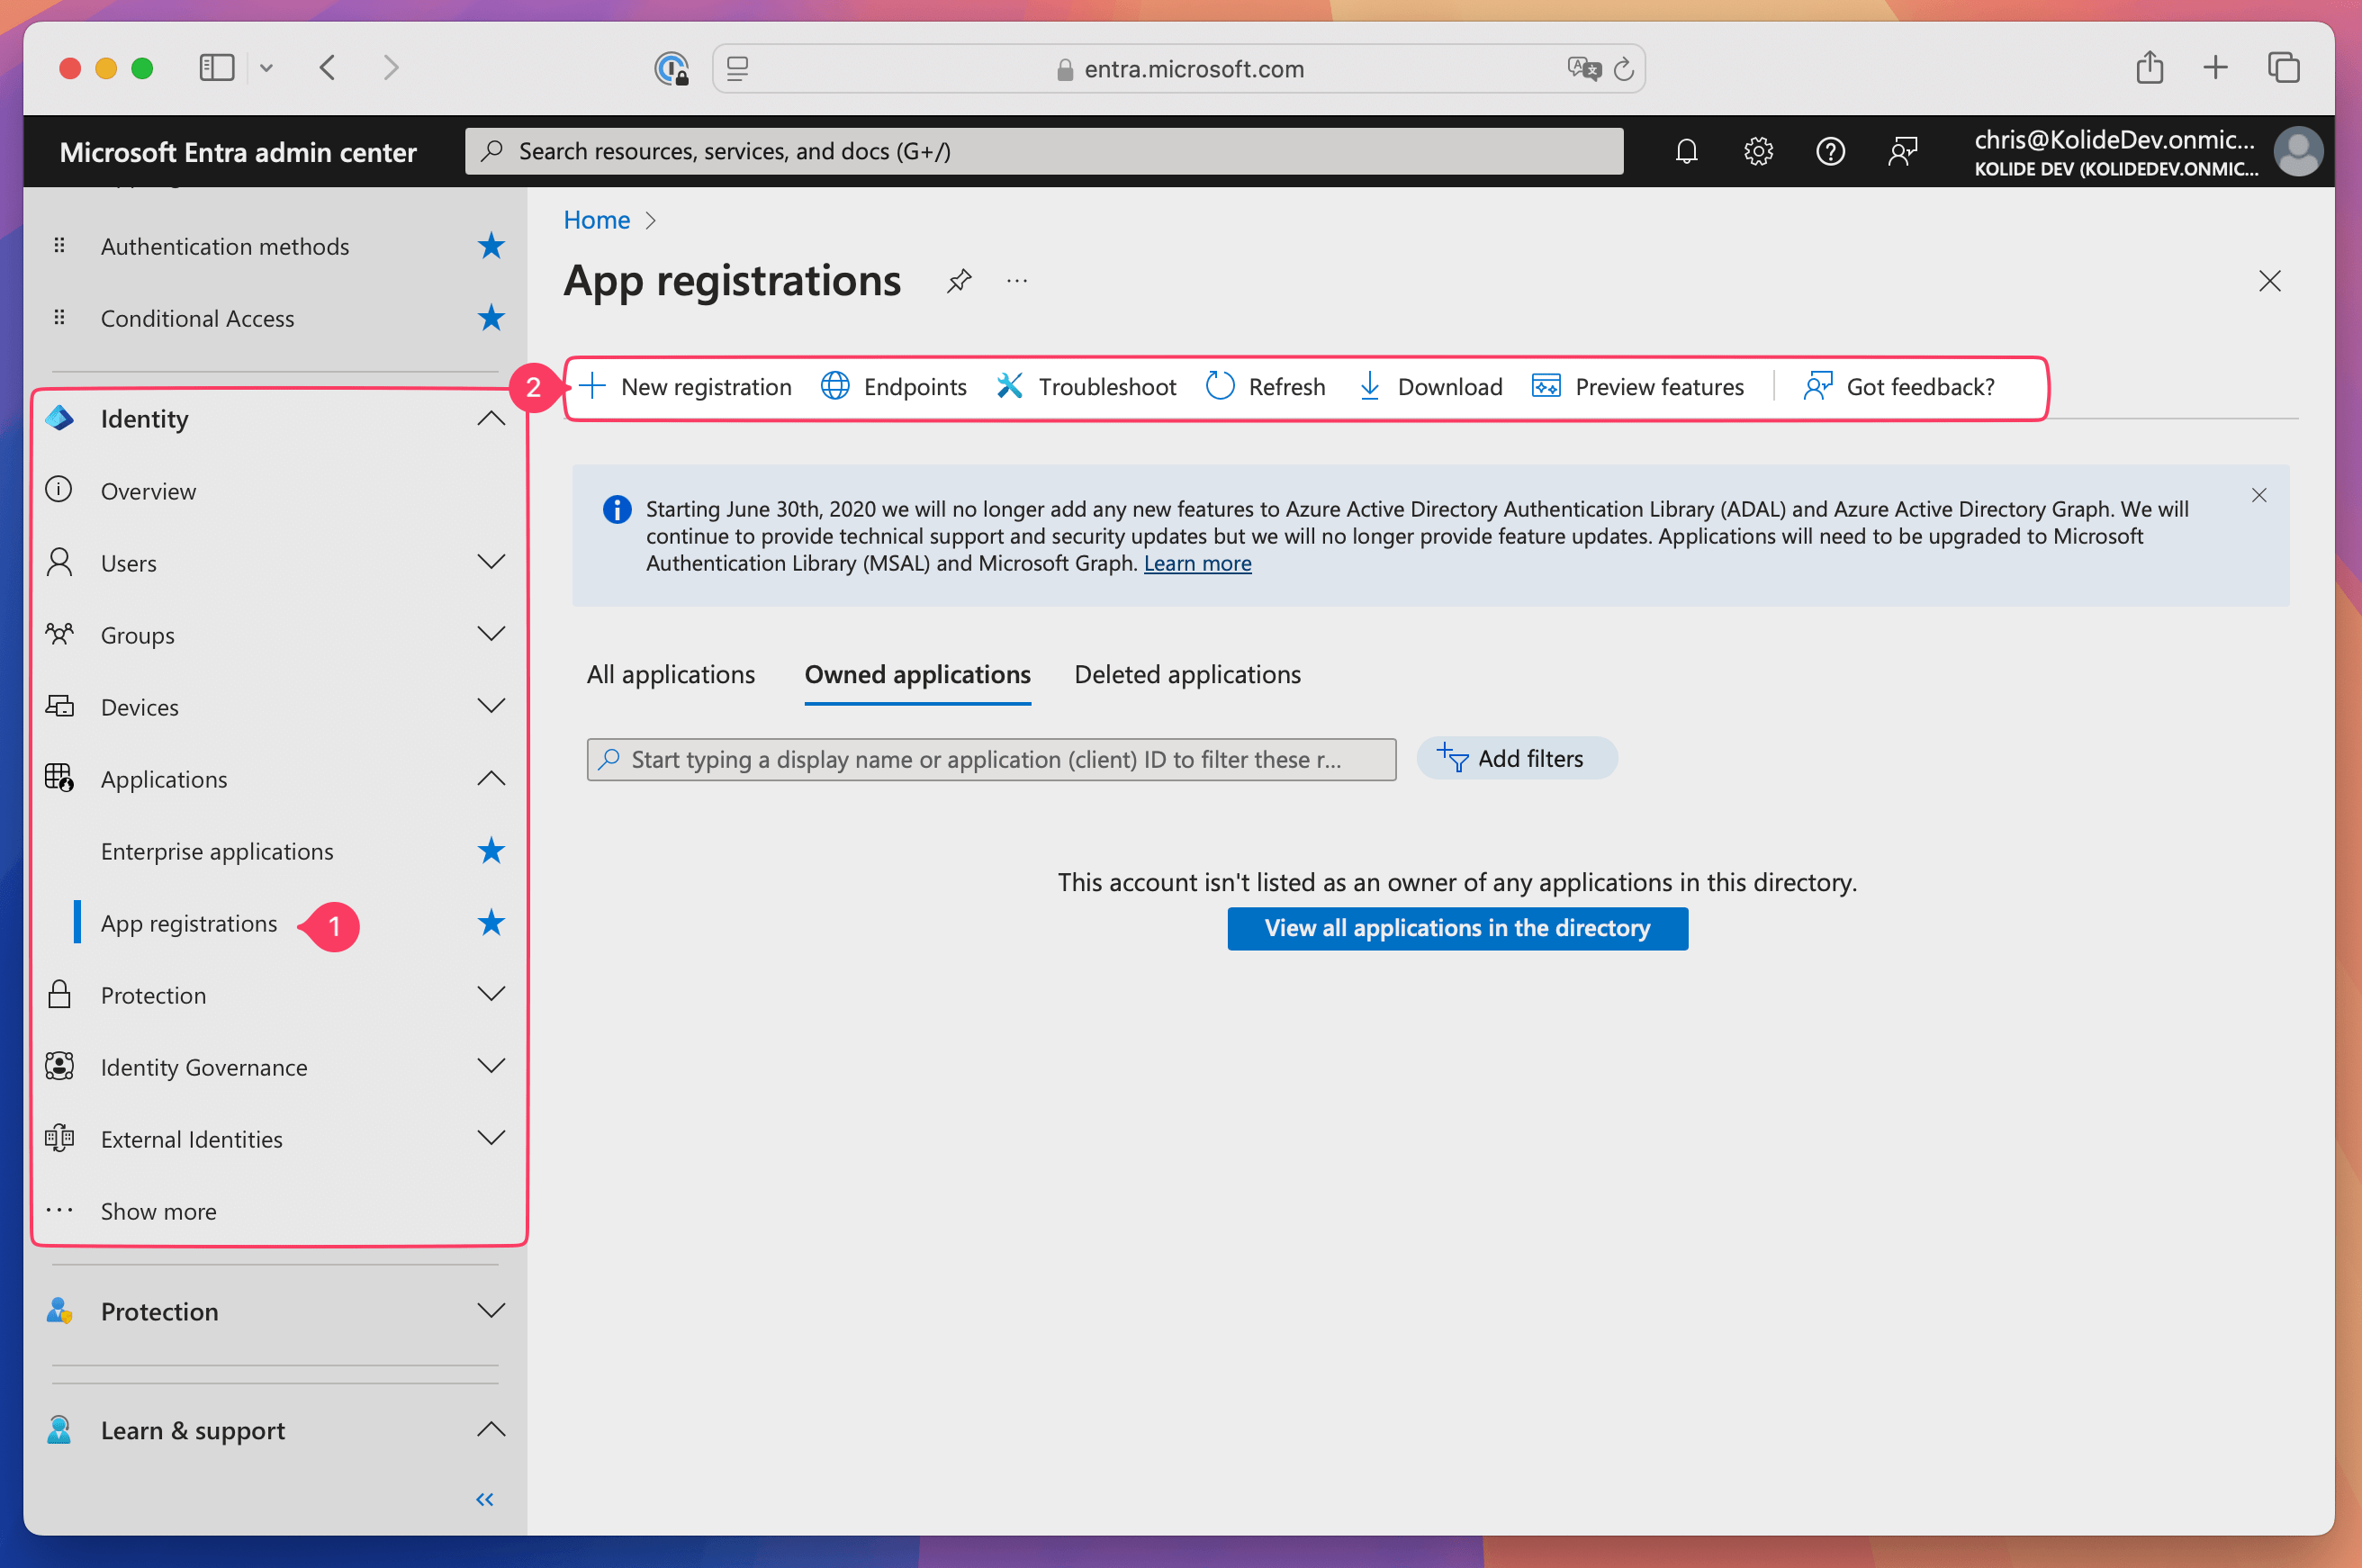
In Entra ID, select Identity > Applications > App registrations in the sidebar.
Select New registration.
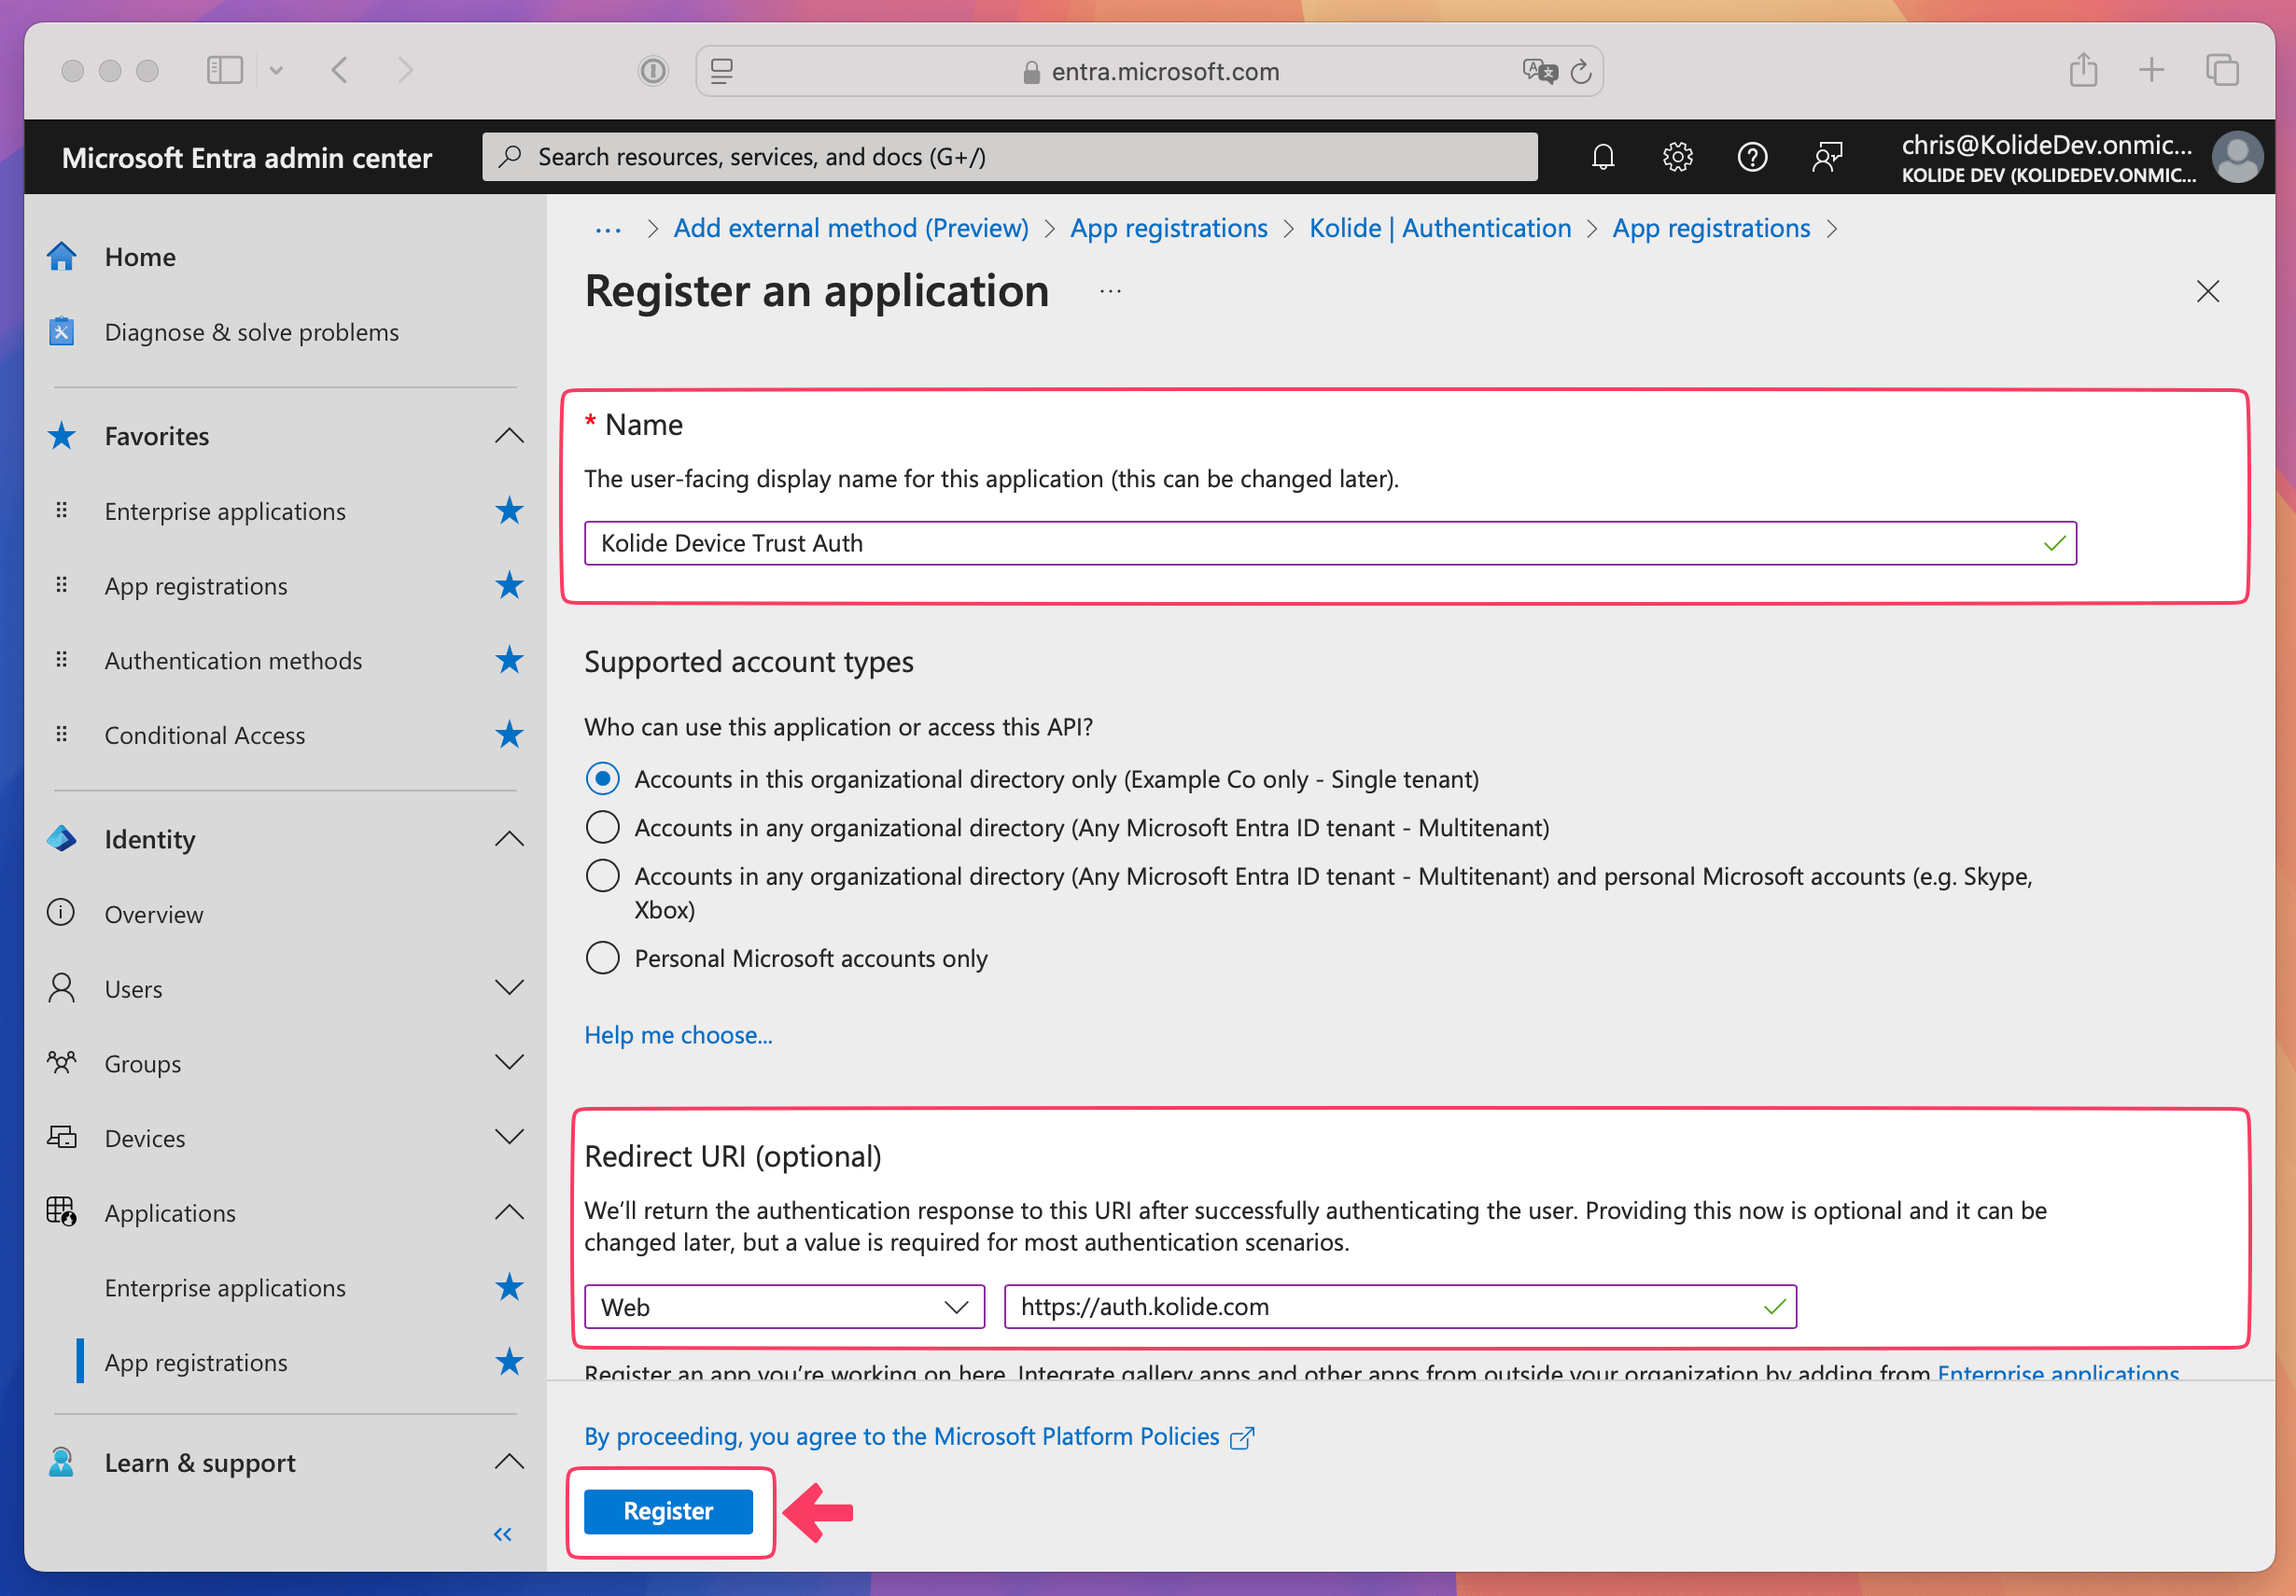
Enter the name “Kolide Device Trust Auth” and select Web from the “Select a platform” dropdown.
From Kolide, copy the Kolide Auth URI and paste it into the Redirect URI field in Entra ID.
Select Register to create the application.
Add Application Redirect URIs
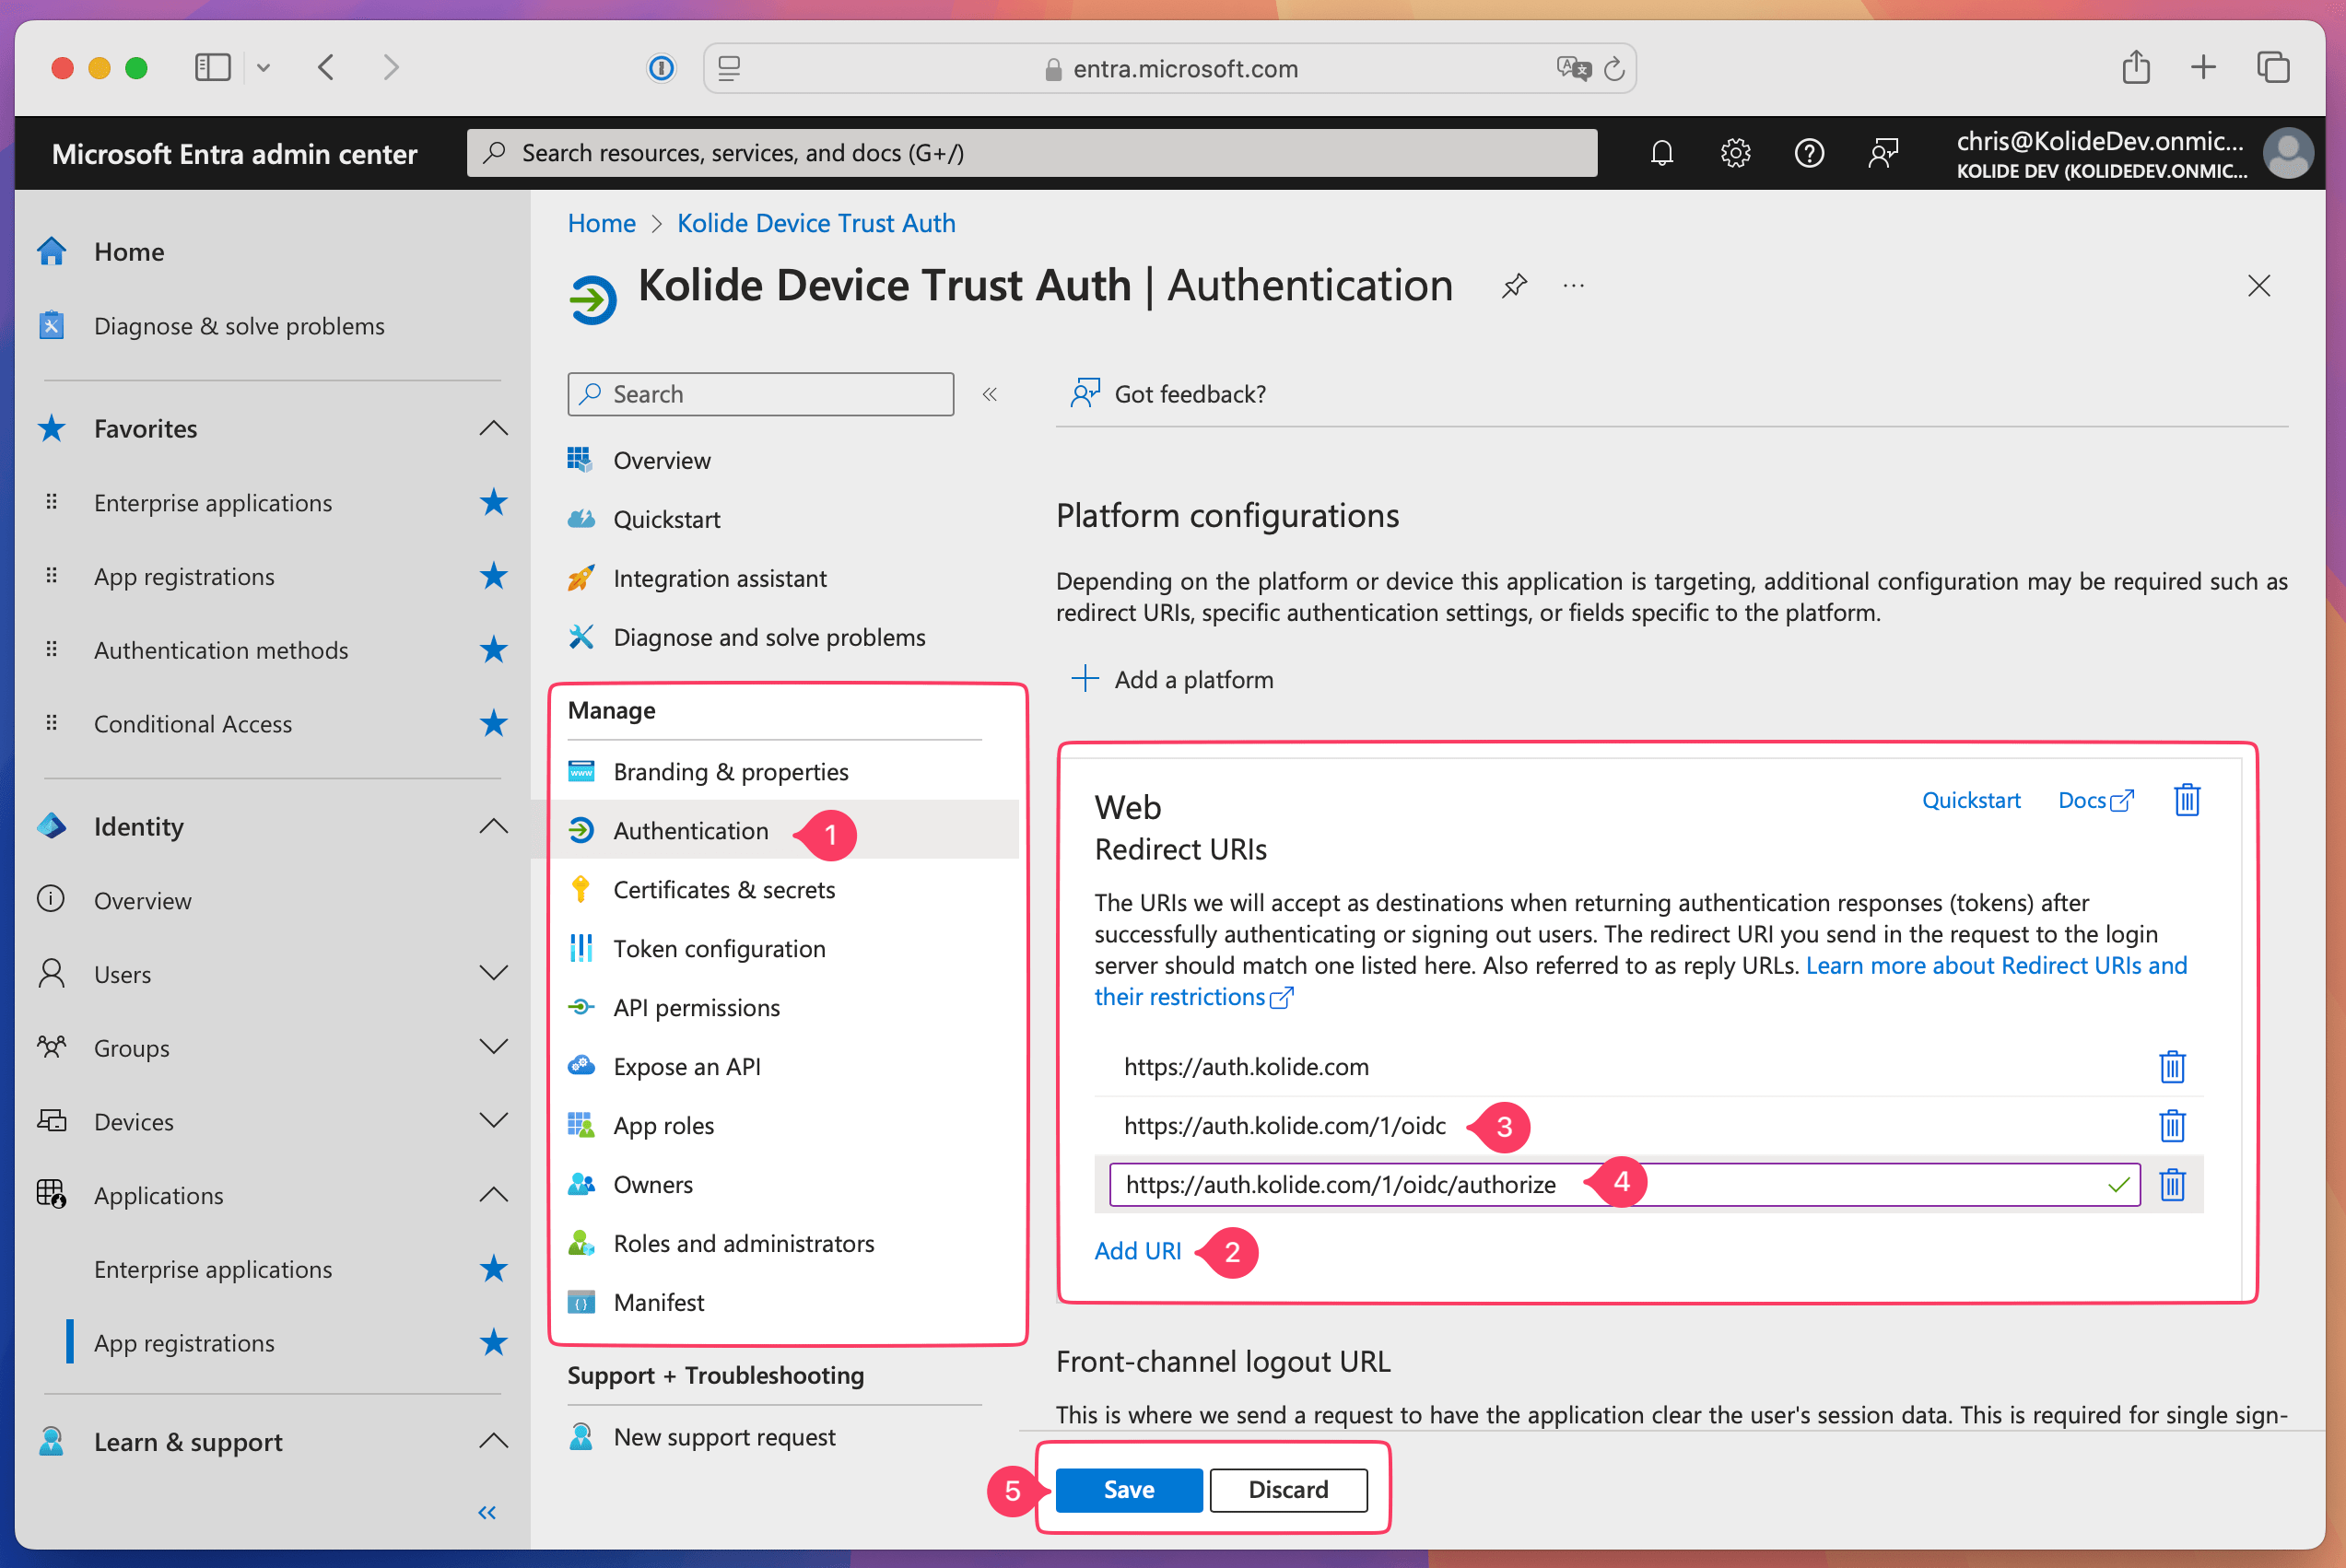
After you’ve successfully created the application, select Manage > Authentication in the sidebar.
Click Add URI twice in the Web section of the page in Entra ID to make two input fields appear.
In Kolide, copy the Issuer URI and paste it into the second Redirect URIs field in Entra ID.
In Kolide, copy the Authorization URL and paste it into the third Redirect URIs field in Entra ID.
In Entra ID, select Save at the bottom of the page to update the application.
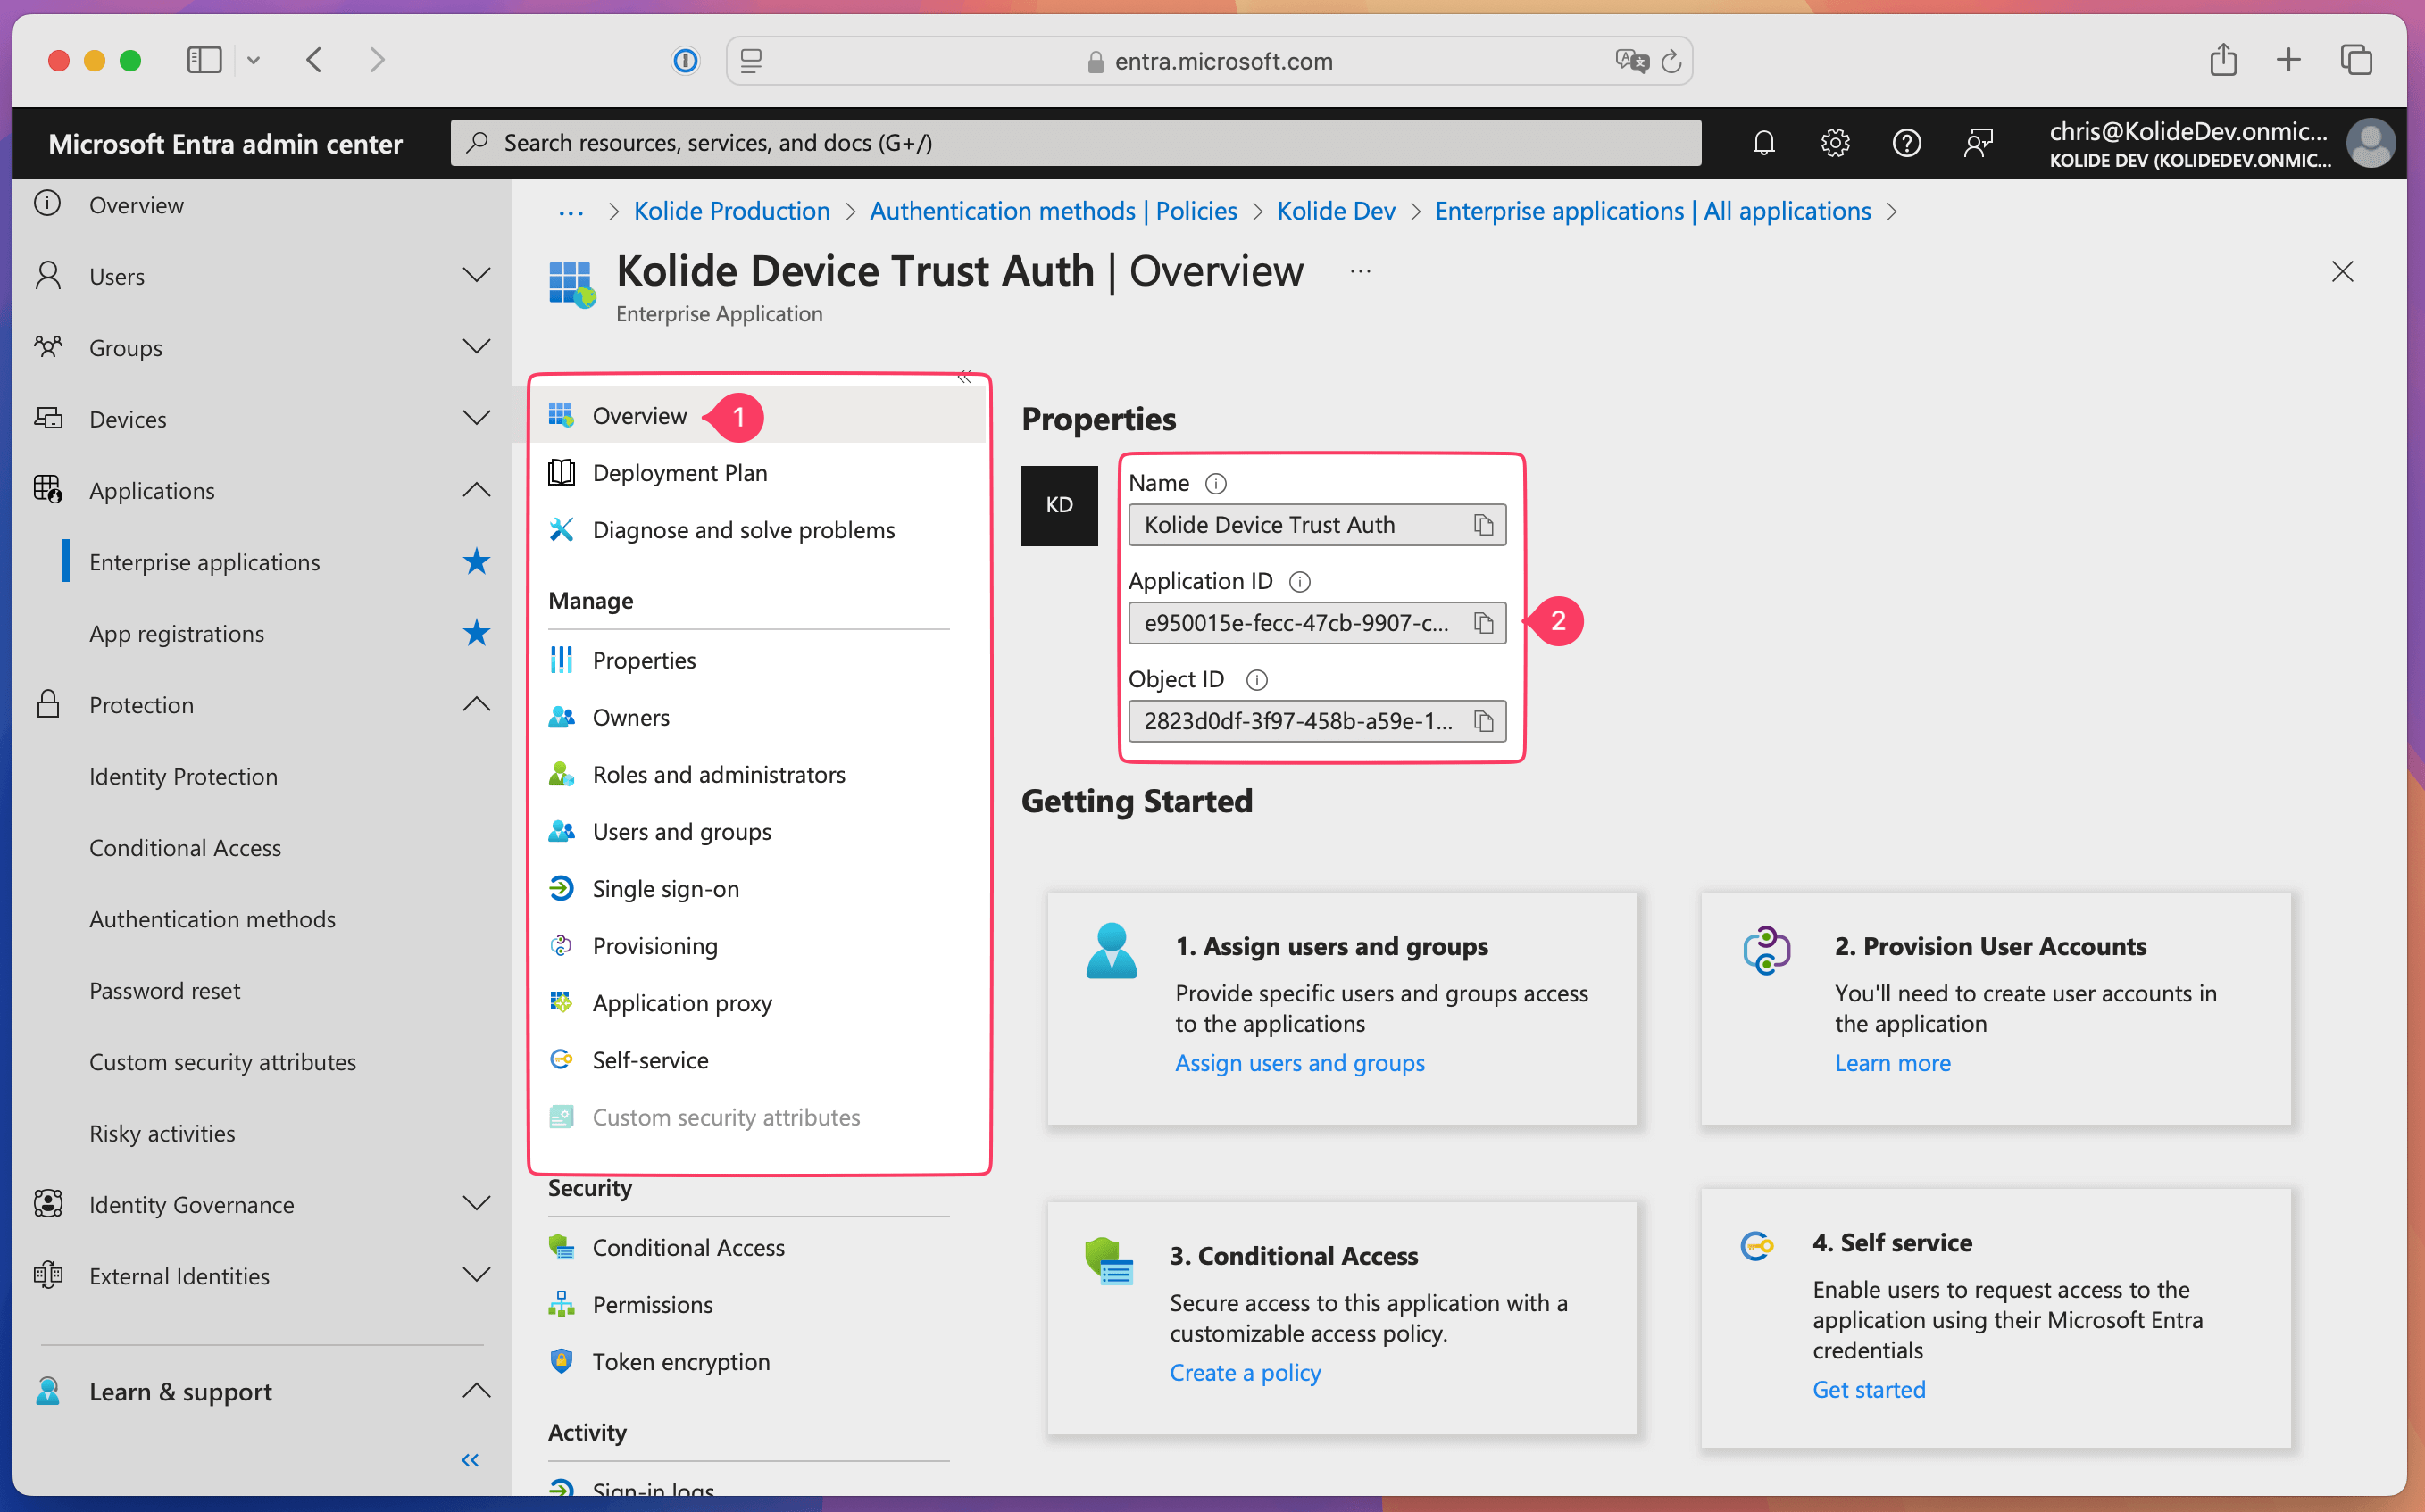
Once saved, click Manage > Overview in the sidebar and copy the Application ID from the Properties section. You will need this for the next section.
Add an external authentication method in Entra ID
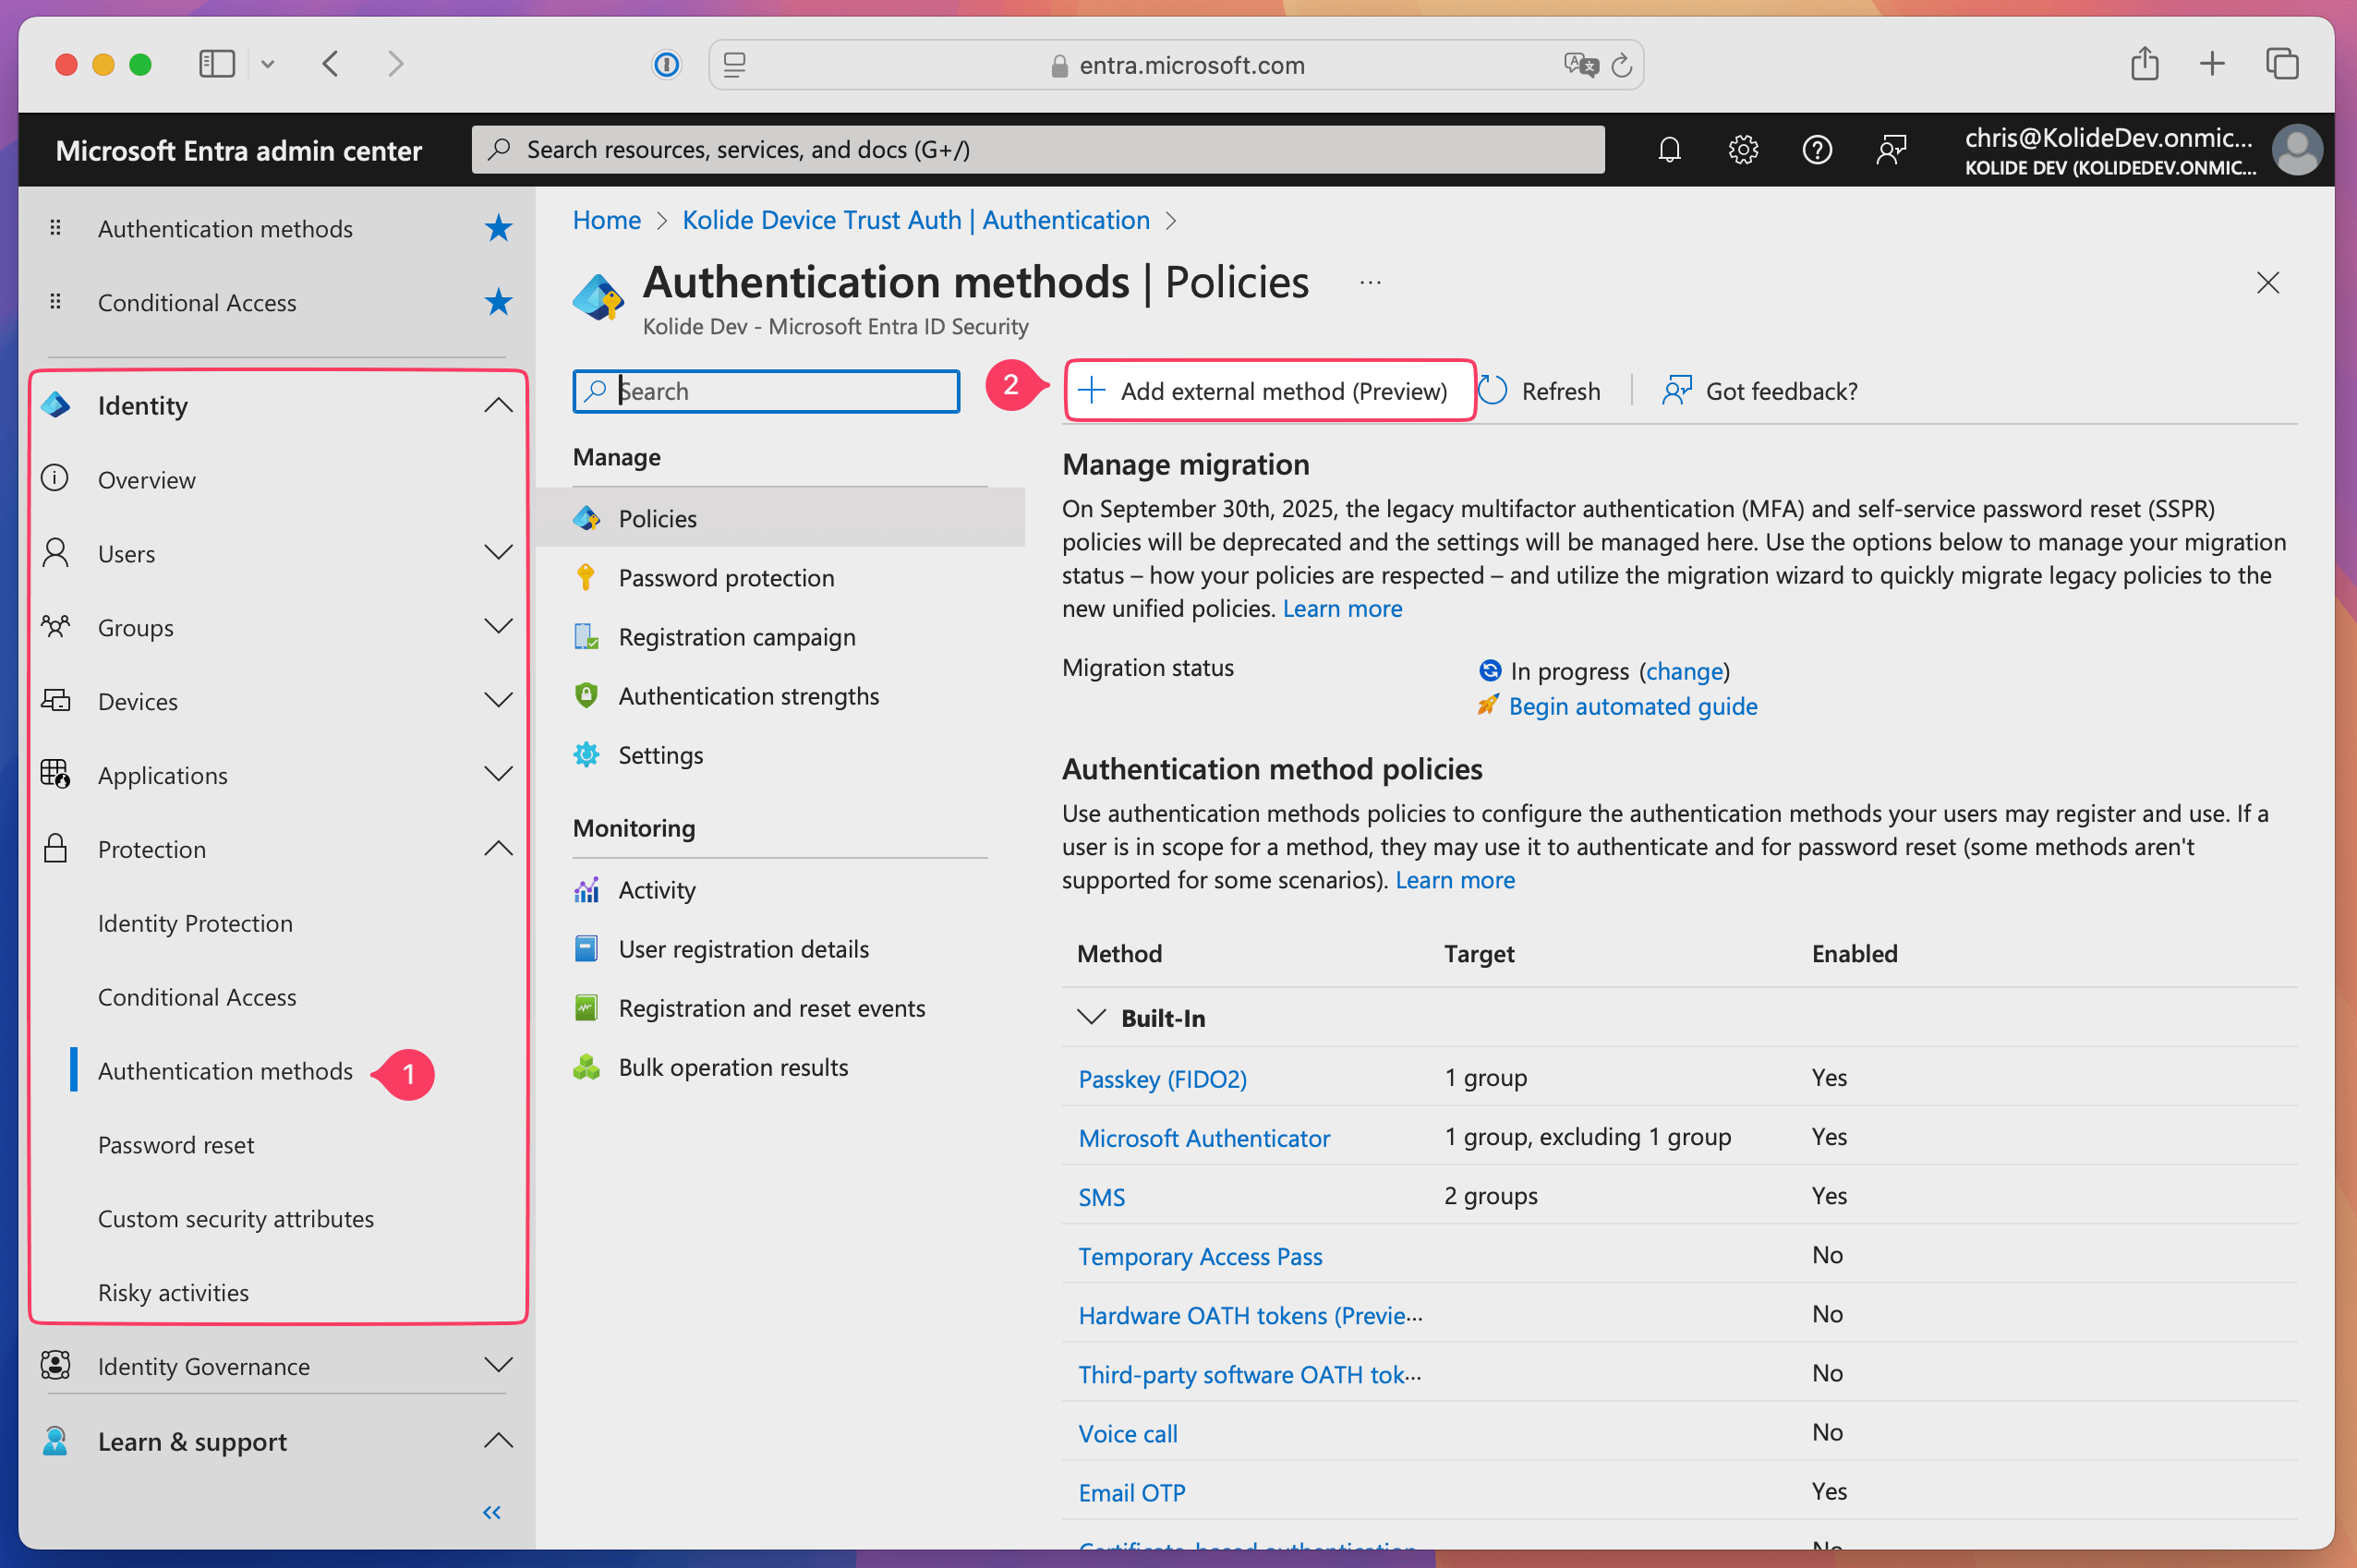
In Entra ID, select Identity > Protection > Authentication methods in the sidebar.
Select Add external method.
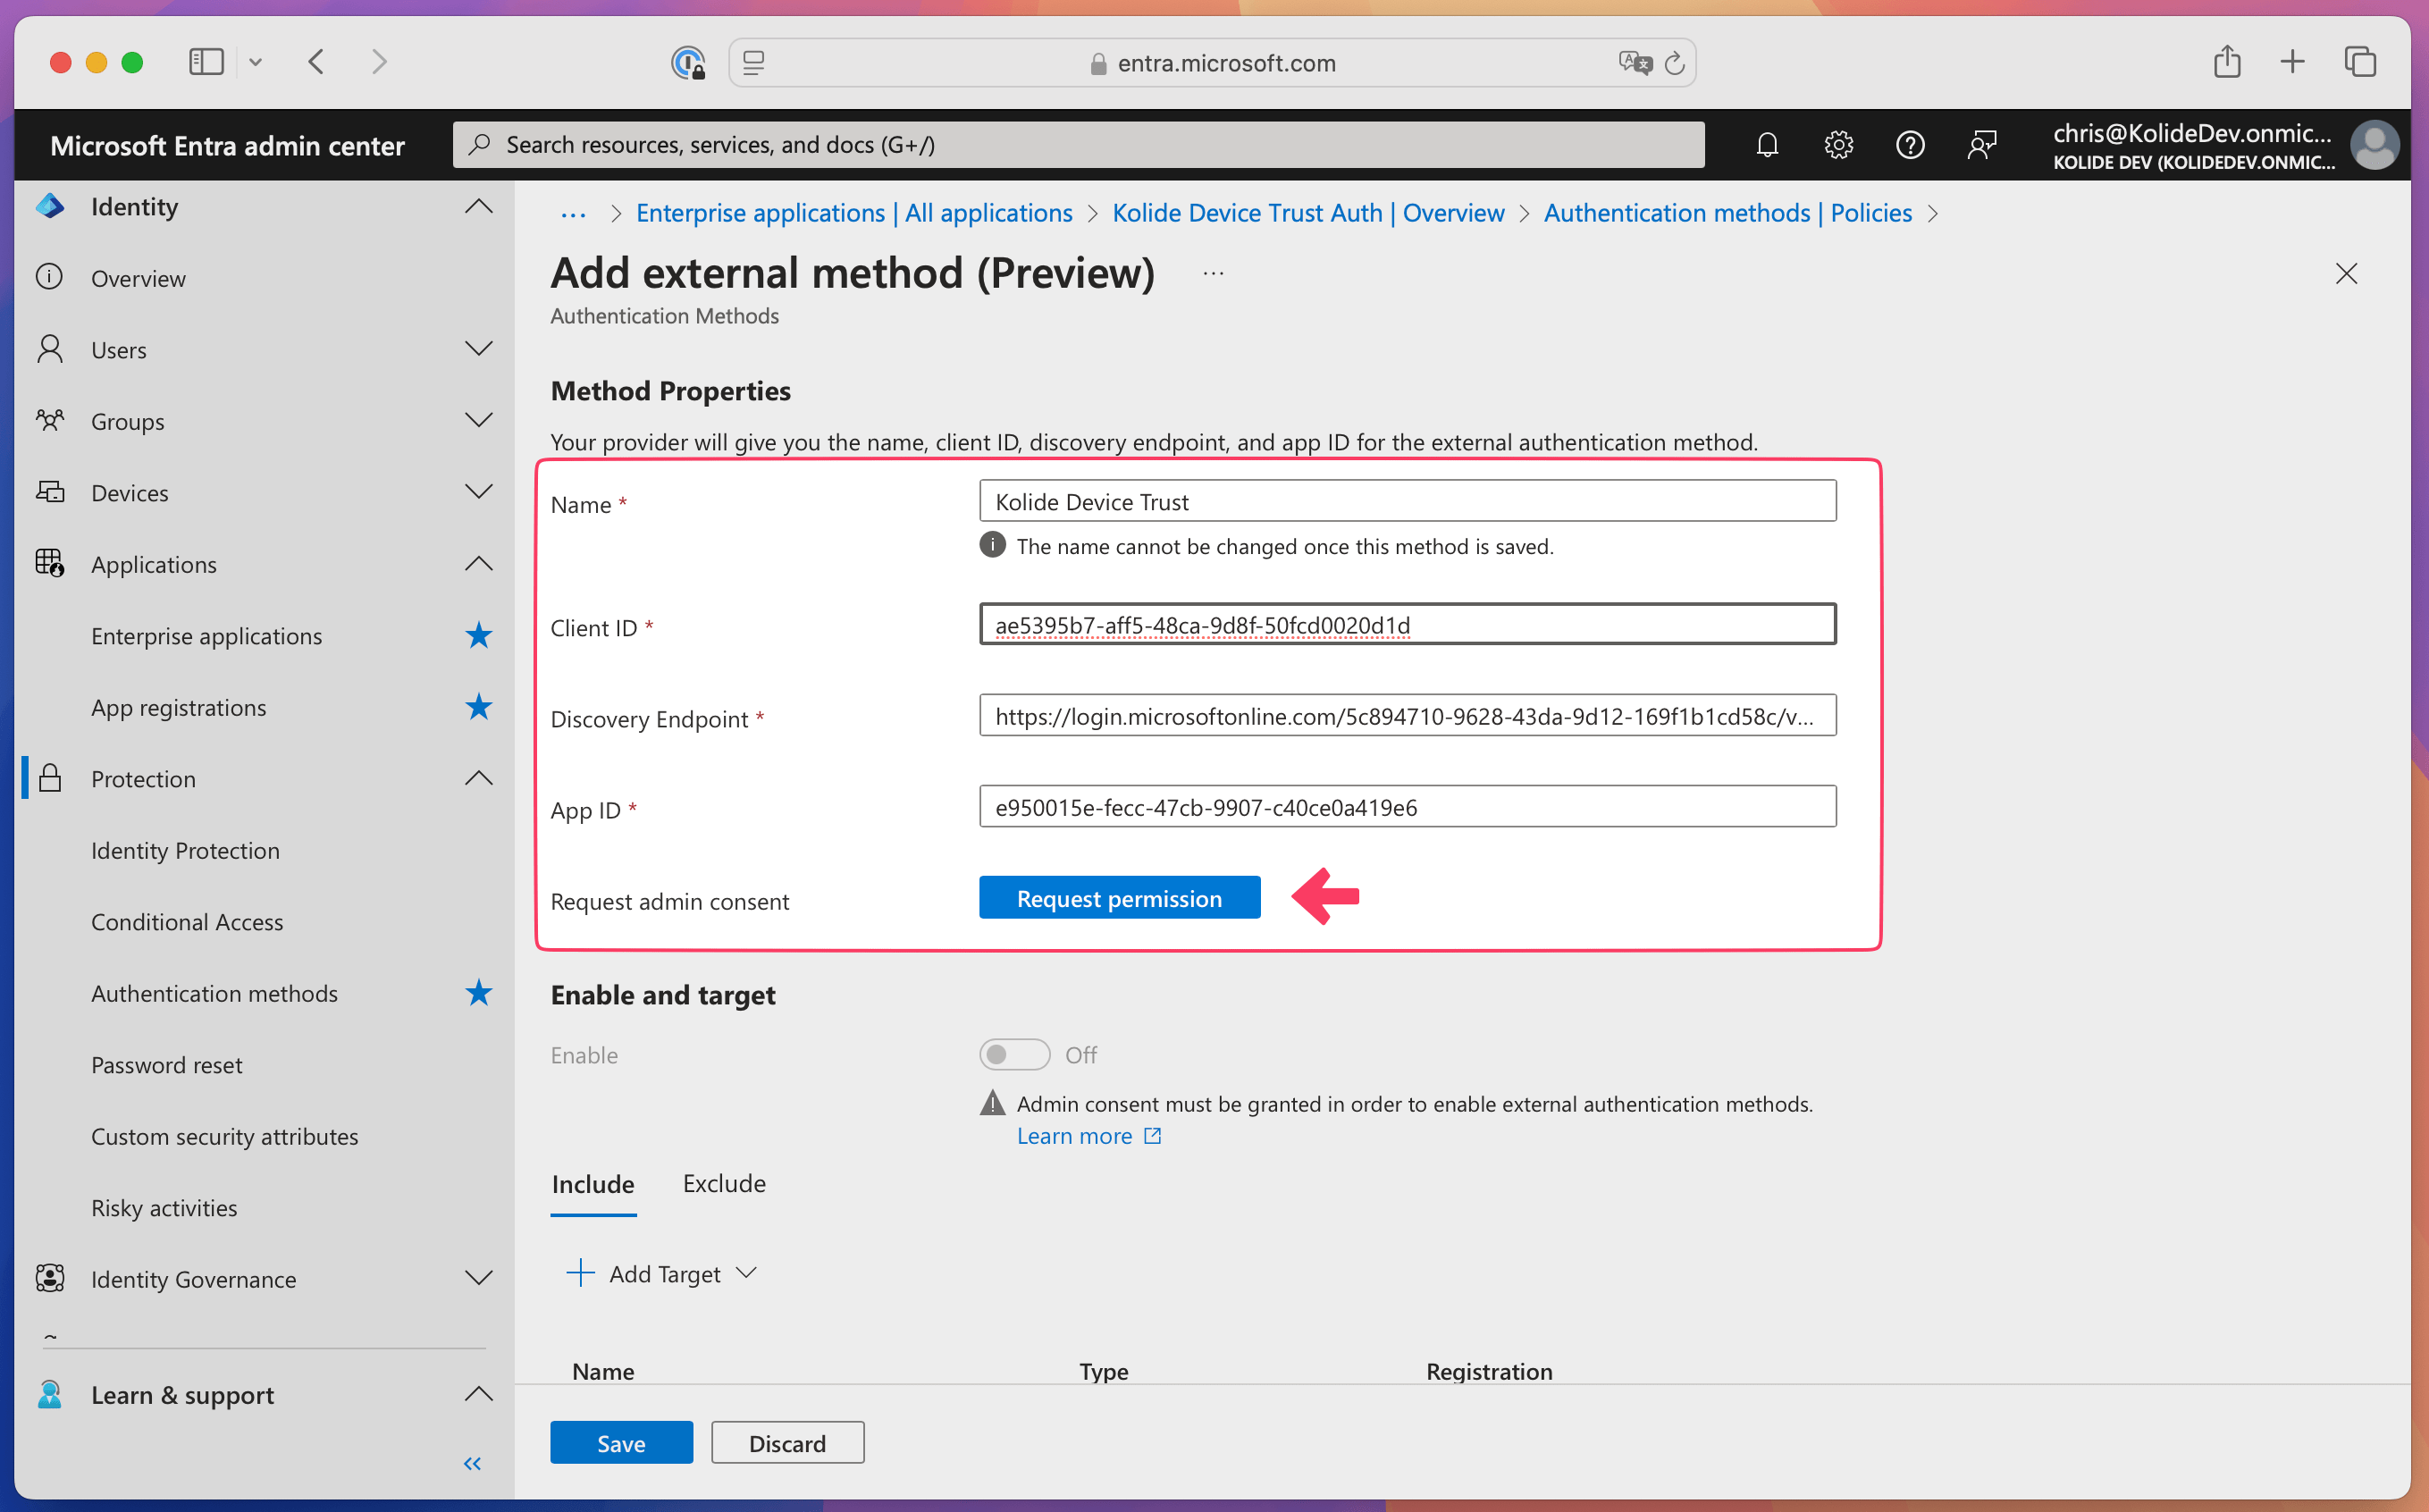
Paste the Application ID you copied in the previous section into the App ID field.
Enter a name for the external authentication method, such as Kolide Device Trust.
Important:This name cannot be changed later, and it’s the name your team will see when they choose a multi-factor authentication method.In Kolide, copy the Client ID and paste it into the Client ID field in Entra ID.
In Kolide, copy the Discovery URL and paste it into the Discovery Endpoint field in Entra ID.
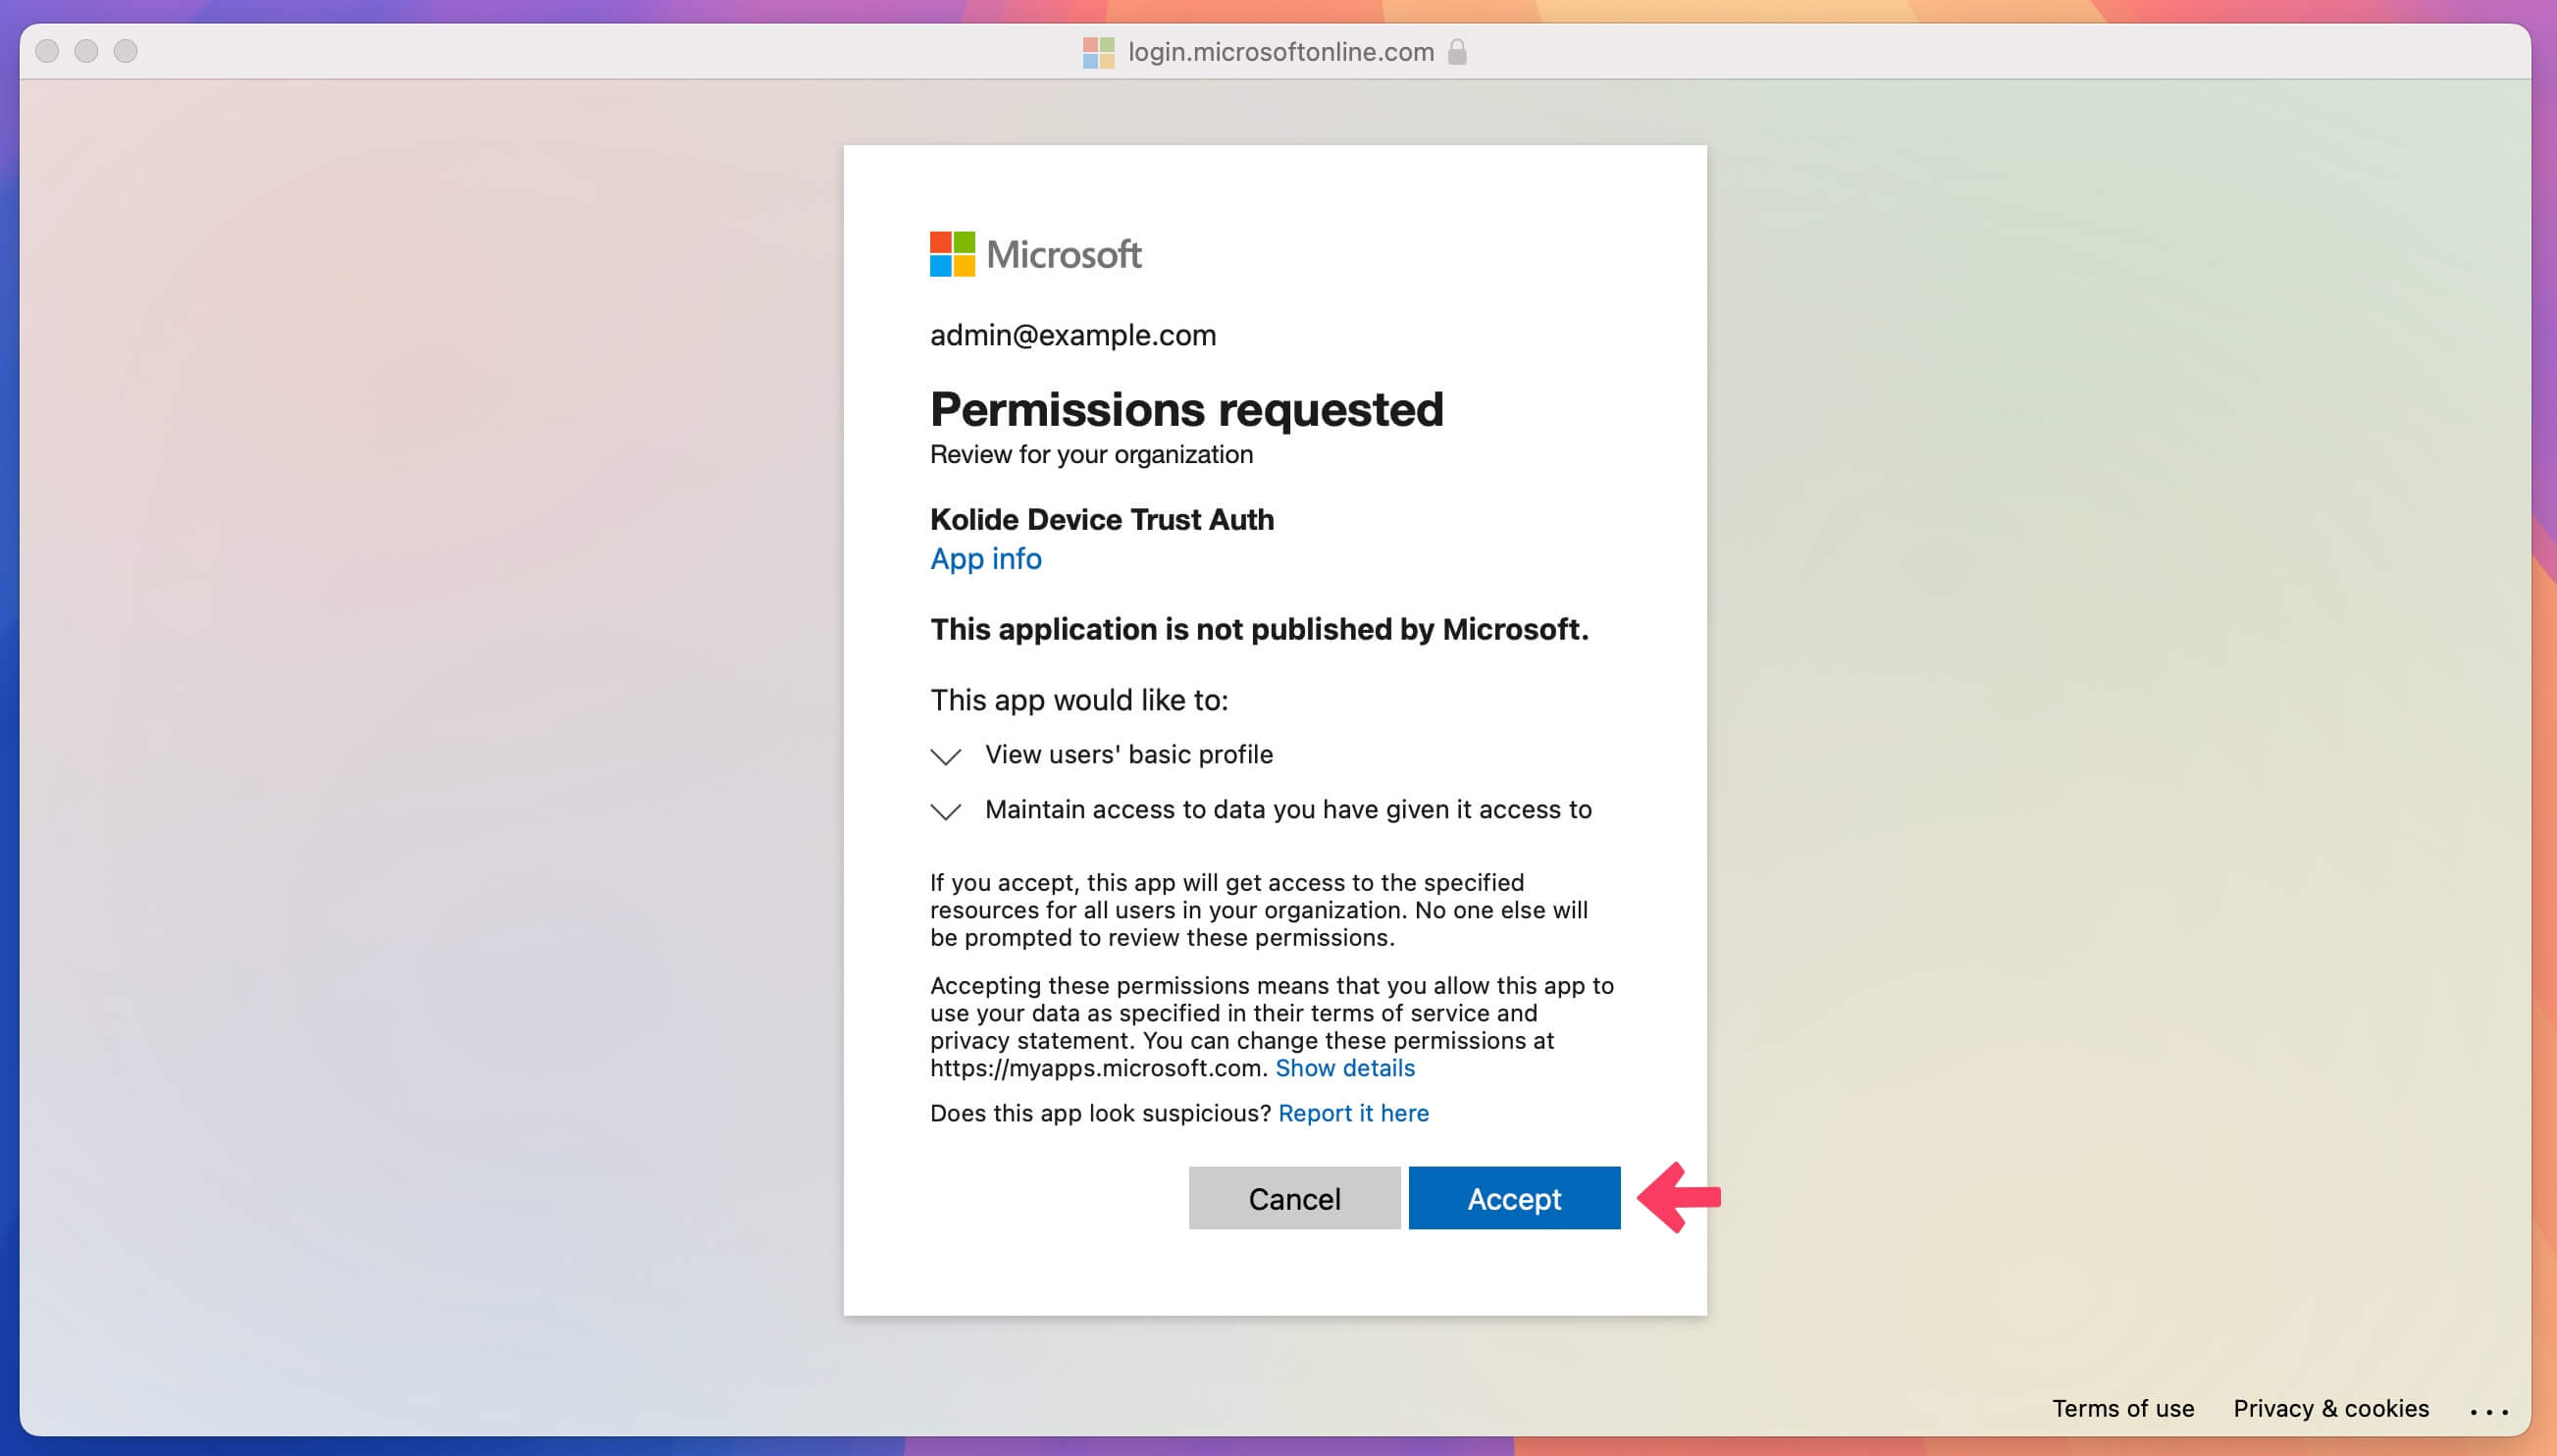
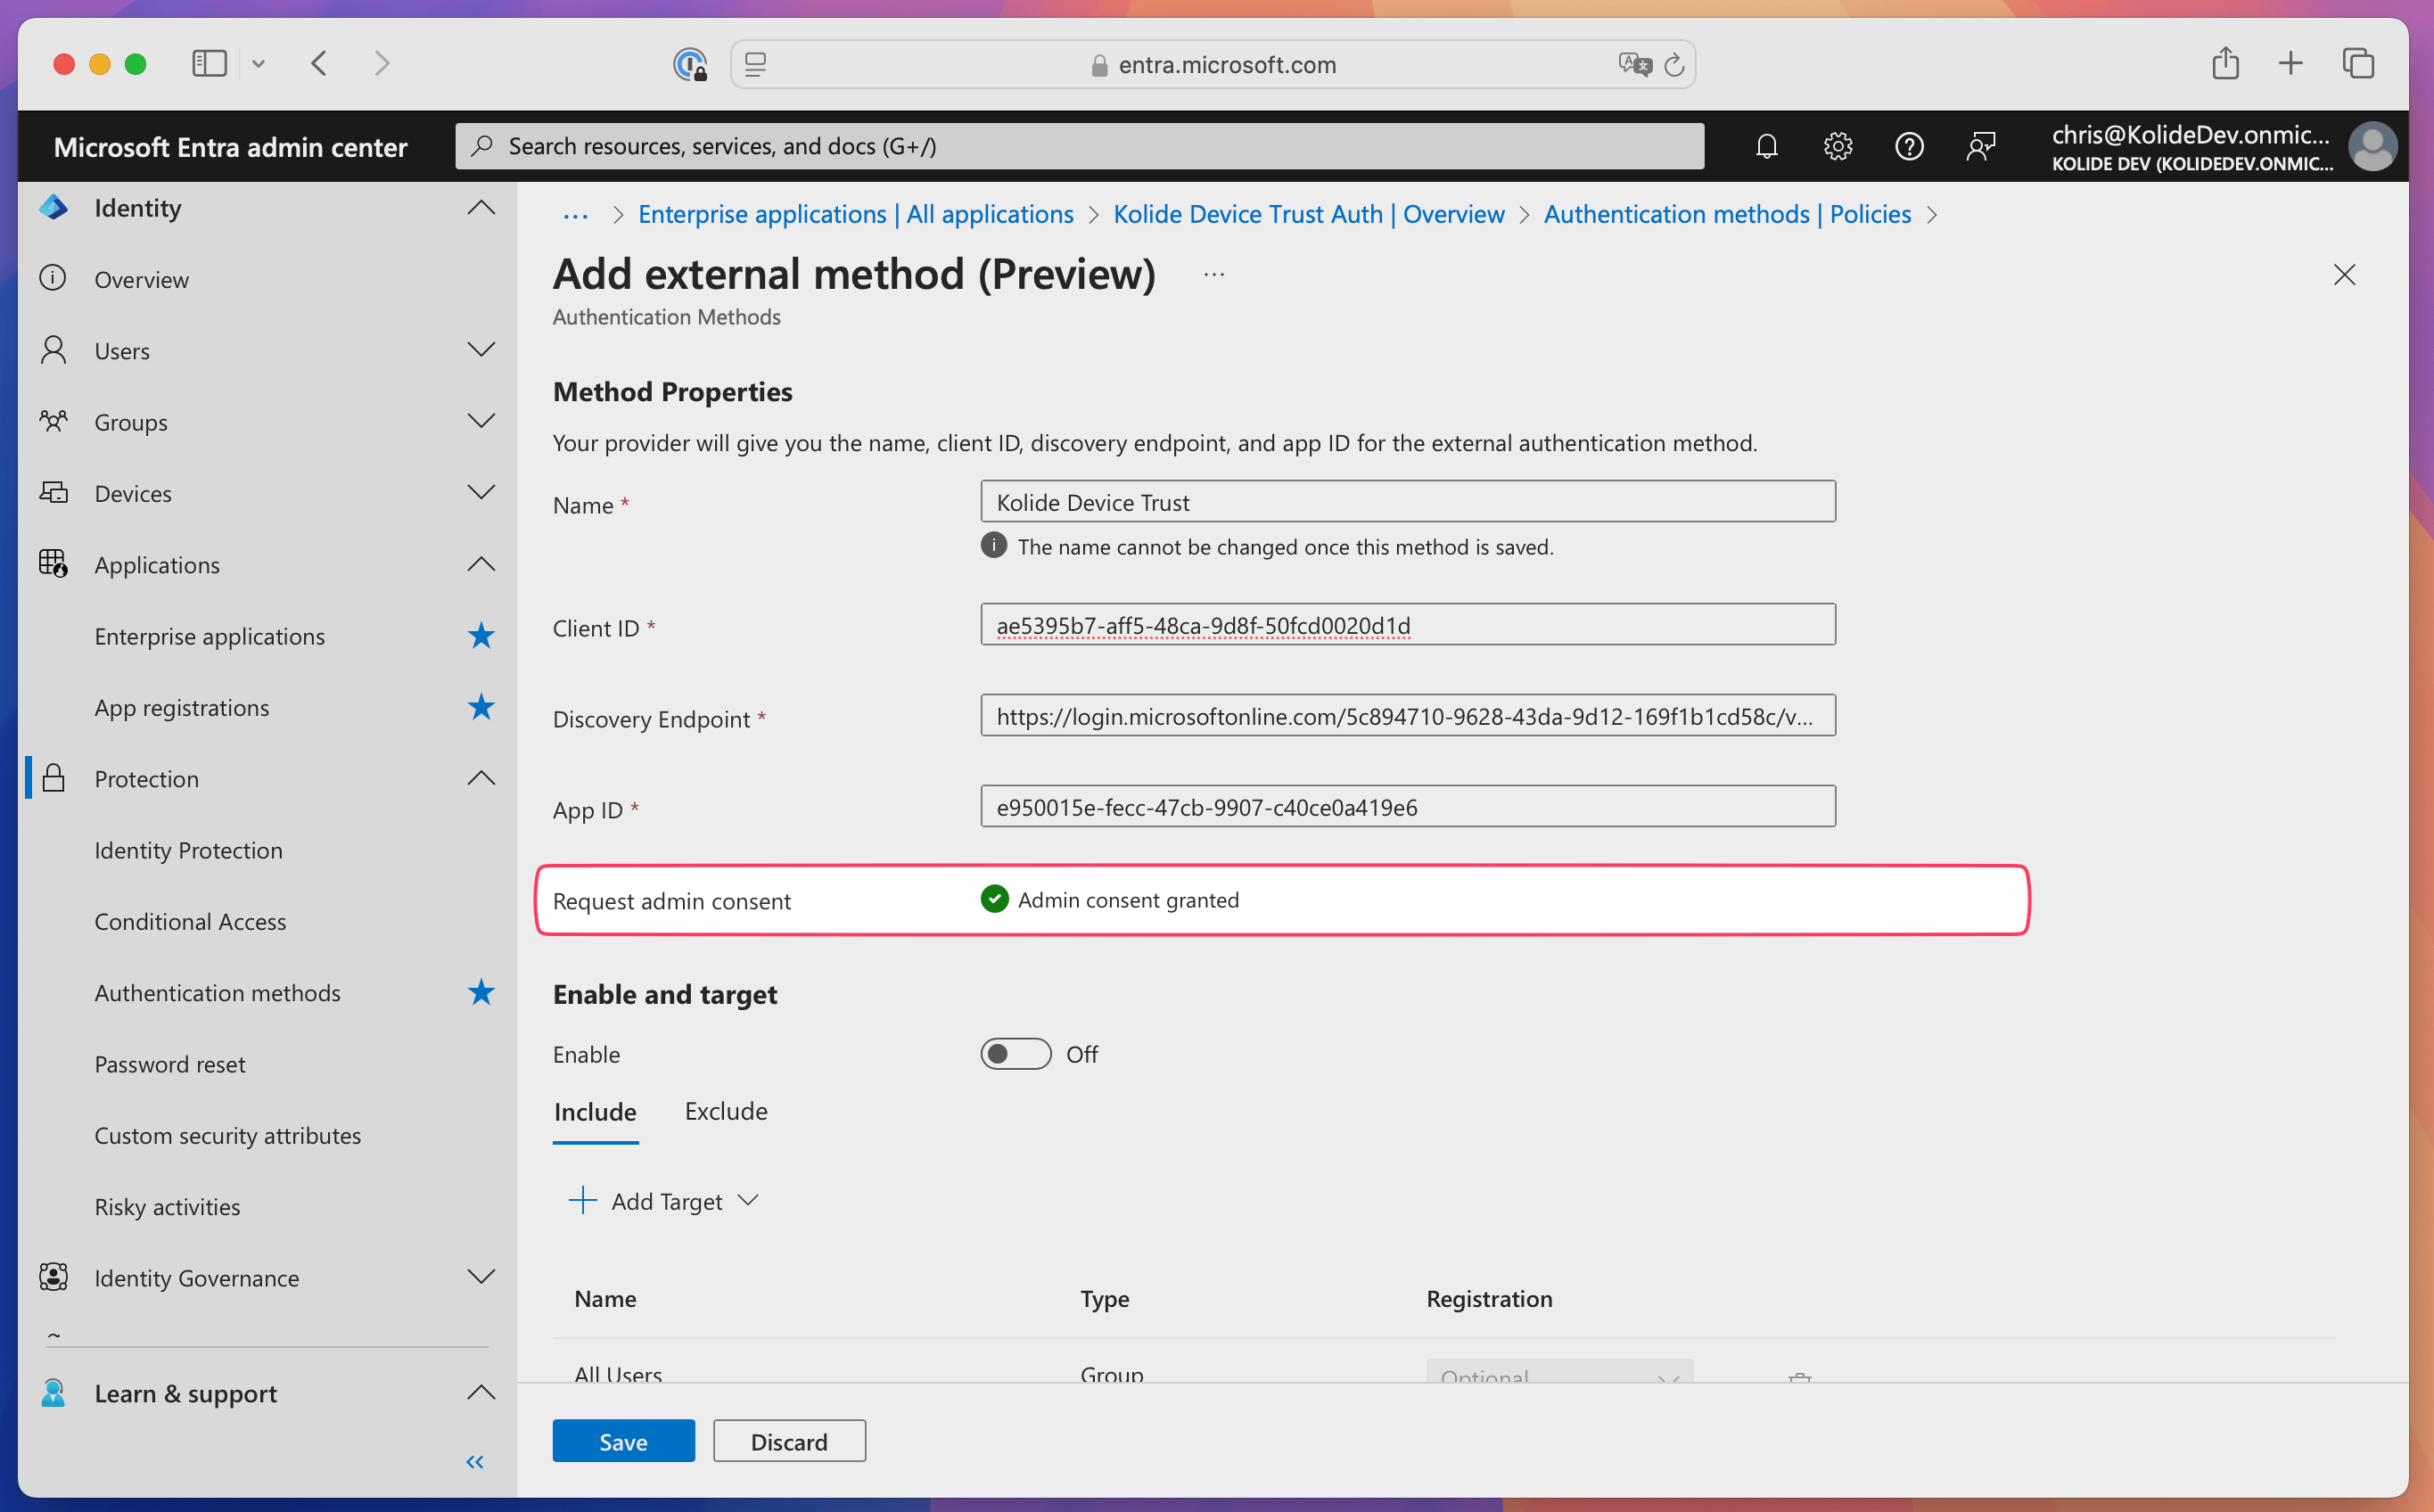
In Entra ID, select Request permission. You’ll see a message that says “Admin consent granted” once the permission request goes through.
Add targets
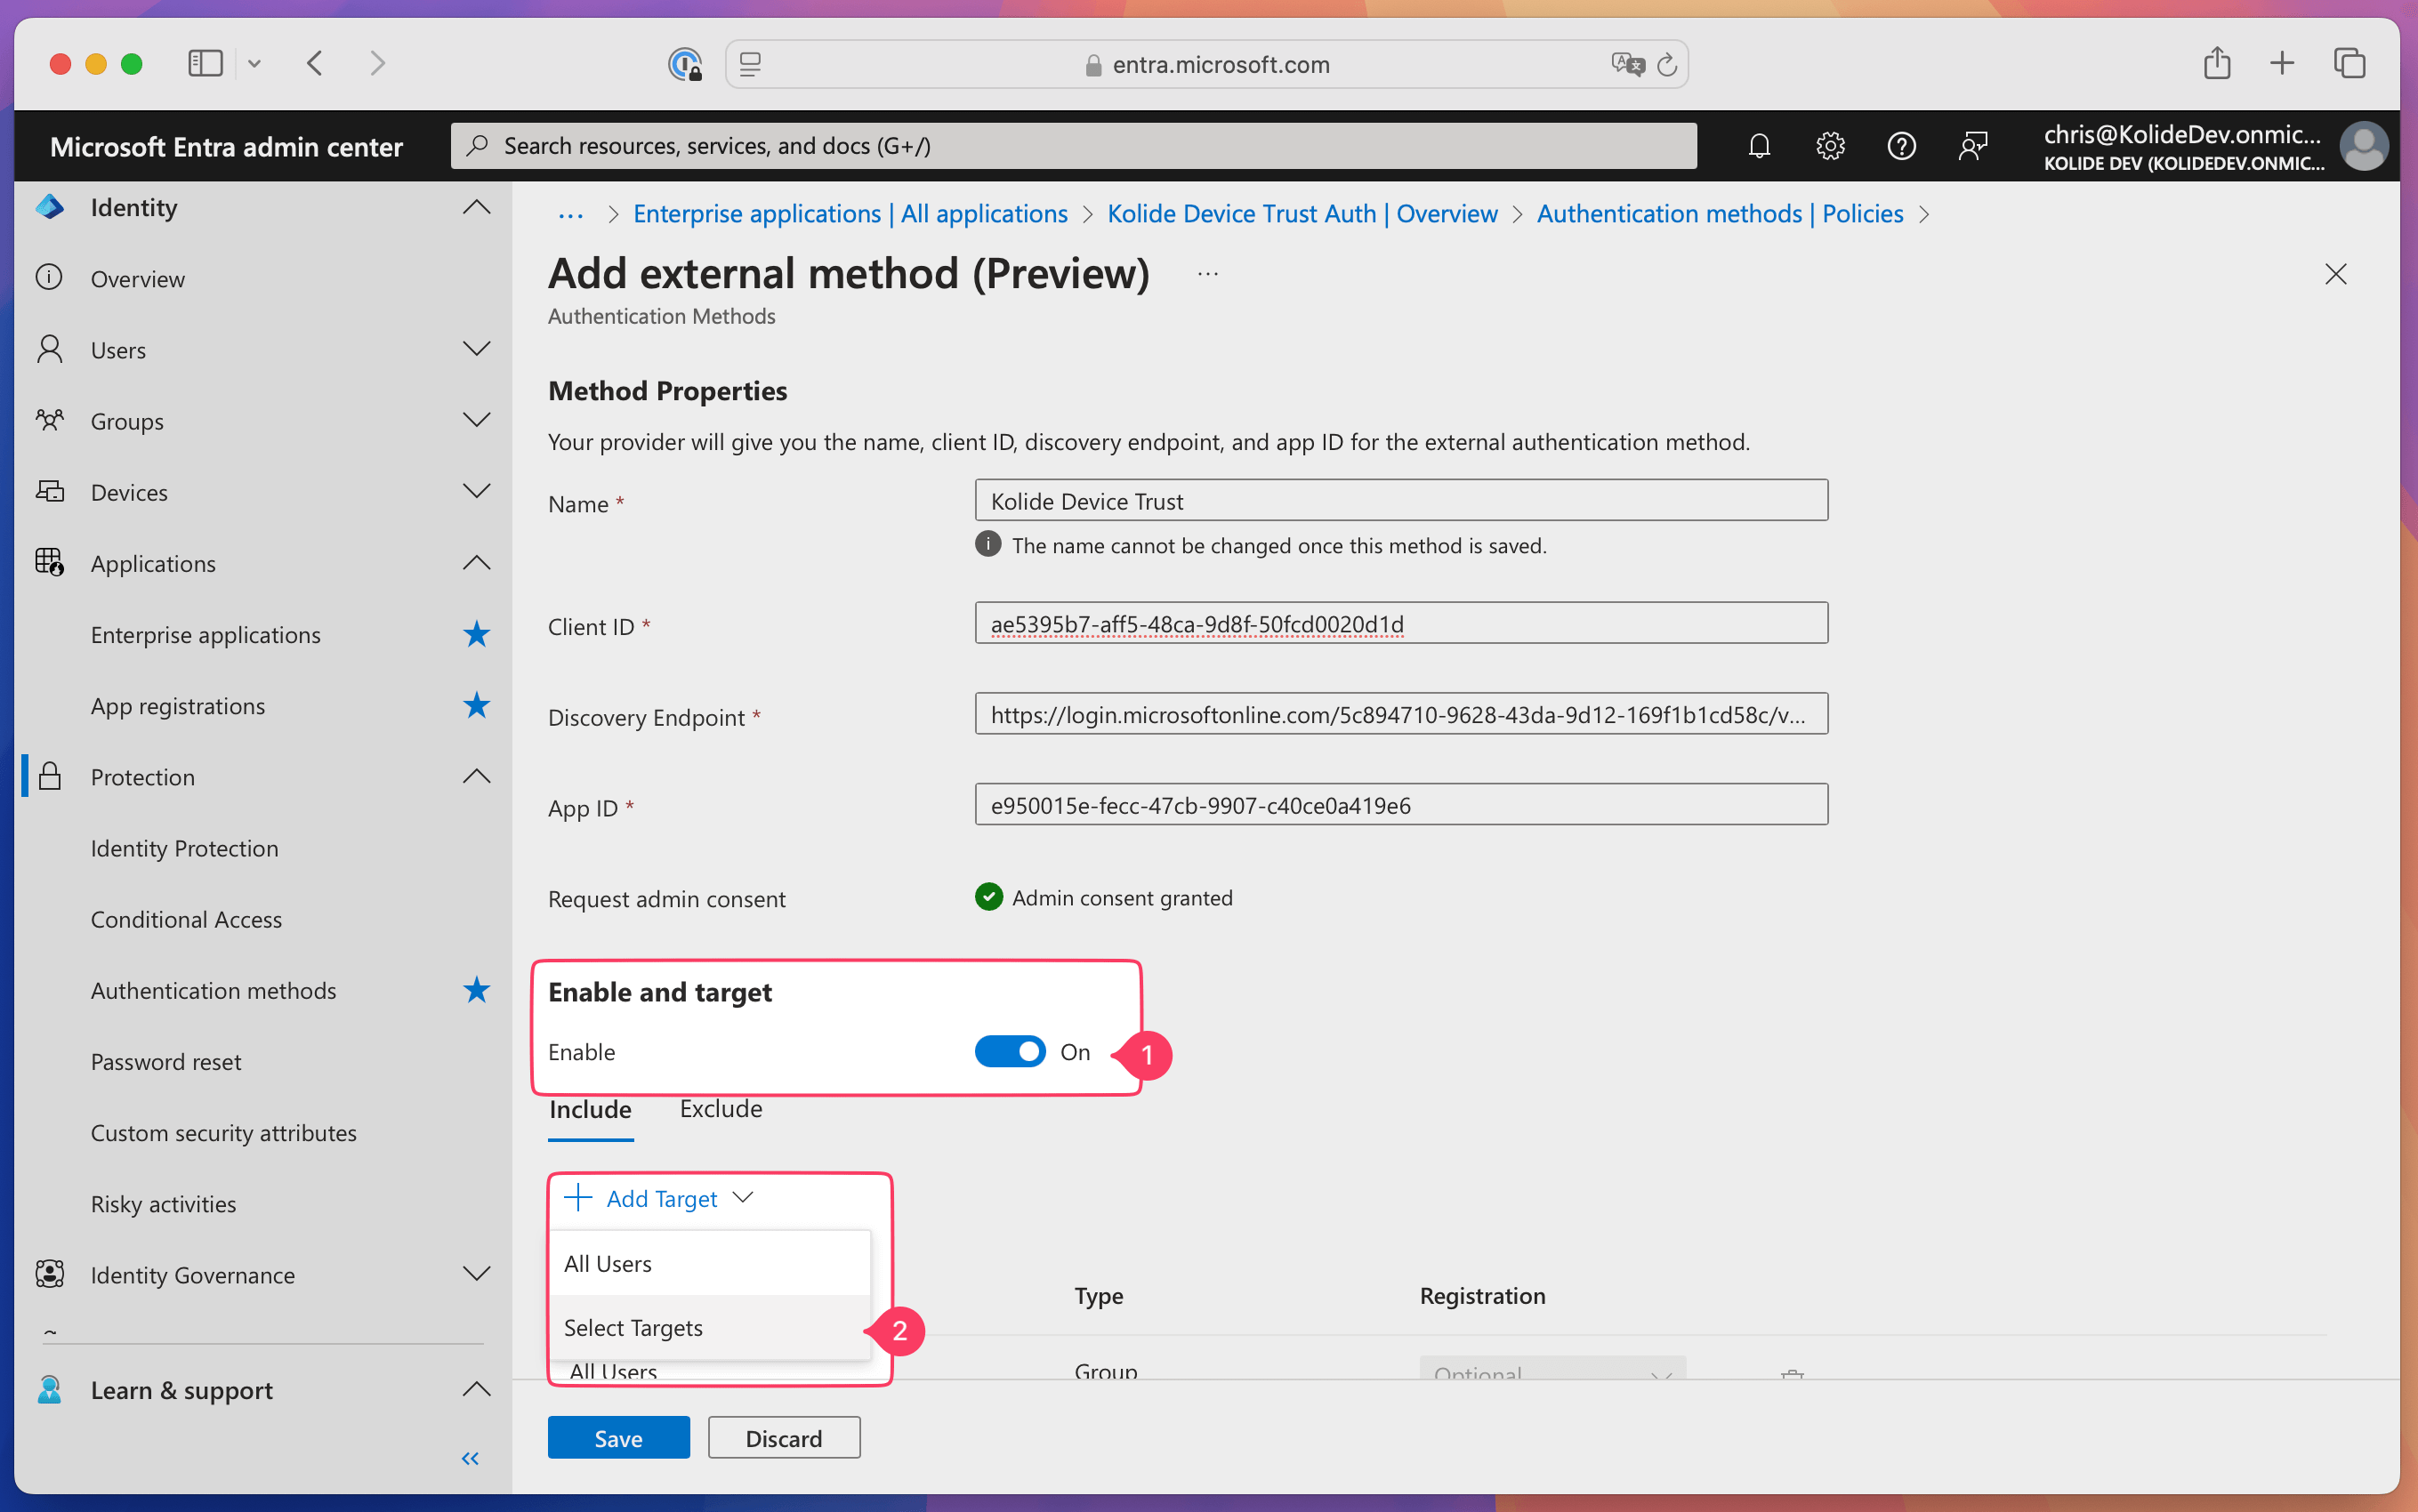
After admin consent is granted, toggle on Enable in the “Enable and target” section.
Select Add Target in the “Enable and target” section, then select Add Target and choose Select Targets in the dropdown.
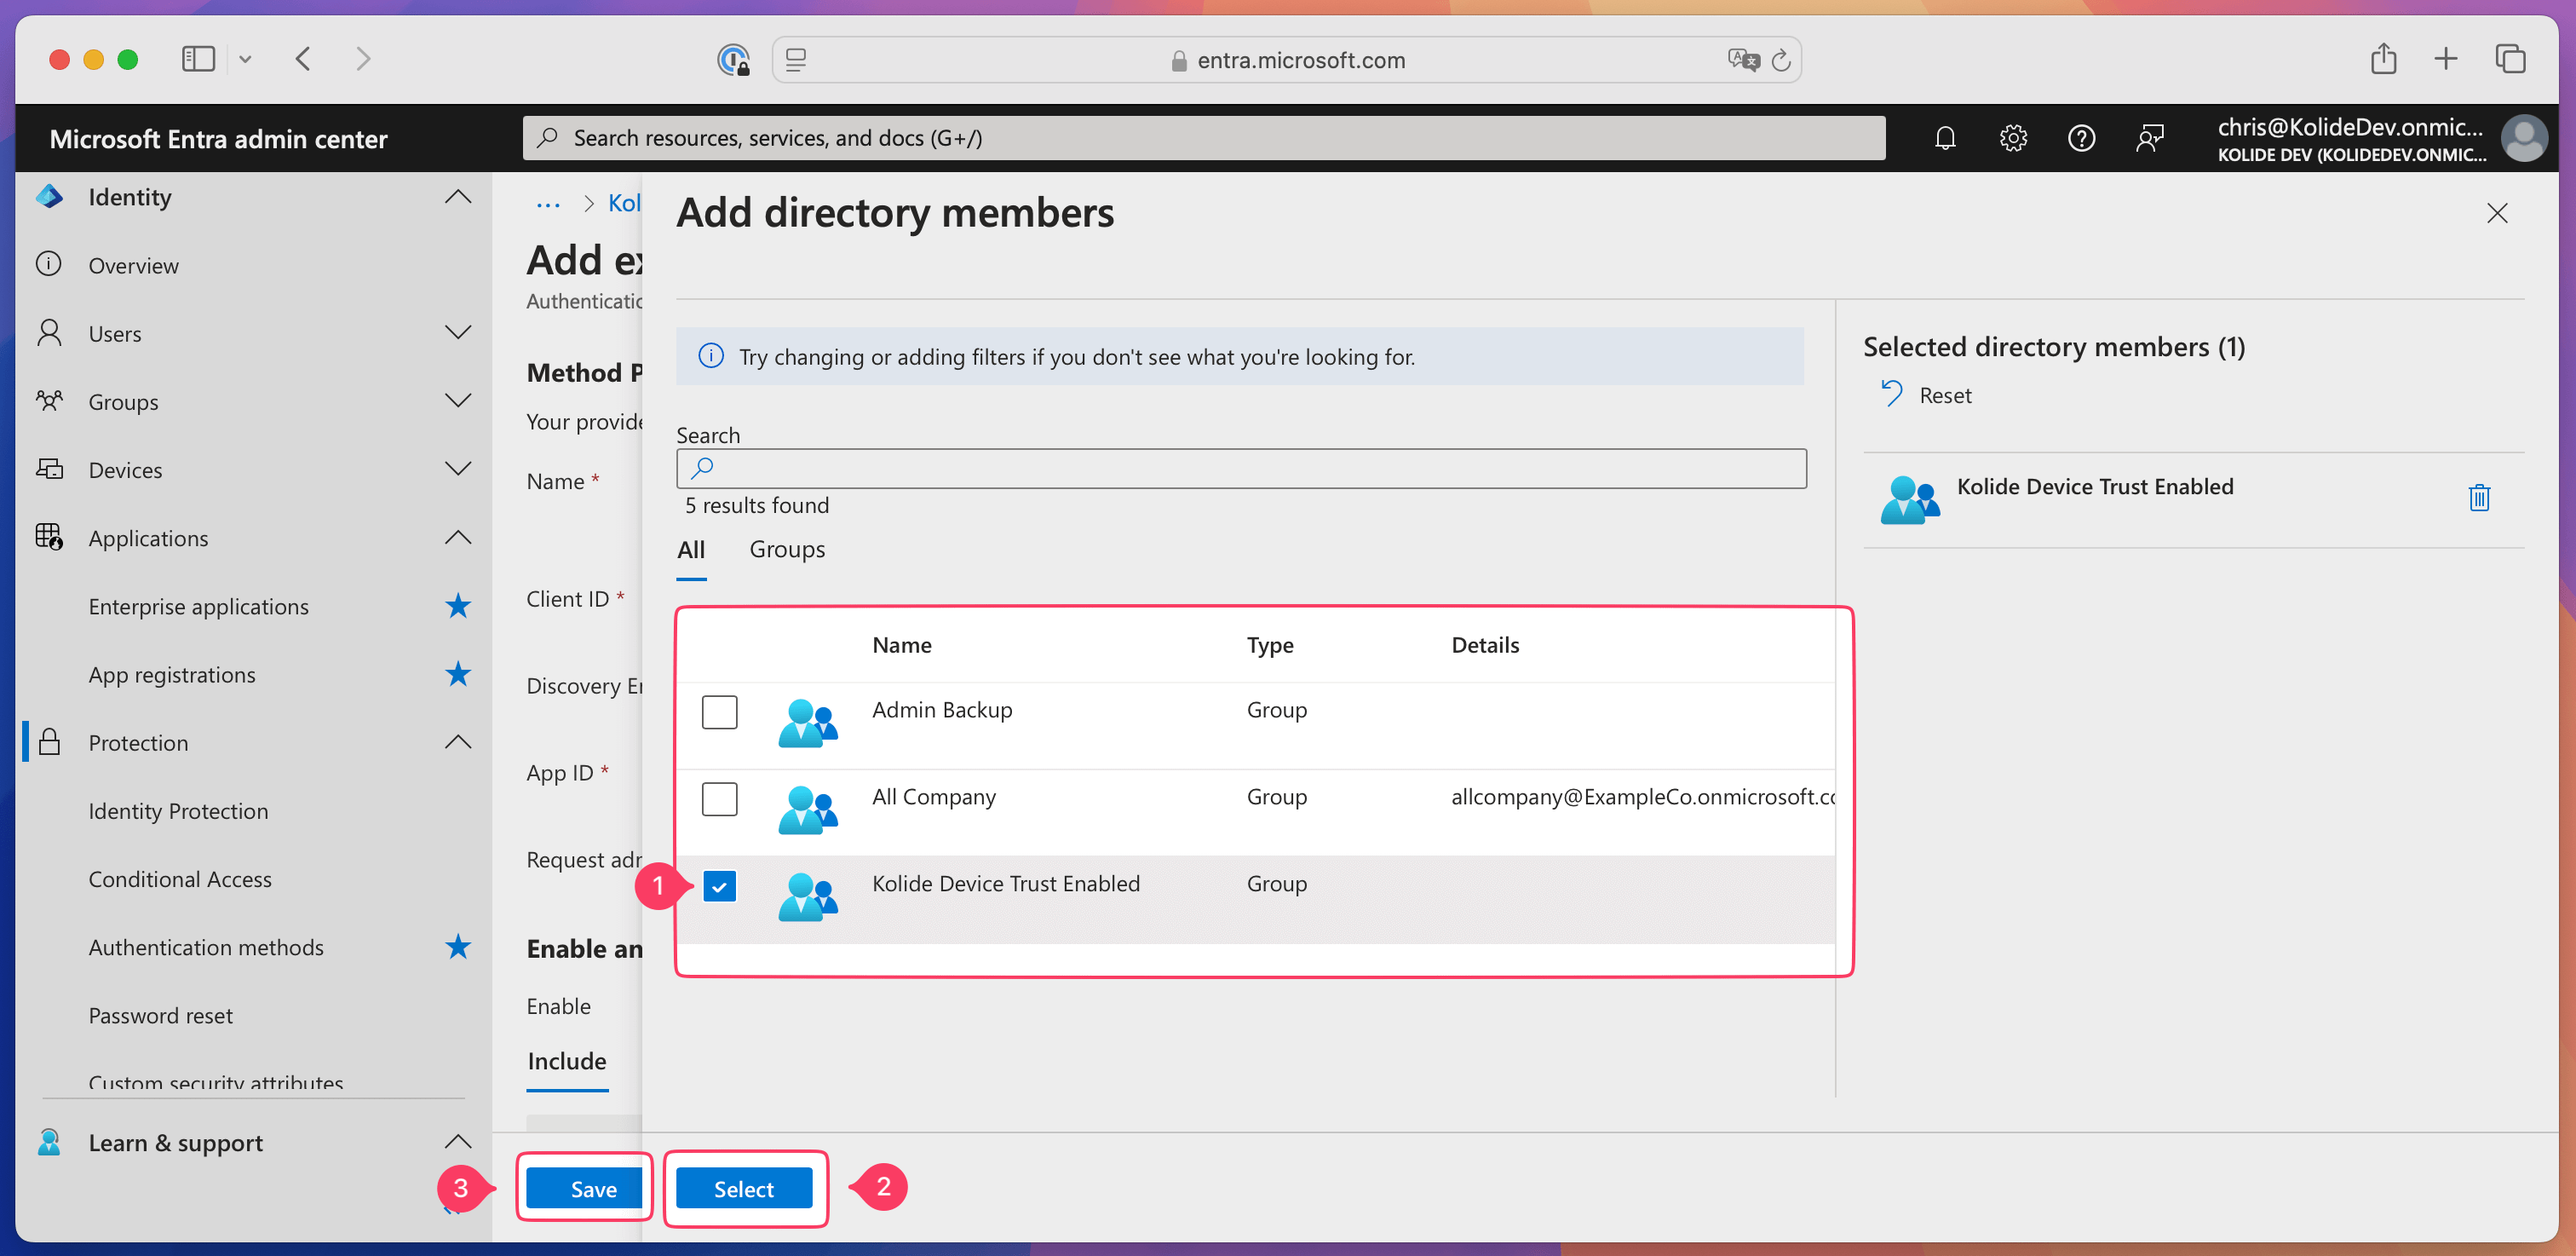
Find and select the checkbox for the “Kolide Device Trust Enabled” group in the list, then choose Select at the bottom of the page.
Select Save at the bottom of the page.
Step 2: Configure SAML SSO for Kolide Device Trust
Create a new Enterprise Application in Entra ID
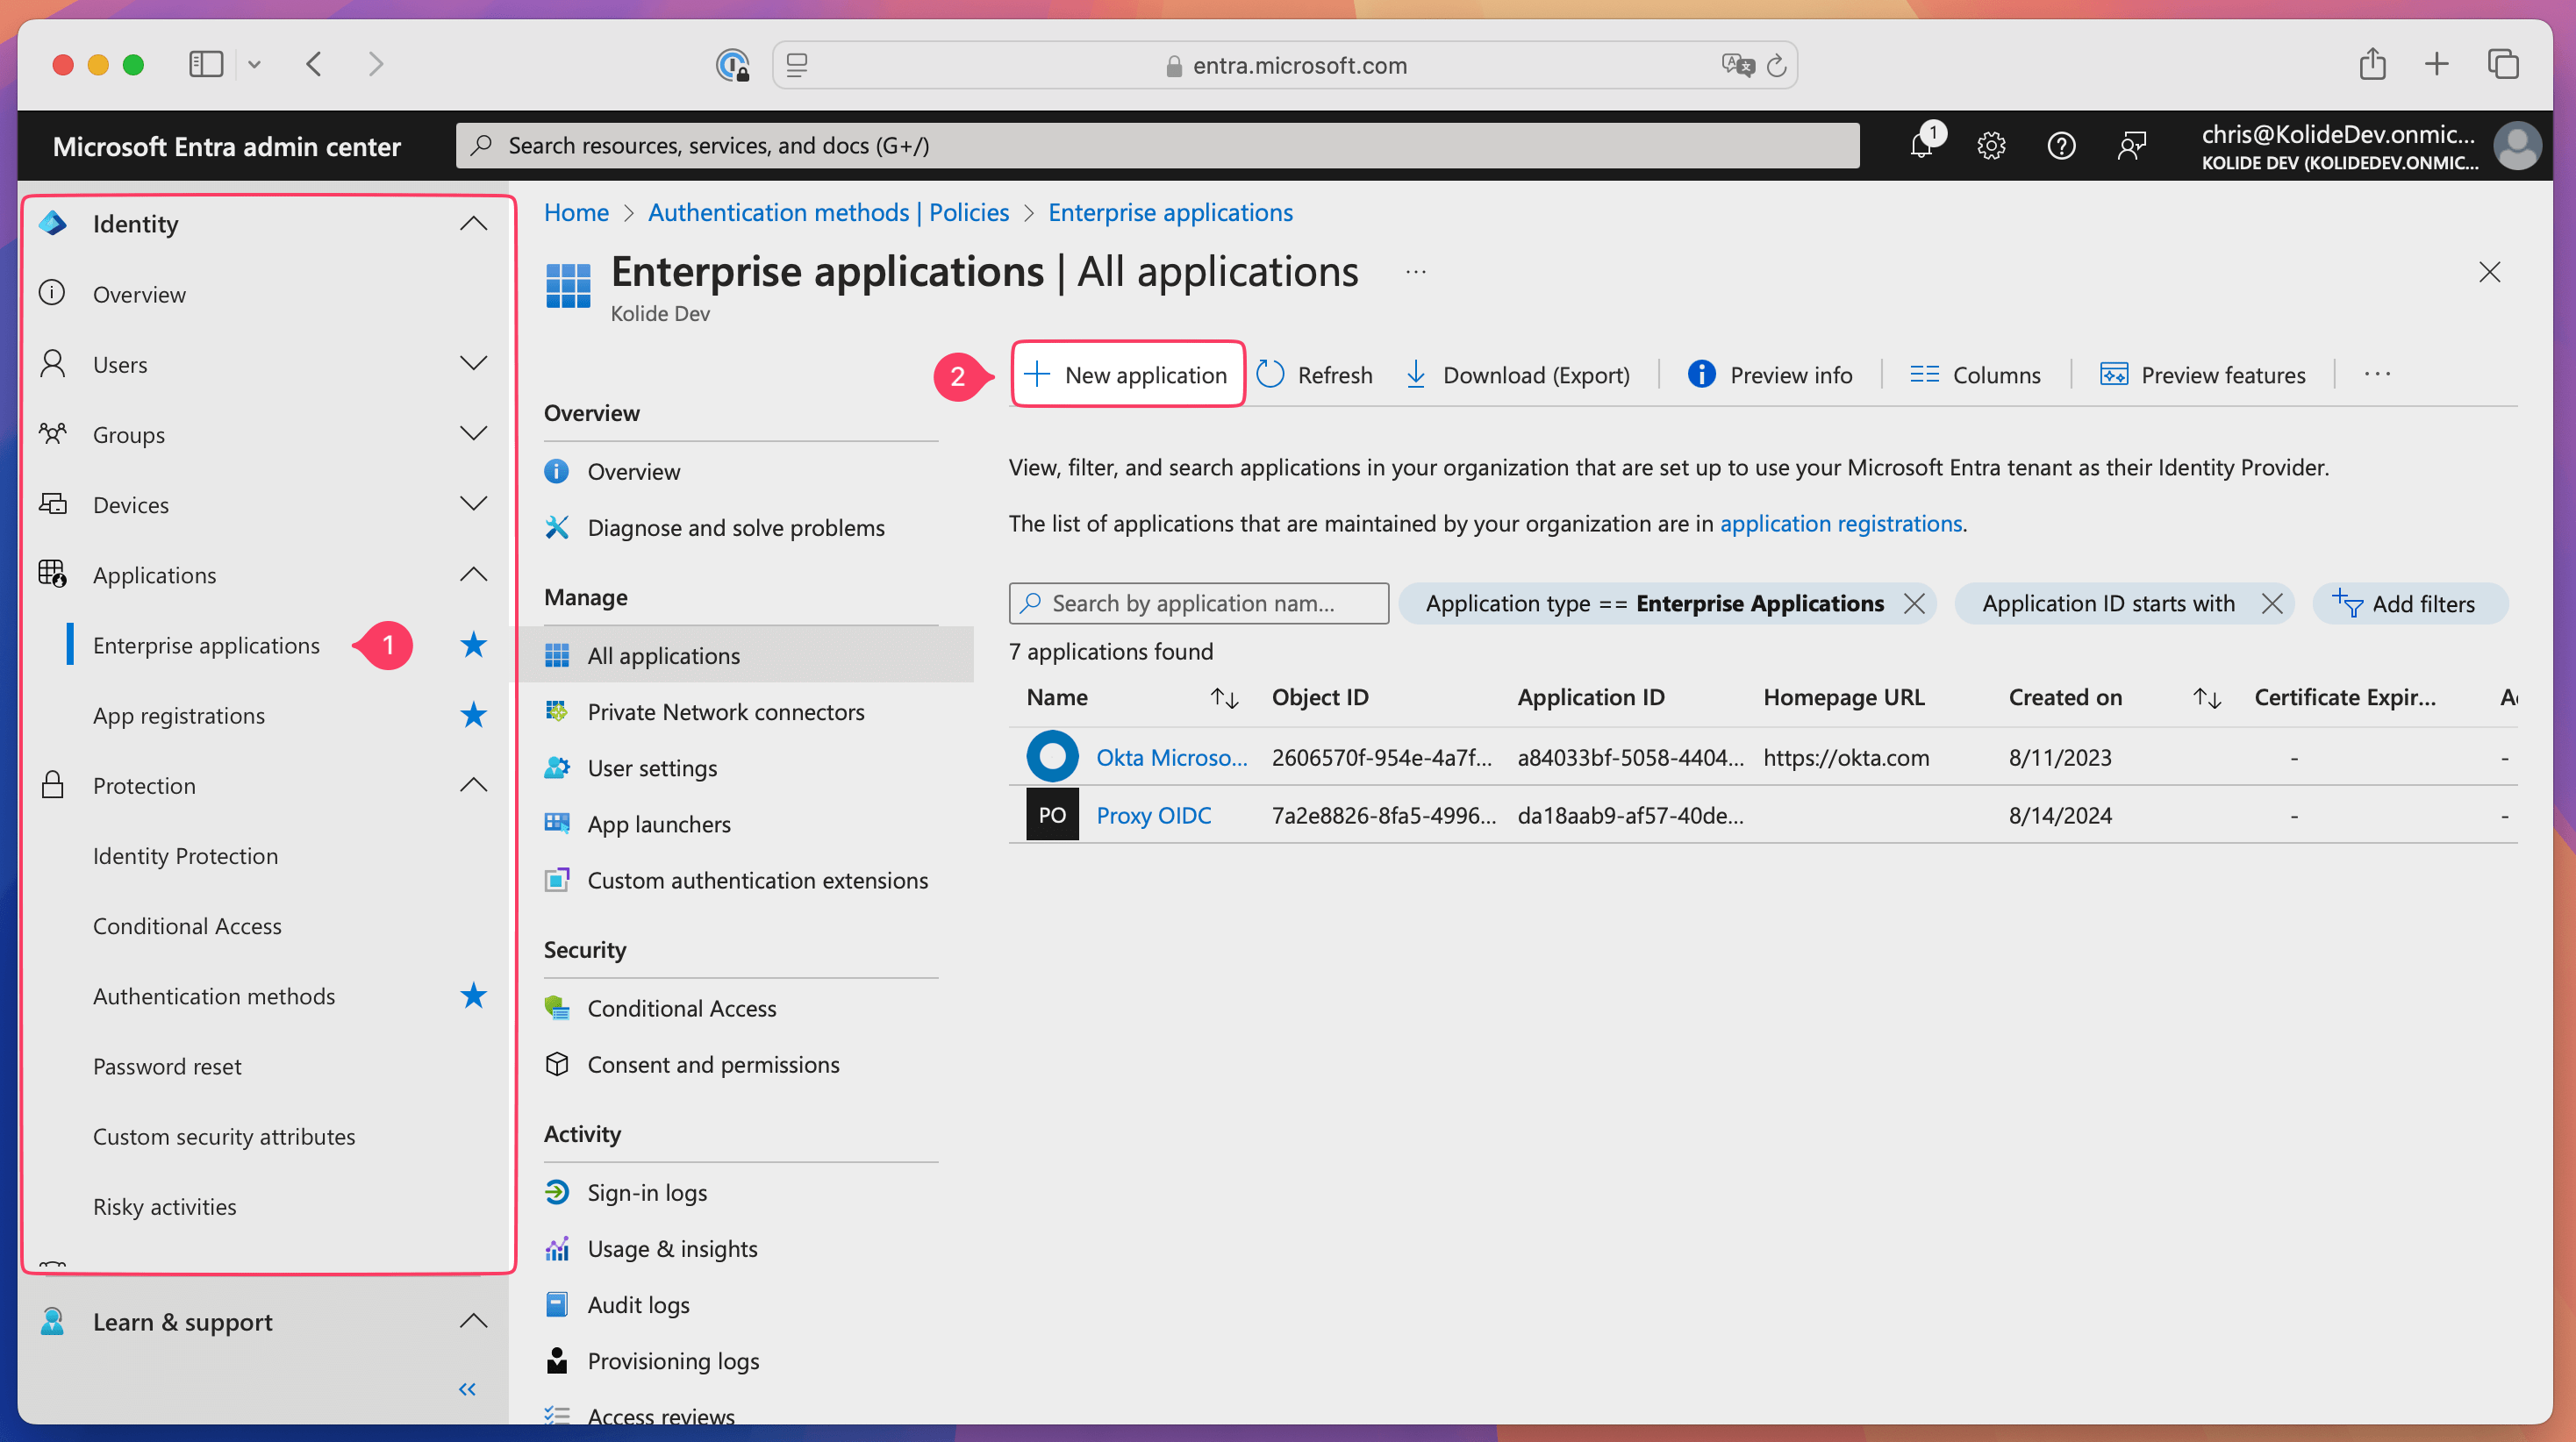
In Entra ID, select Identity > Applications > Enterprise Applications in the sidebar.
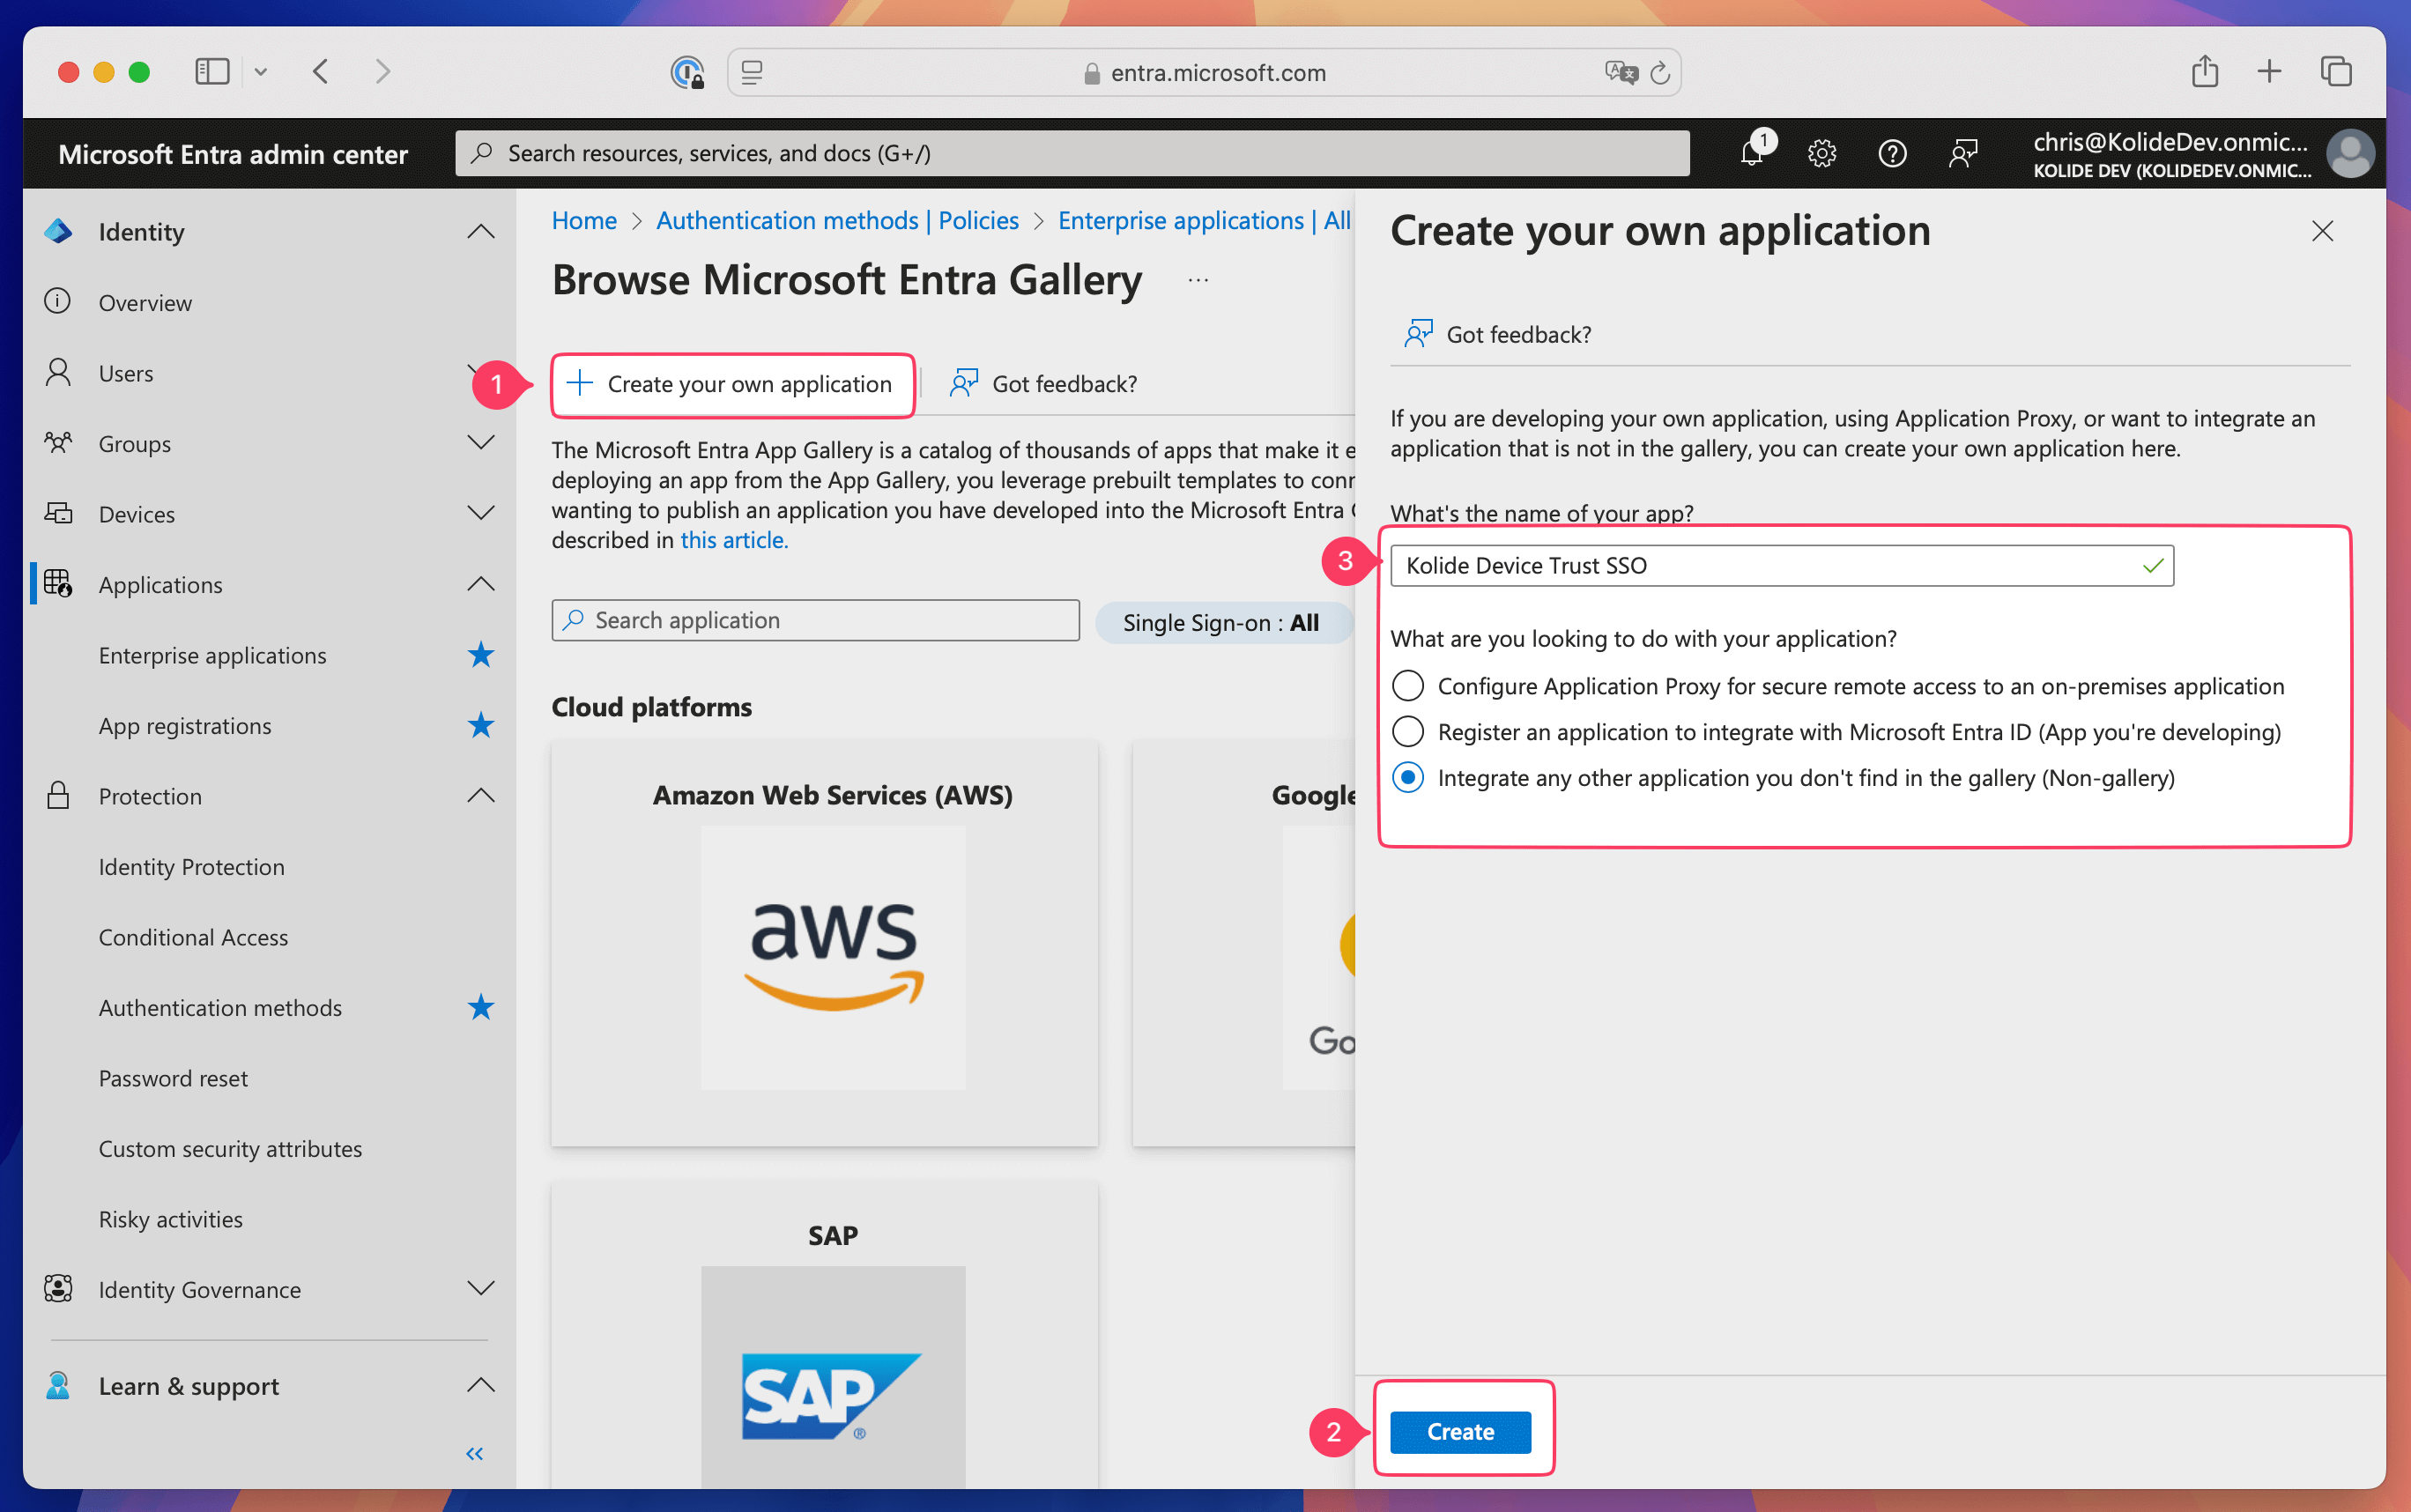
Select New Application, then select Create your own application.
Enter “Kolide Device Trust SSO” for the name of the app.
Select Integrate any other application you don’t find in the gallery (Non-gallery), then select Create.
Assign the Kolide Device Trust Enabled group
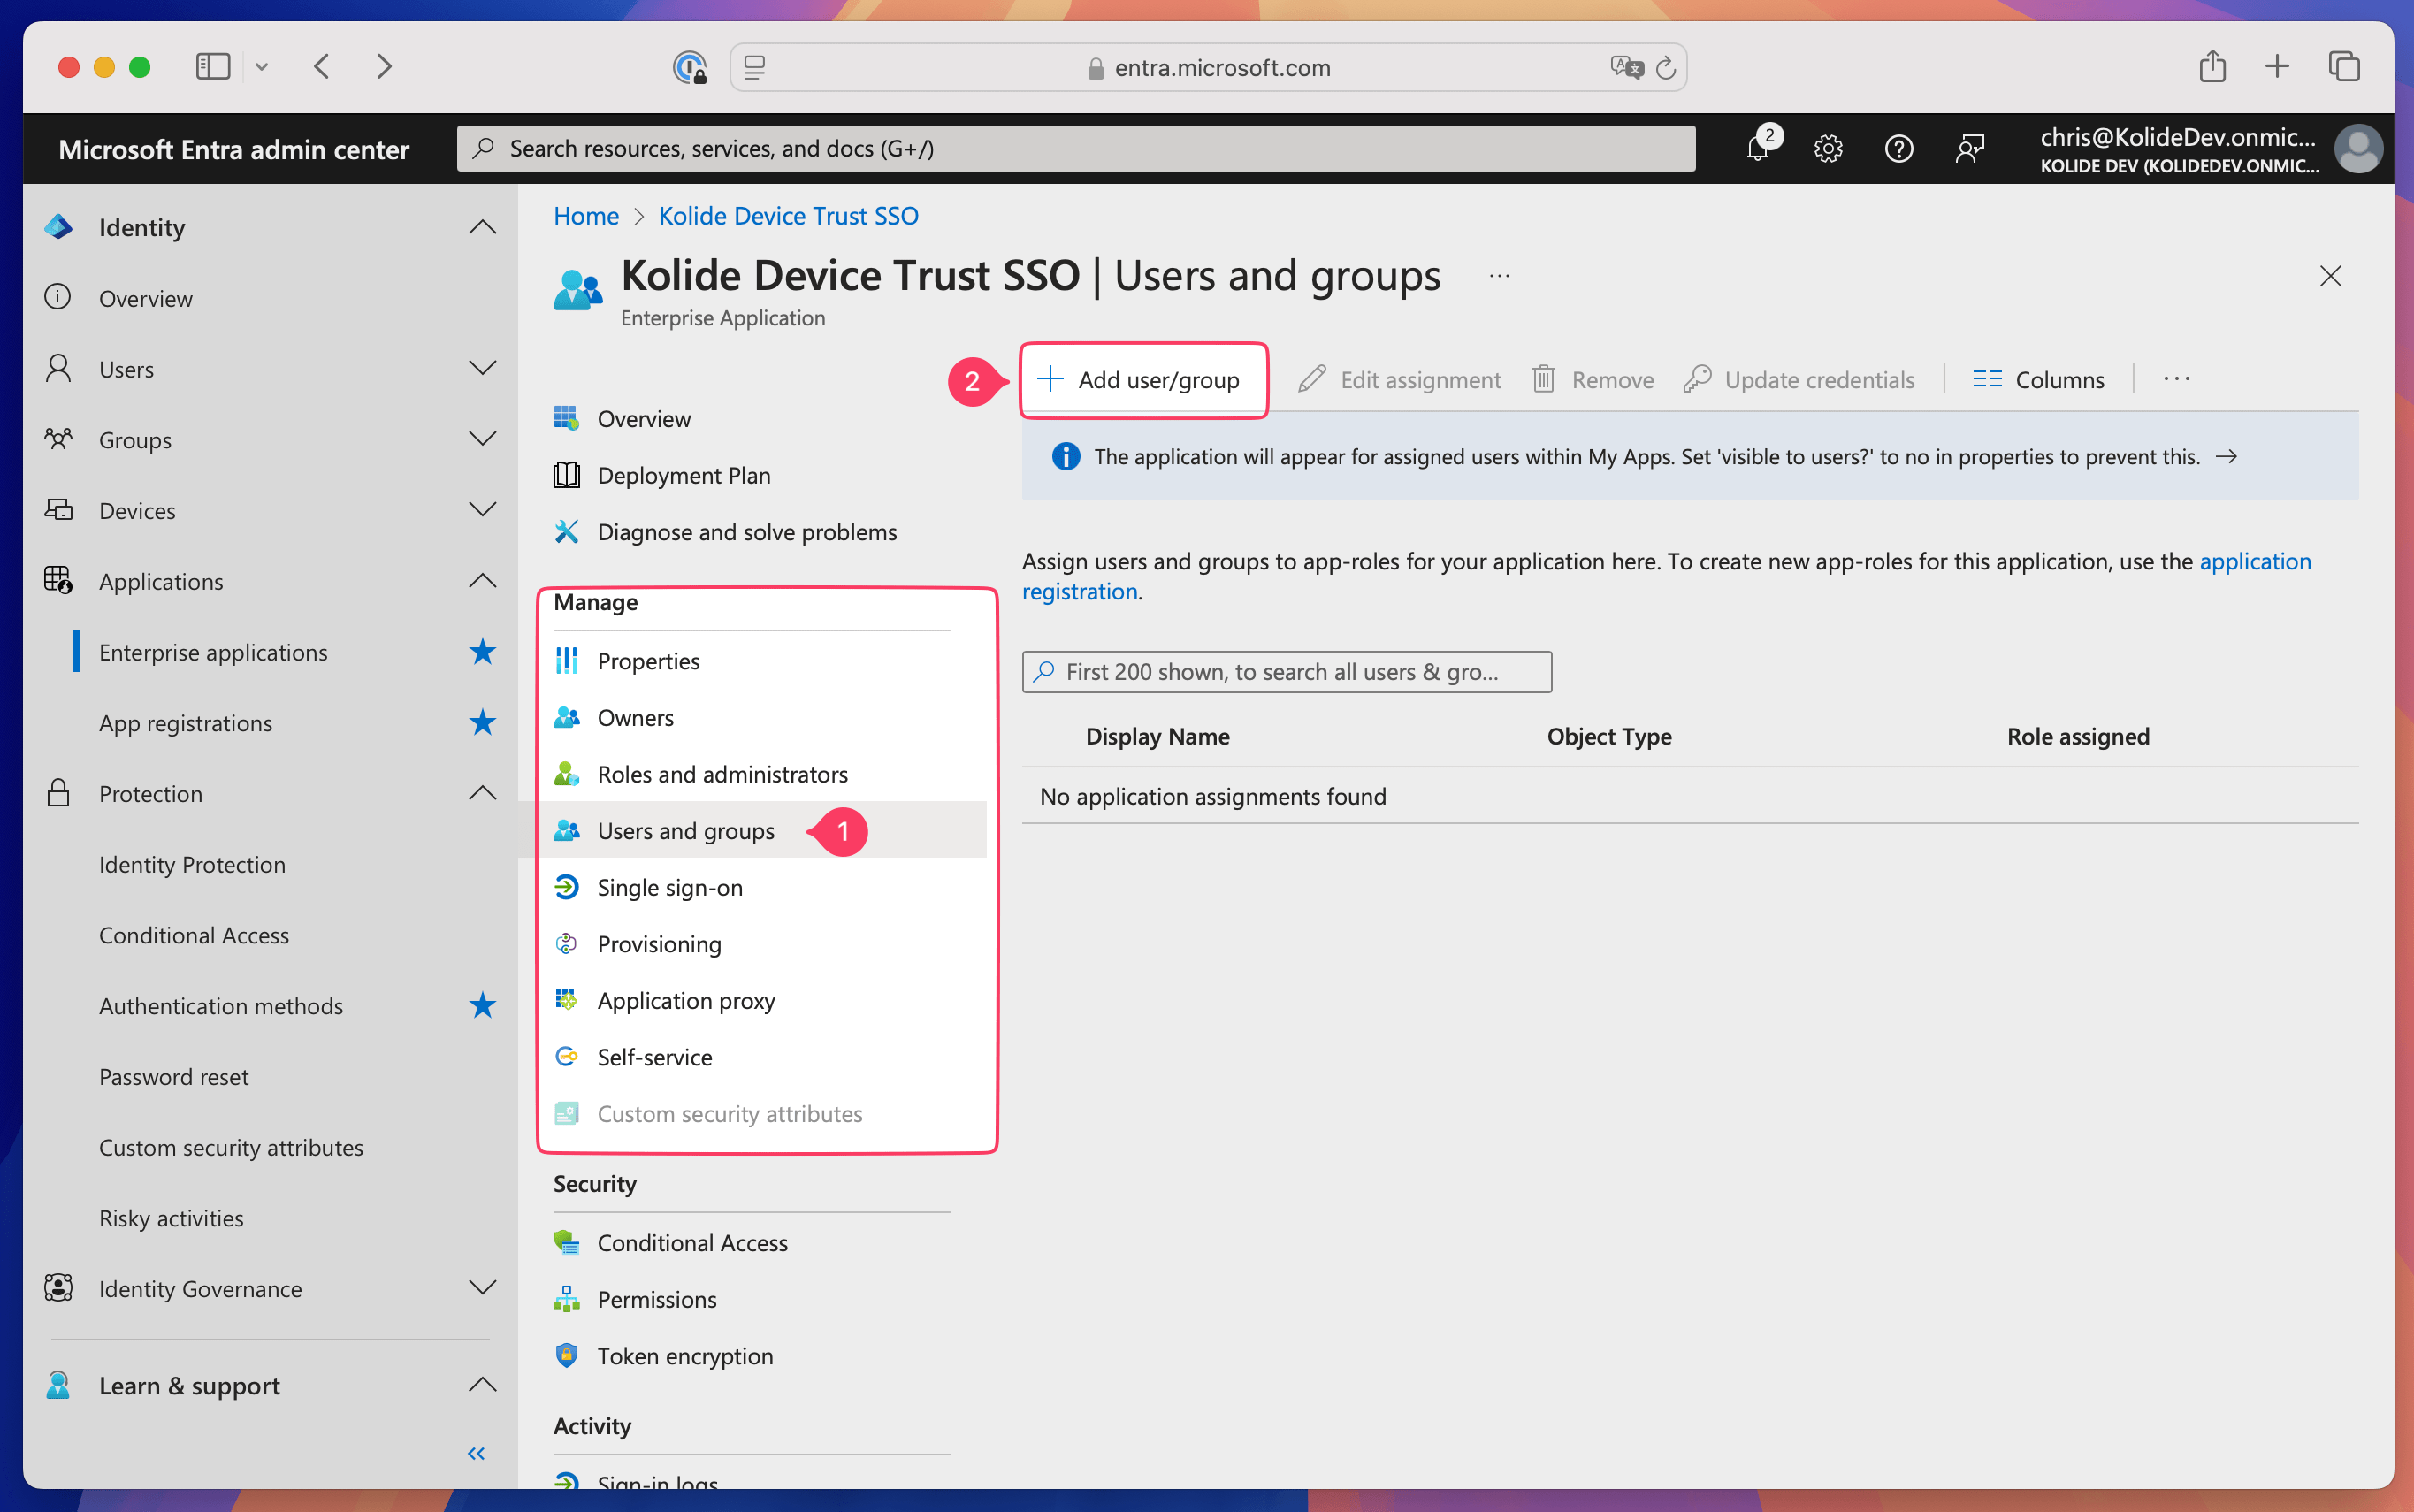
Select Manage > Users and groups in the sidebar.
Select Add user/group.
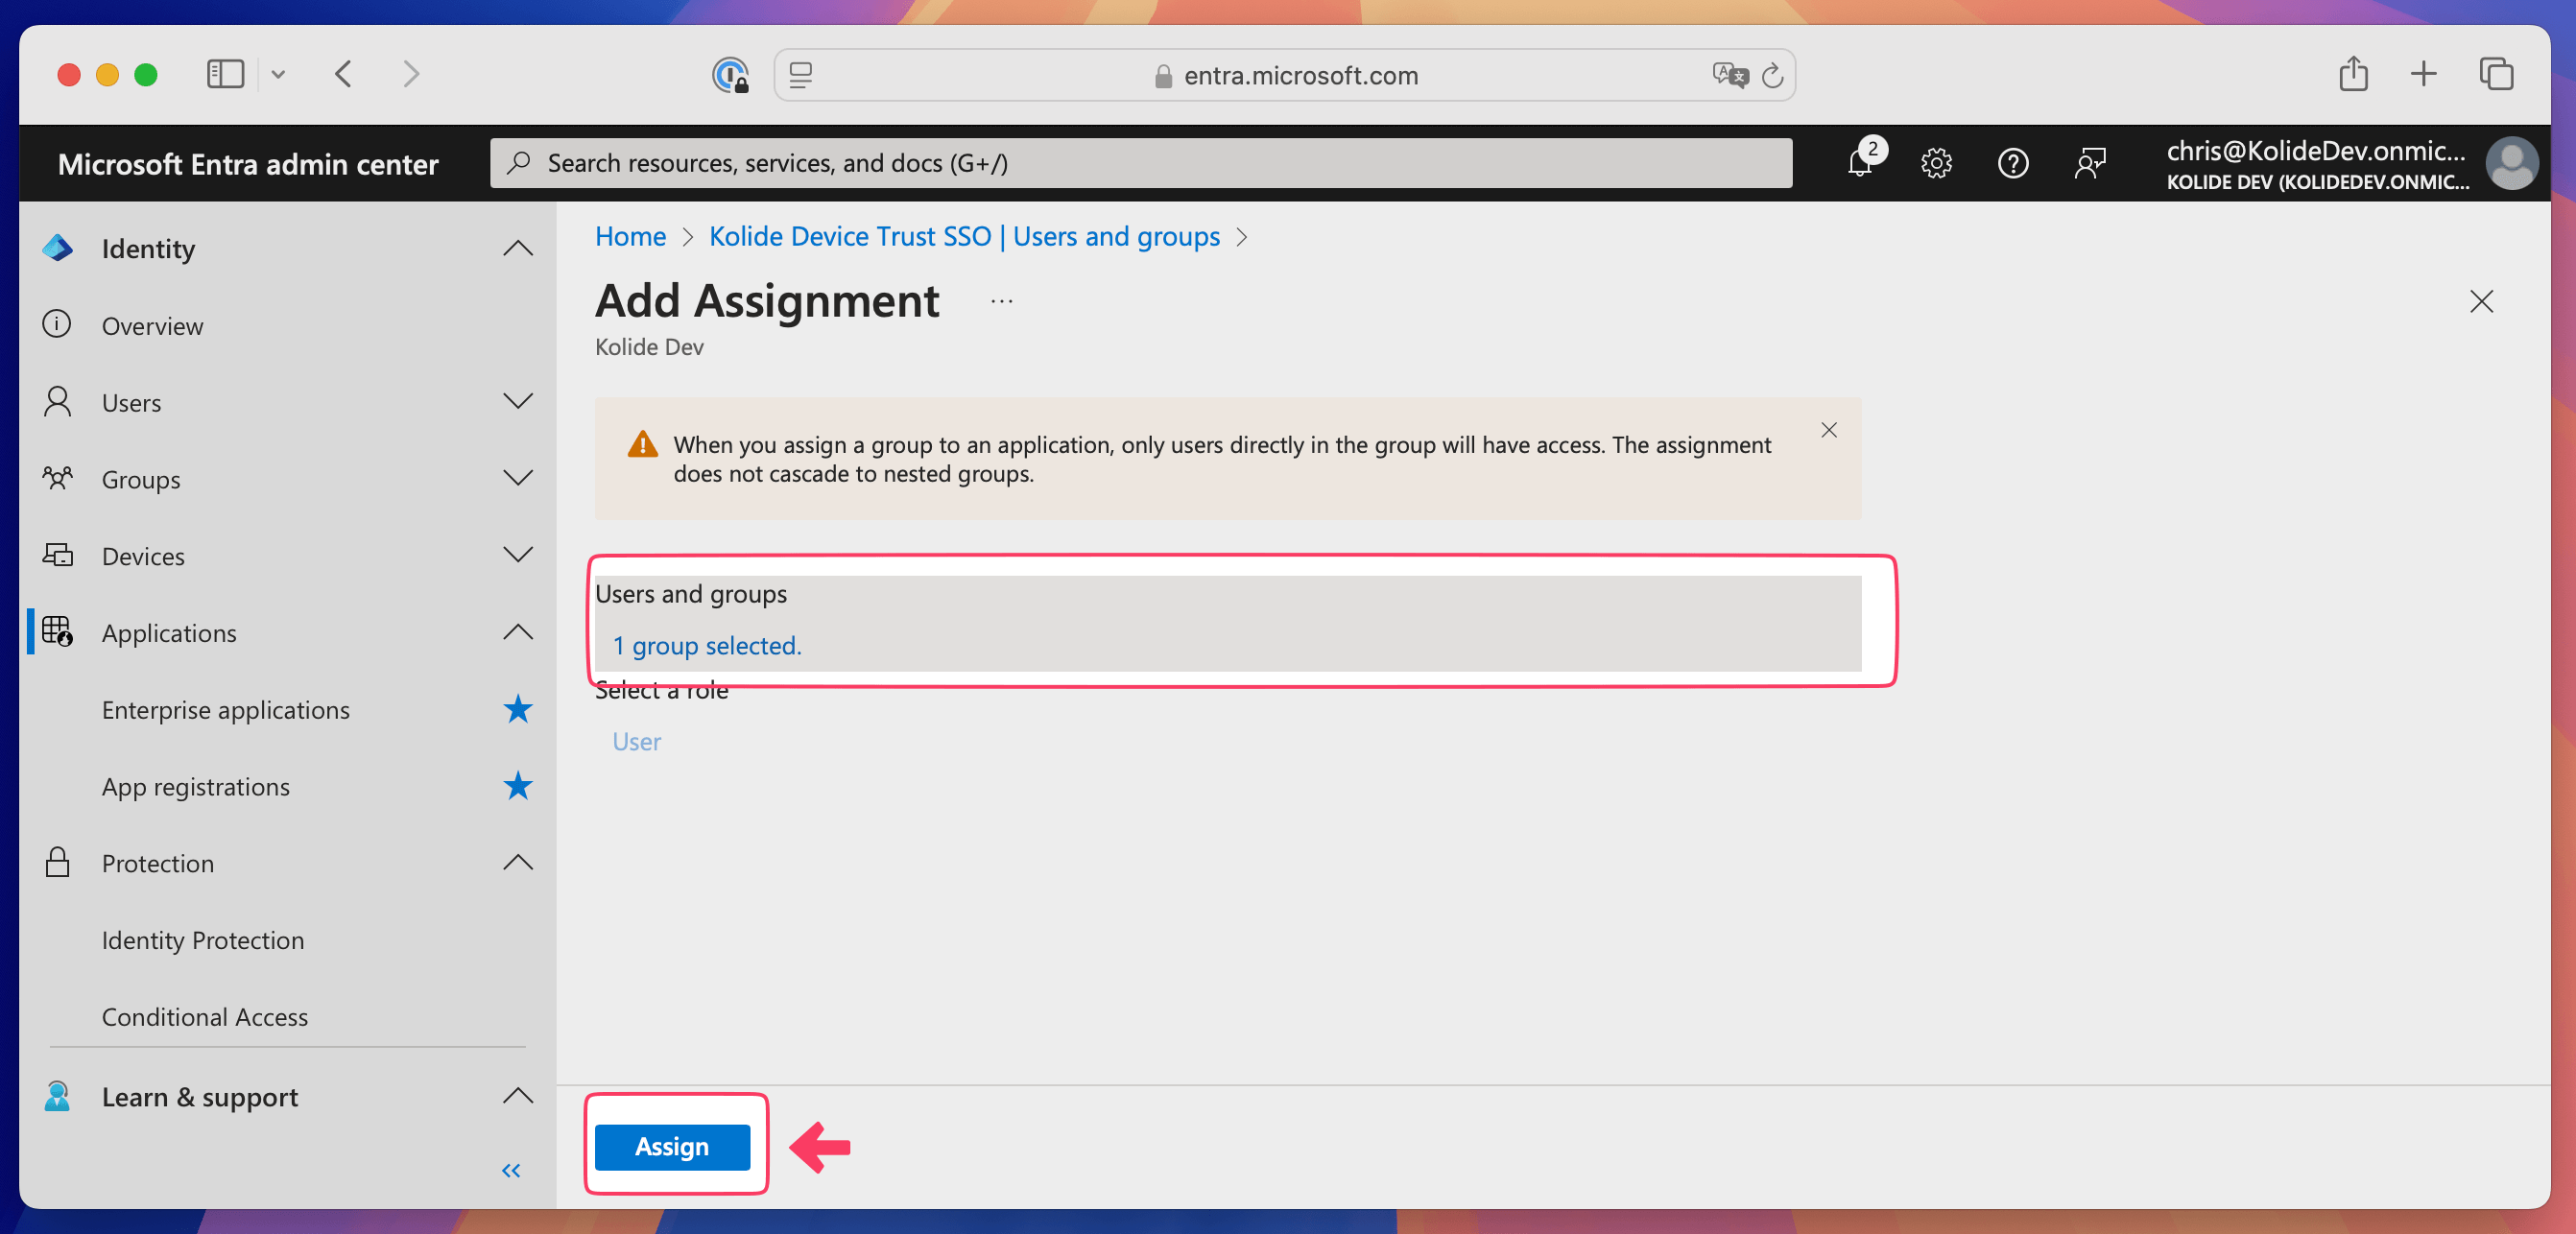
Choose None Selected.
Select the checkbox next to the Kolide Device Trust Enabled group, then choose Select.
Select Assign at the bottom of the page.
Add single sign-on
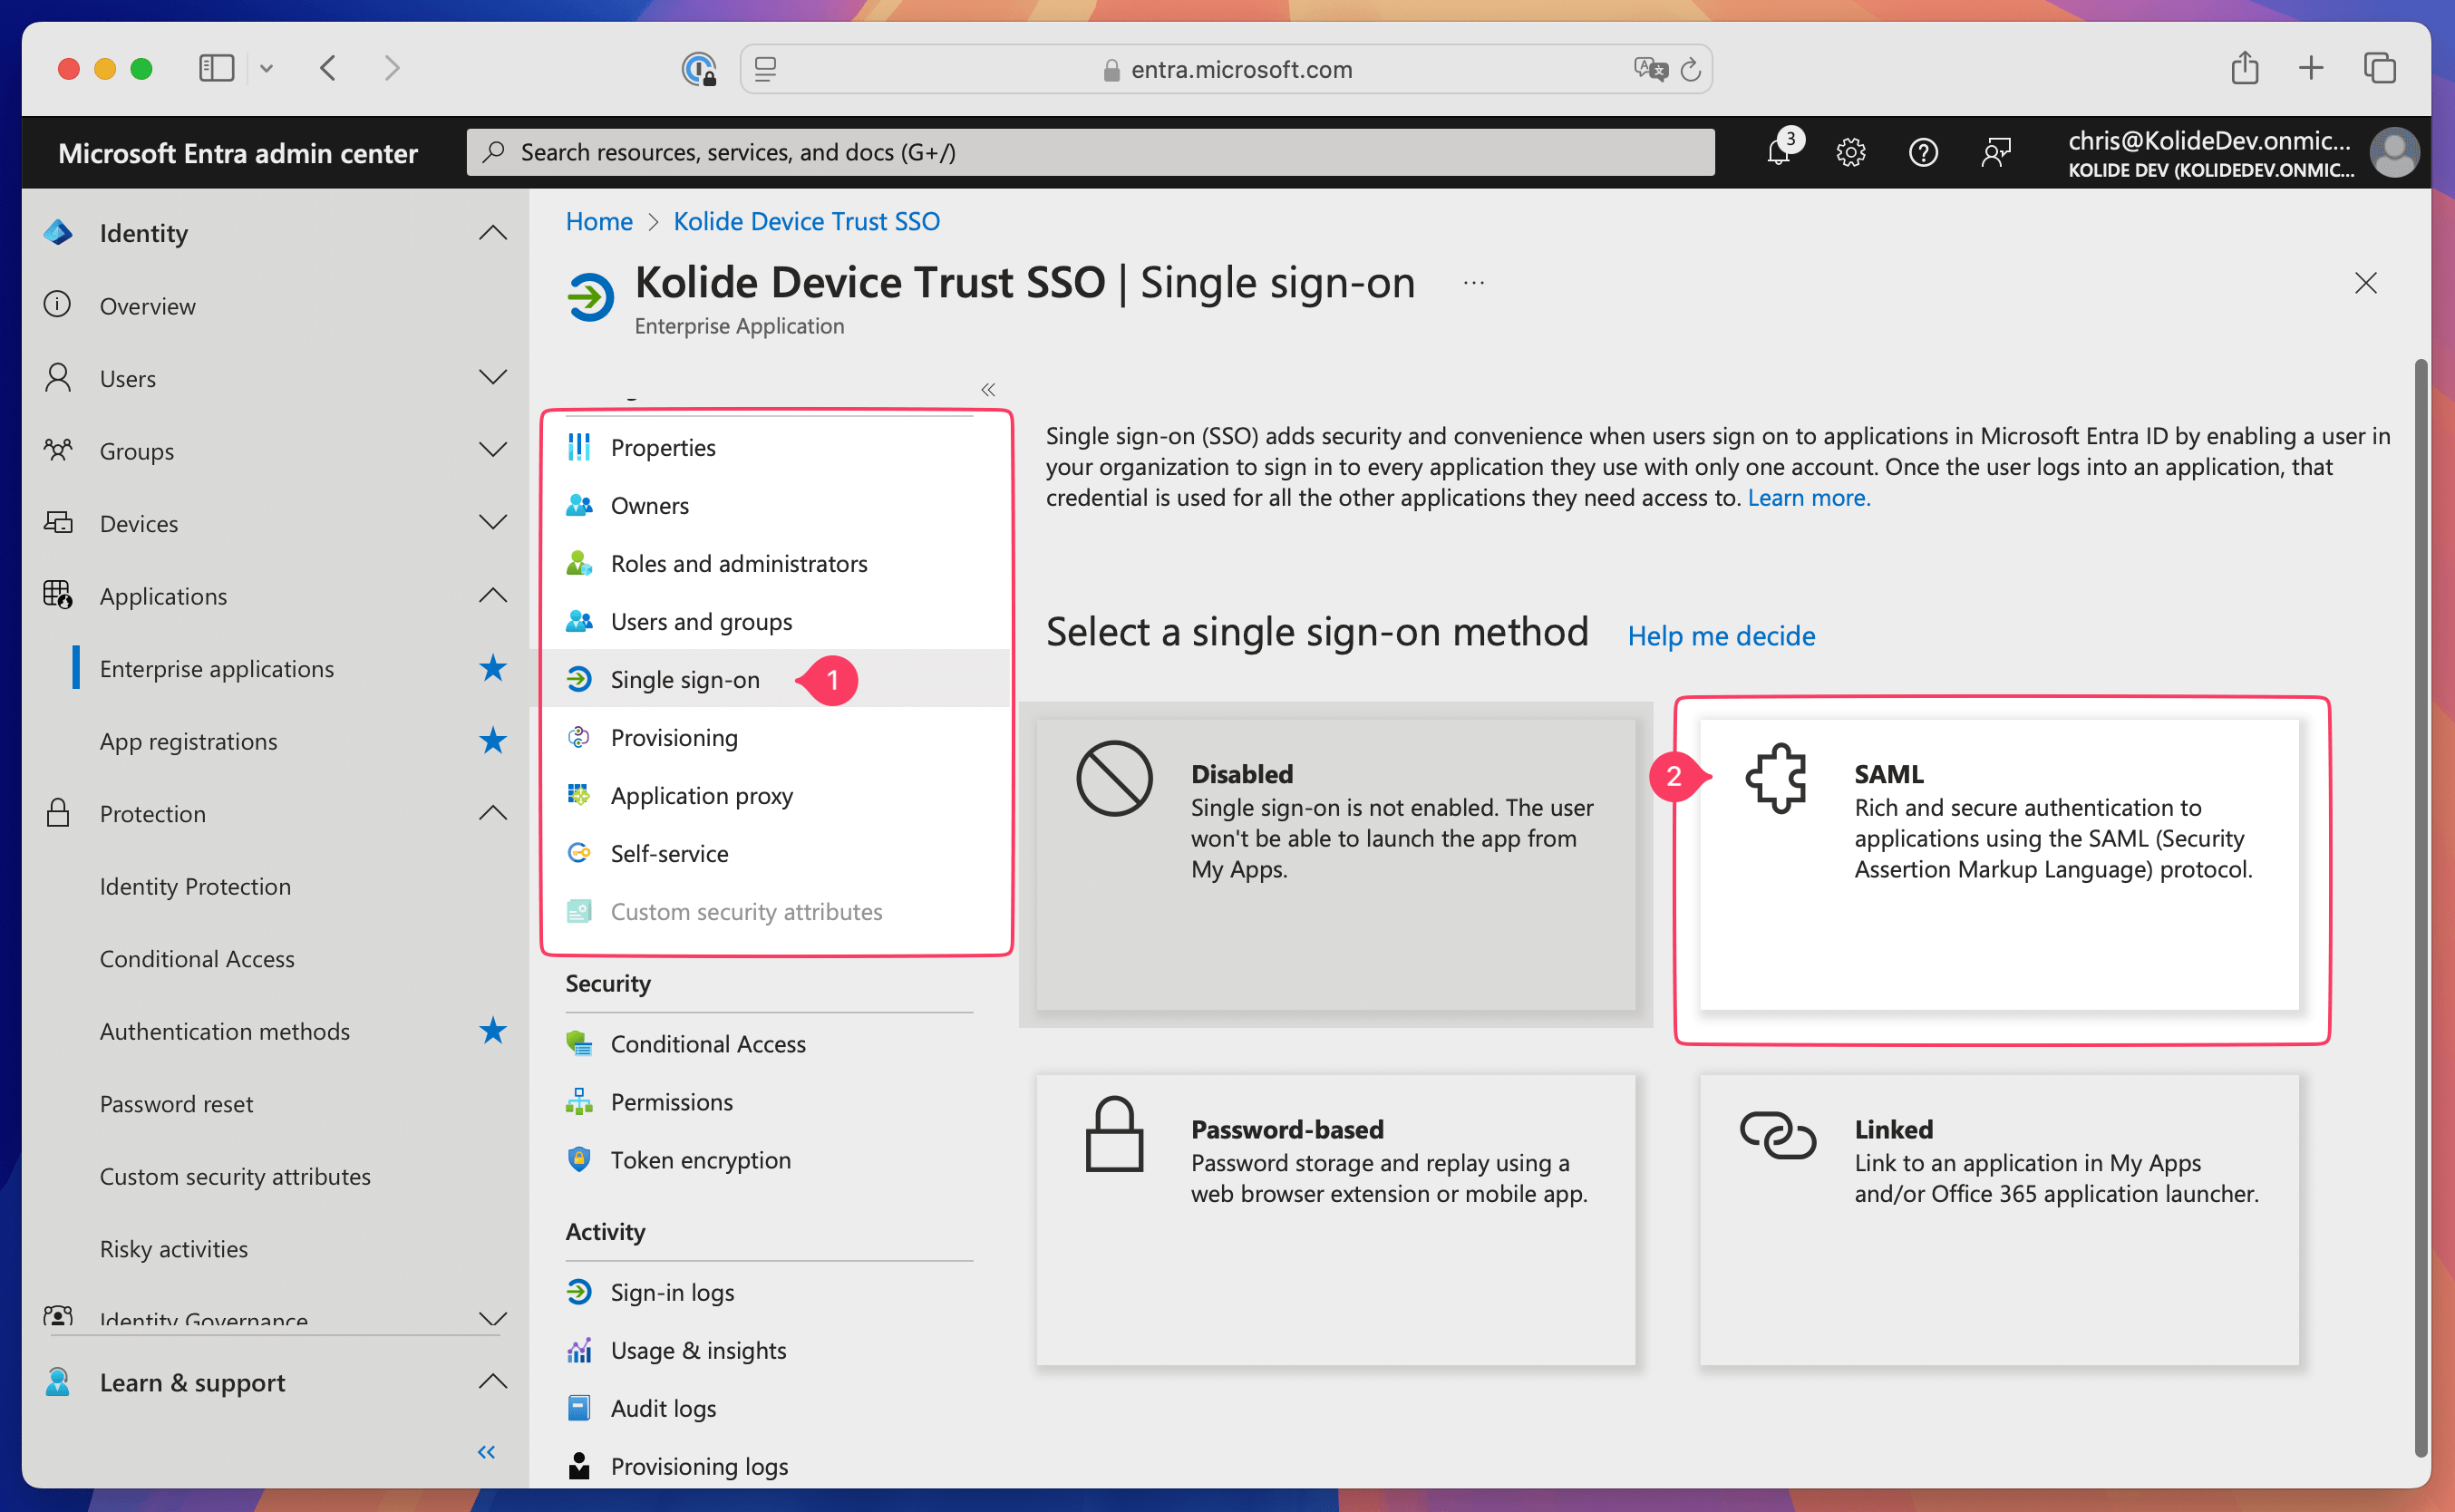
- Select Manage > Single sign-on in the sidebar.
- Select SAML as the single-sign on method.
Add the Entity ID
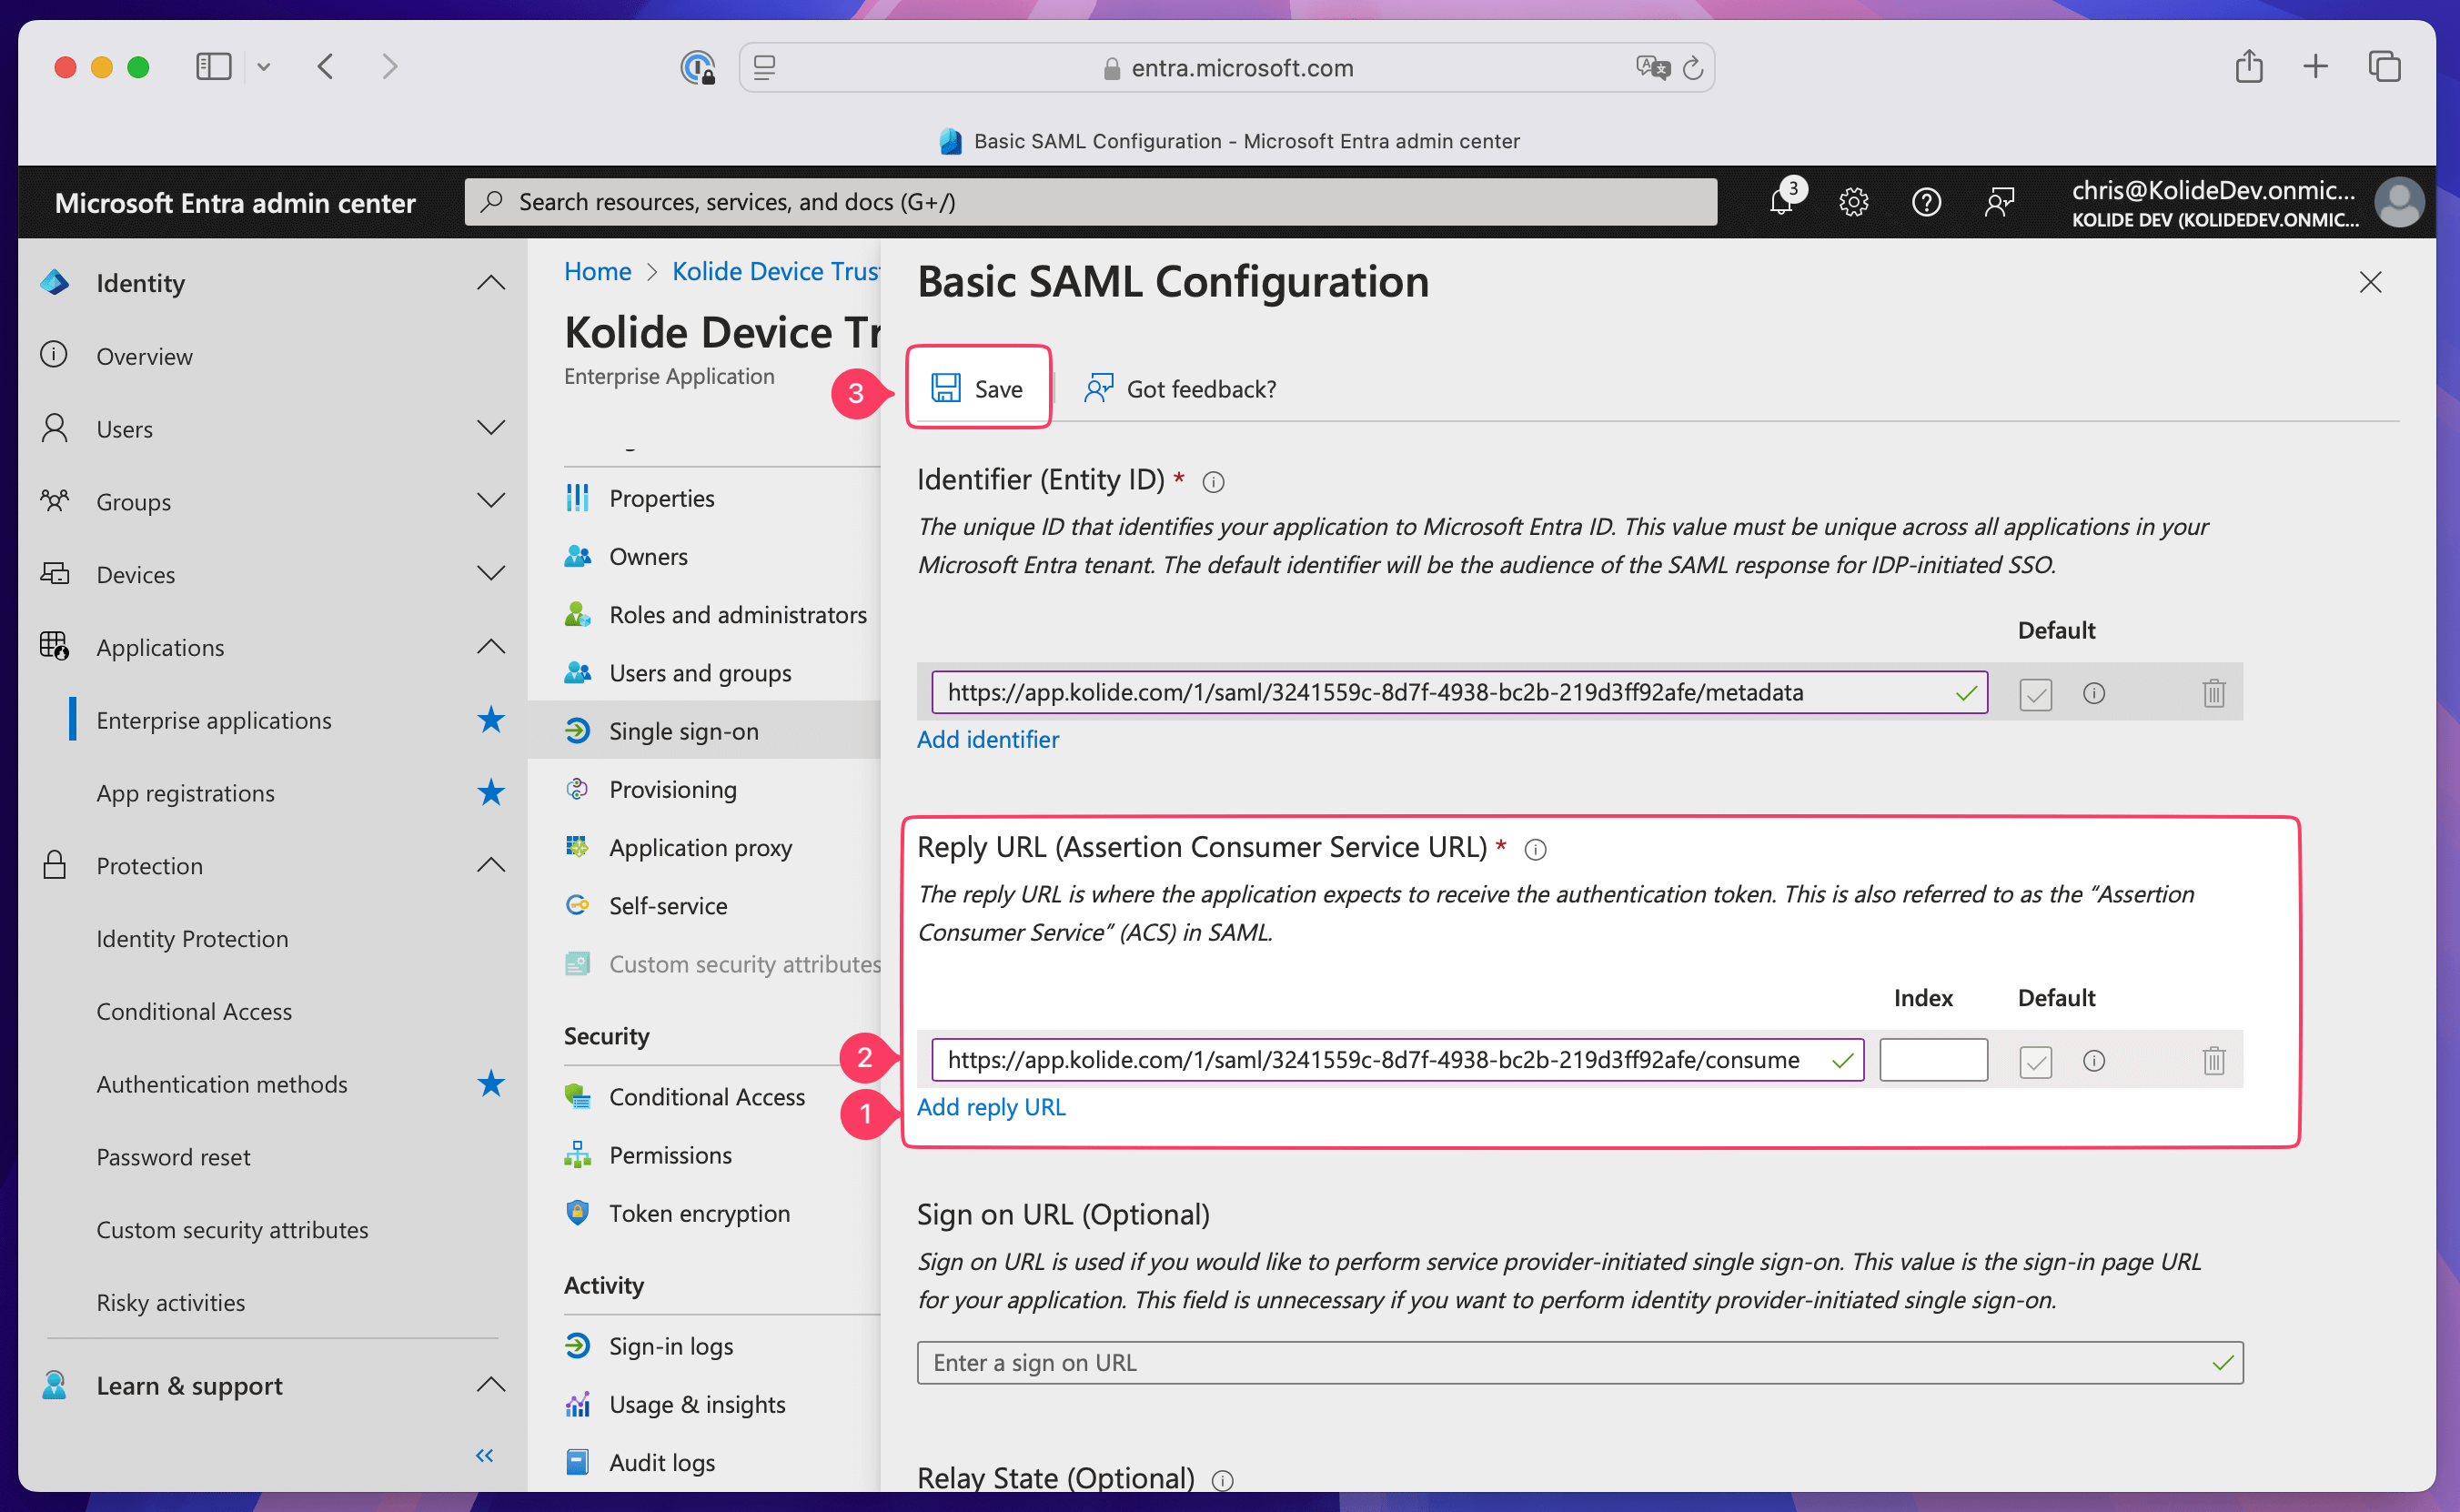
Select Edit within the Basic SAML Configuration box.
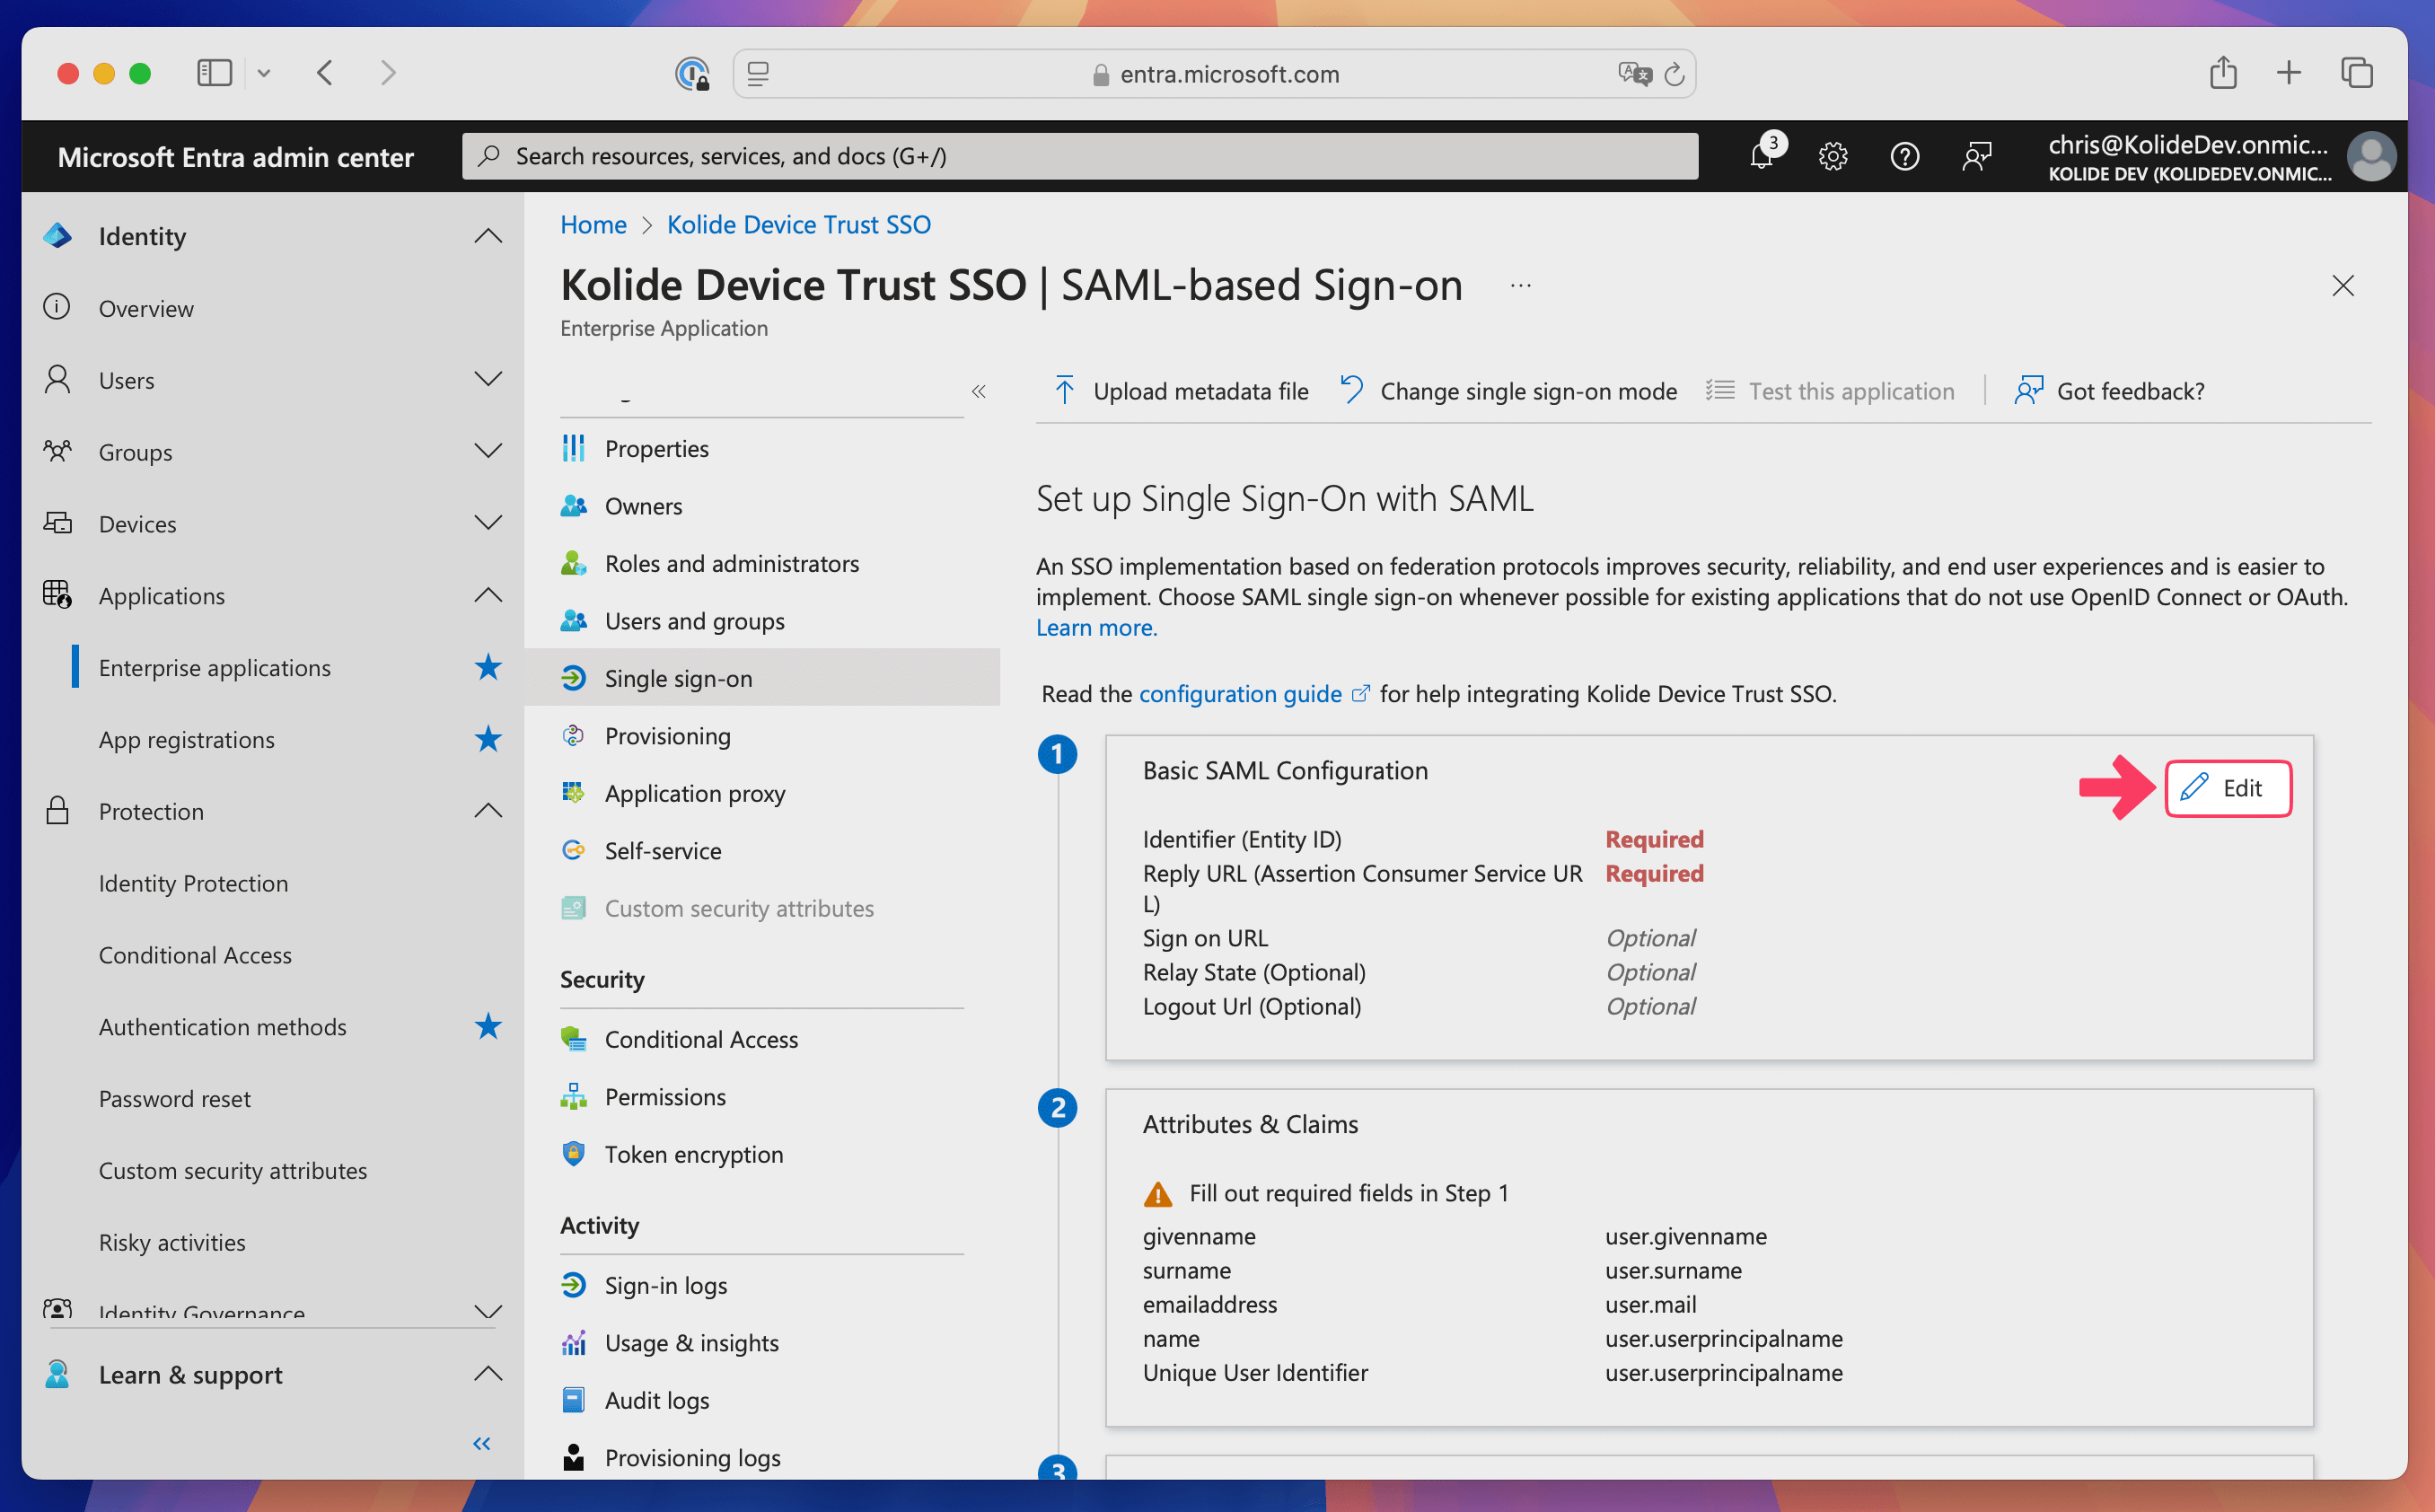
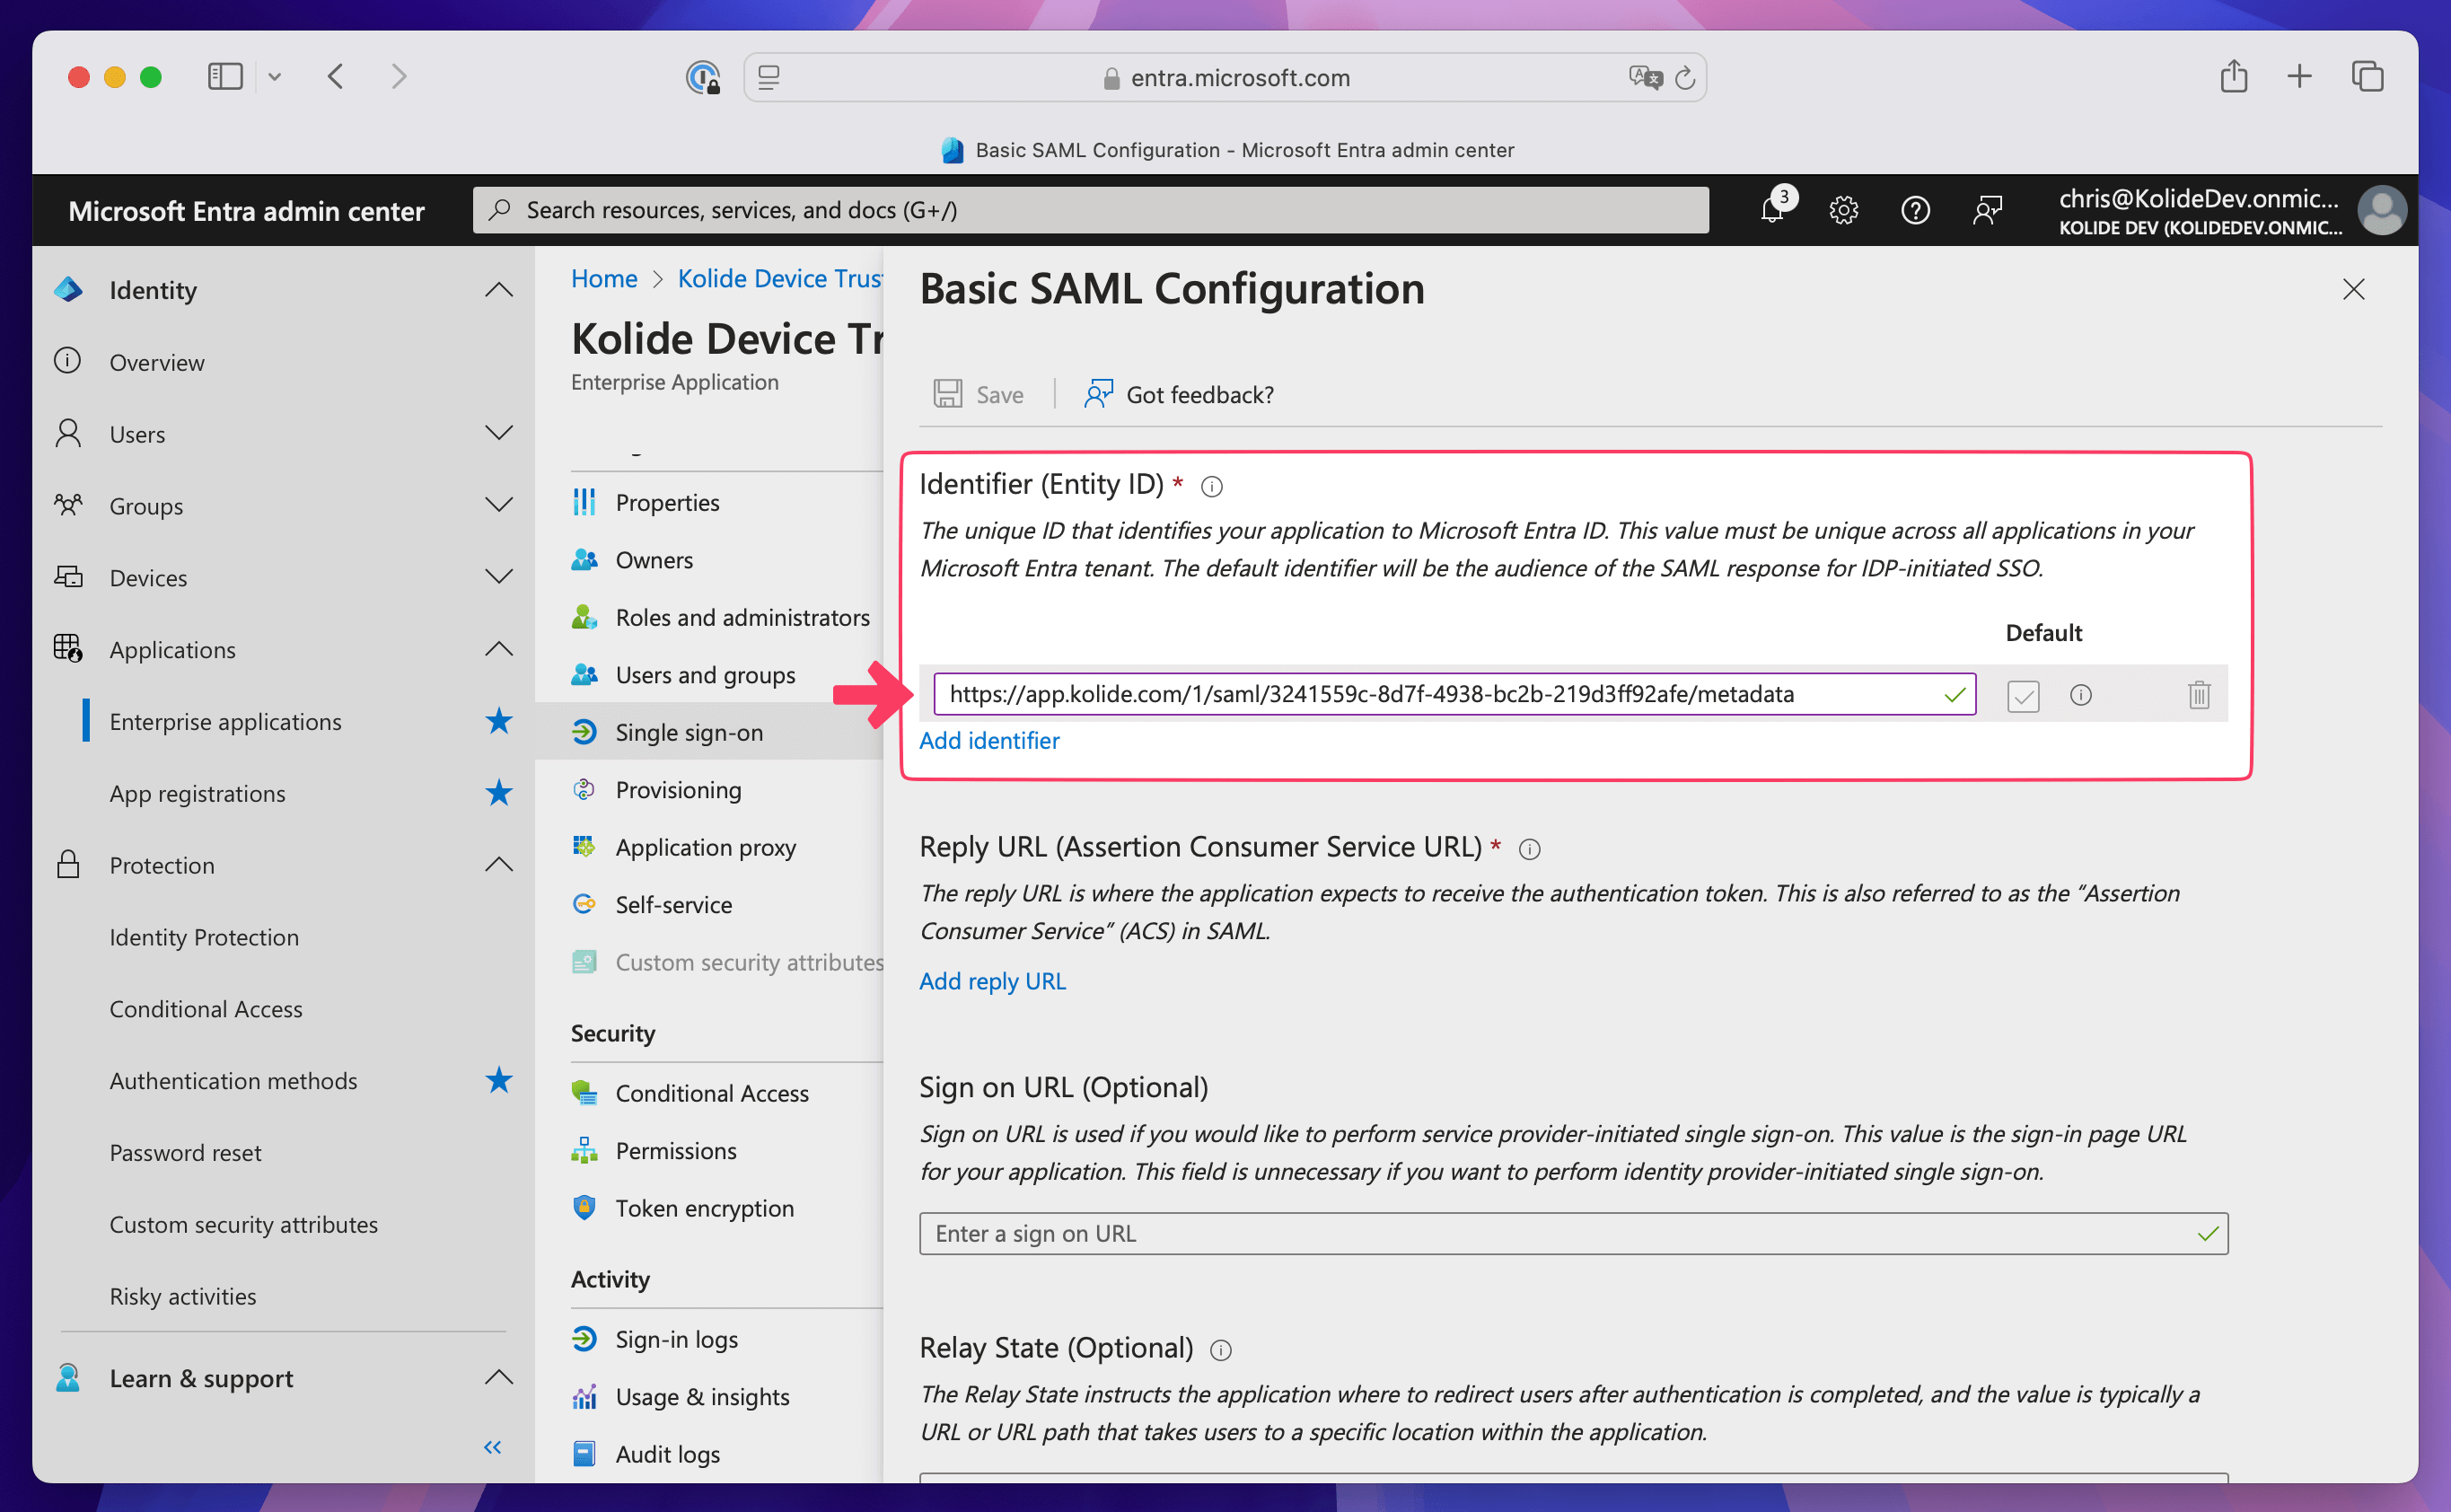
In the Identifier (Entity ID) section, select Add identifier.
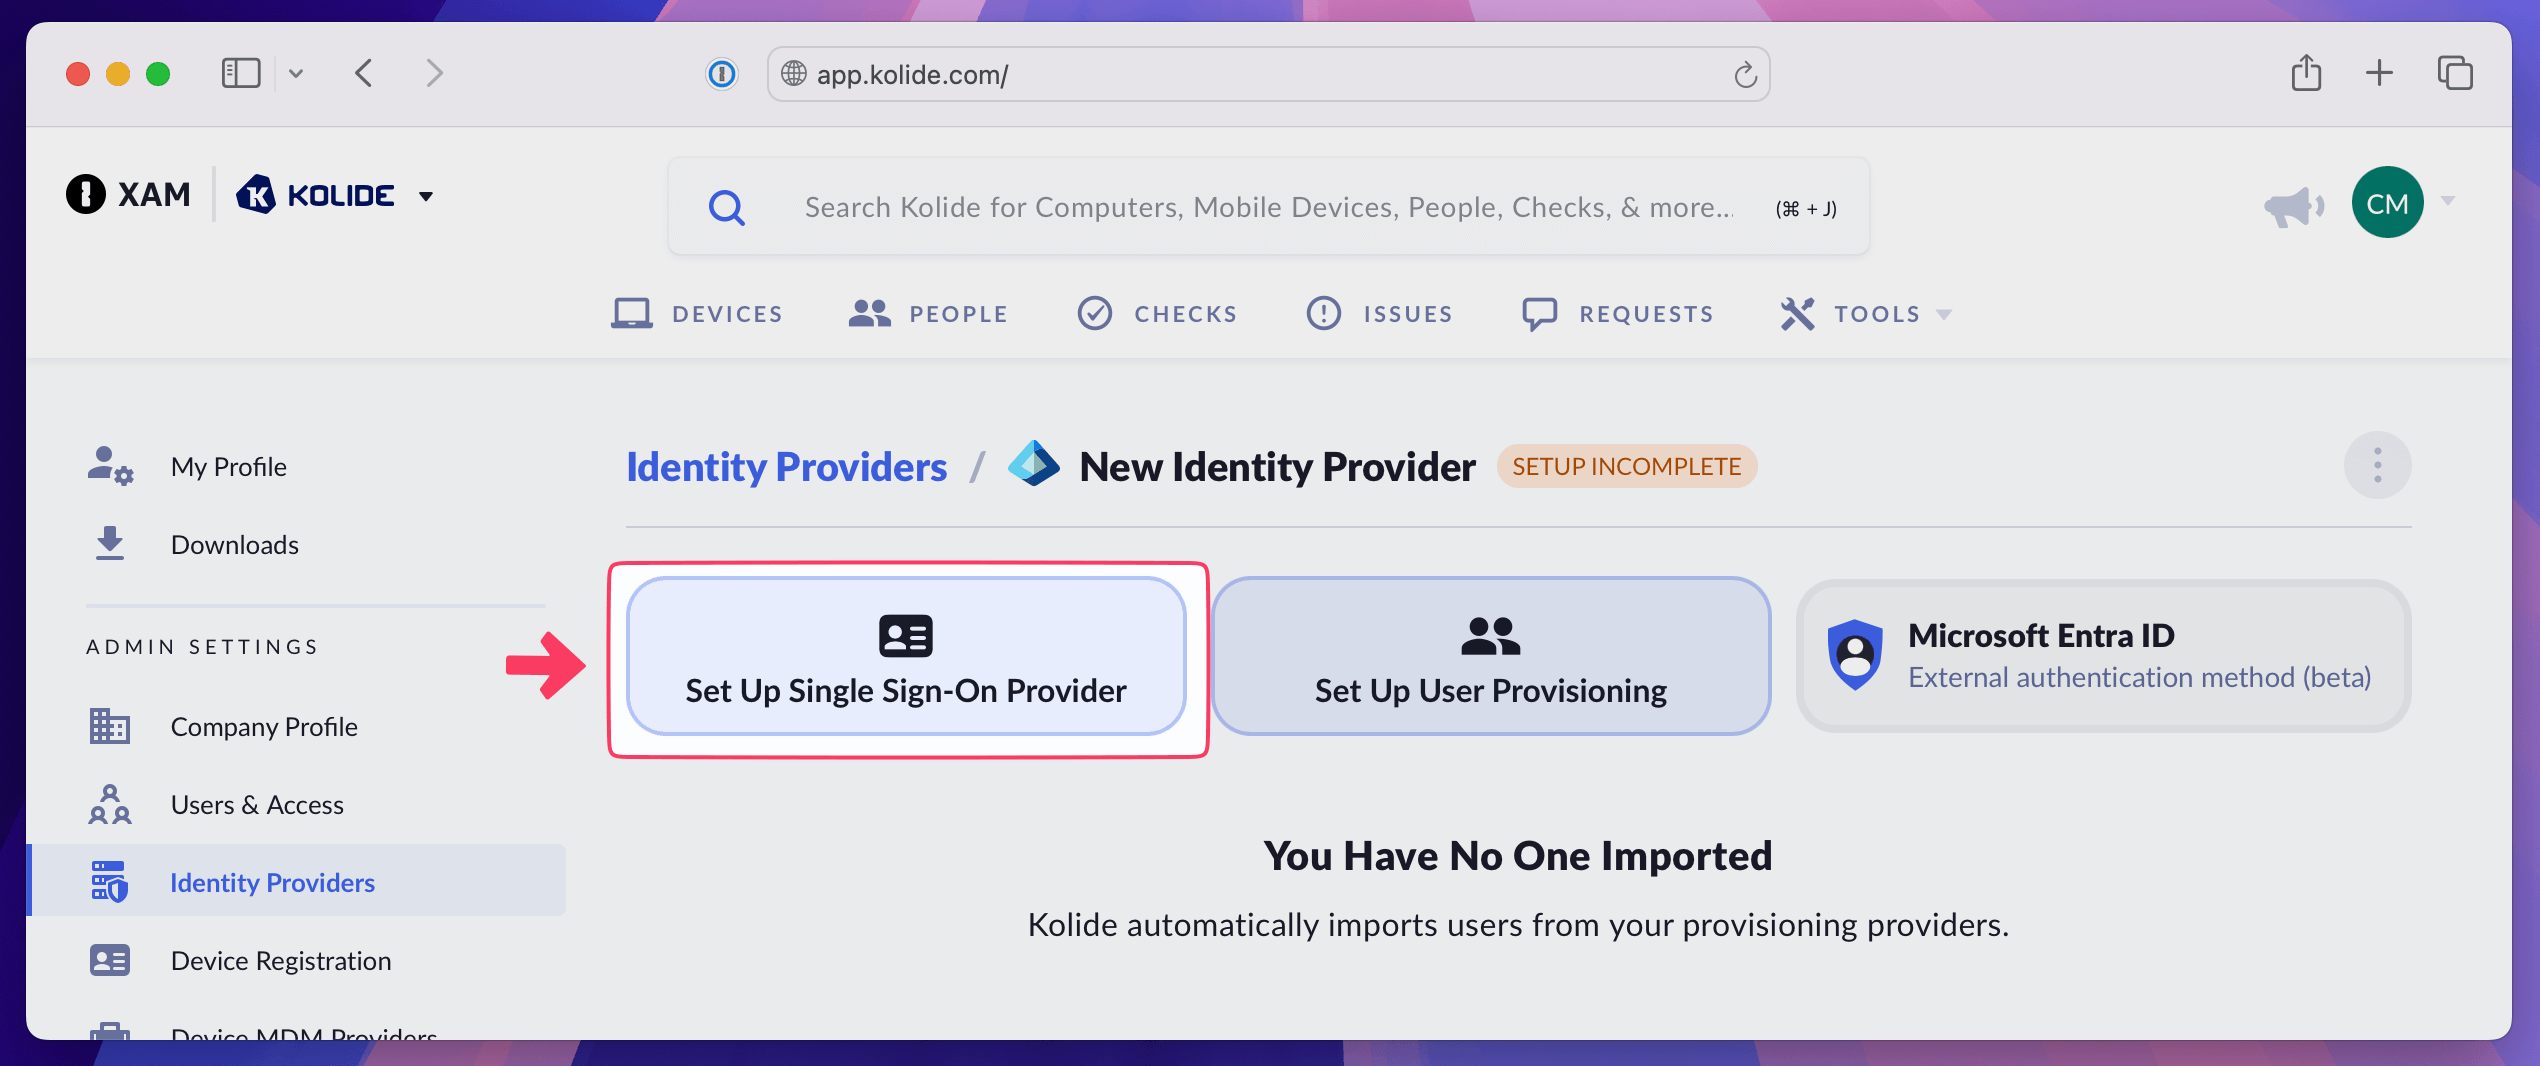
In Kolide, choose Set Up Single Sign On Provider.
In Kolide, copy the Kolide Entity ID, then paste it into the Enter an identifier field in Entra ID.
Add the Reply URL
In Entra ID, select Add reply URL in the Reply URL (Assertion Consumer Service URL) section.
In Kolide, copy the Kolide ACS URL and paste it into the Enter a reply URL field in Entra ID.
In Entra ID, select Save, then select X in the top-right to close the Basic SAML Configuration overlay.
Select No, I’ll test later in the “Test single sign-on with Kolide Device Trust SSO” notification.
Configure Kolide Device Trust SSO to link with Entra ID
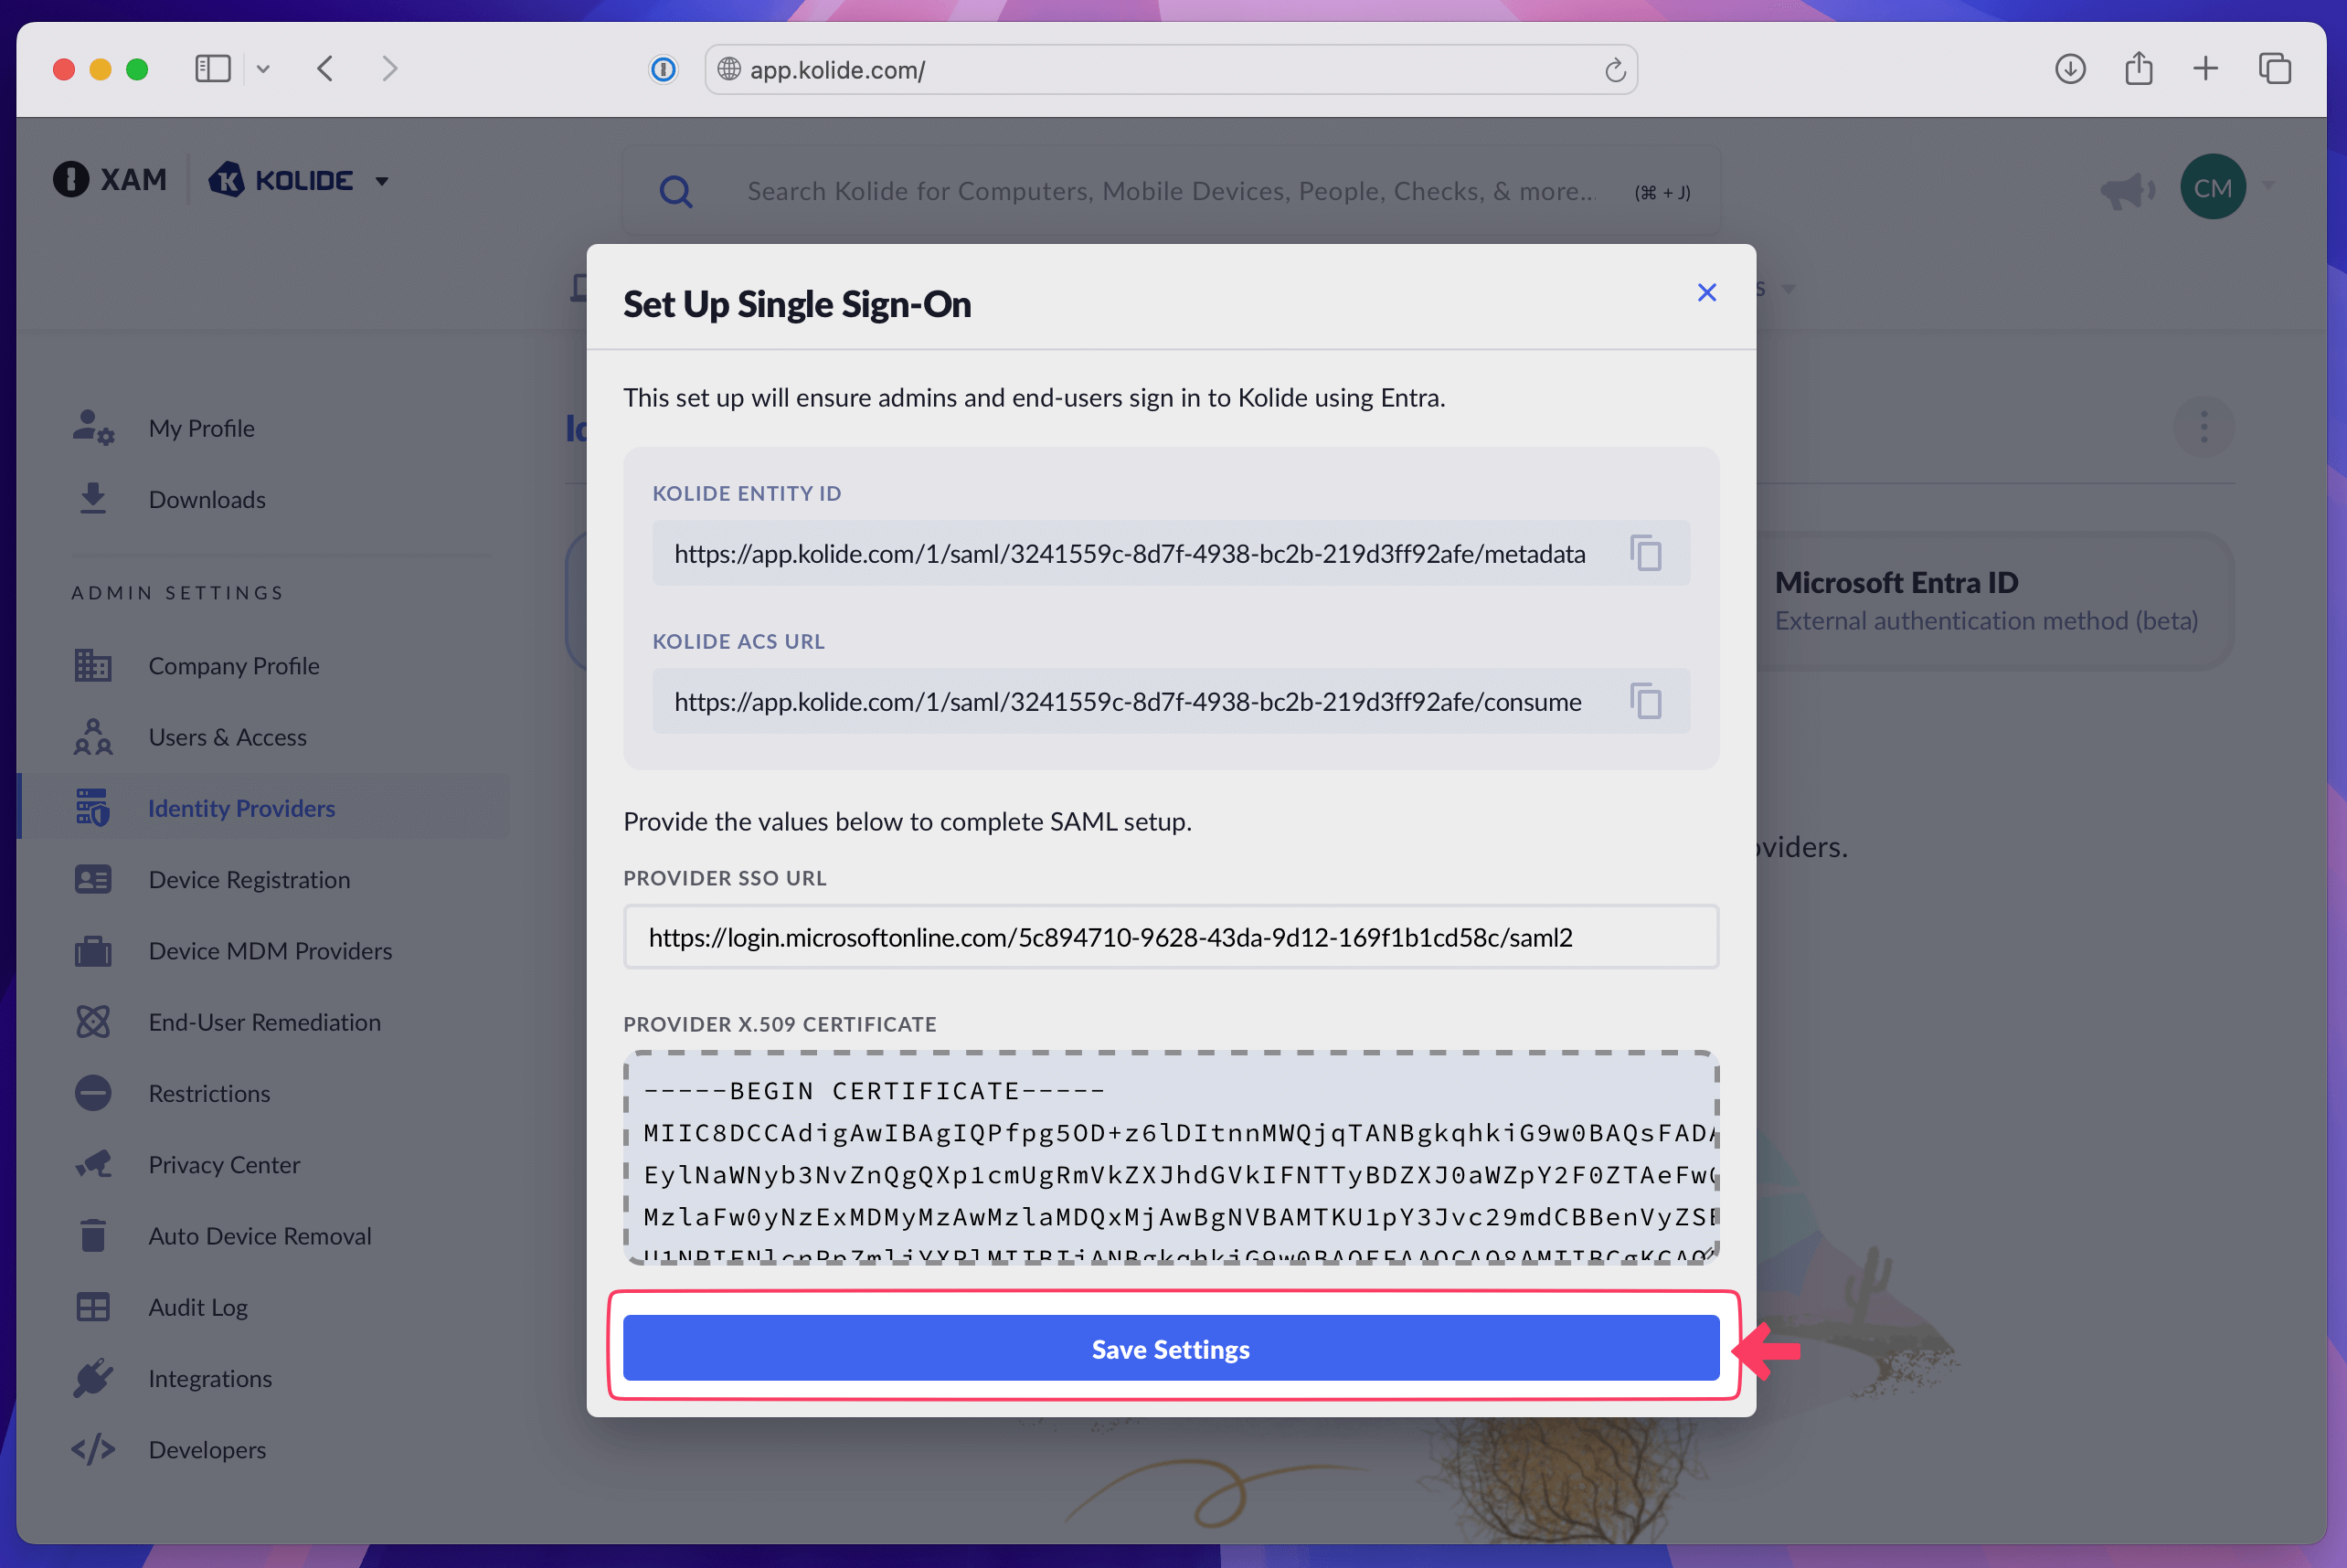
In the “Set up Kolide Device Trust SSO” box in Entra ID, copy the Login URL and paste it into the Provider SSO URL field in Kolide.
In Entra ID, select Download next to Certificate (Base64) in the SAML Certificates box.
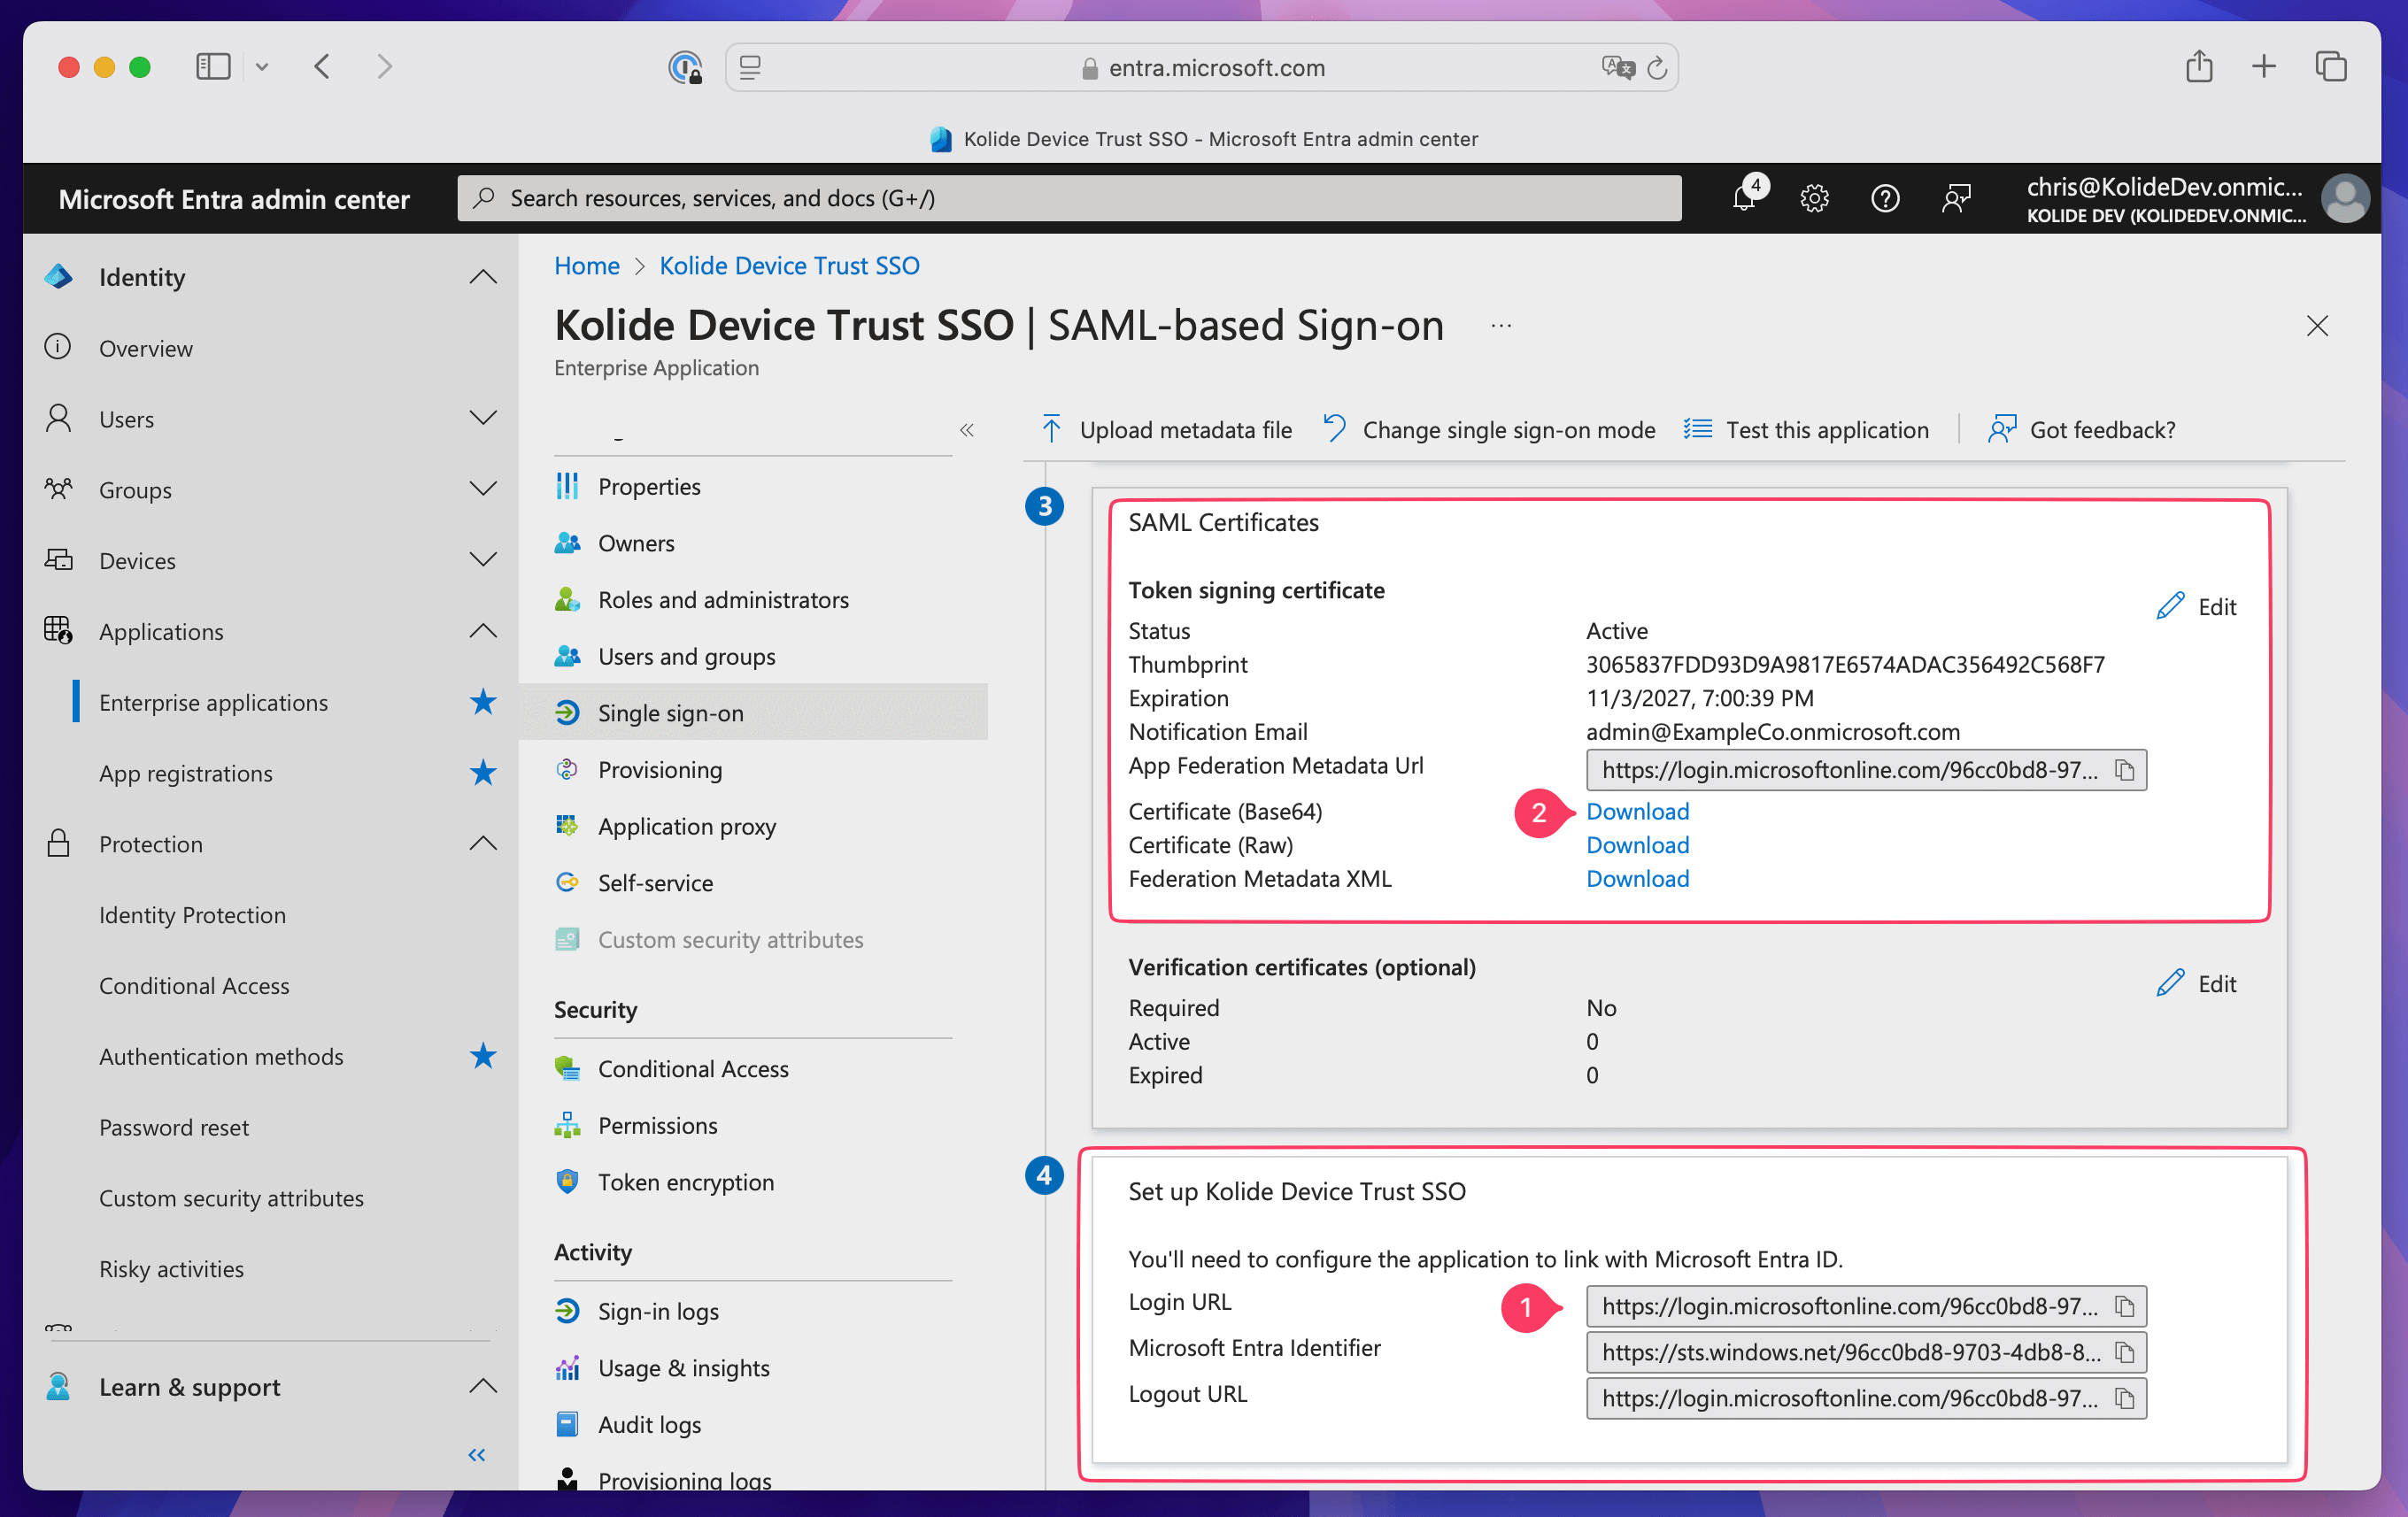
Drag and drop the certificate or copy and paste the contents into the Provider X.509 Certificate box in Kolide.
In Kolide, select Save Settings.
Step 3: Configure SCIM provisioning for Kolide Device Trust
Set up provisioning
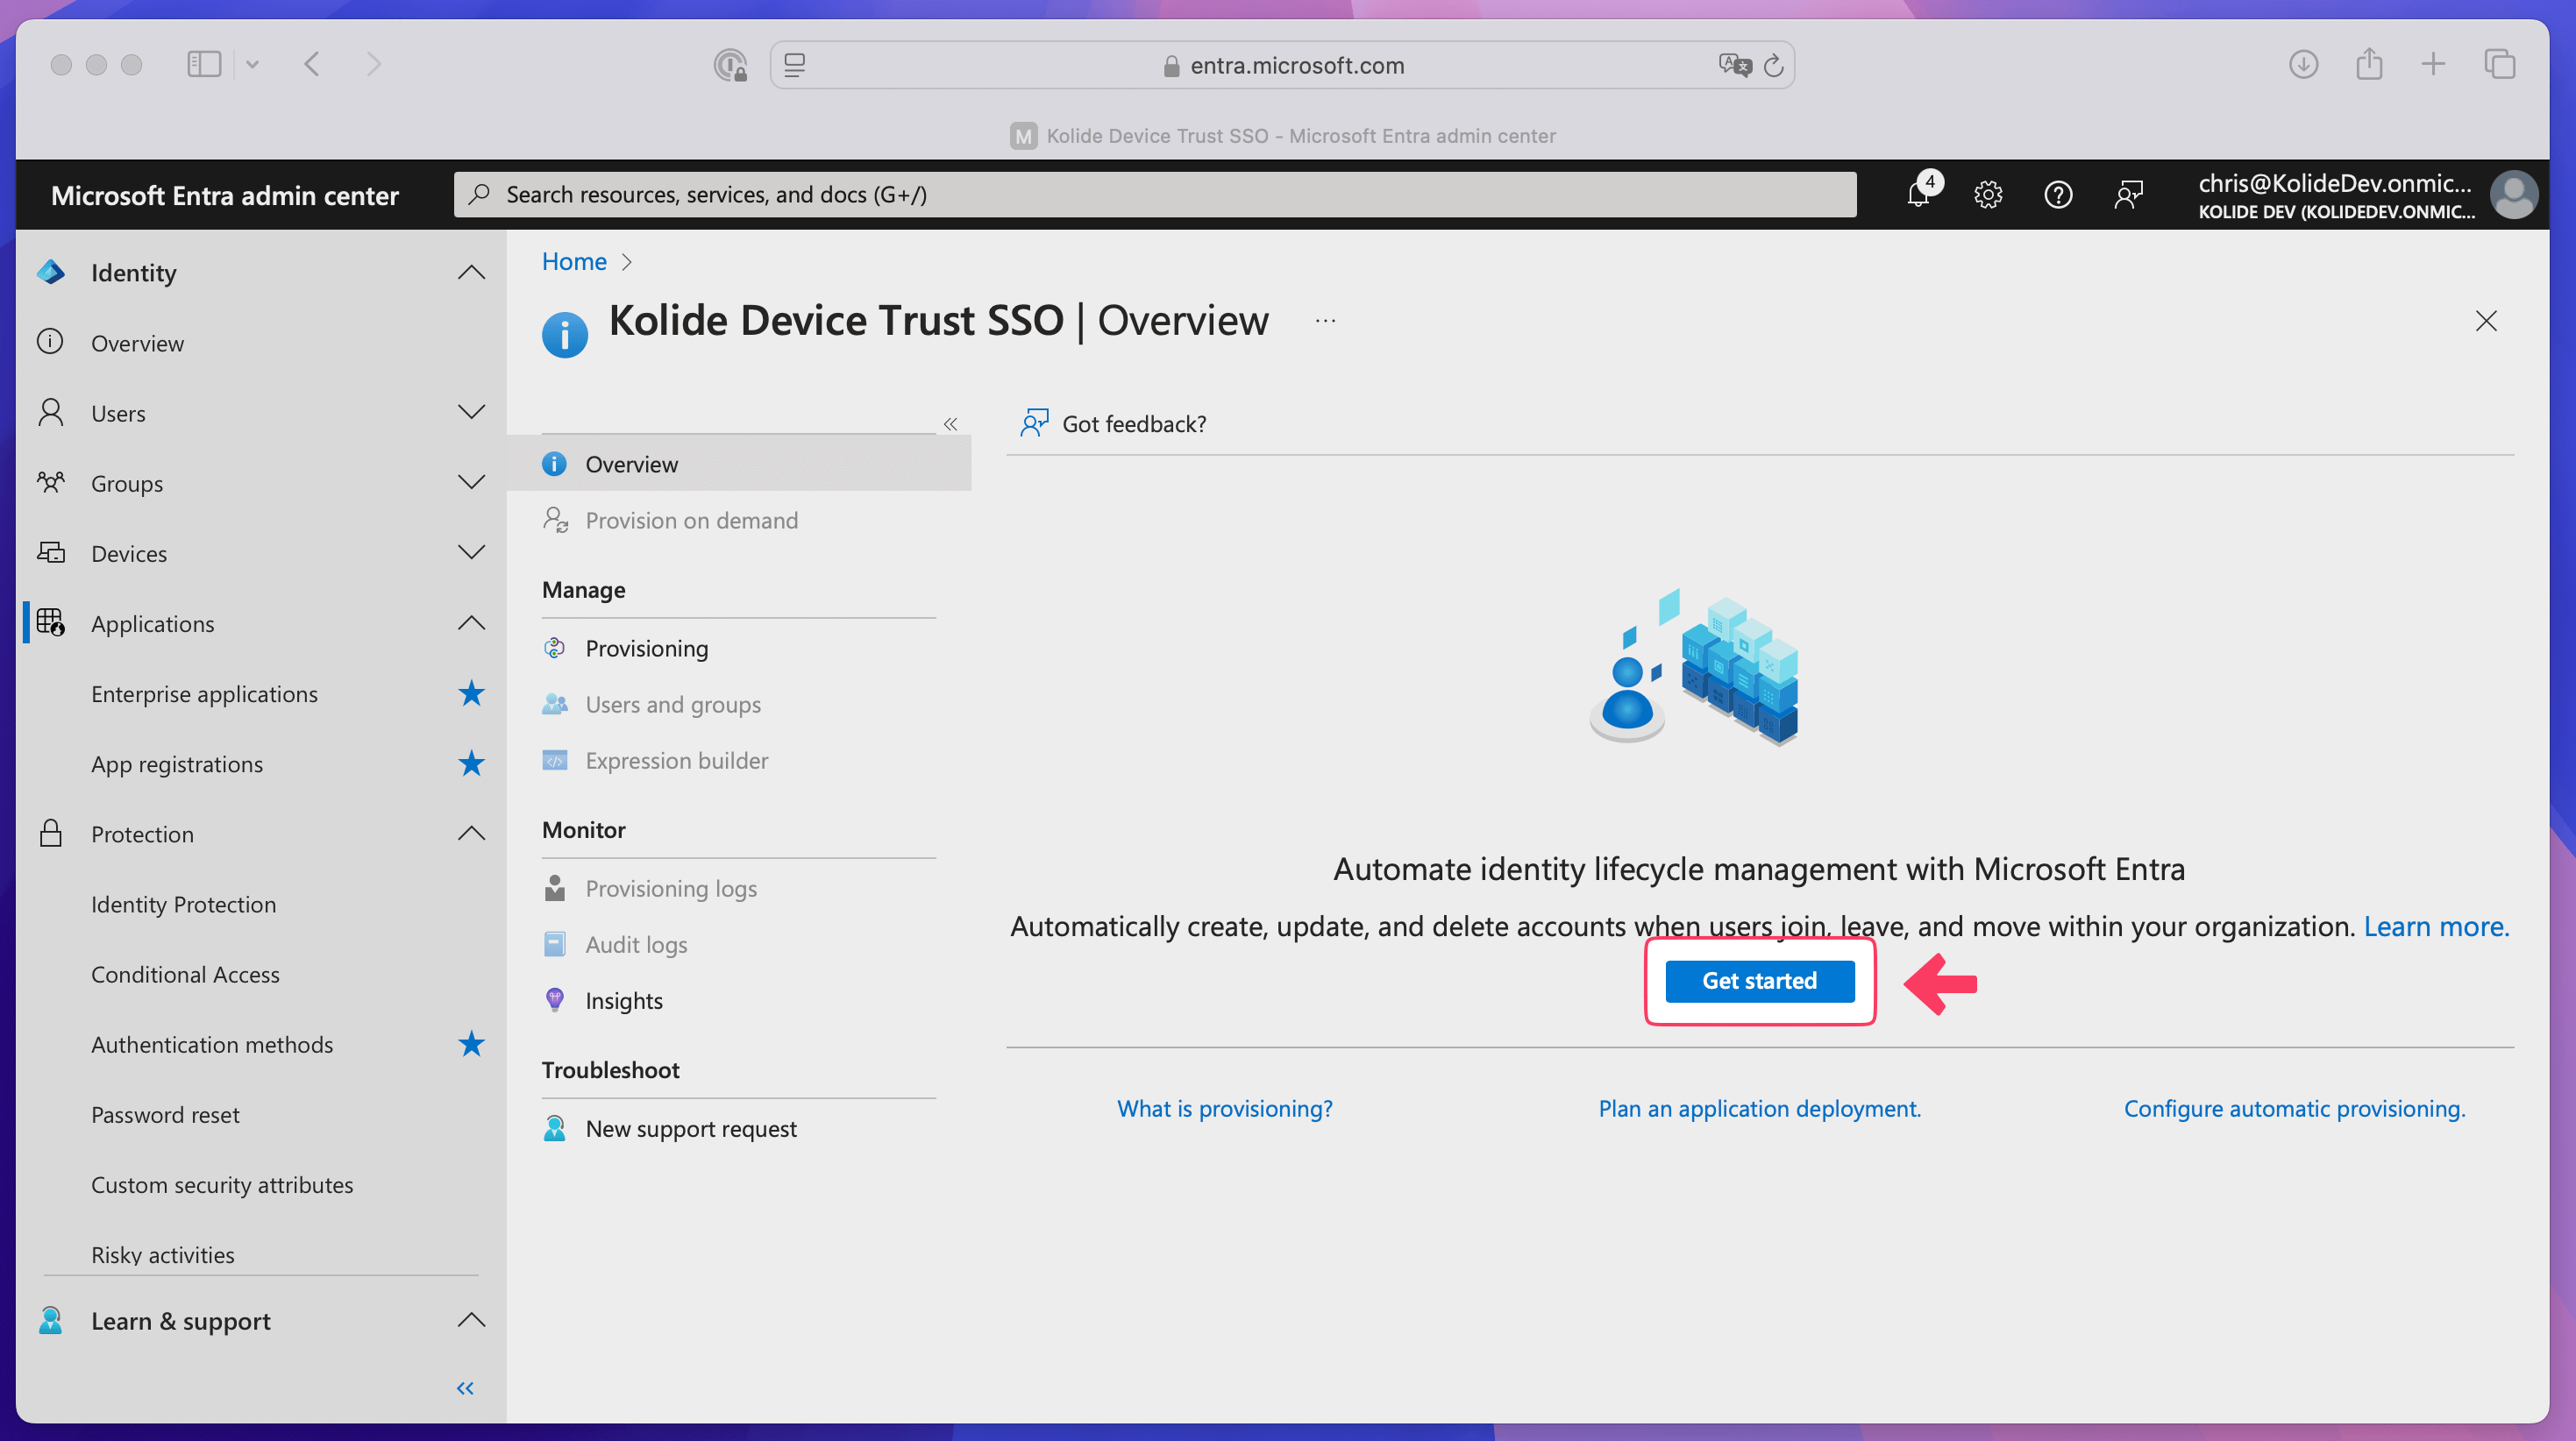
In Entra ID, select Manage > Provisioning in the sidebar.
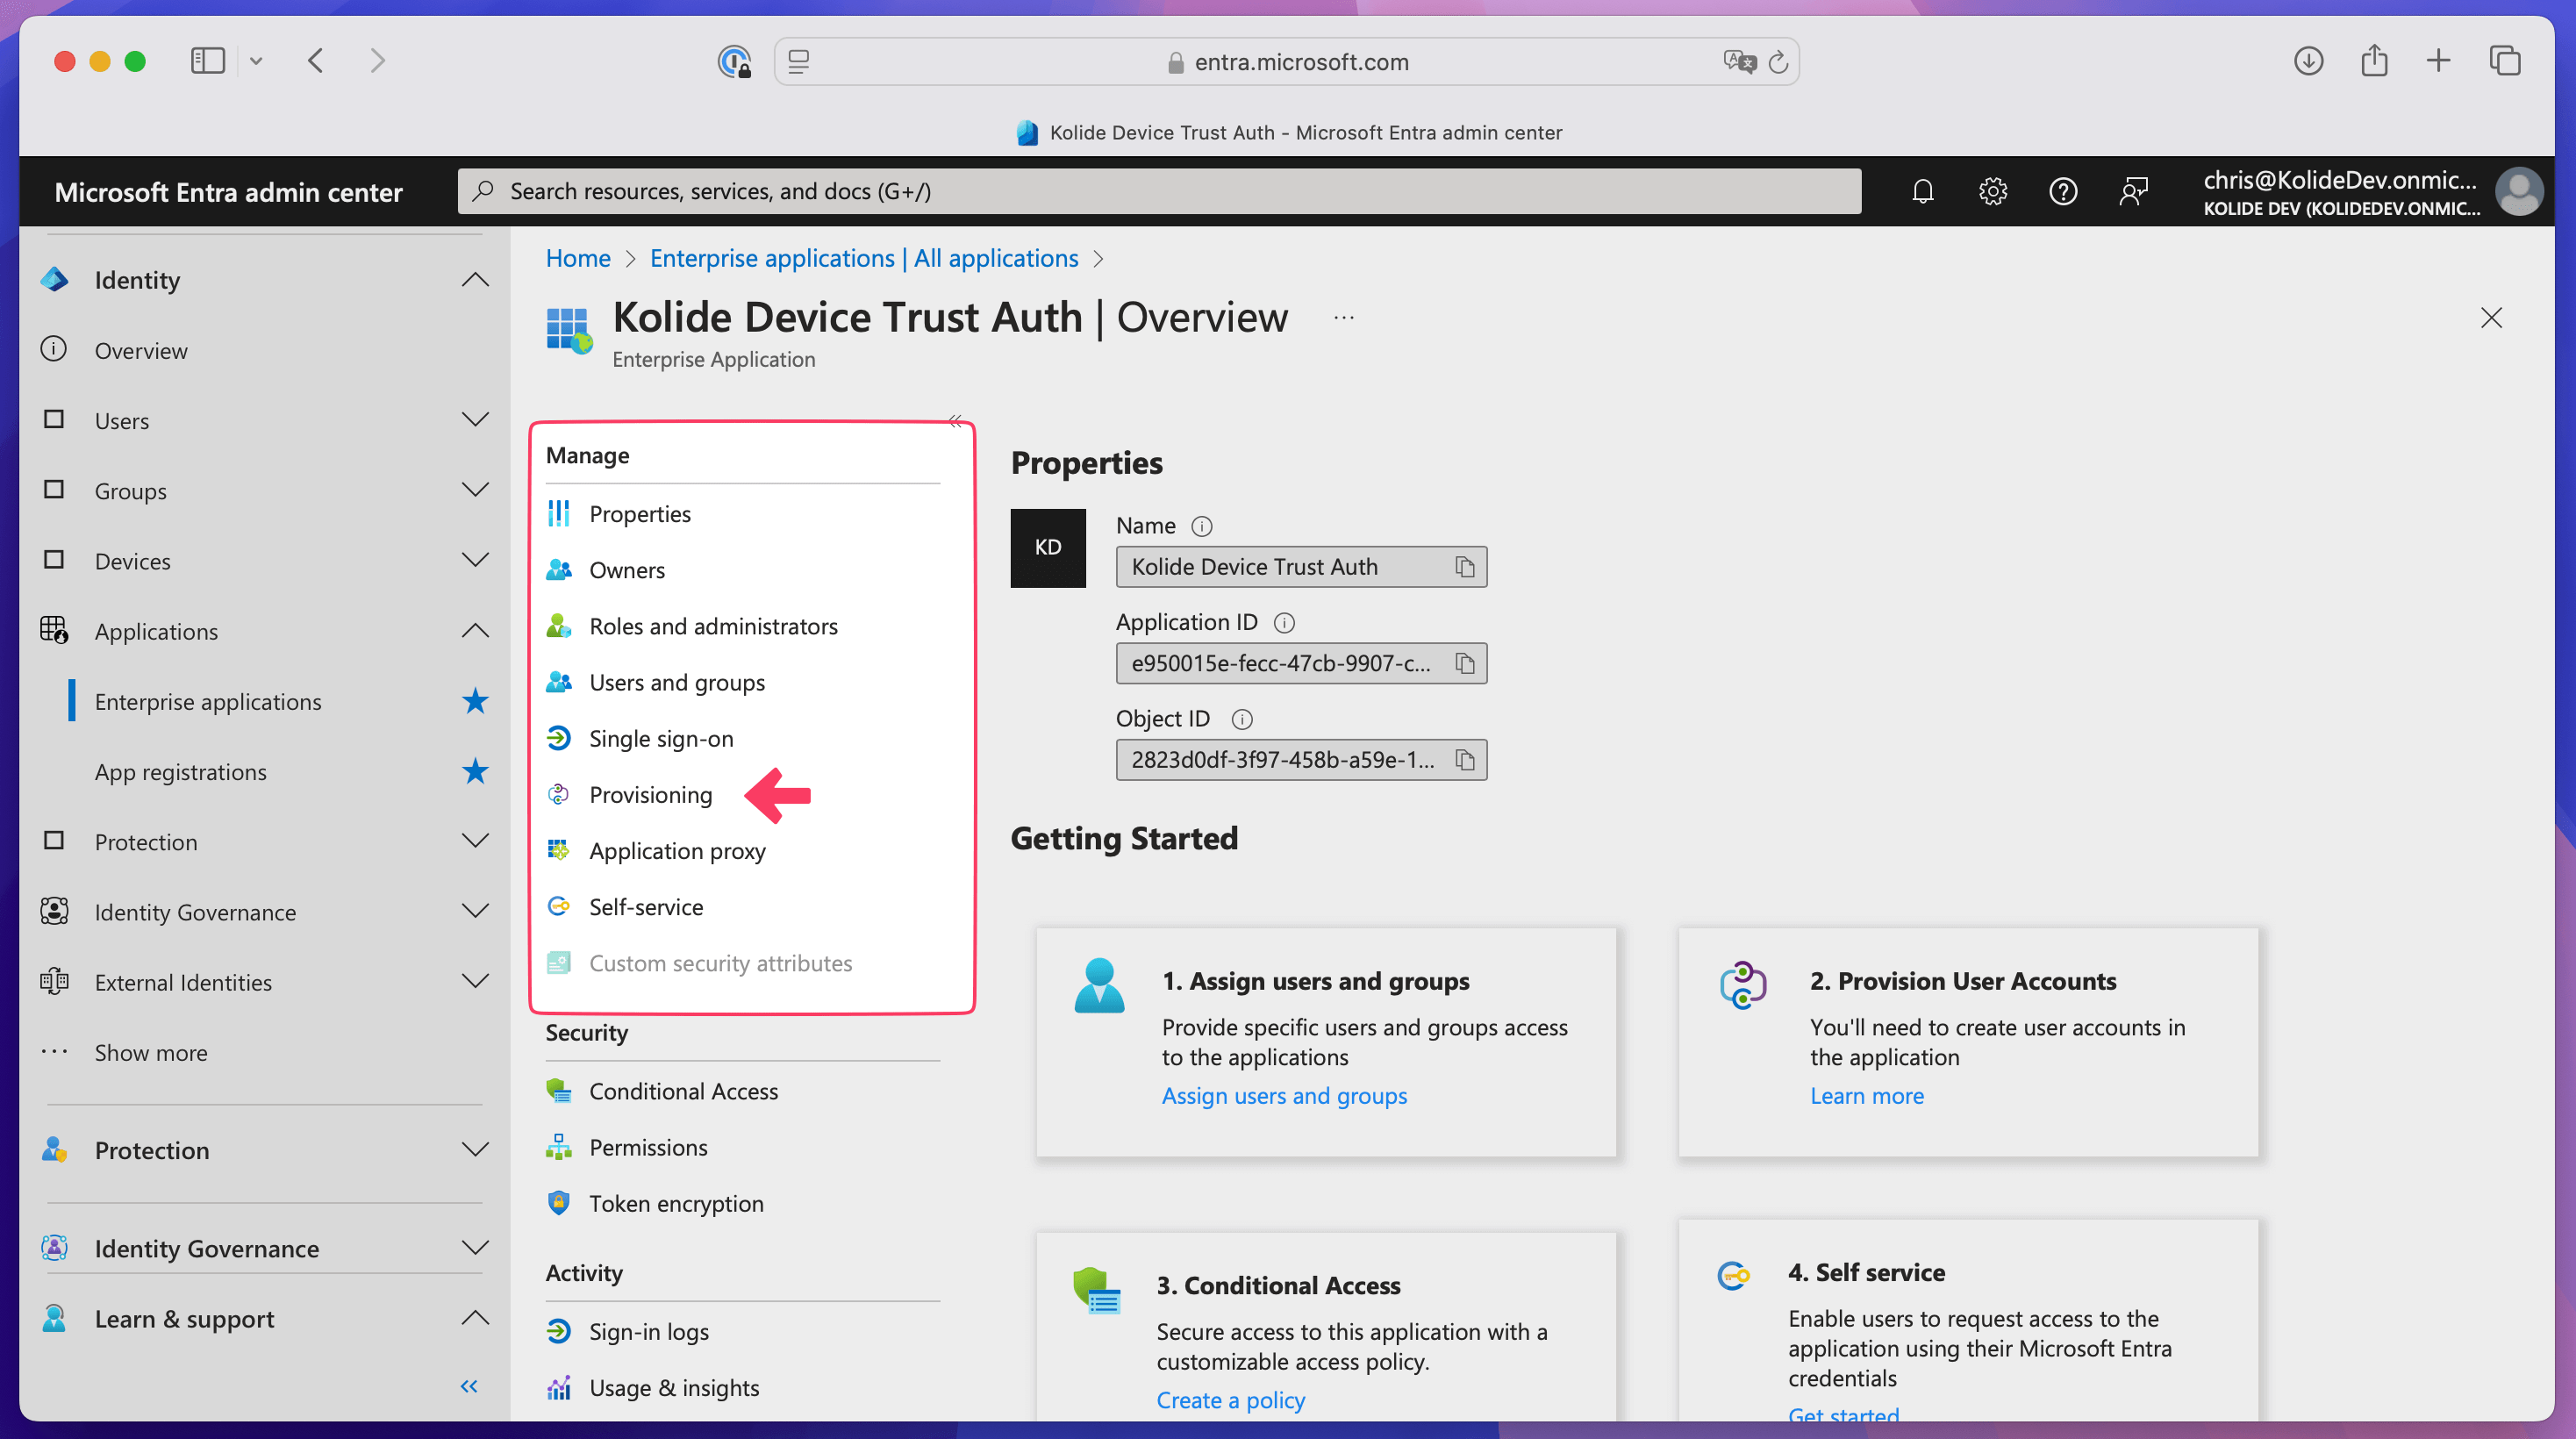
Select Get started.
Choose Automatic from the “Provisioning Mode” dropdown.
Select the Admin Credentials dropdown.
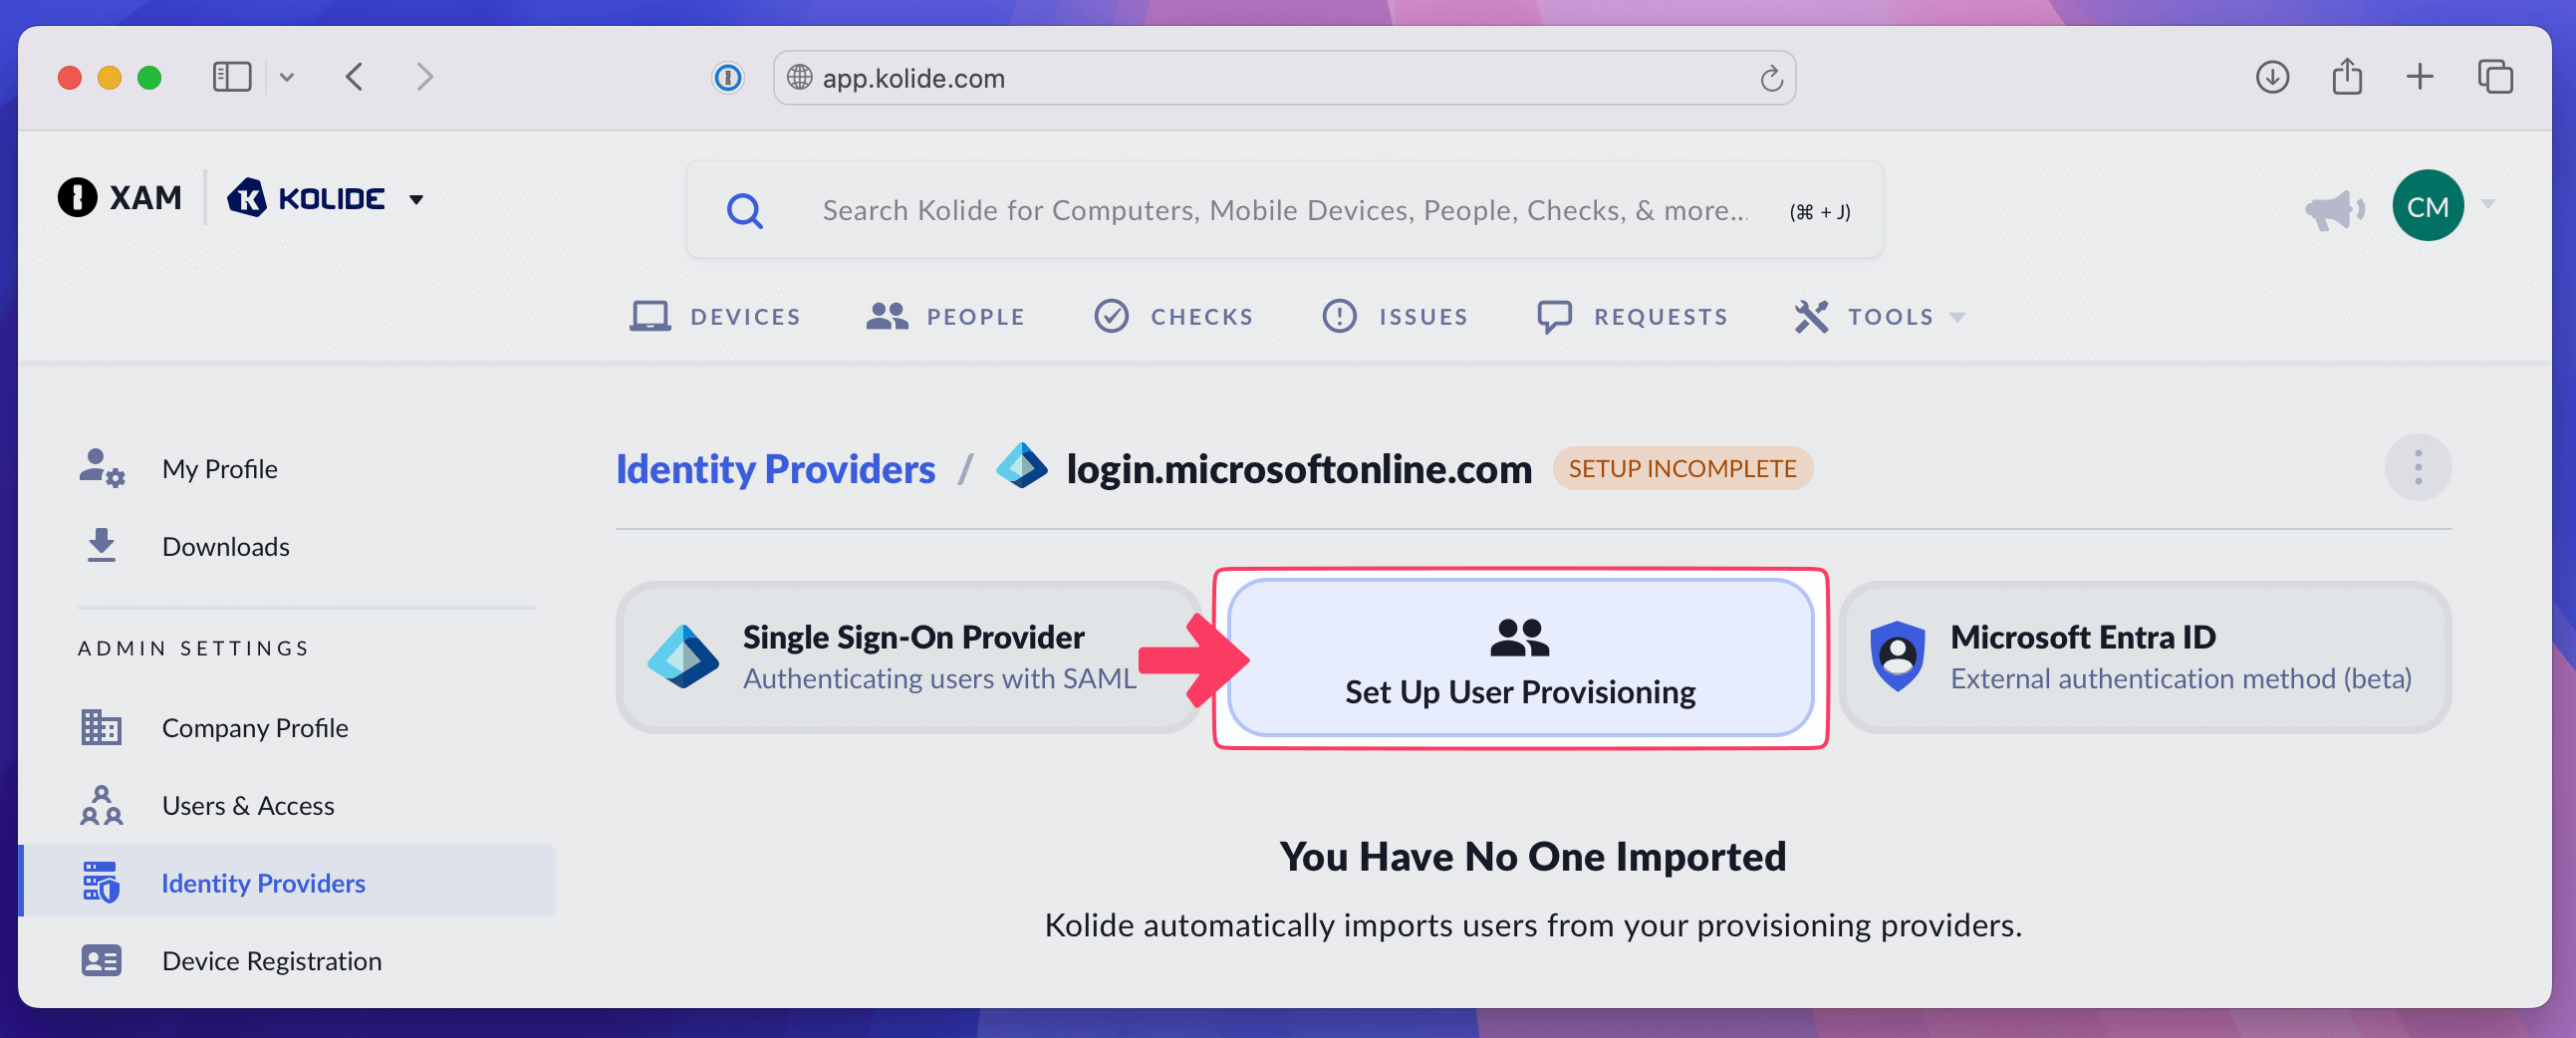
In Kolide, choose Set Up User Provisioning.
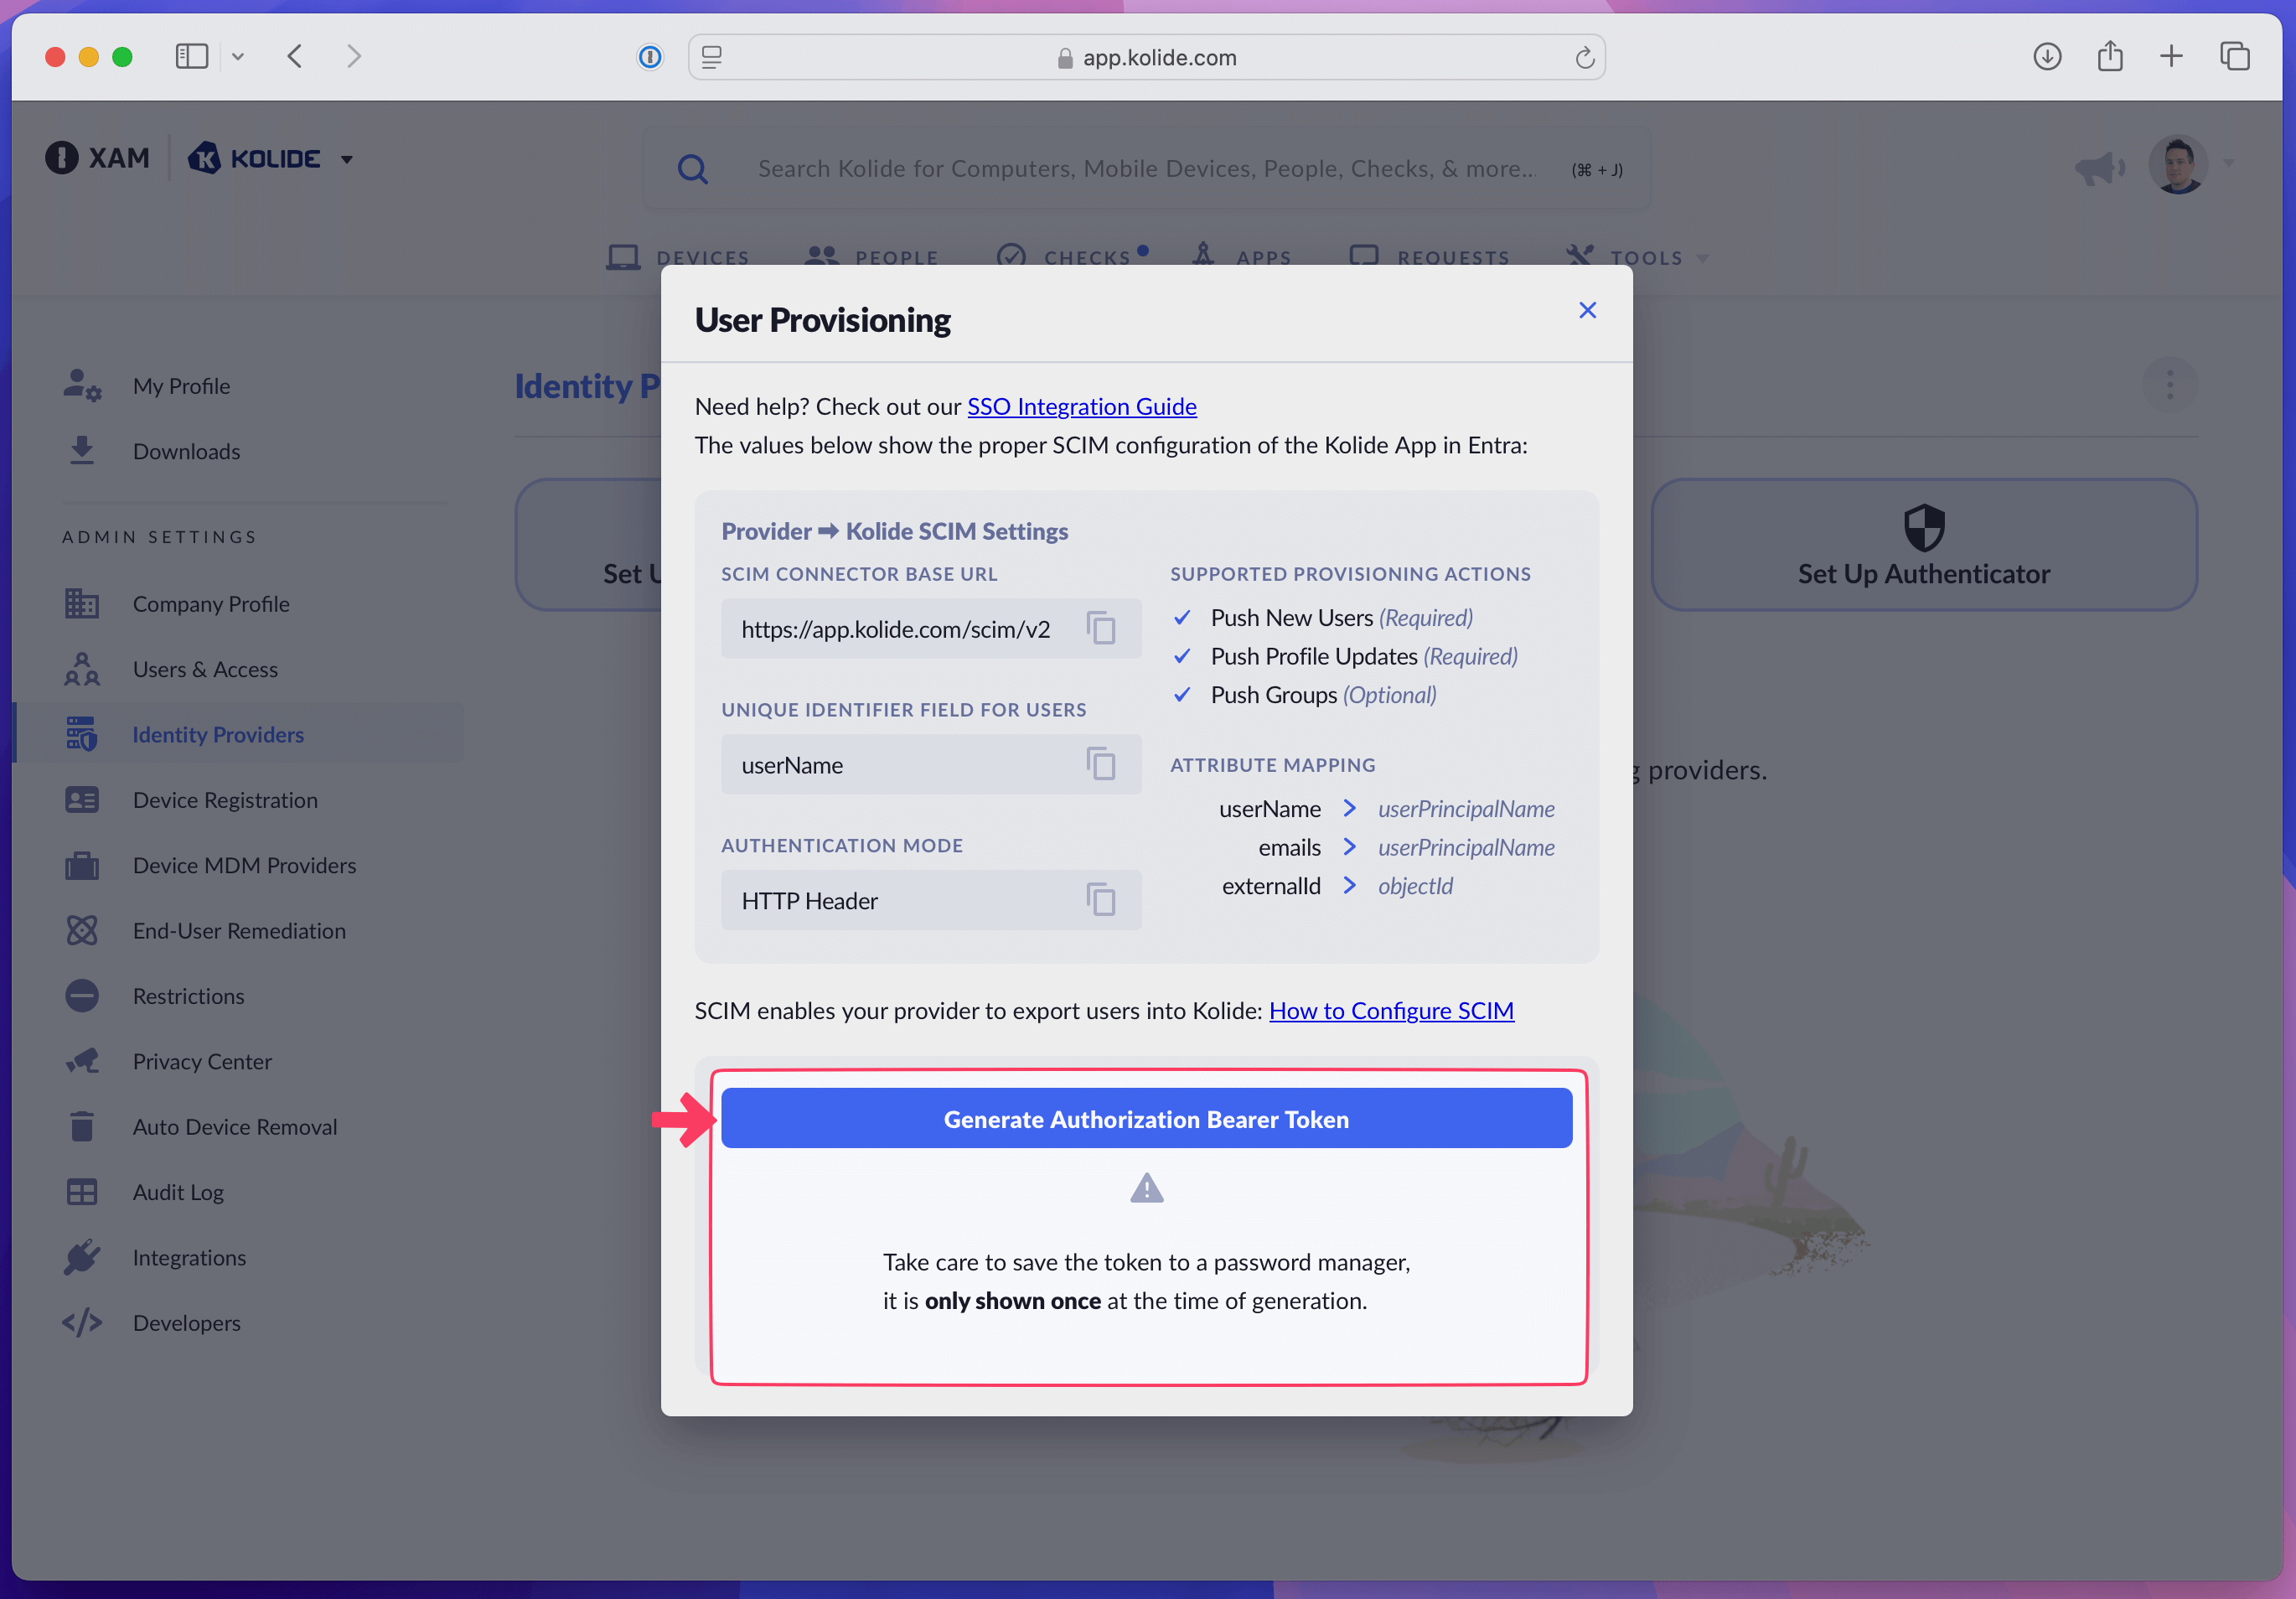
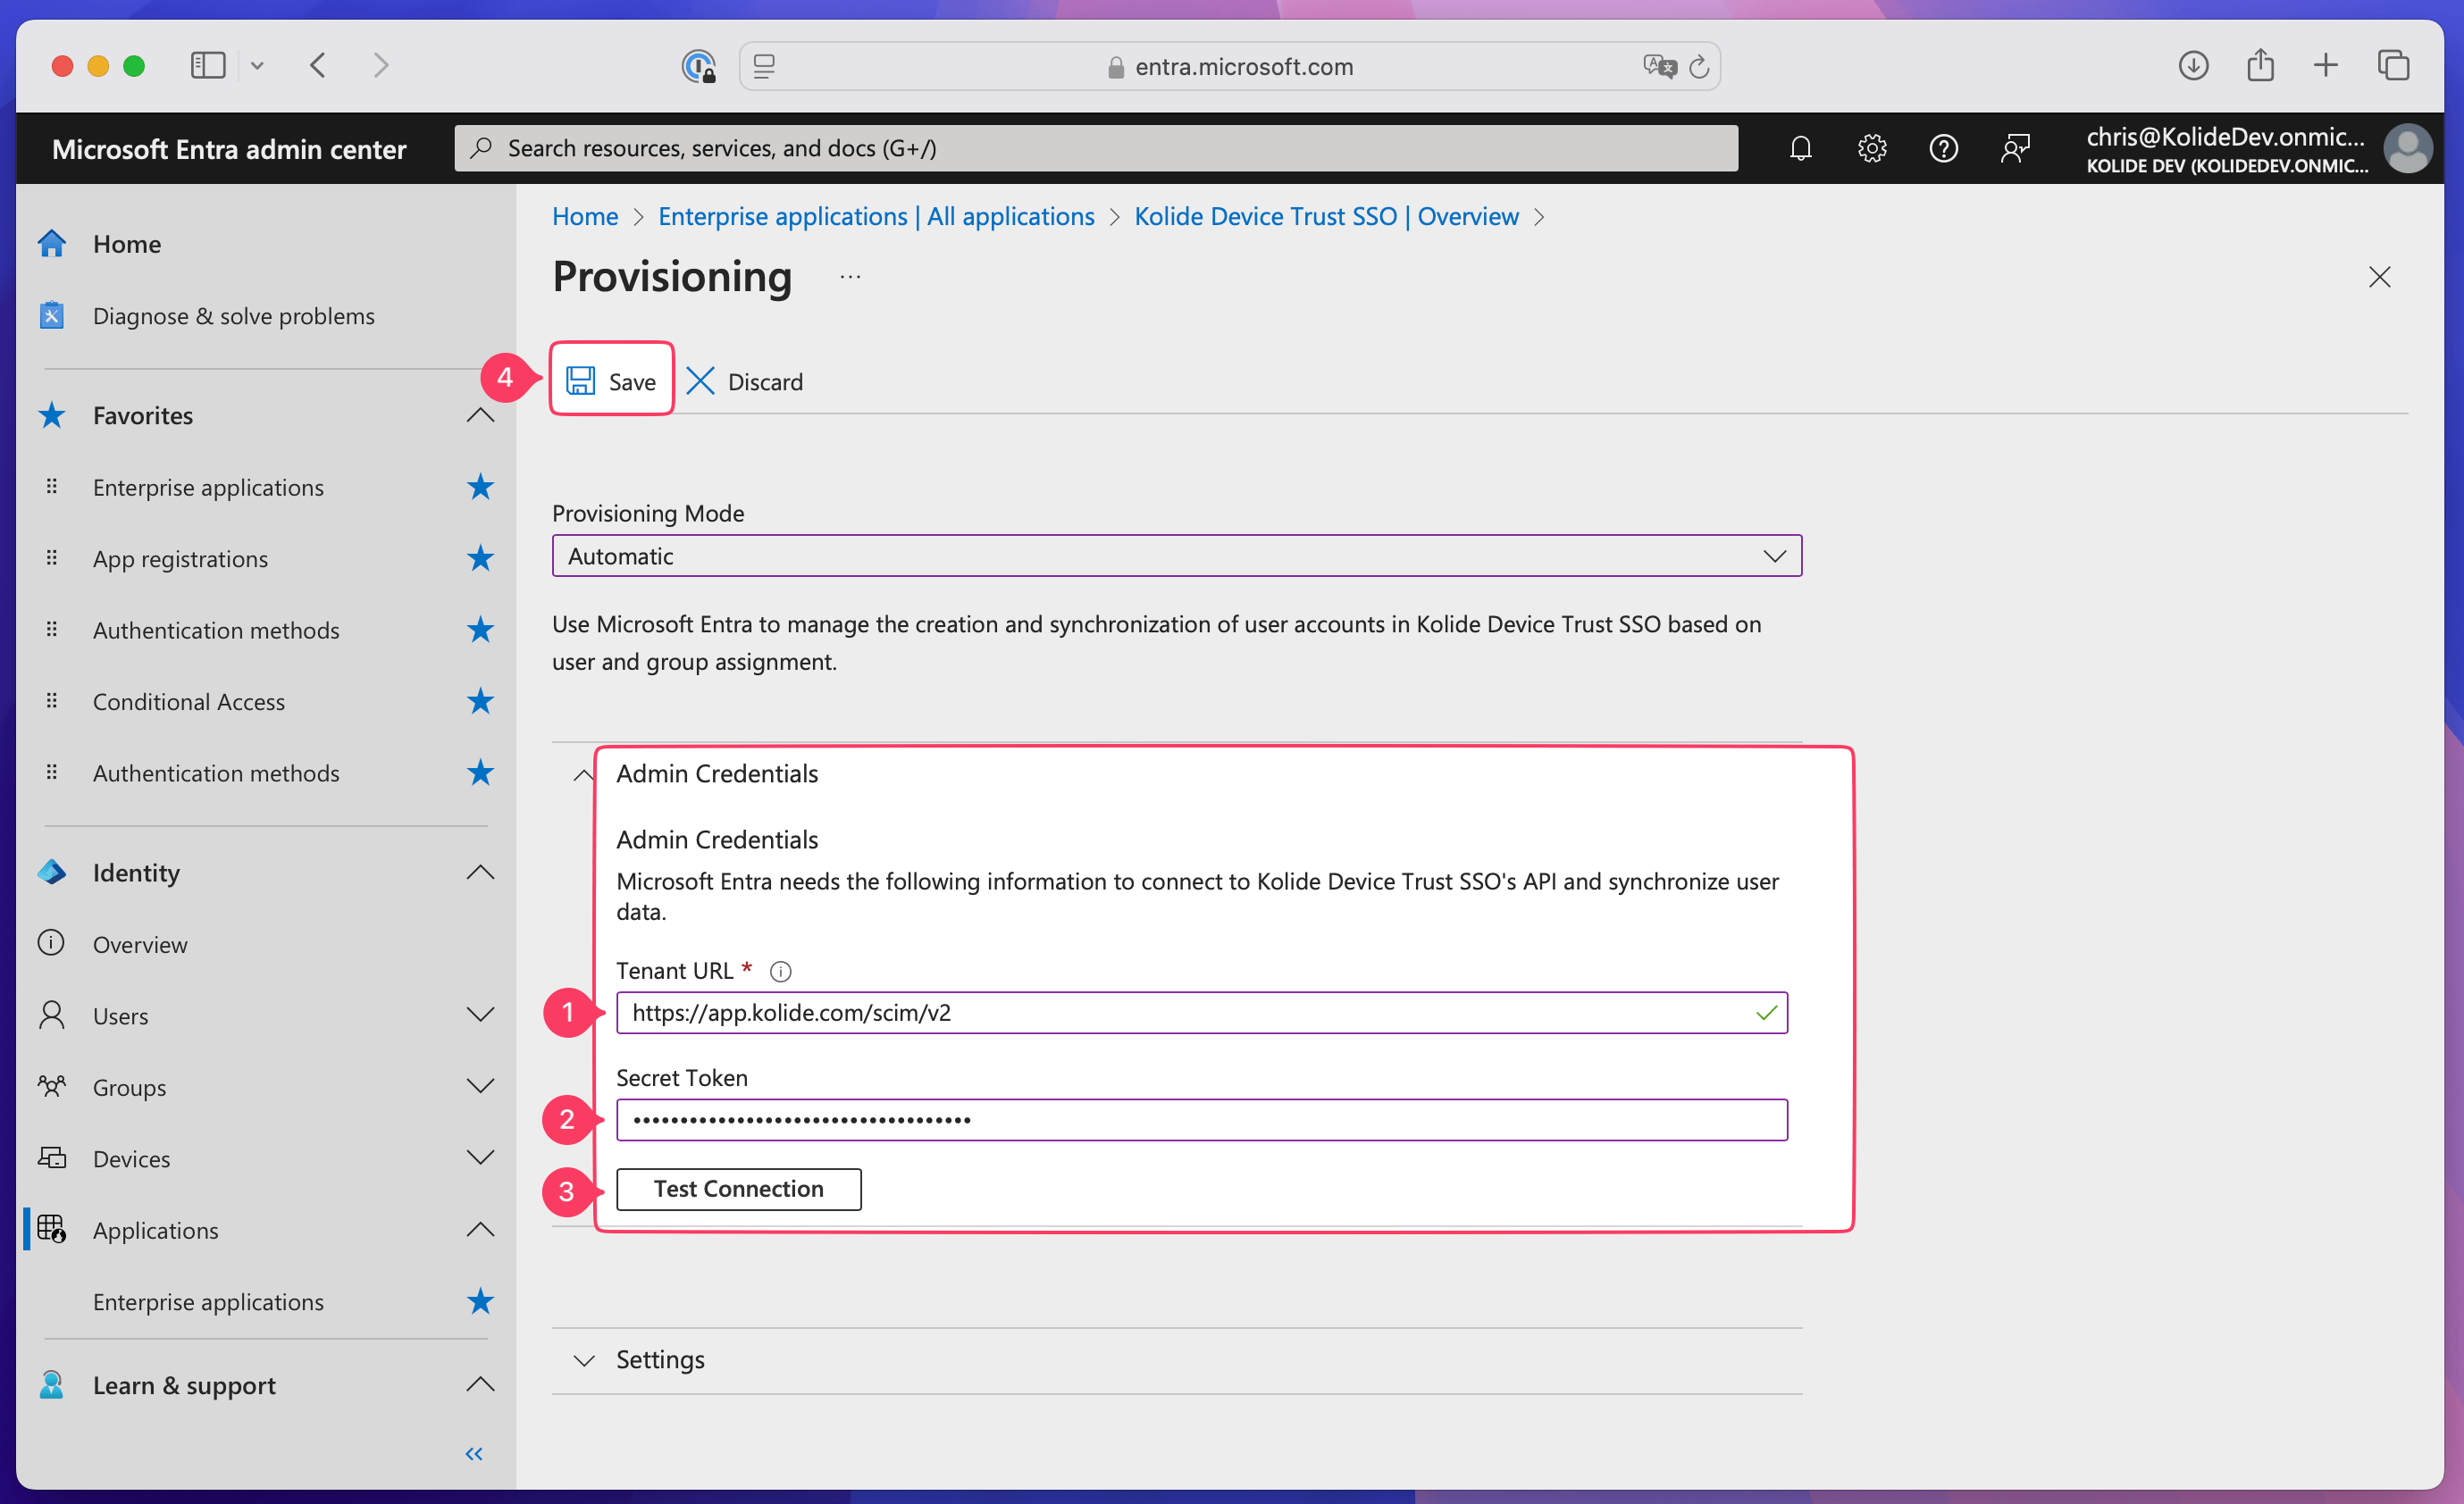
In Kolide, copy the SCIM Connector Base URL and paste it into the Tenant URL field in the Admin Credentials section of Entra ID.
In Kolide, select Generate Authorization Bearer Token and copy the generated token.
Paste the bearer token into the Secret Token field in the Admin Credentials section of Entra ID.
In Entra ID, select Test Connection, then select Save when the testing is complete.
Map attributes
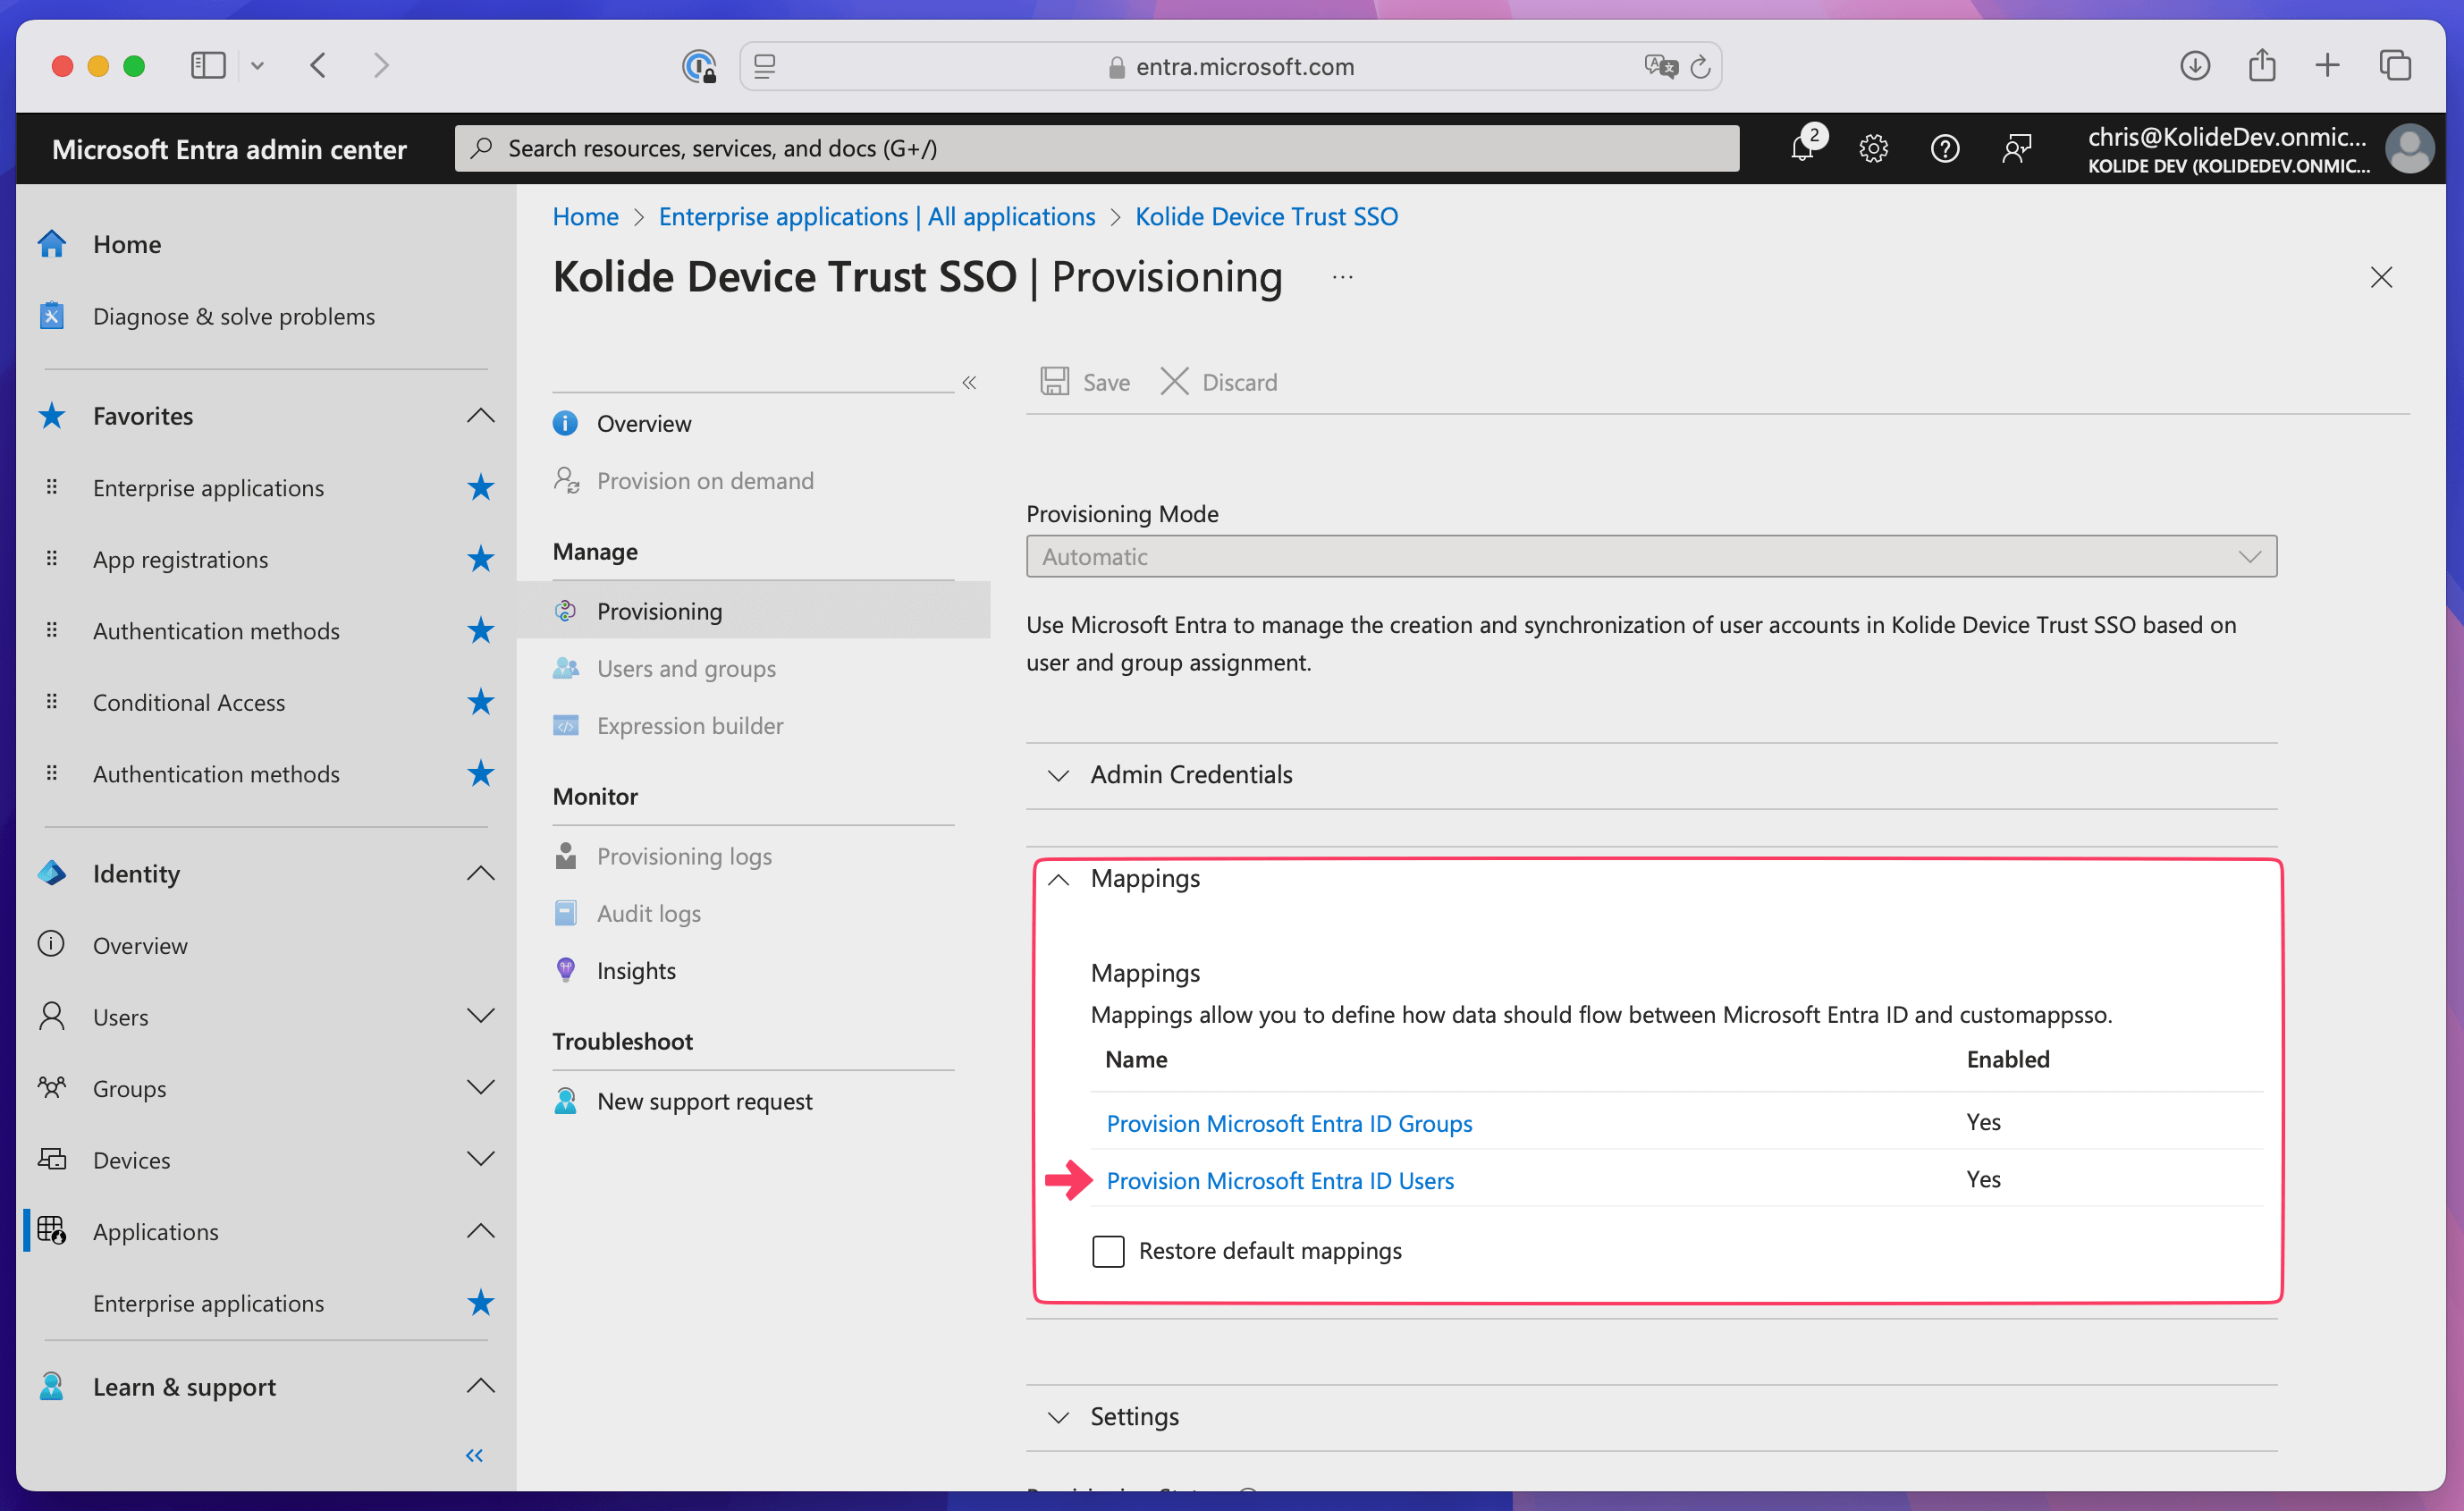
In Entra ID, select the Mappings dropdown and choose Provision Microsoft Entra ID Users.
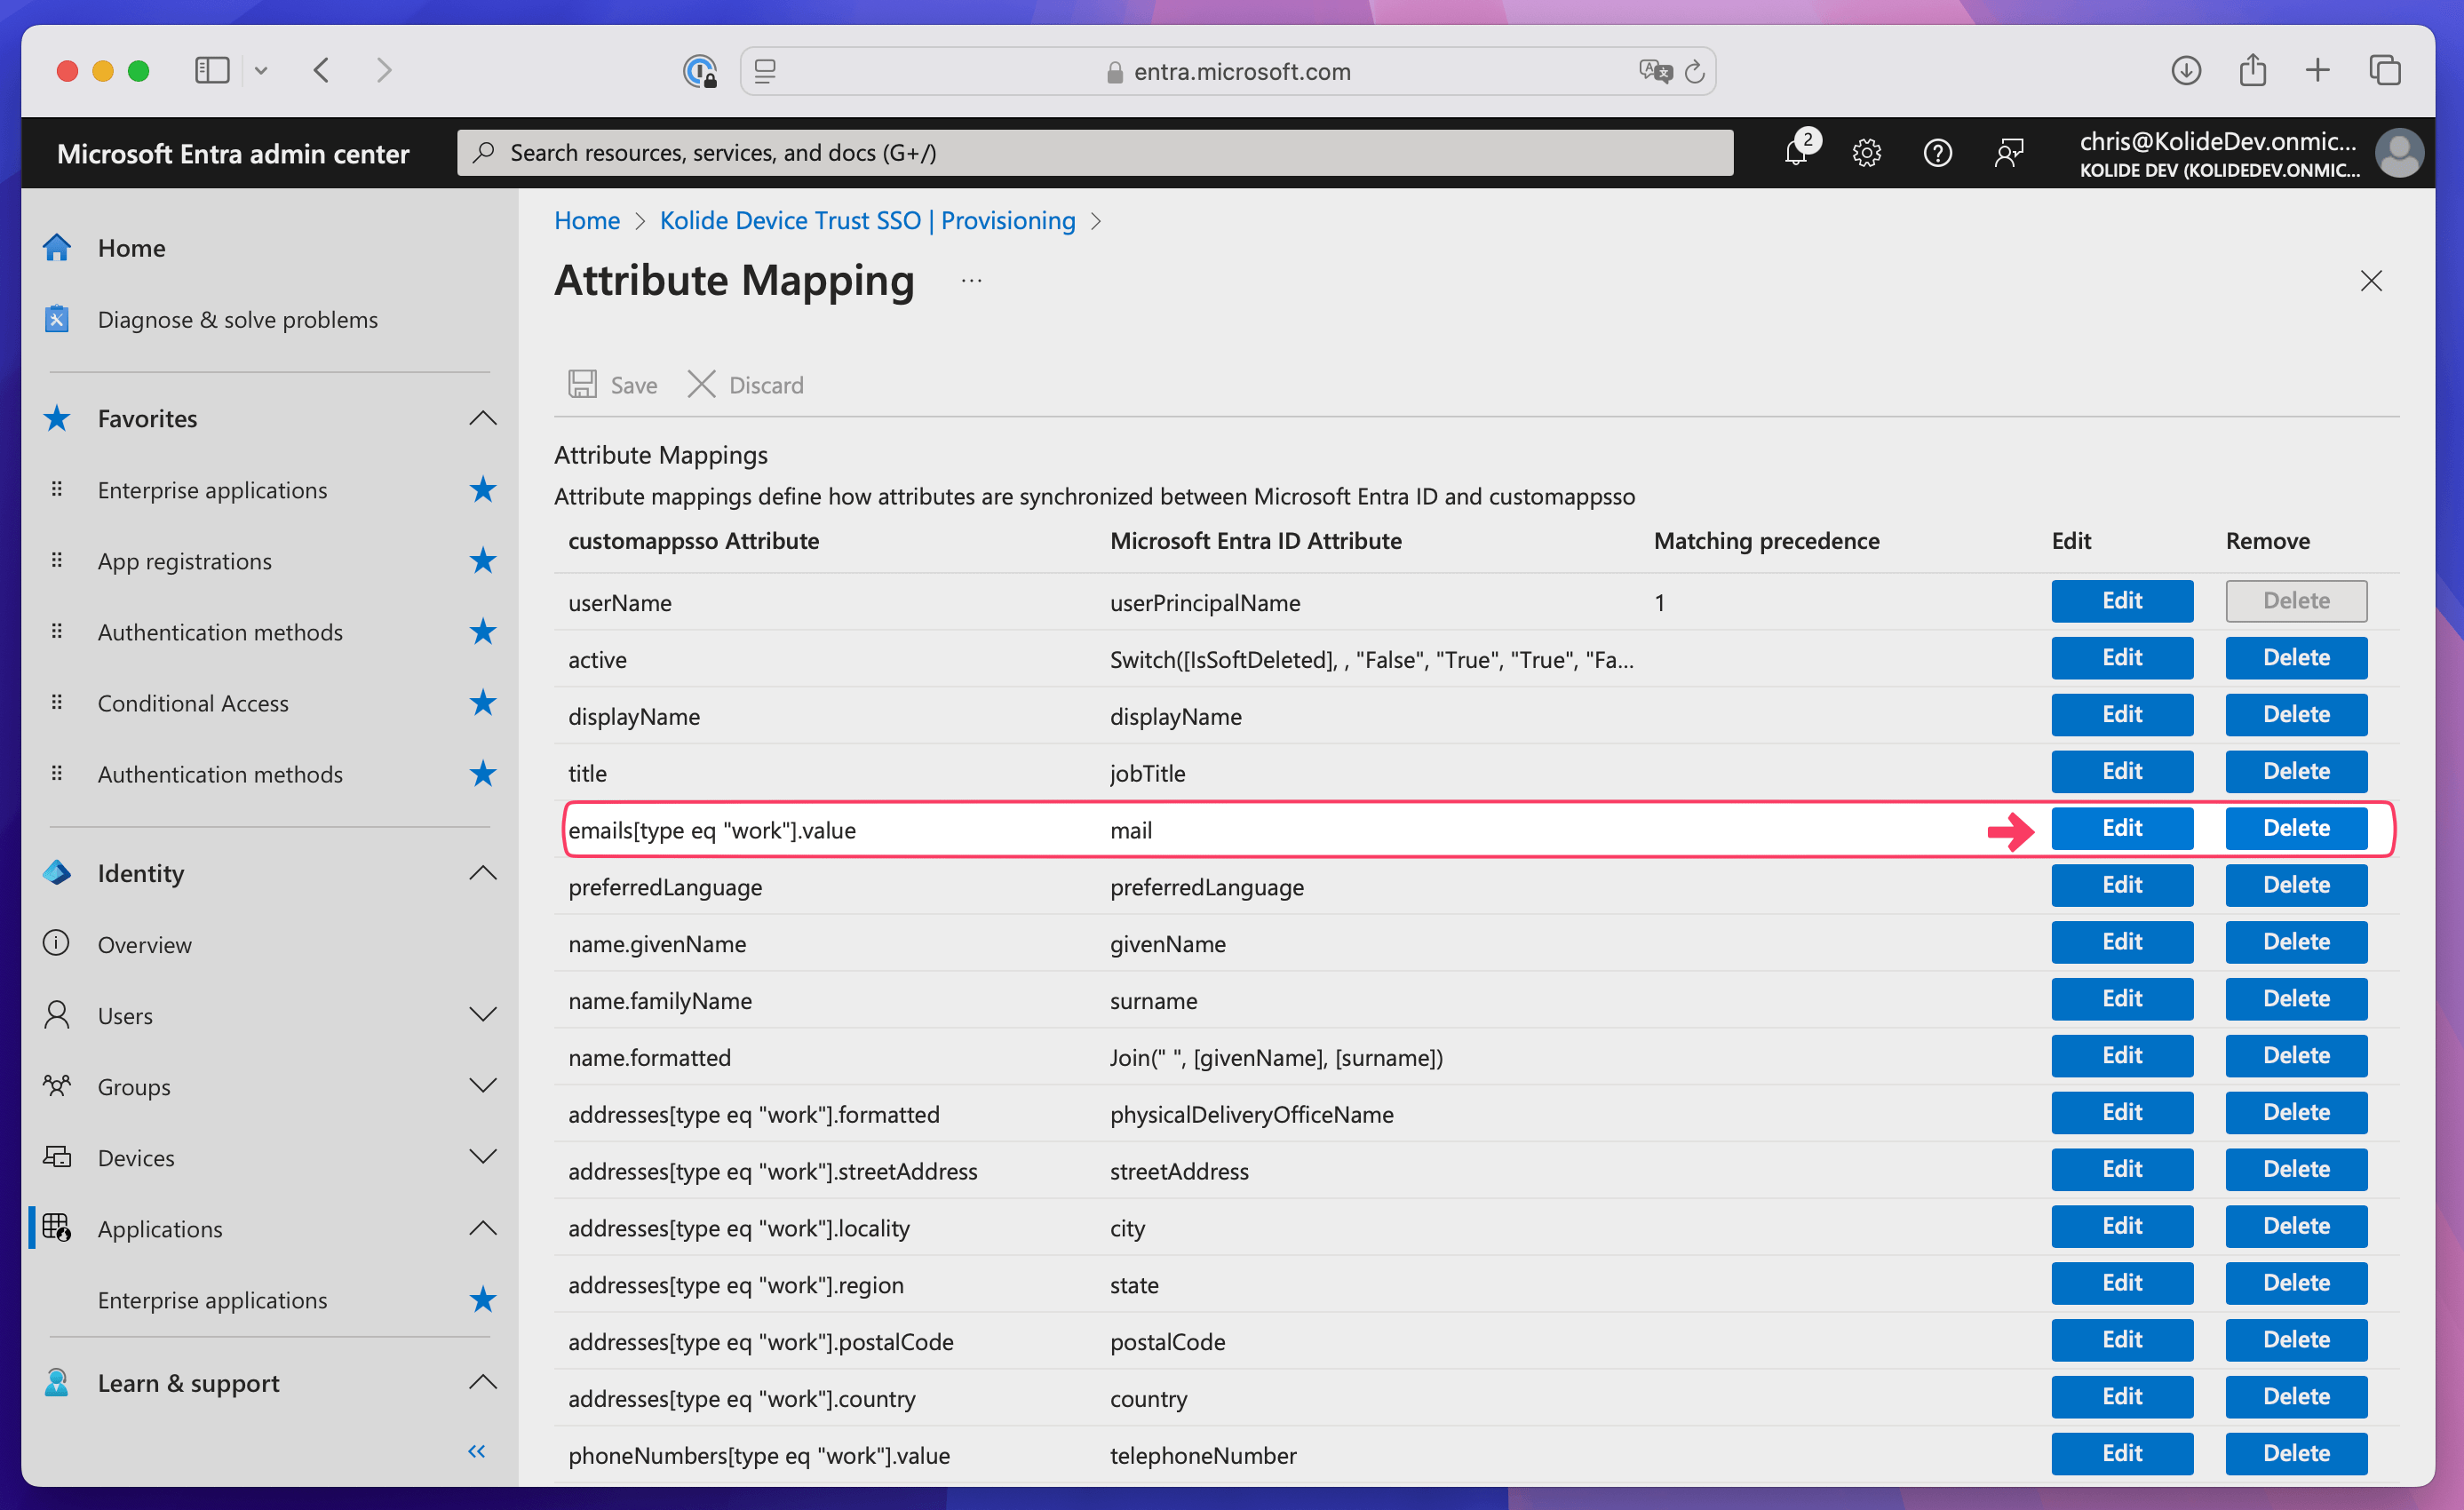
Make sure that the “userName” attribute maps to “userPrincipalName” in the Attribute Mappings table.
Select Edit for the email attribute.
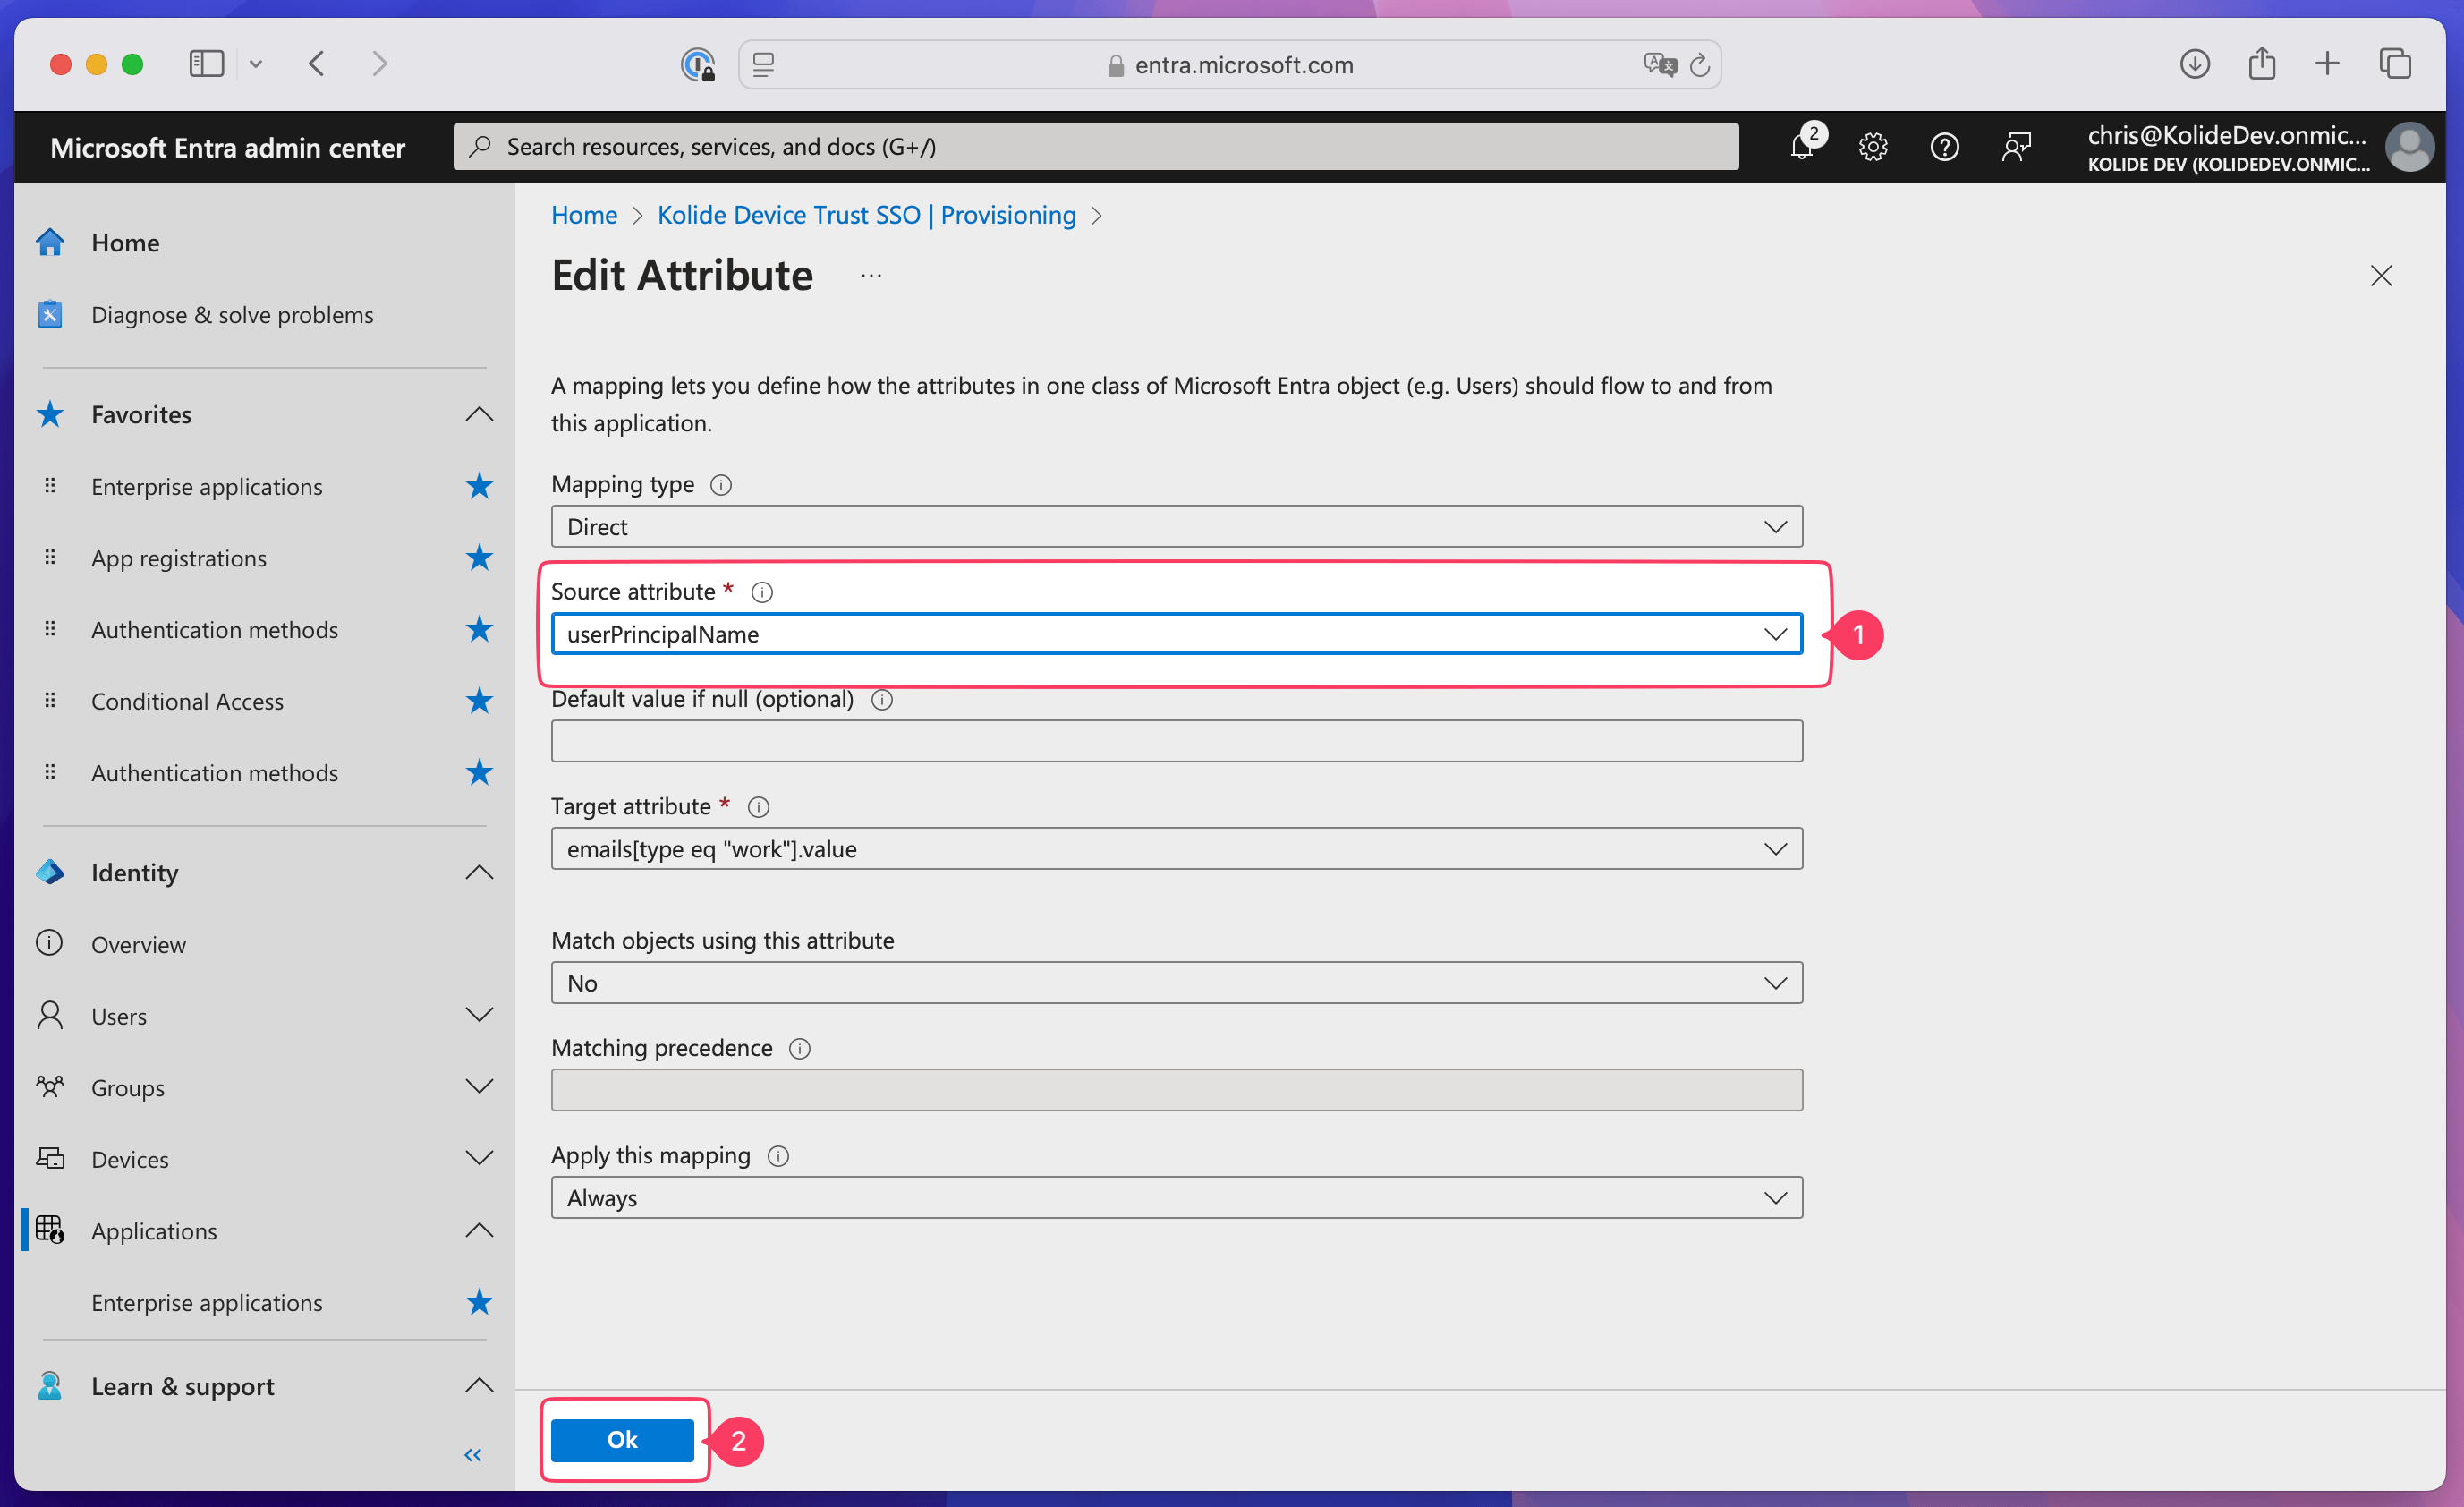
Select the Source attribute dropdown and choose userPrincipalName, then select Ok.
Select Edit for the “externalId” attribute.
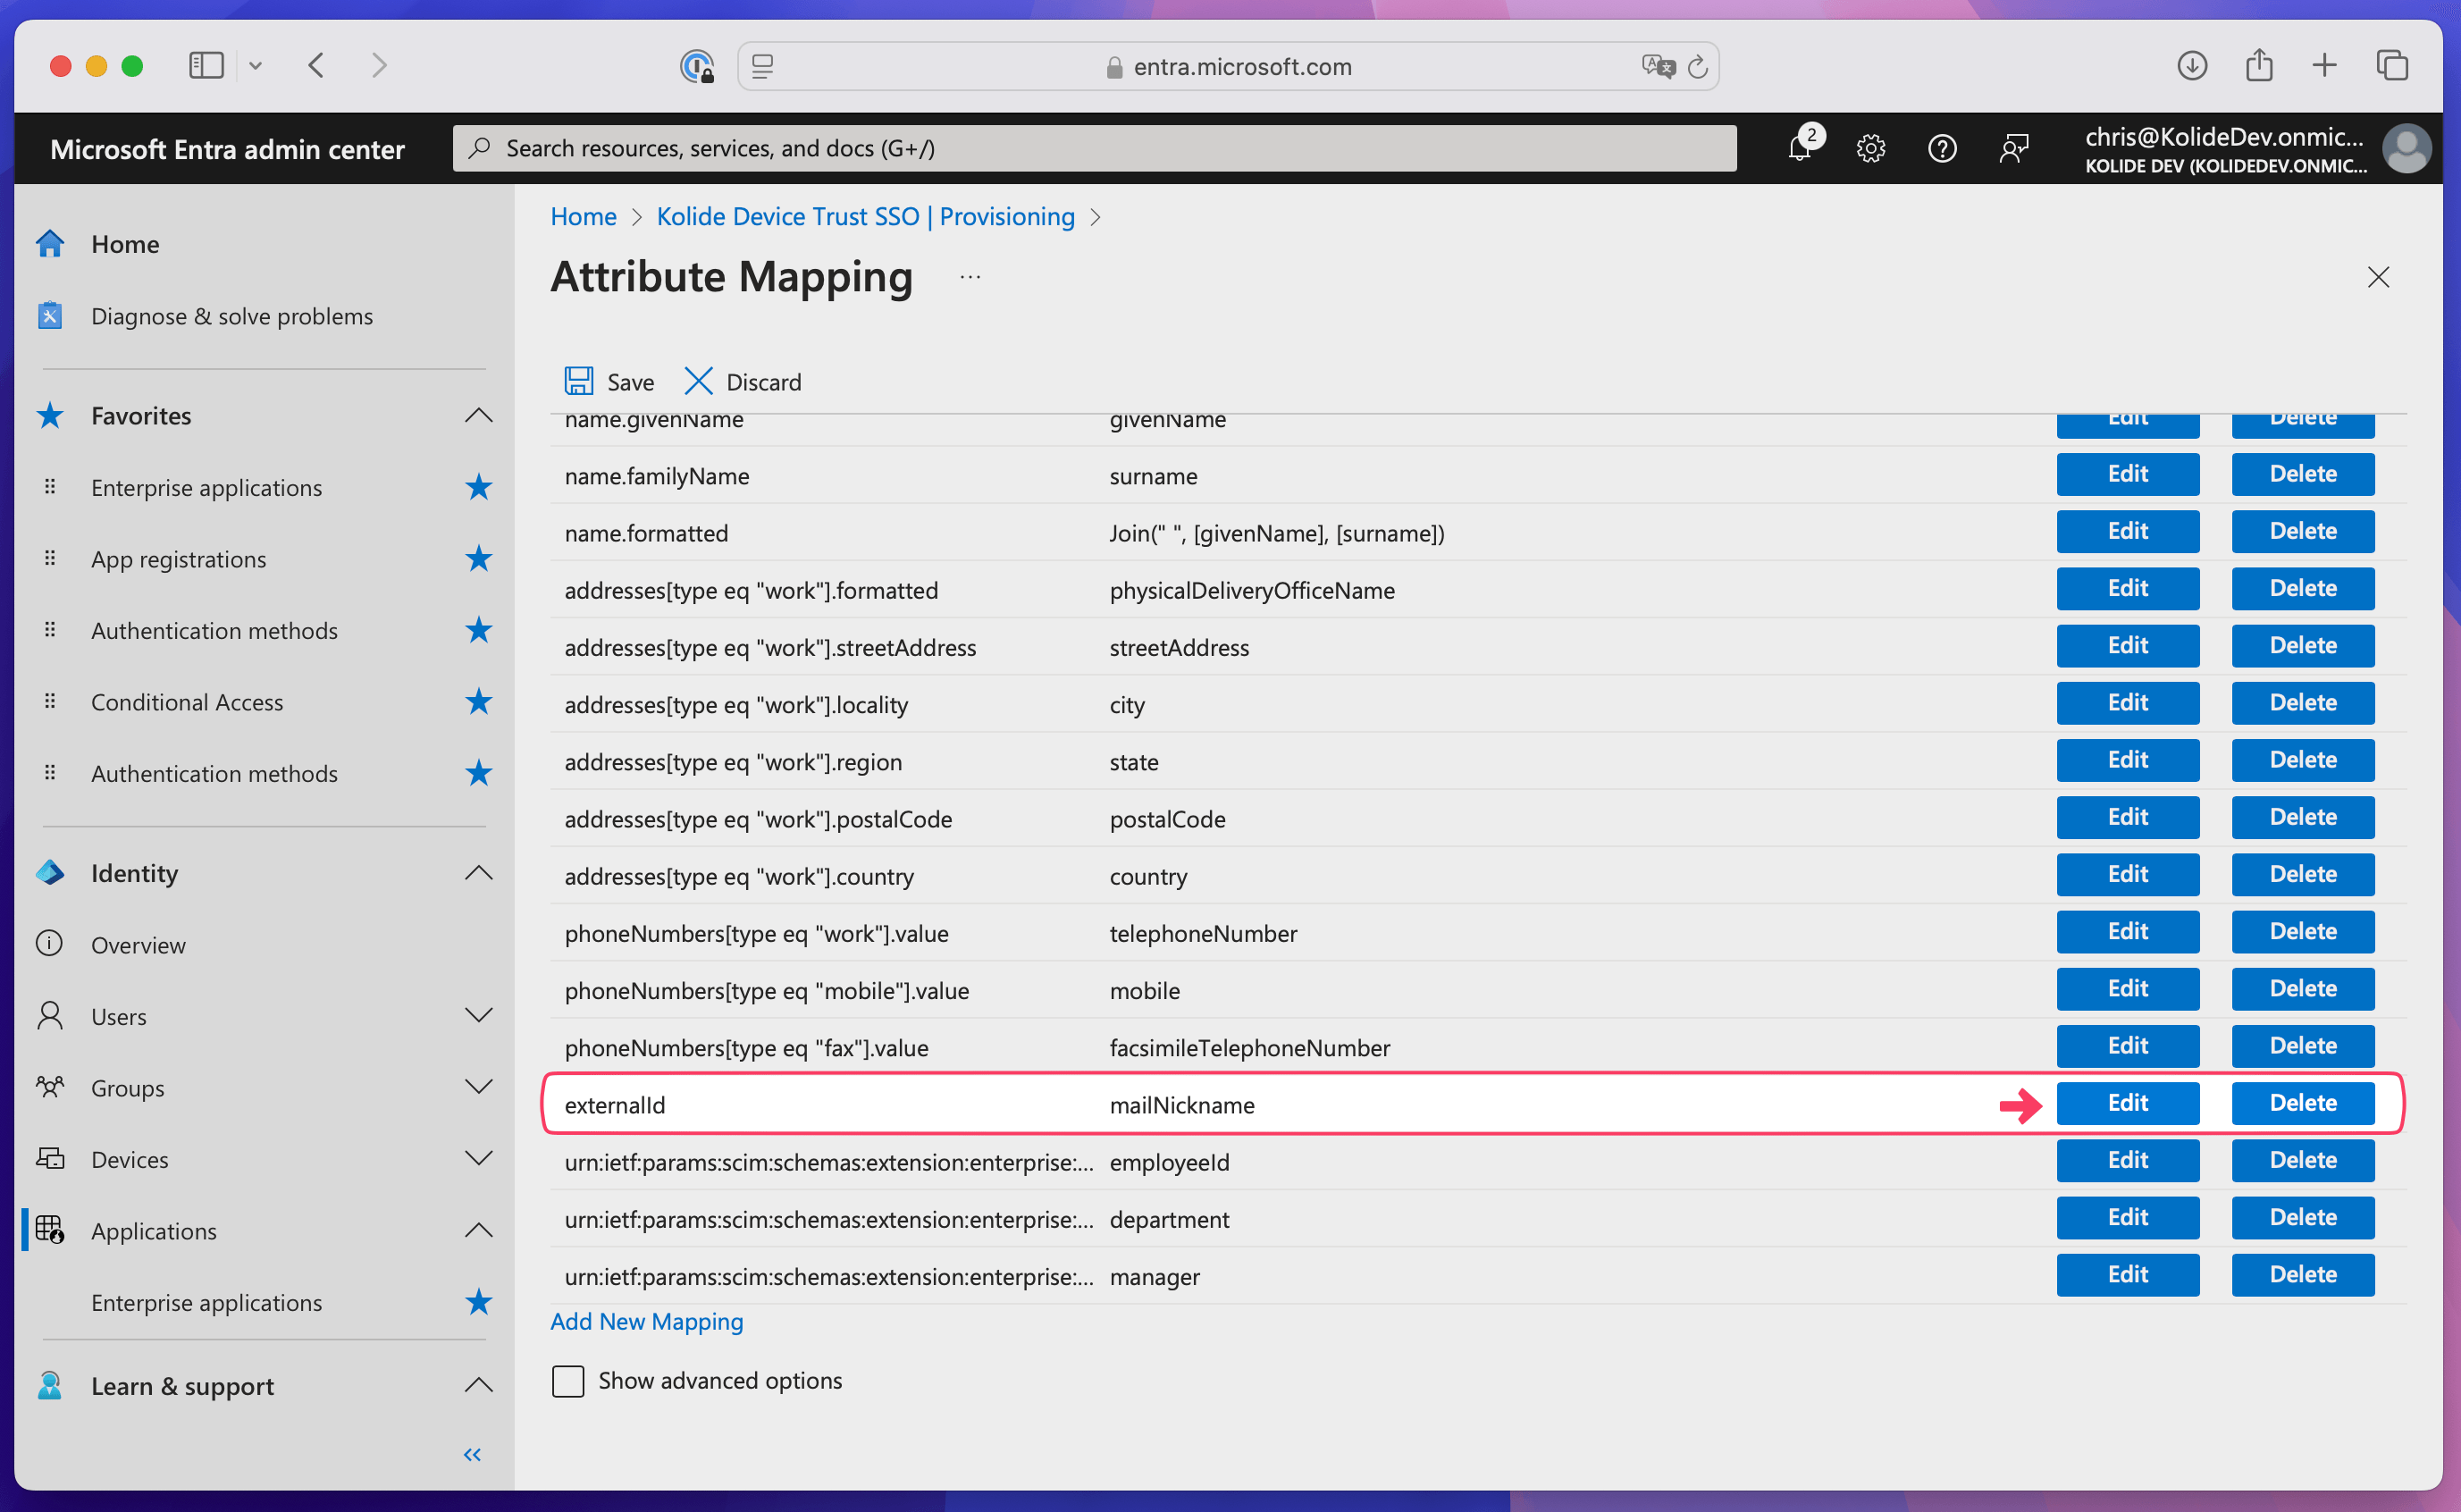
Select the Source attribute dropdown and choose objectID, then select Ok.
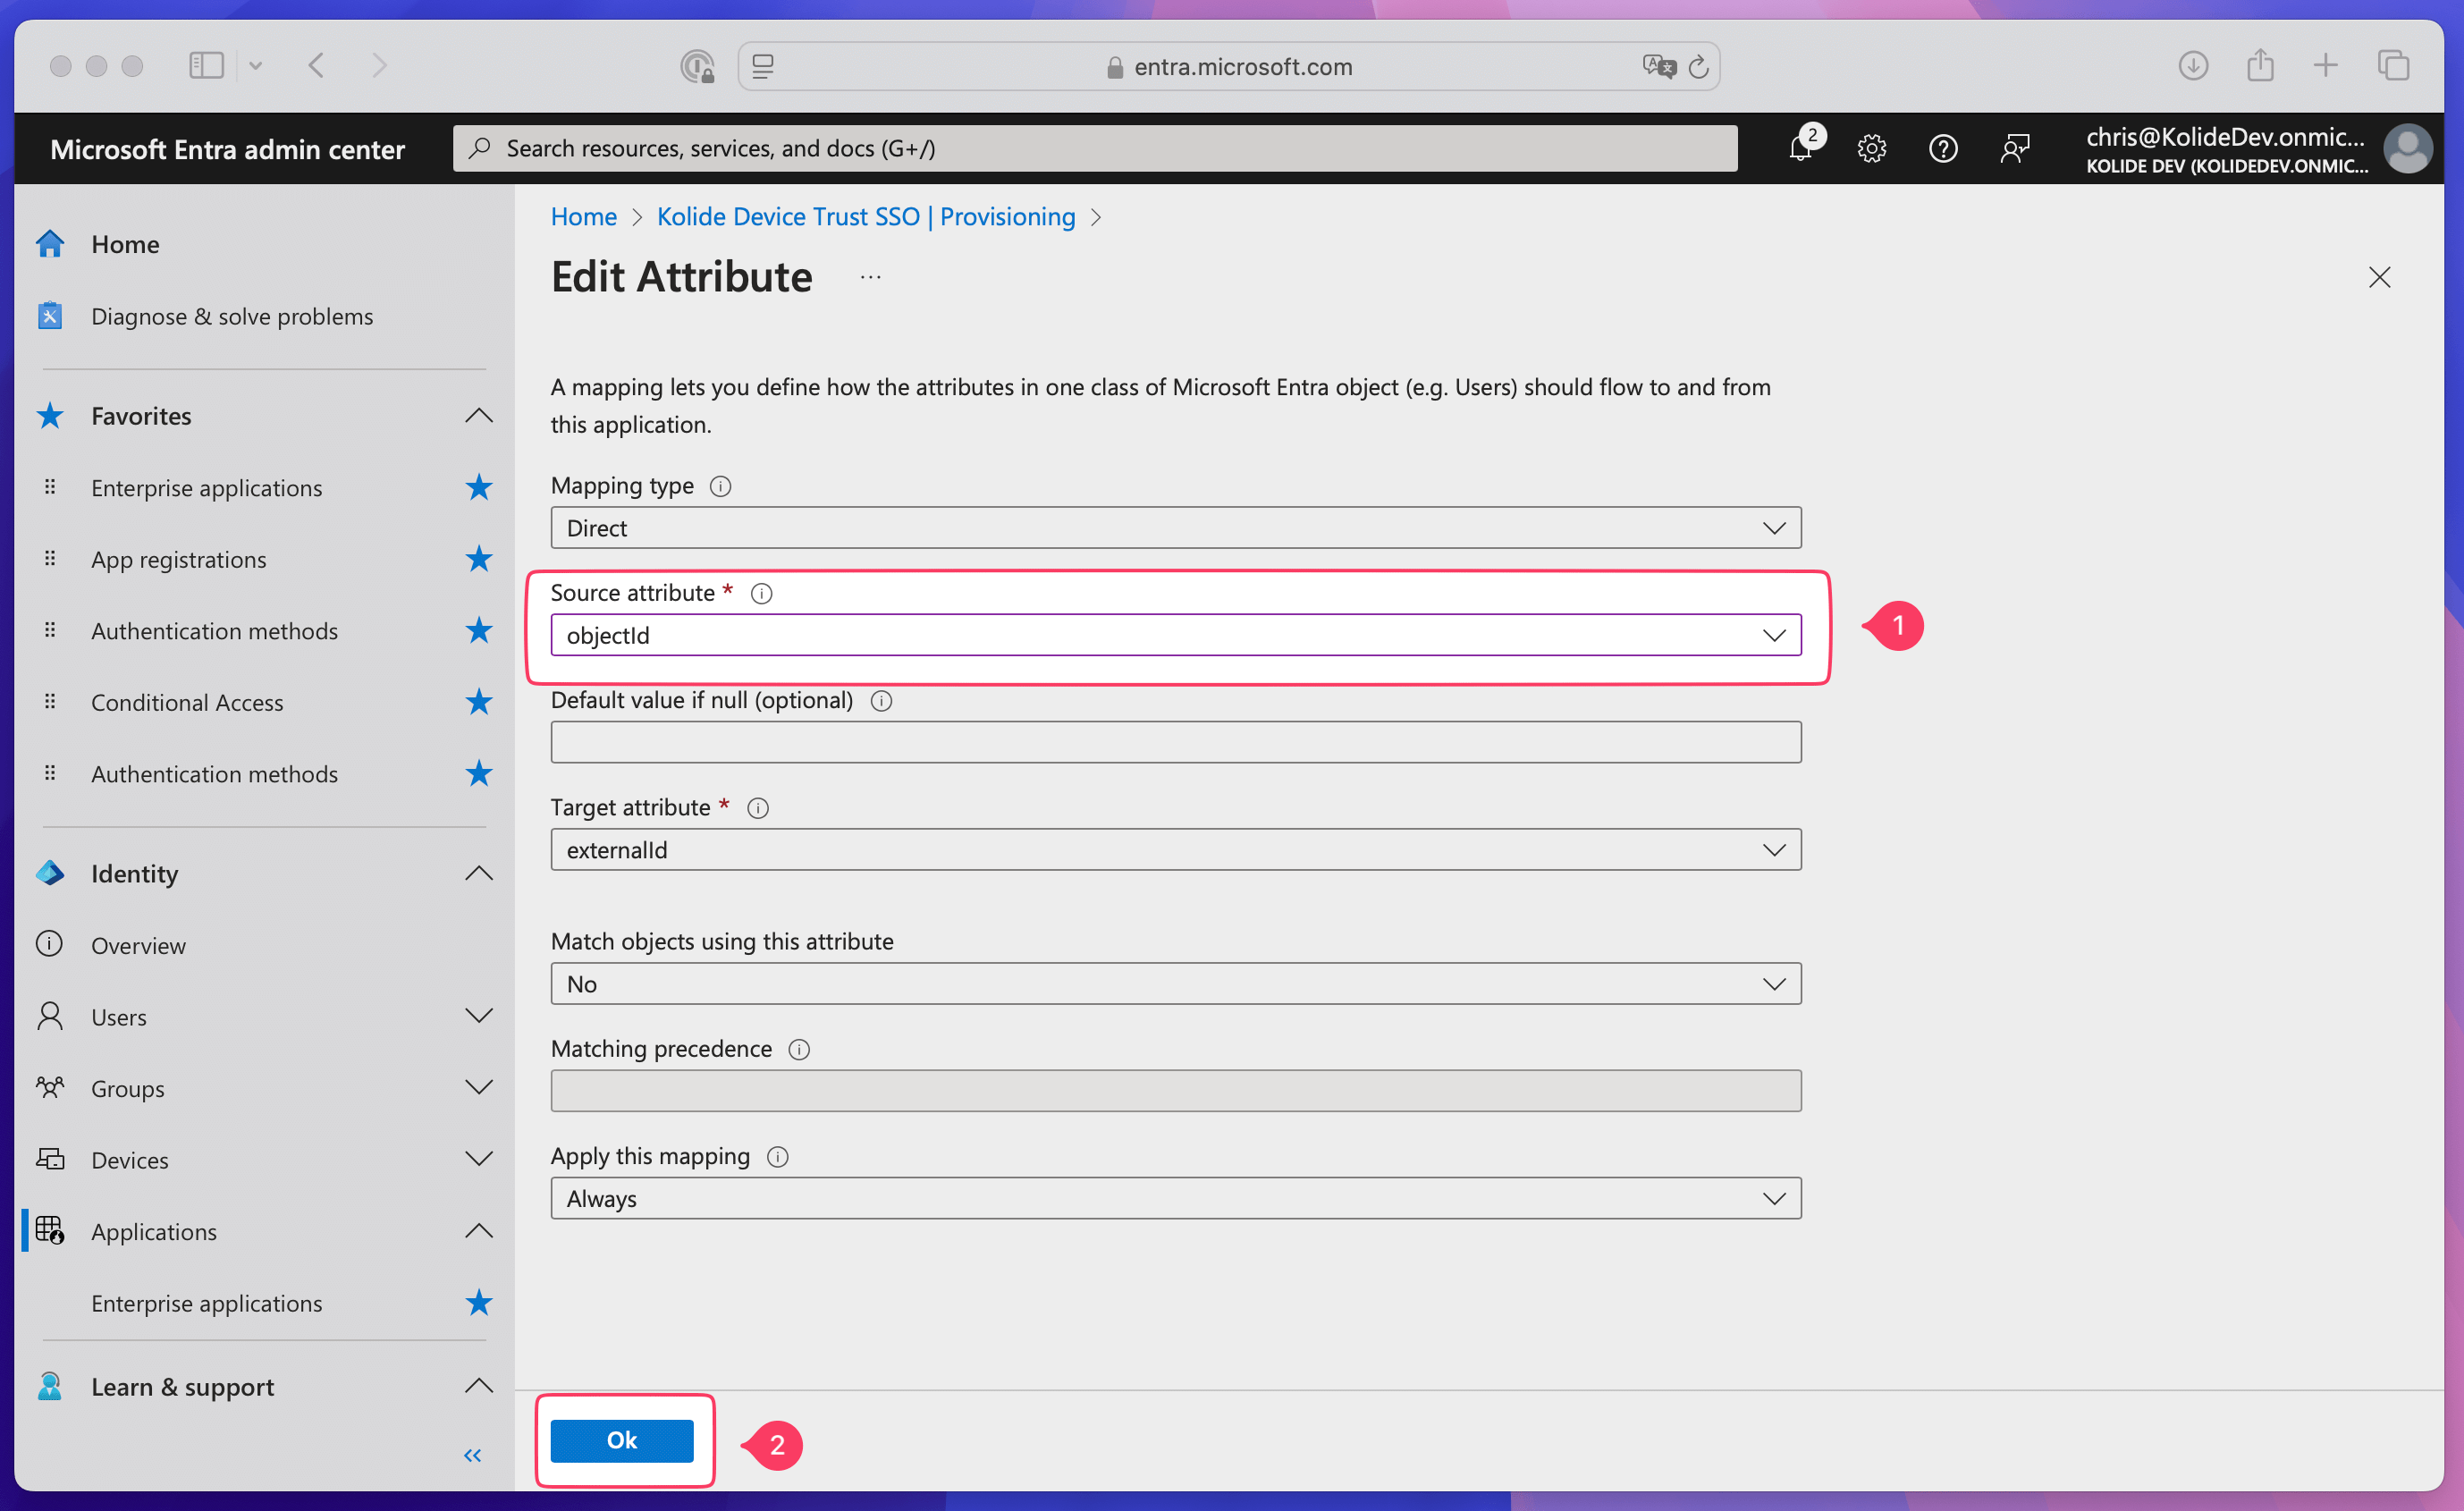
Select Save.
In Kolide, select I’ve Saved the Token, Finish Set Up.
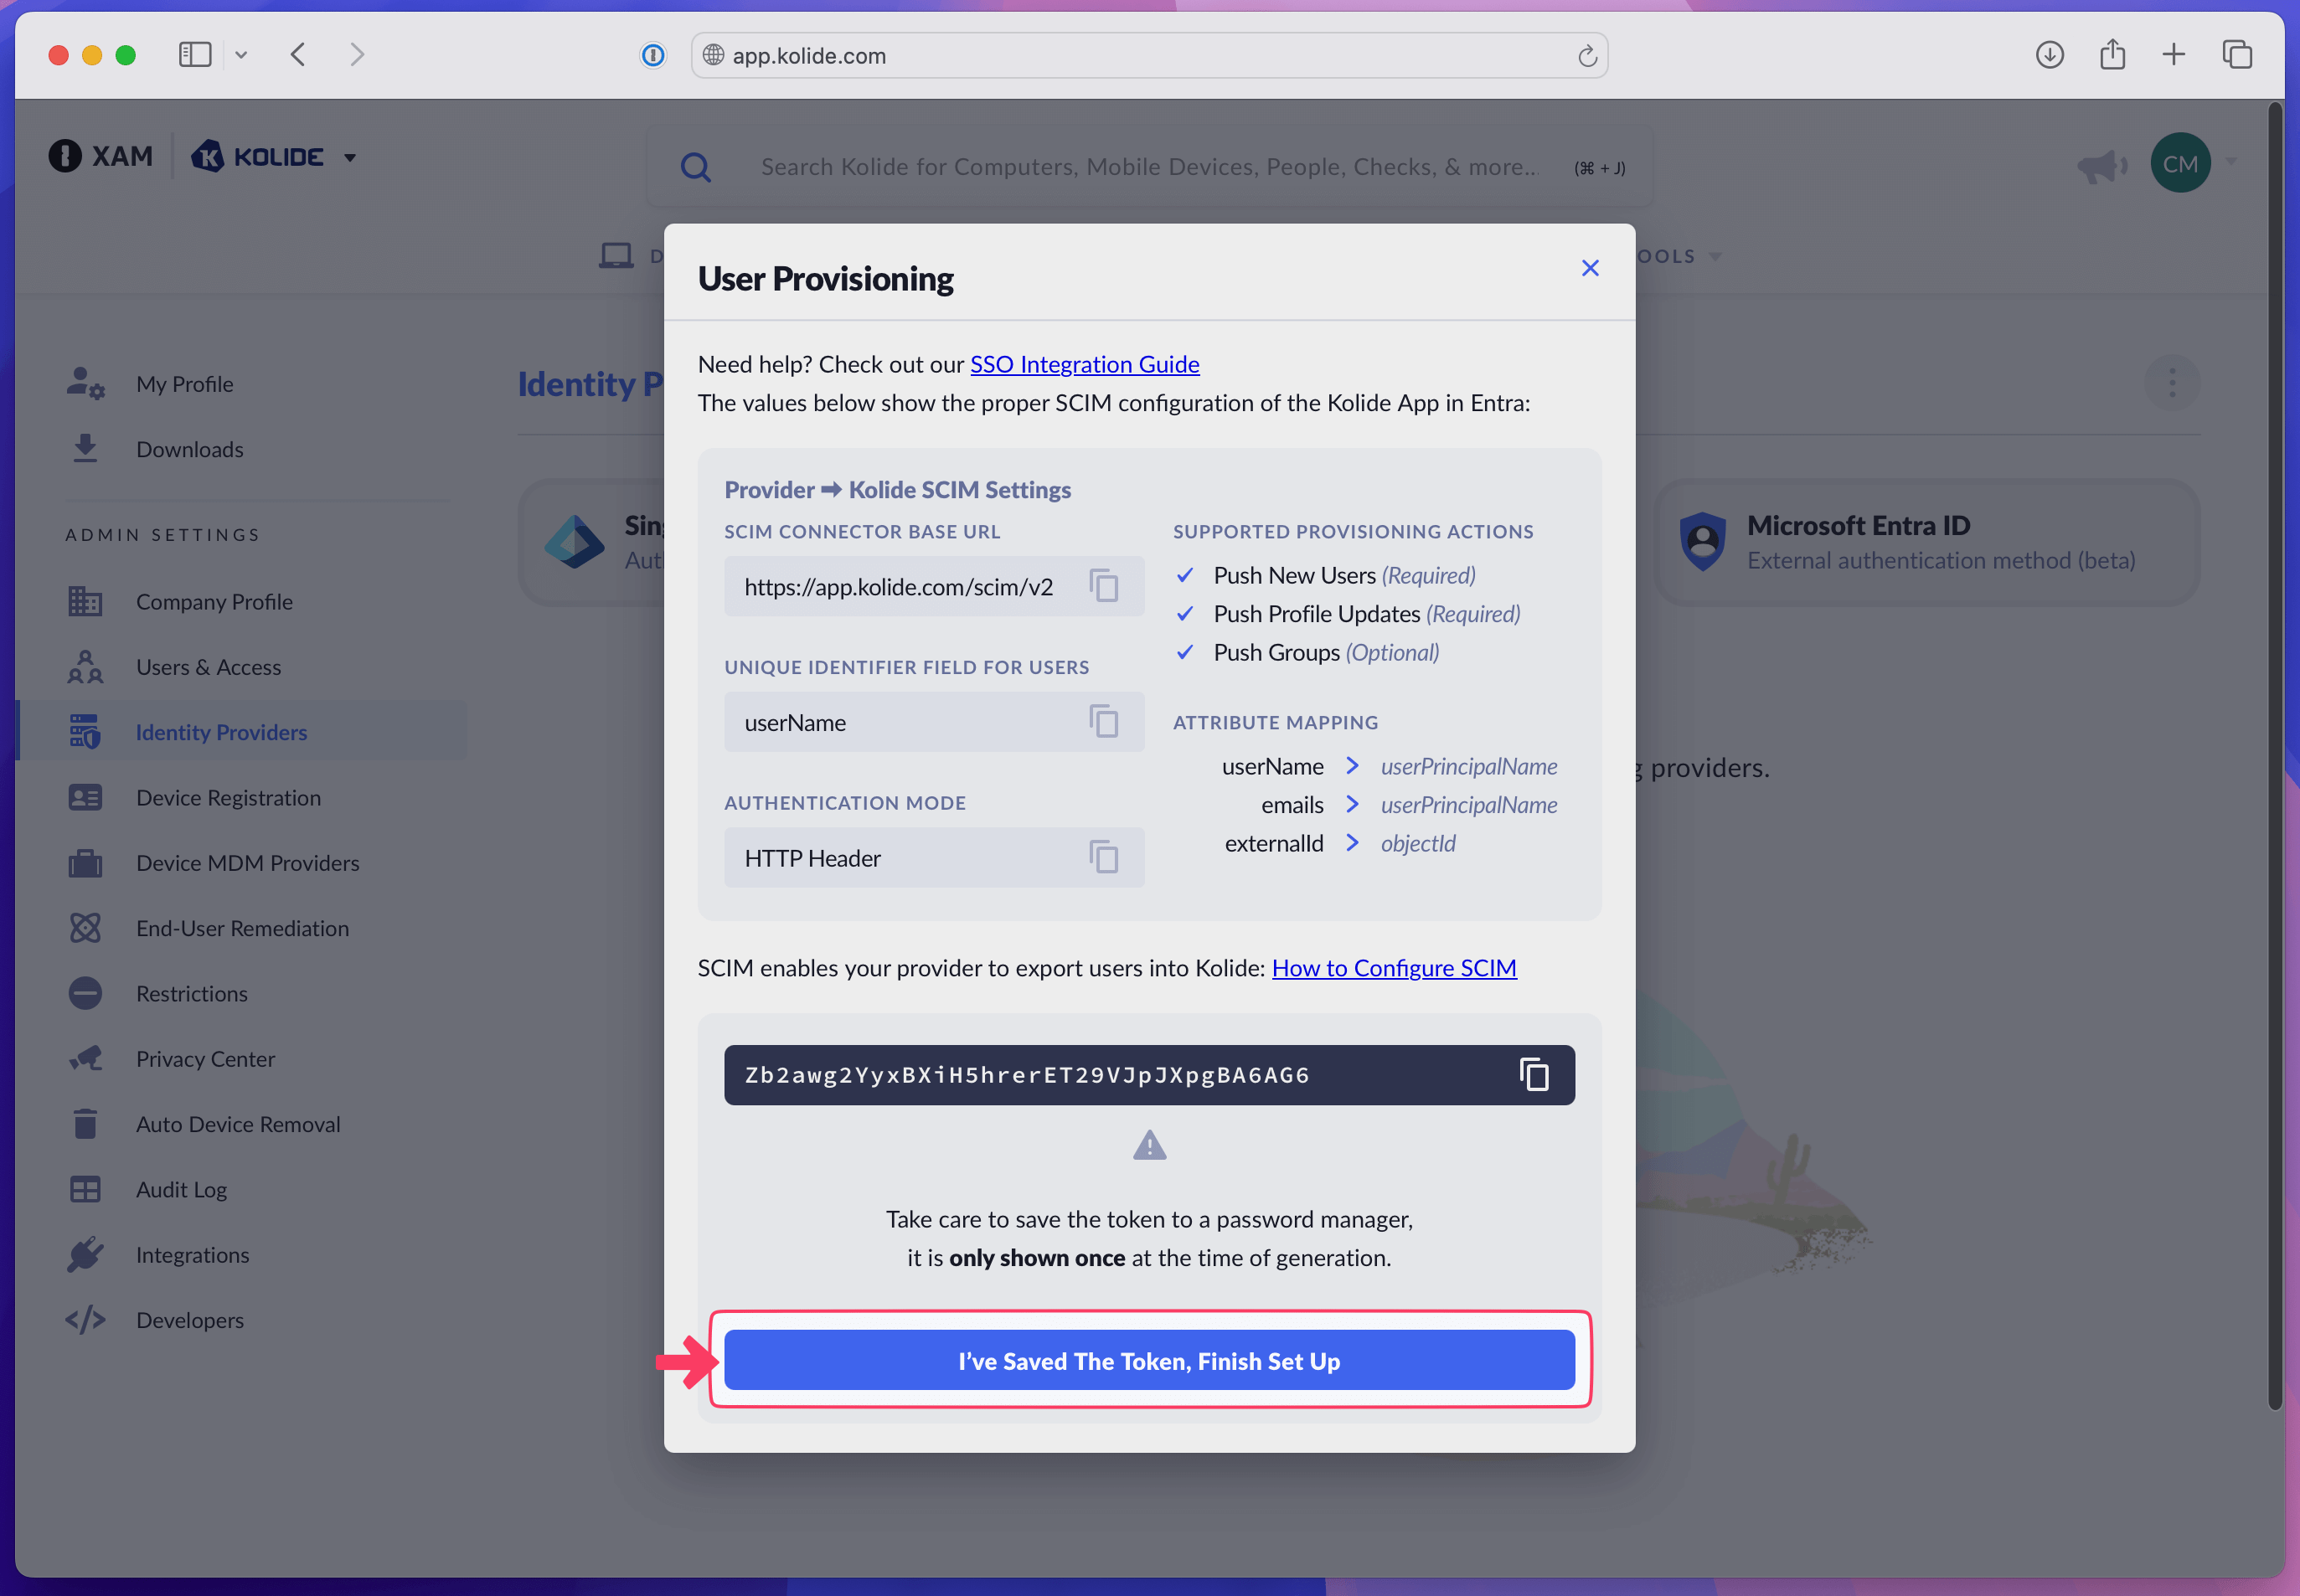
In Entra ID, select X in the top-right corner of the Attribute Mapping overlay to close it, then select X in the top-right corner of the Provisioning overlay to close it as well.
Start provisioning
In Entra ID, select Start Provisioning.
Note:Entra ID has 40-minute provisioning cycles, so you can either start the initial provisioning cycle or wait for it to start.In Kolide, select the vertical ellipsis icon, then choose Make Primary.
Step 4: Create a Conditional Access policy
In Entra ID, select Identity > Protection > Conditional Access in the sidebar.

Select Create New policy.
For the name, enter Require Kolide Device Trust, or a name that meets your internal naming conventions.
In the Users section, select 0 users and groups selected, then choose Select users and groups and select the checkbox next to Users and groups.
Select your Kolide Device Trust Enabled group and choose Select.
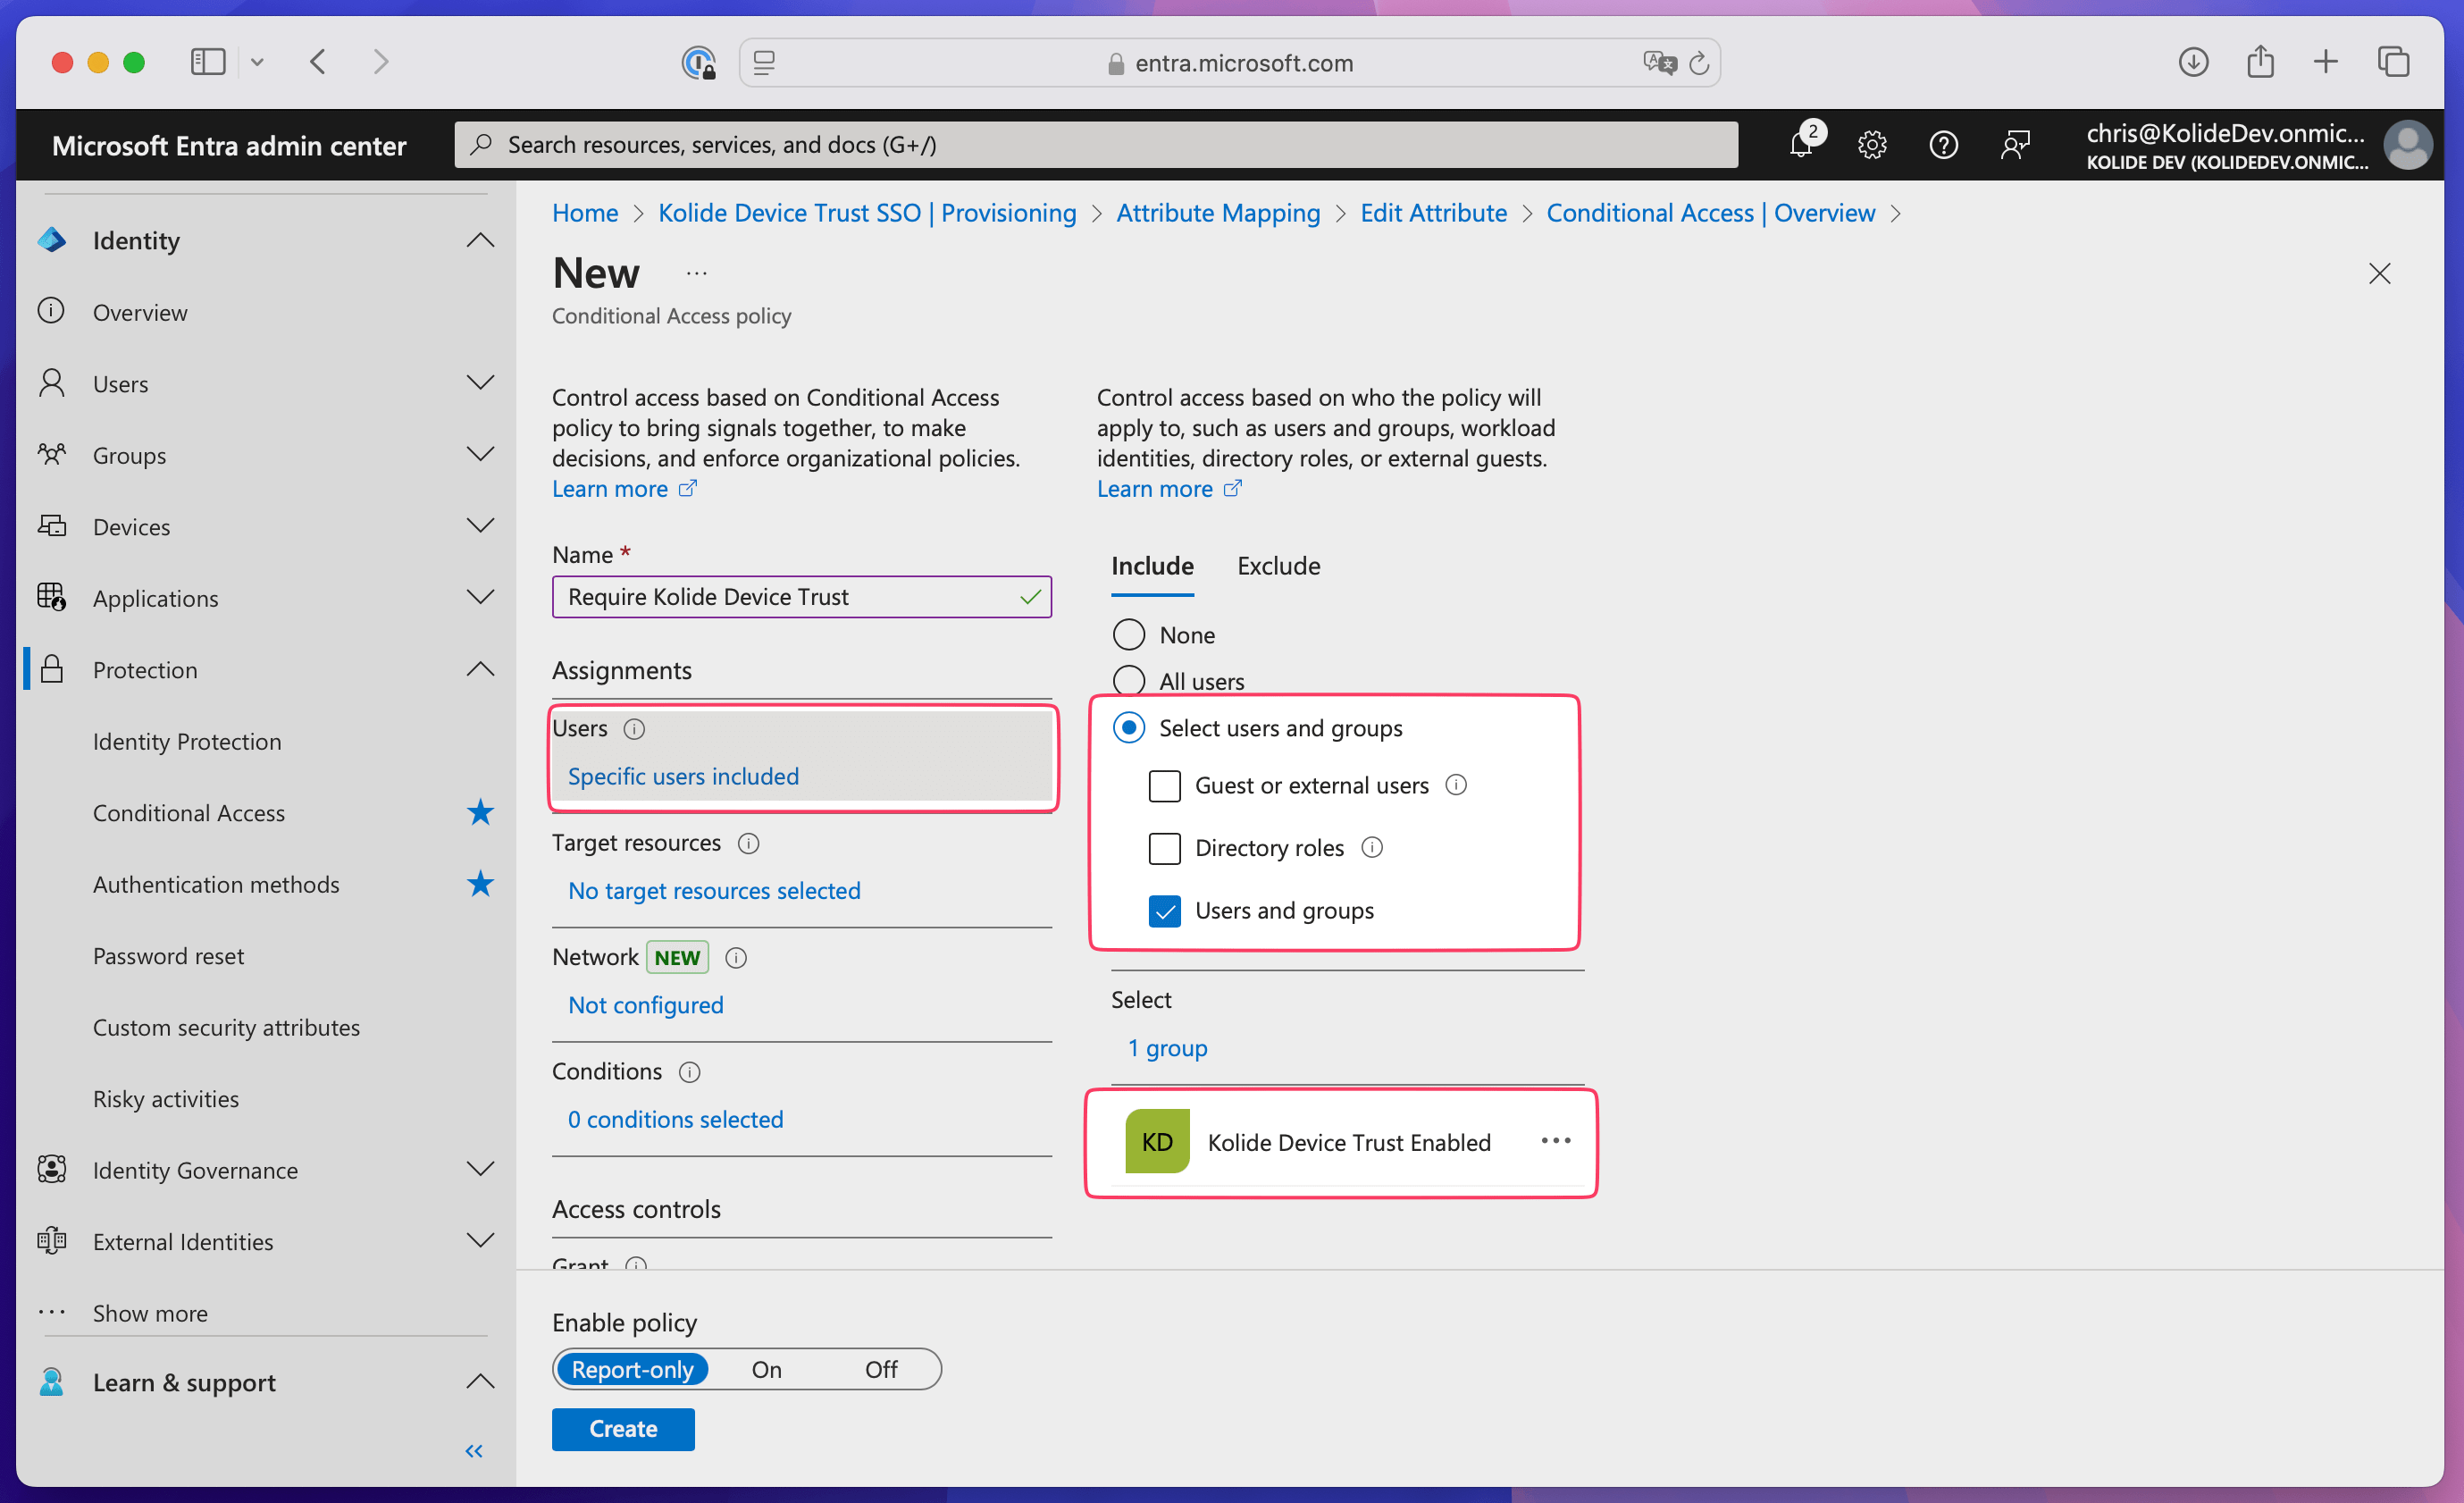
In the Target resources section, select No target resources selected, then open the Select what this policy applies to dropdown and select Resources (formerly cloud apps).
Select your Kolide Device Trust SSO app and choose Select.
In the Grant section, select 0 controls selected, then select the checkbox next to Require multifactor authentication and choose Select.

In the Enable Policy section, select On. This makes sure that team members are prompted with the Kolide Device Trust verification step.
Select Create.
Note:As an optional step, you can choose which apps you’d like to include or exclude. To do this, change the Target resources section. Select All cloud apps, or add additional selected apps in the Select section. We recommend you limit your selected apps so you can control which users and apps are using Kolide Device Trust.
The next time a user in your Kolide Device Trust Enabled group signs in to the SSO-controlled resource, Kolide will check the health of their device. If the user passes the device health checks you’ve set up in Kolide, they’ll be able to sign in without taking additional steps. If they fail a check, Kolide will show them how to resolve the issue. After the user has fixed the issues with their device, Kolide will perform an instant recheck so they can sign in.
Step 5: Test Sign In
Once you’ve activated Entra and set it as the primary IdP, you should test signing into Kolide.
In a private browsing window, log into https://app.kolide.com. After entering your email address, you should be redirected to Entra Sign In where you should be able to complete authentication and sign into the Kolide admin dashboard.