Connect Kolide to Google
With Kolide’s Google Workspace integration, you can:
- Import and regularly synchronize your Google Workspace Users and Groups
- Protect the Kolide admin dashboard with Google Single Sign-On authentication
- Enable your users to sign into Kolide Device Trust-protected apps with their Google credentials
In this guide, we will walk you through the exact steps to securely integrate Kolide with your existing production Google Workspace instance and enable it.
Minimum Requirements
Before we start the process, we need to ensure you have everything needed to successfully integrate Kolide. Please check the following requirements before you get started.
You must be a Google Workspace Administrator
In this guide, you will need access to the Google Workspace Admin console with the ability to perform the following actions:
- Add a Custom SAML app under Web and mobile apps
- Authorize Kolide’s OAuth integration with the following scopes:
- https://www.googleapis.com/auth/admin.directory.user.readonly
- https://www.googleapis.com/auth/admin.directory.group.readonly
You must be part of the Kolide Multi-IdP Beta
This feature is not currently available to all Device Trust customers. To verify you have it enabled, go to https://app.kolide.com/x/settings/my/profile/edit and under Admin Settings if you see an item called Identity Providers then you are all set. If instead, you see an item called Identity & Access, you will need to ask Kolide support to enable the feature.
Step 0: Activate your Kolide Account
If you haven’t already, you will need to sign into the administrative dashboard of Kolide via magic link authentication.
- Go to the Kolide Sign-in page (https://app.kolide.com/signin)
- Enter your email address
- When prompted, go to your email provider and click the magic link.
- Accept the 1Password Extended Access Management Terms and Conditions
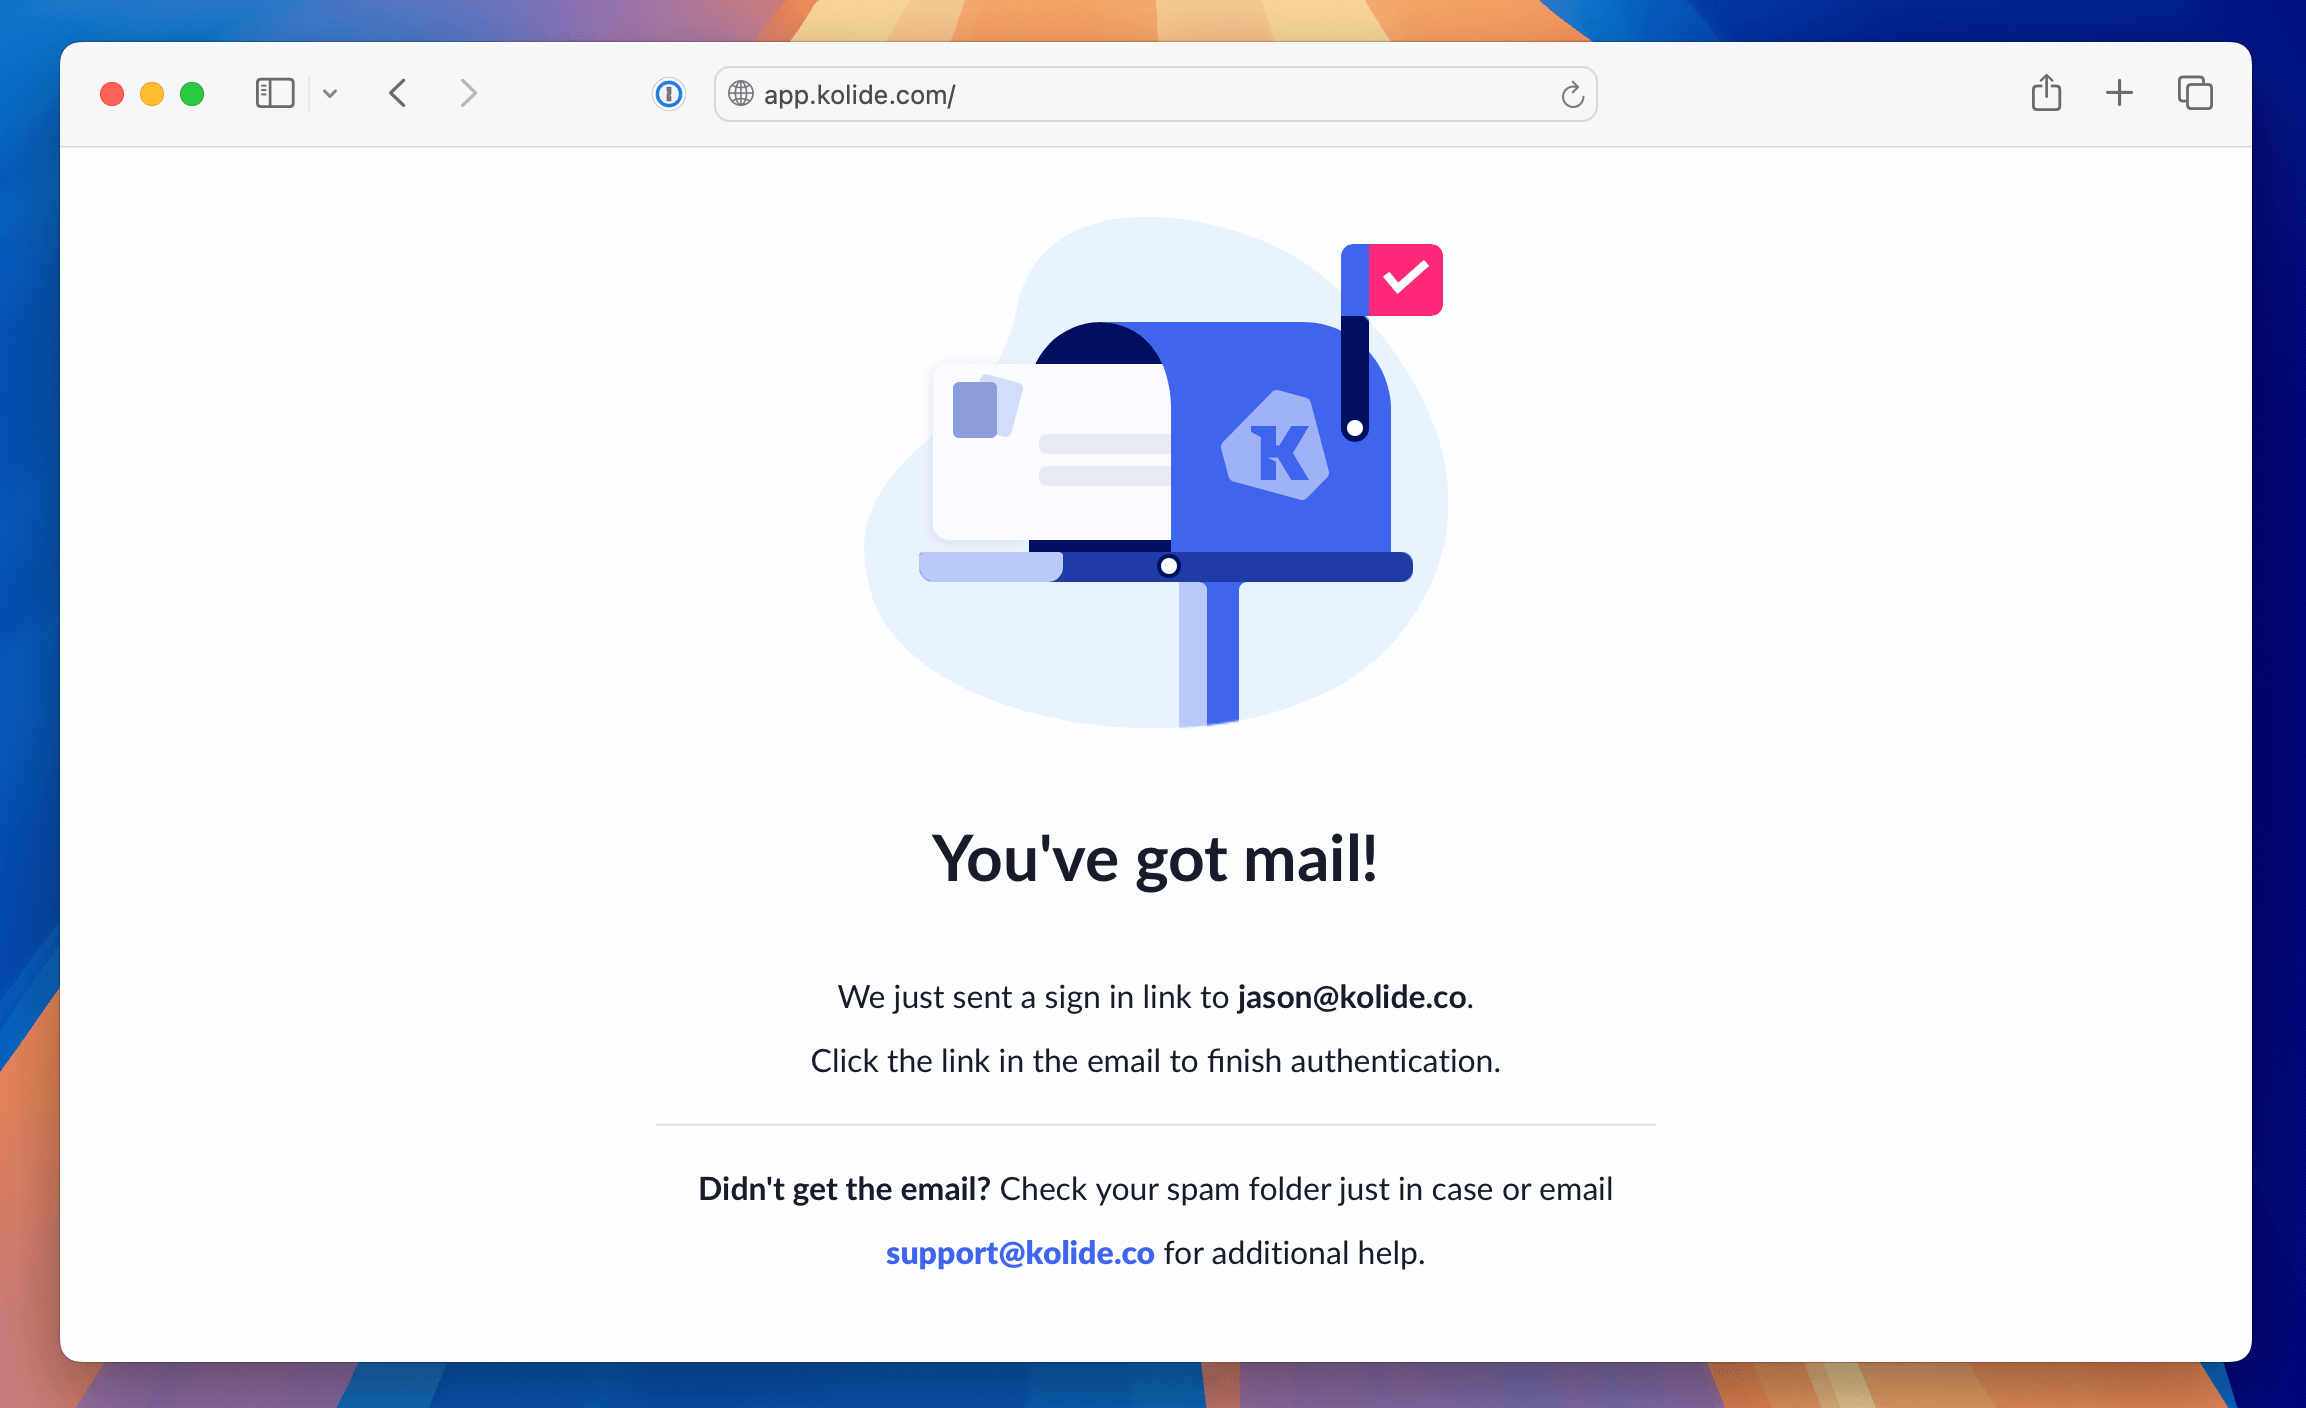
If you do not see the prompt to check your email, please contact support.
Step 1: Create a Group For Device Trust
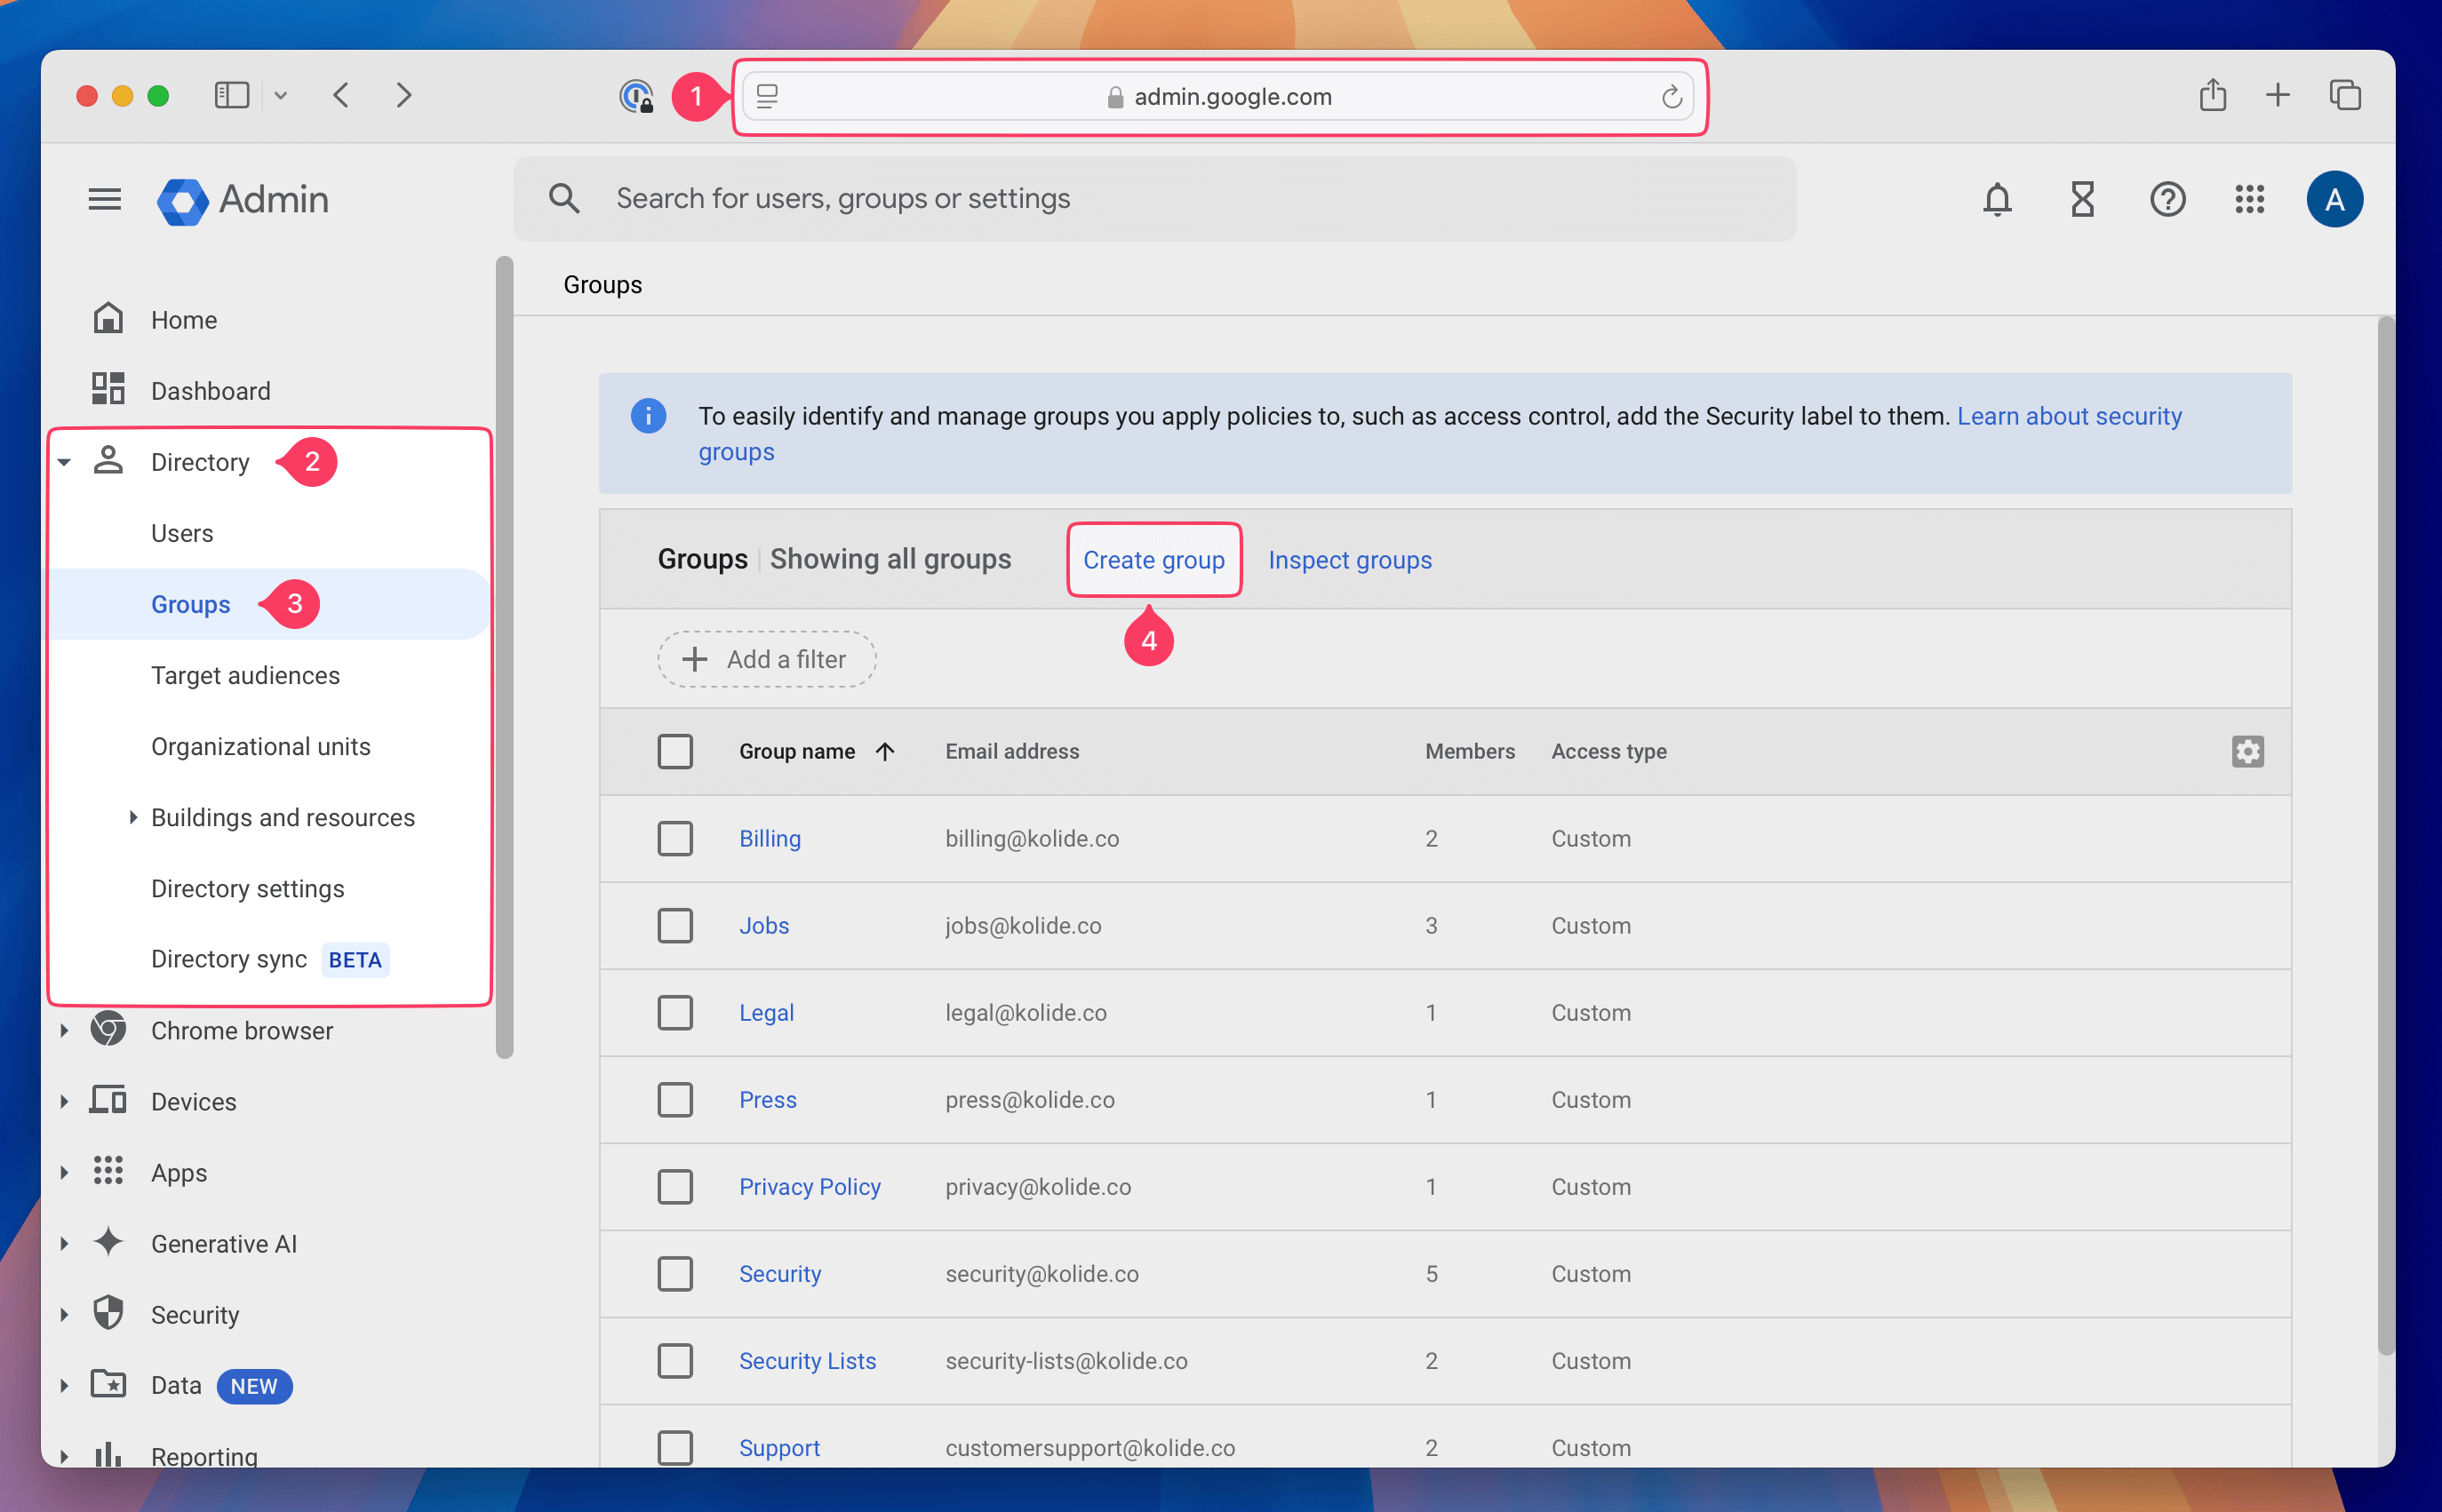
Sign into the Google Workspace admin console by going to (https://admin.google.com)
Expand Directory
Click Groups
On the Groups page, click Create Group
-
In the form that appears, fill it out with the following suggested details:
-
Name:
Device Trust Enabled -
Email:
device-trust-enabled -
Description:
Control users who are in-scope for Device Trust - Group Owners: Make yourself and others owners who you want to control membership into this group
-
Group Labels: Ensure
Securityis selected Then click Next
-
Name:
-
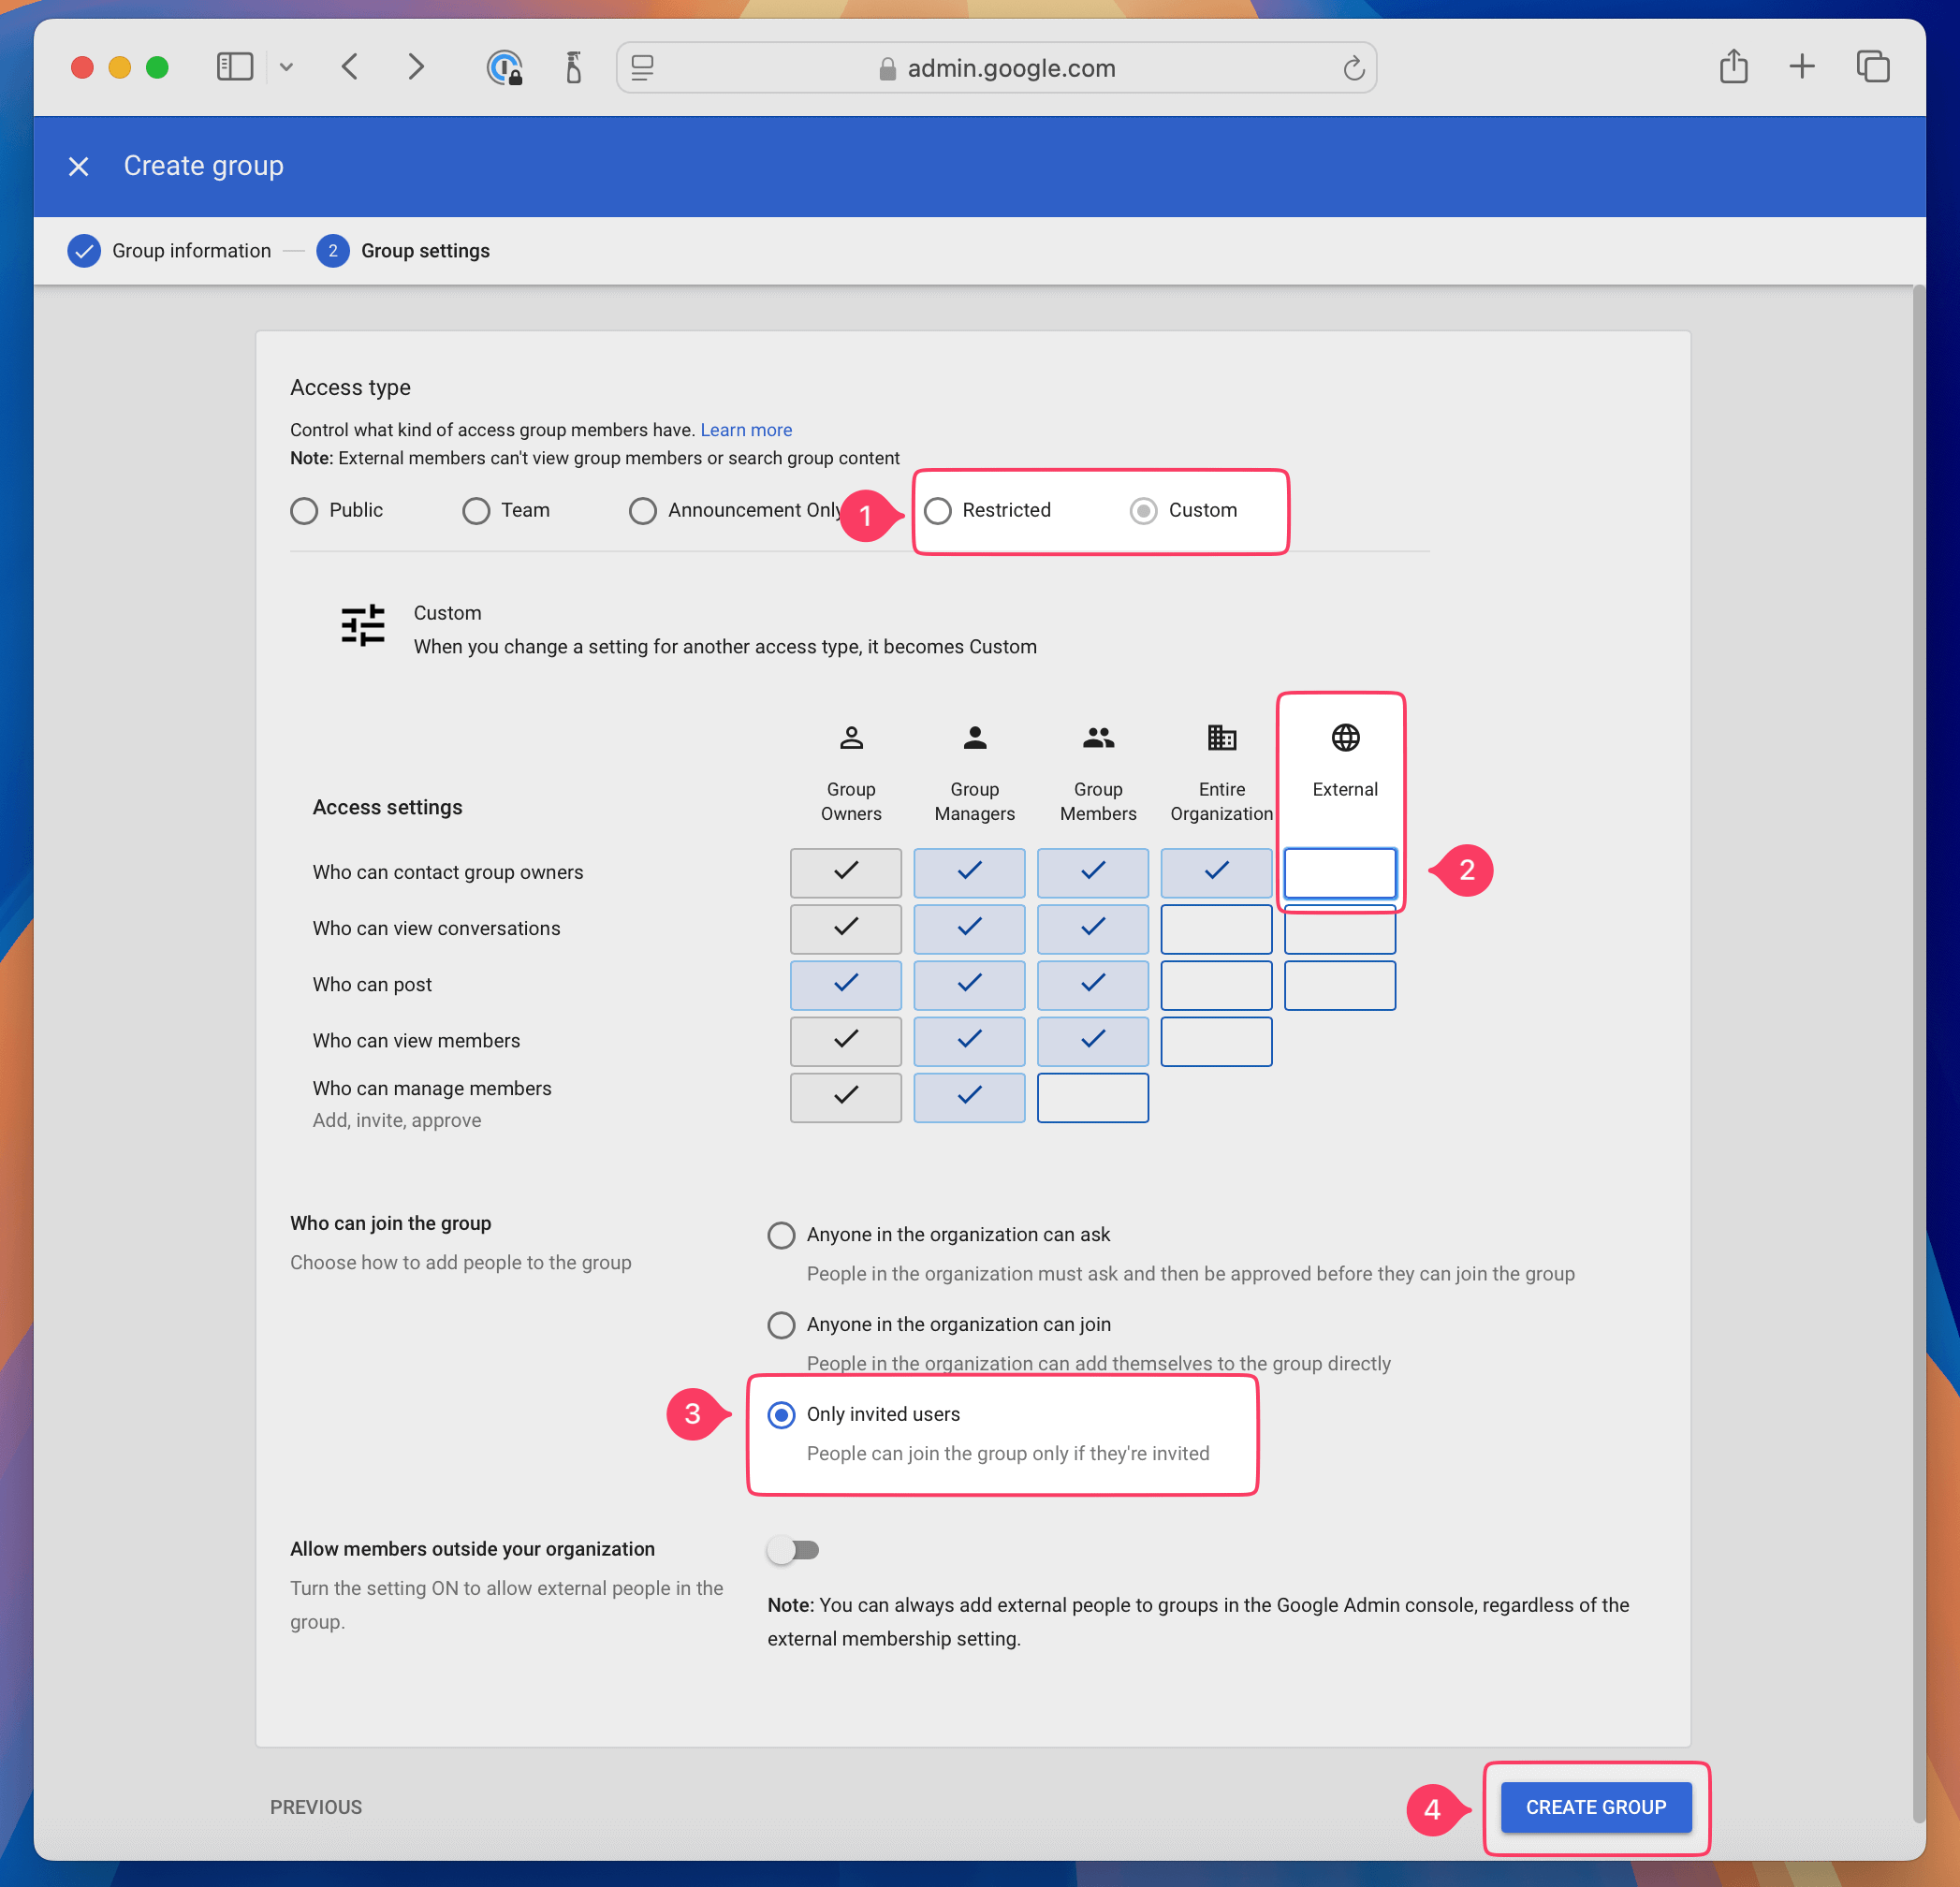
In the Group Settings step:
- Select Restricted for Access Type (this will later change to Custom when we modify other settings)
- Unselect Who can contact group owners from the External column.
- Under Who can join this group select Only invited users
- Click Create Group
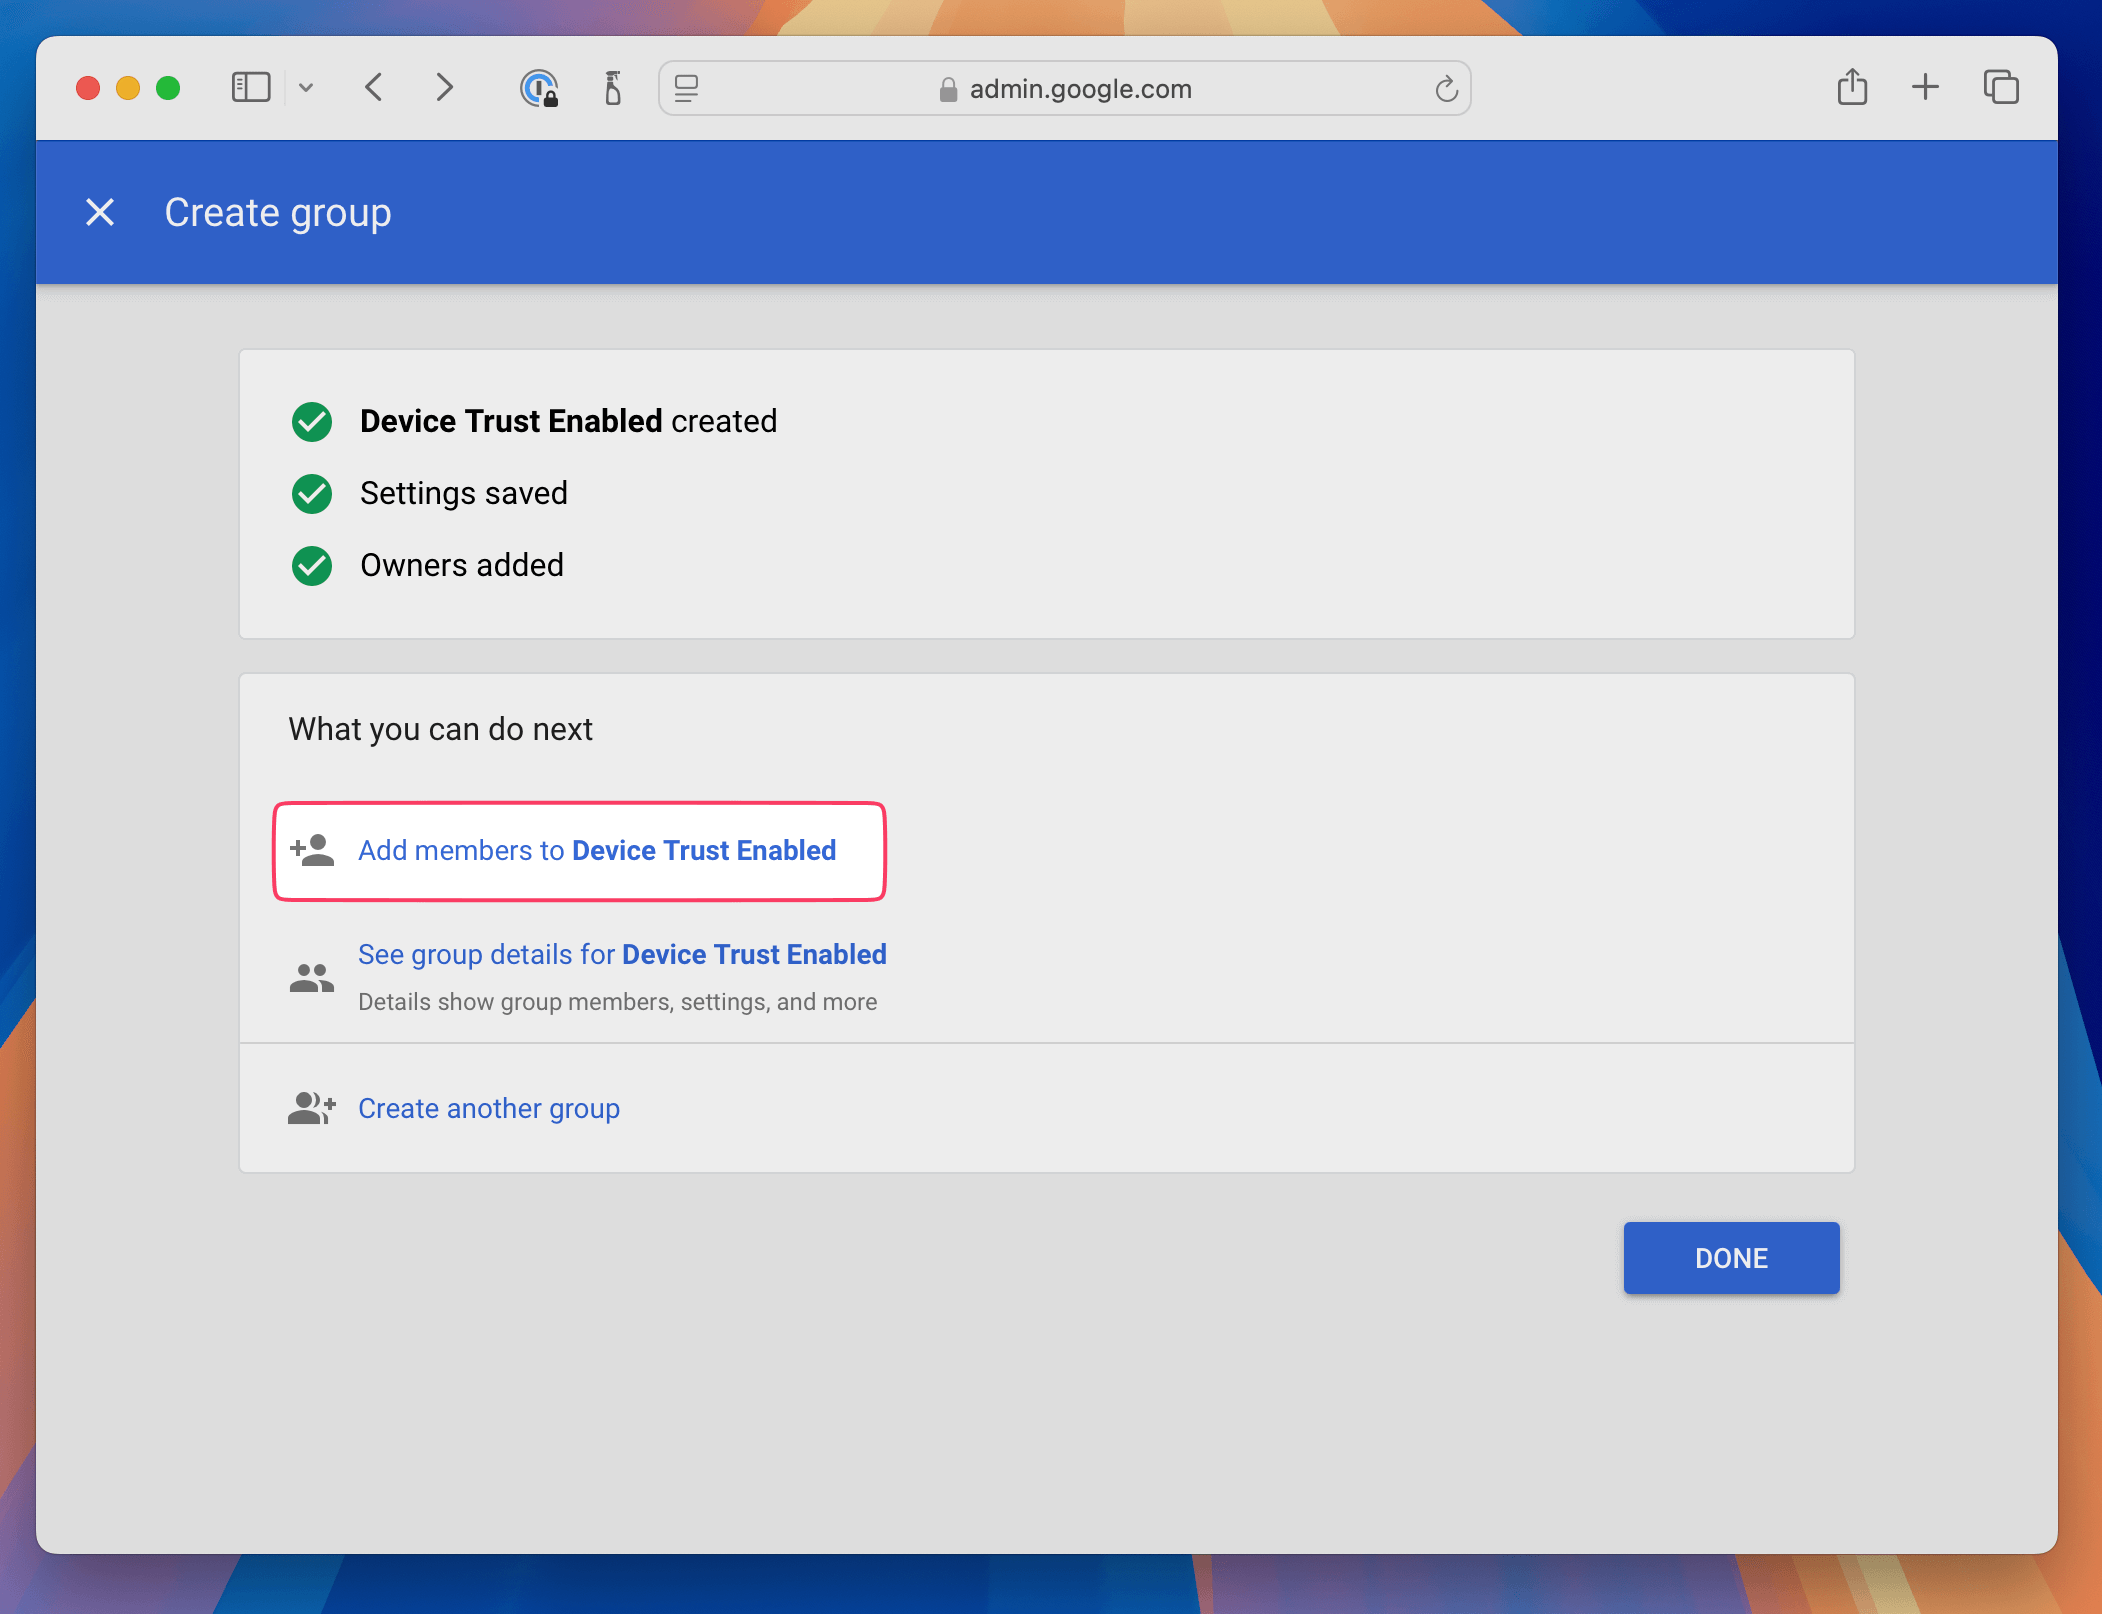
On the group creation confirmation screen, click Add members to Device Trust Enabled
In the modal that appears, search for the email addresses that belong to the people you’d like to add and then click Add to Group
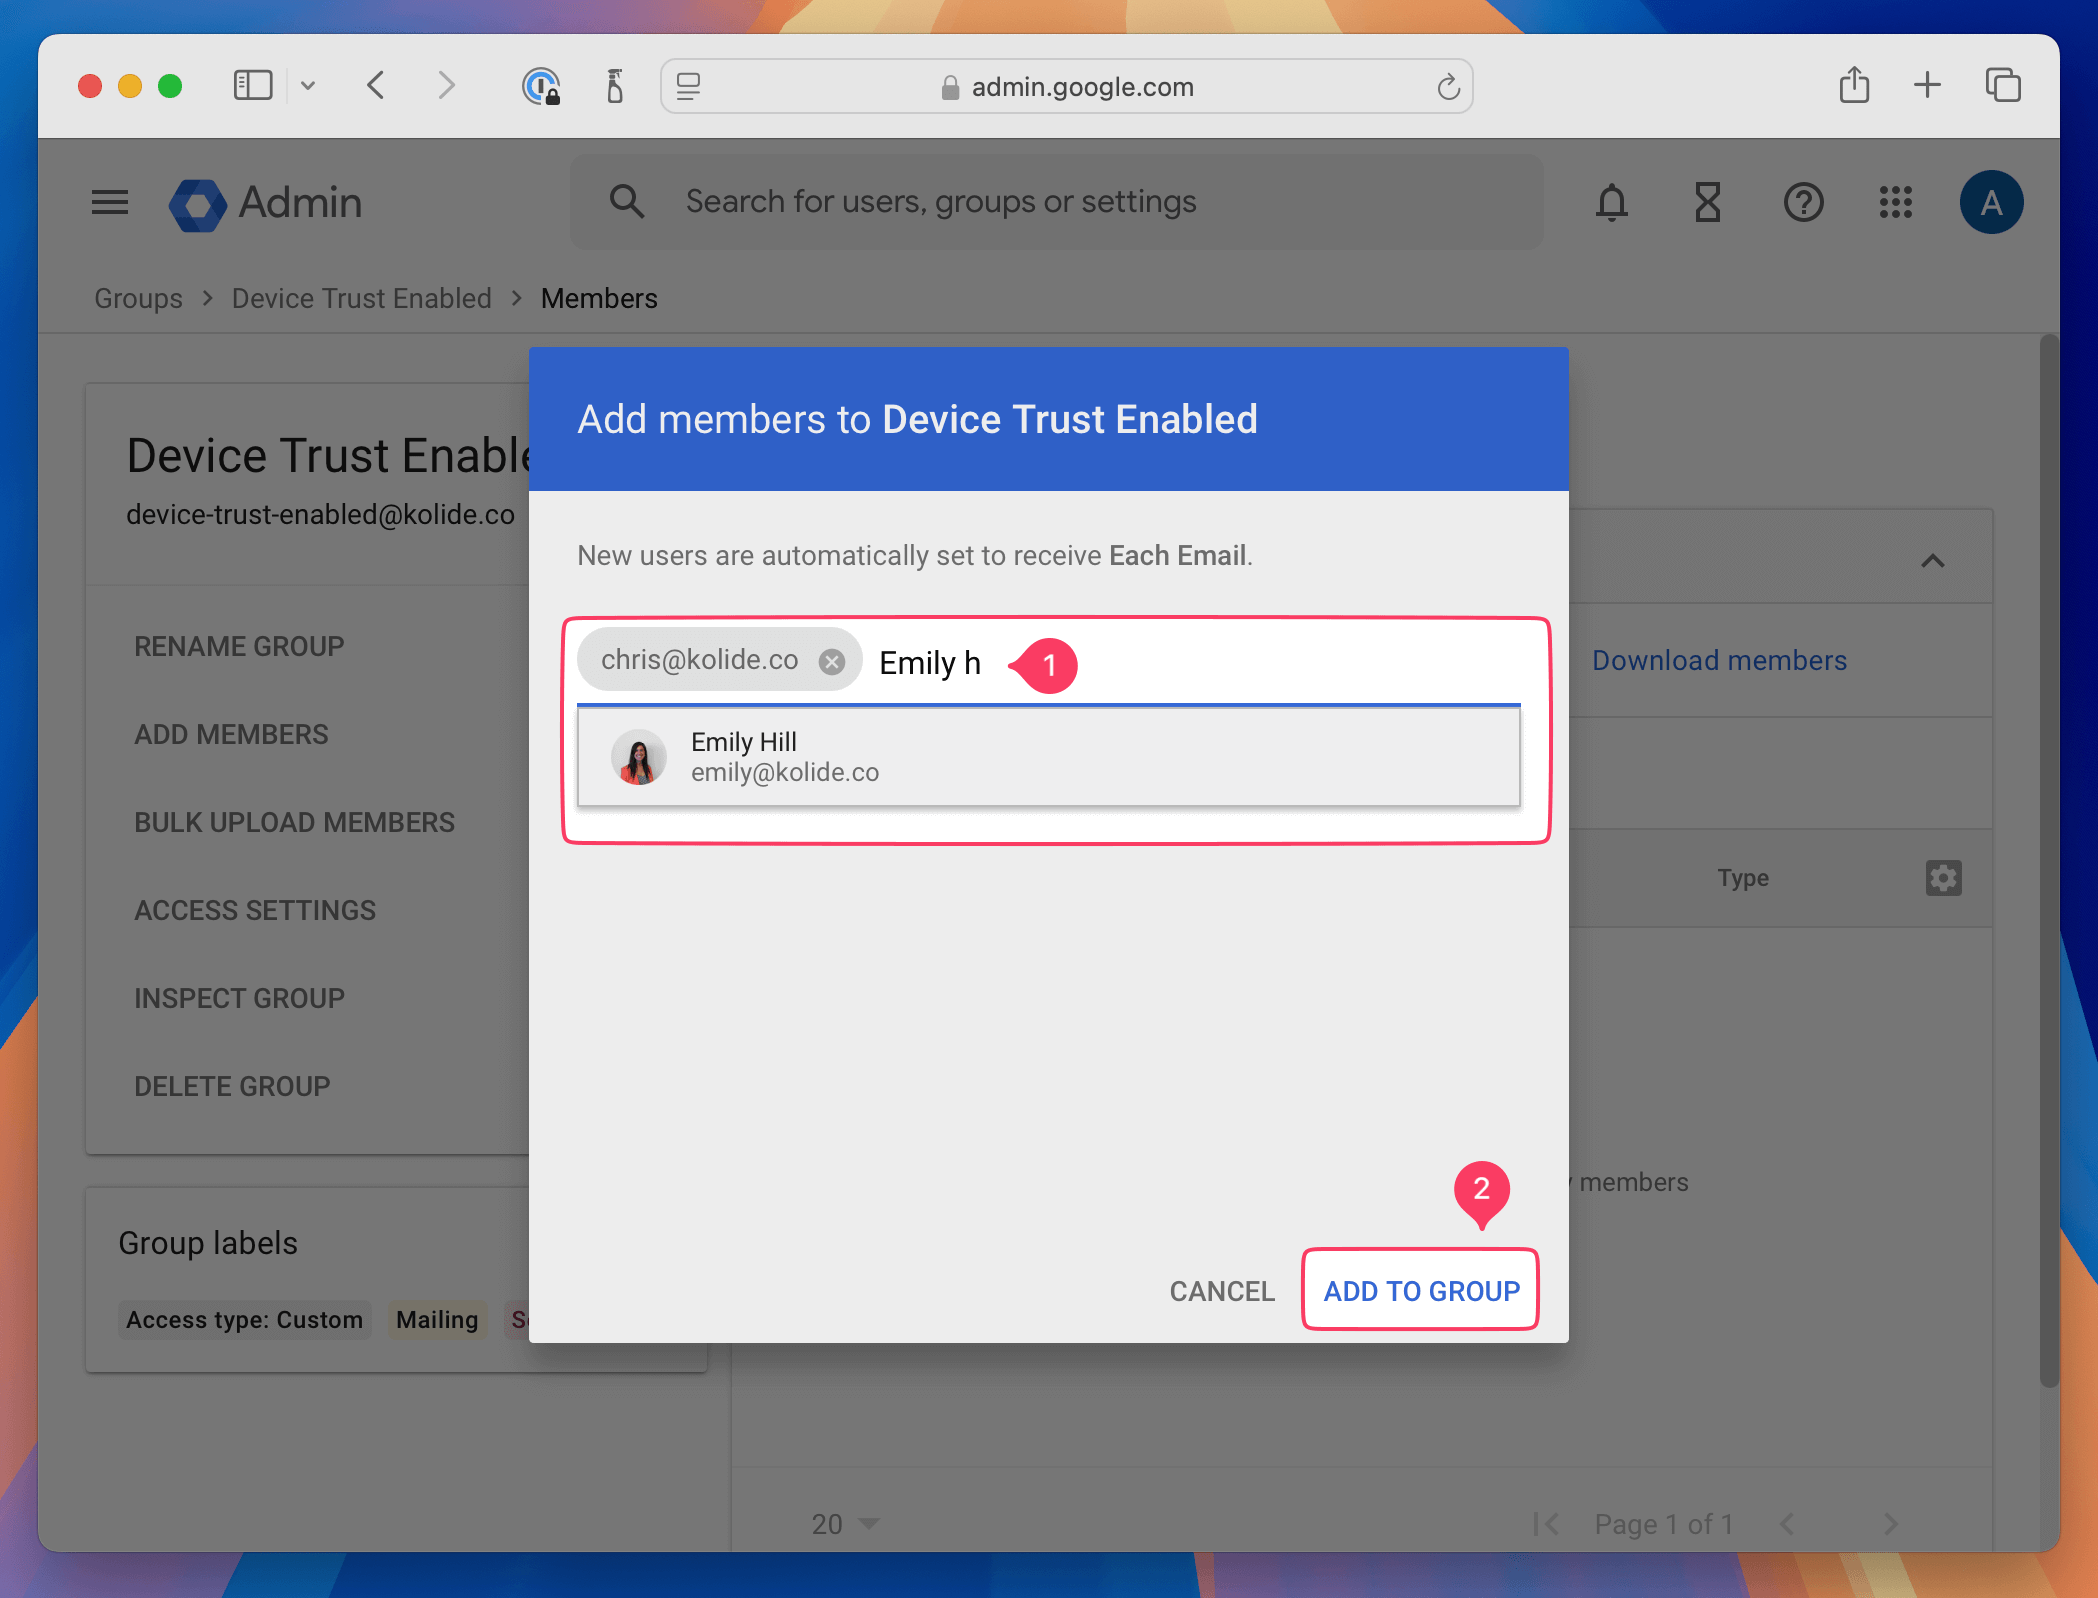
That’s it! You’re ready to move on to the next step.
Step 2: Add the Kolide SAML App
In this step, we will add Kolide as a custom SAML app within your Google Workspace portal. This will allow Kolide to use Google as a Single Sign-On service provider for authenticating users into the Kolide admin interface, the end-user portal, and any apps you are managing within Kolide.
You will need two browser tabs or windows open for the steps below.
In the first tab…
Sign into https://app.kolide.com
Click the avatar in the upper-right
Click Settings
In the left-hand navigation menu, click Identity Providers.
Under Google click Set Up.
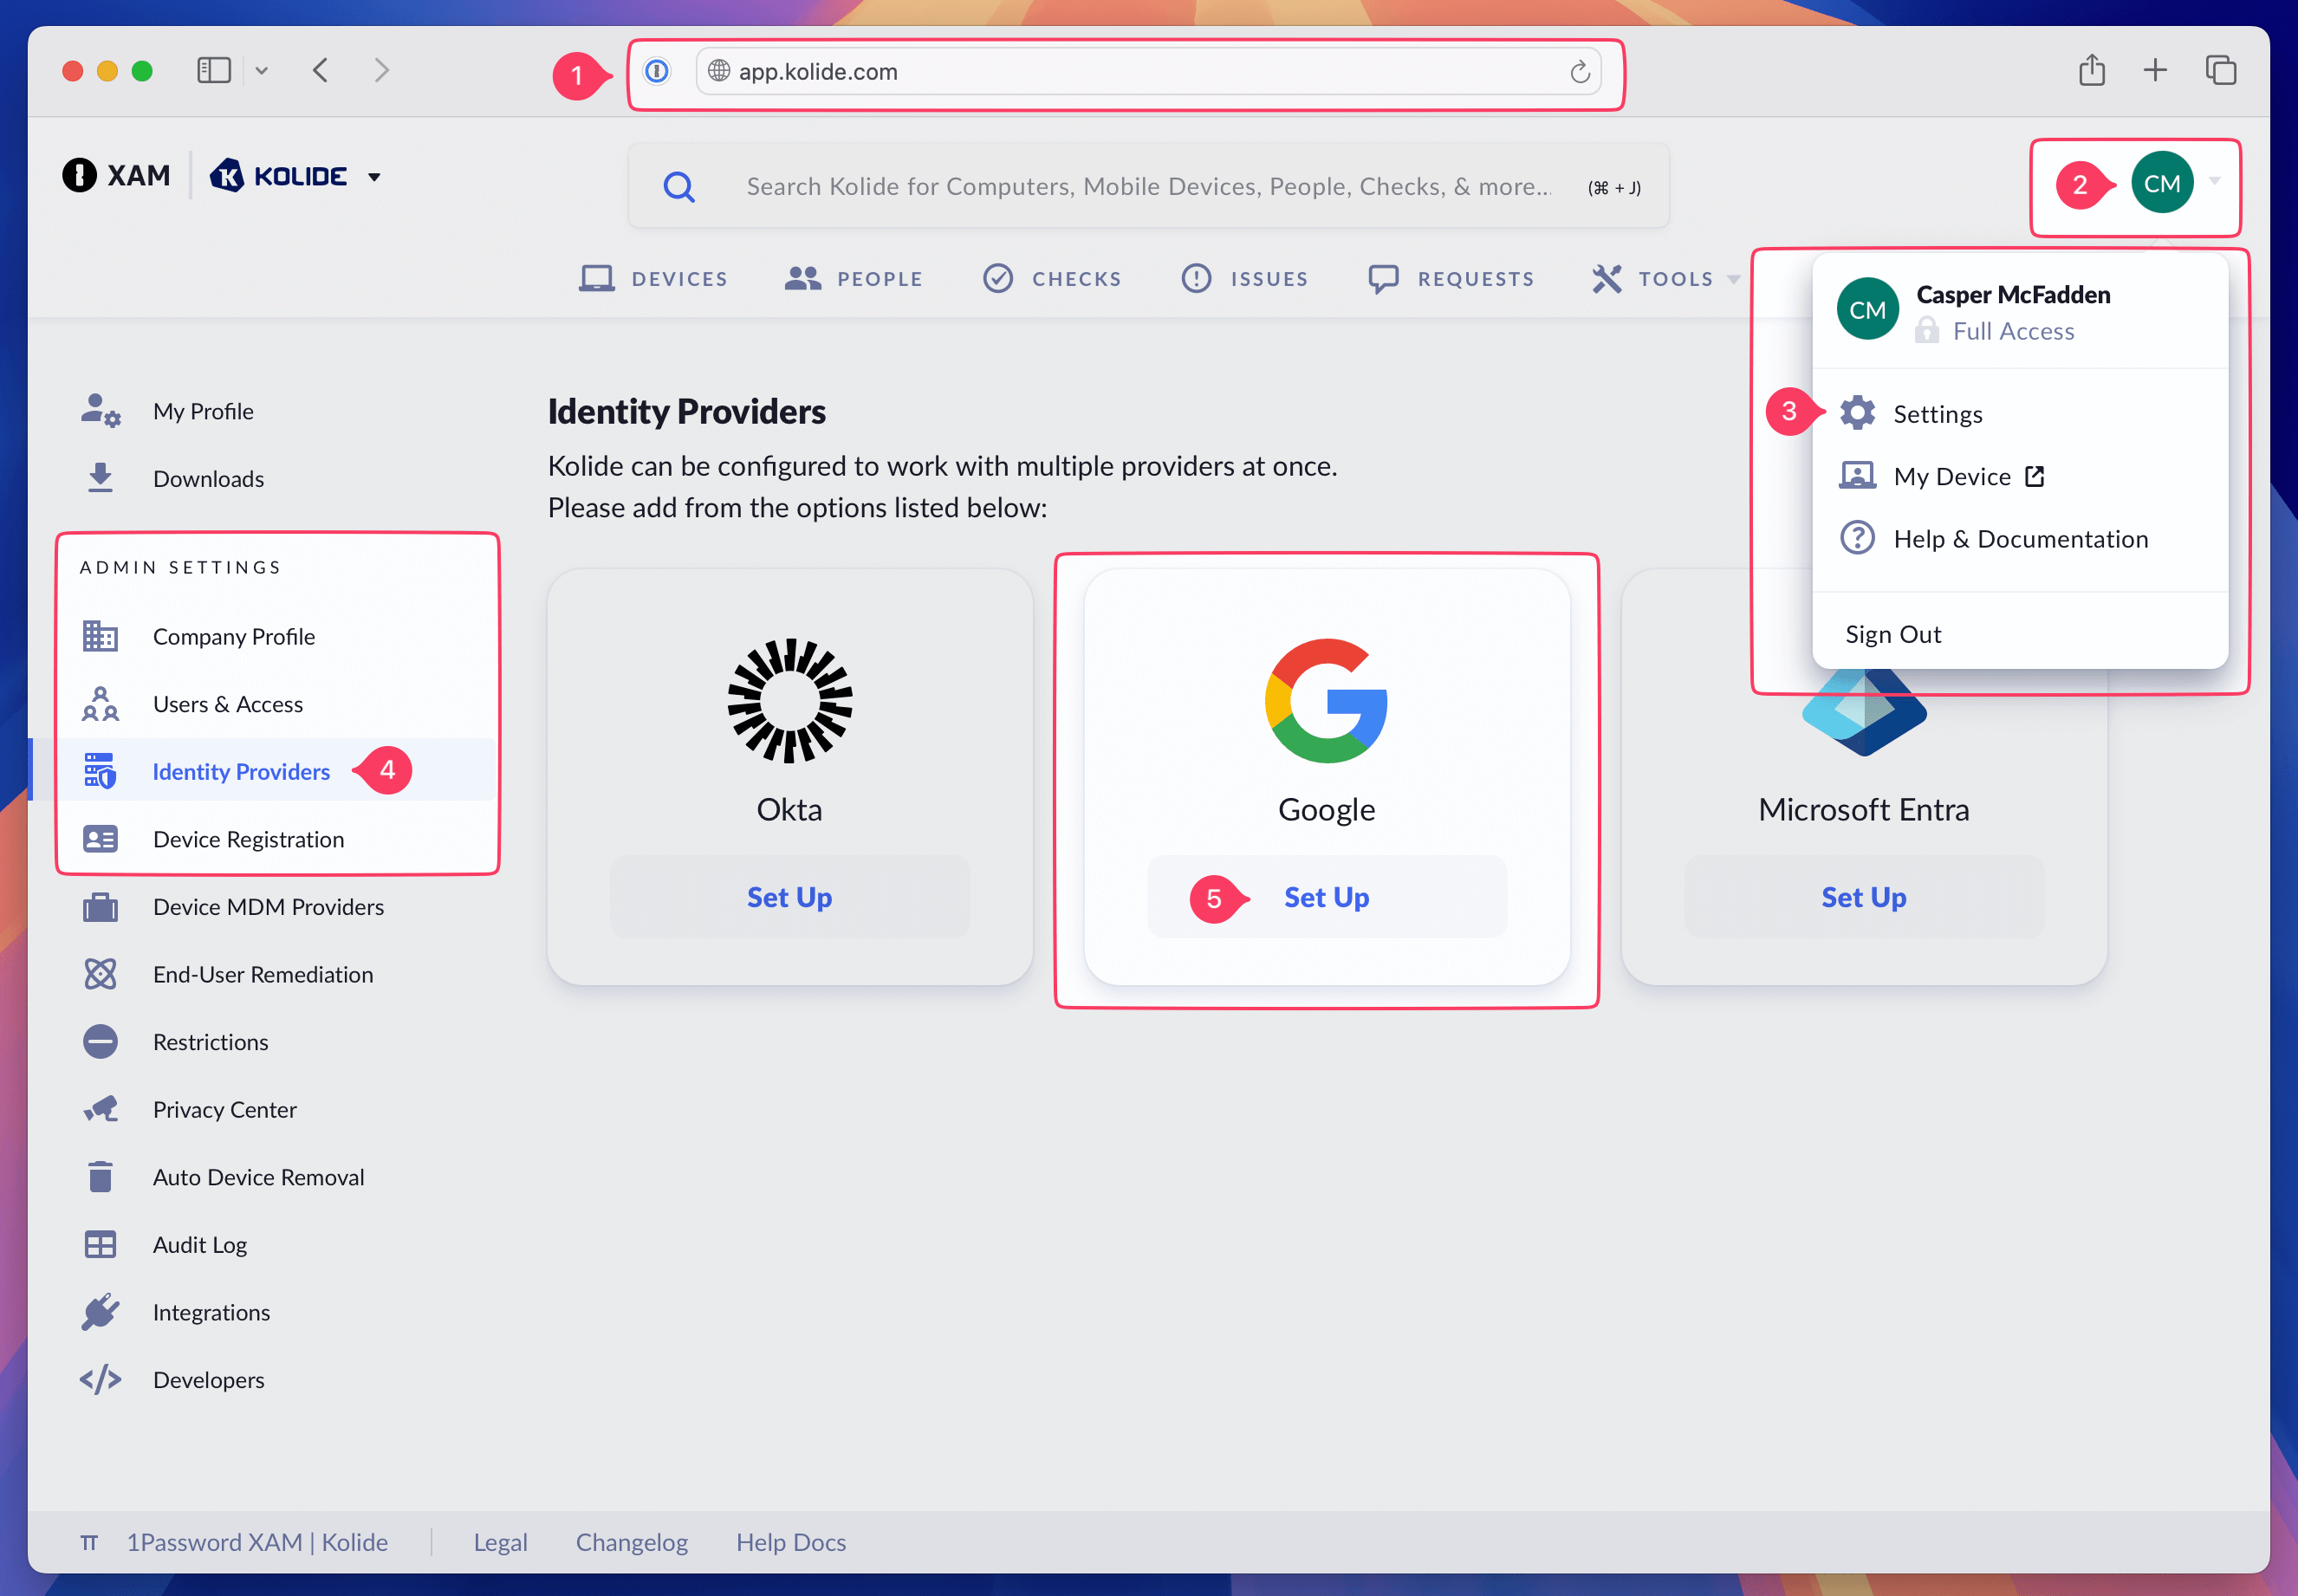
In the second tab…
Sign into the Google Workspace admin console by going to (https://admin.google.com)
Expand Apps
Click Web and Mobile apps
On the Groups page, click Add app
In the pull-down menu, click Add custom SAML app
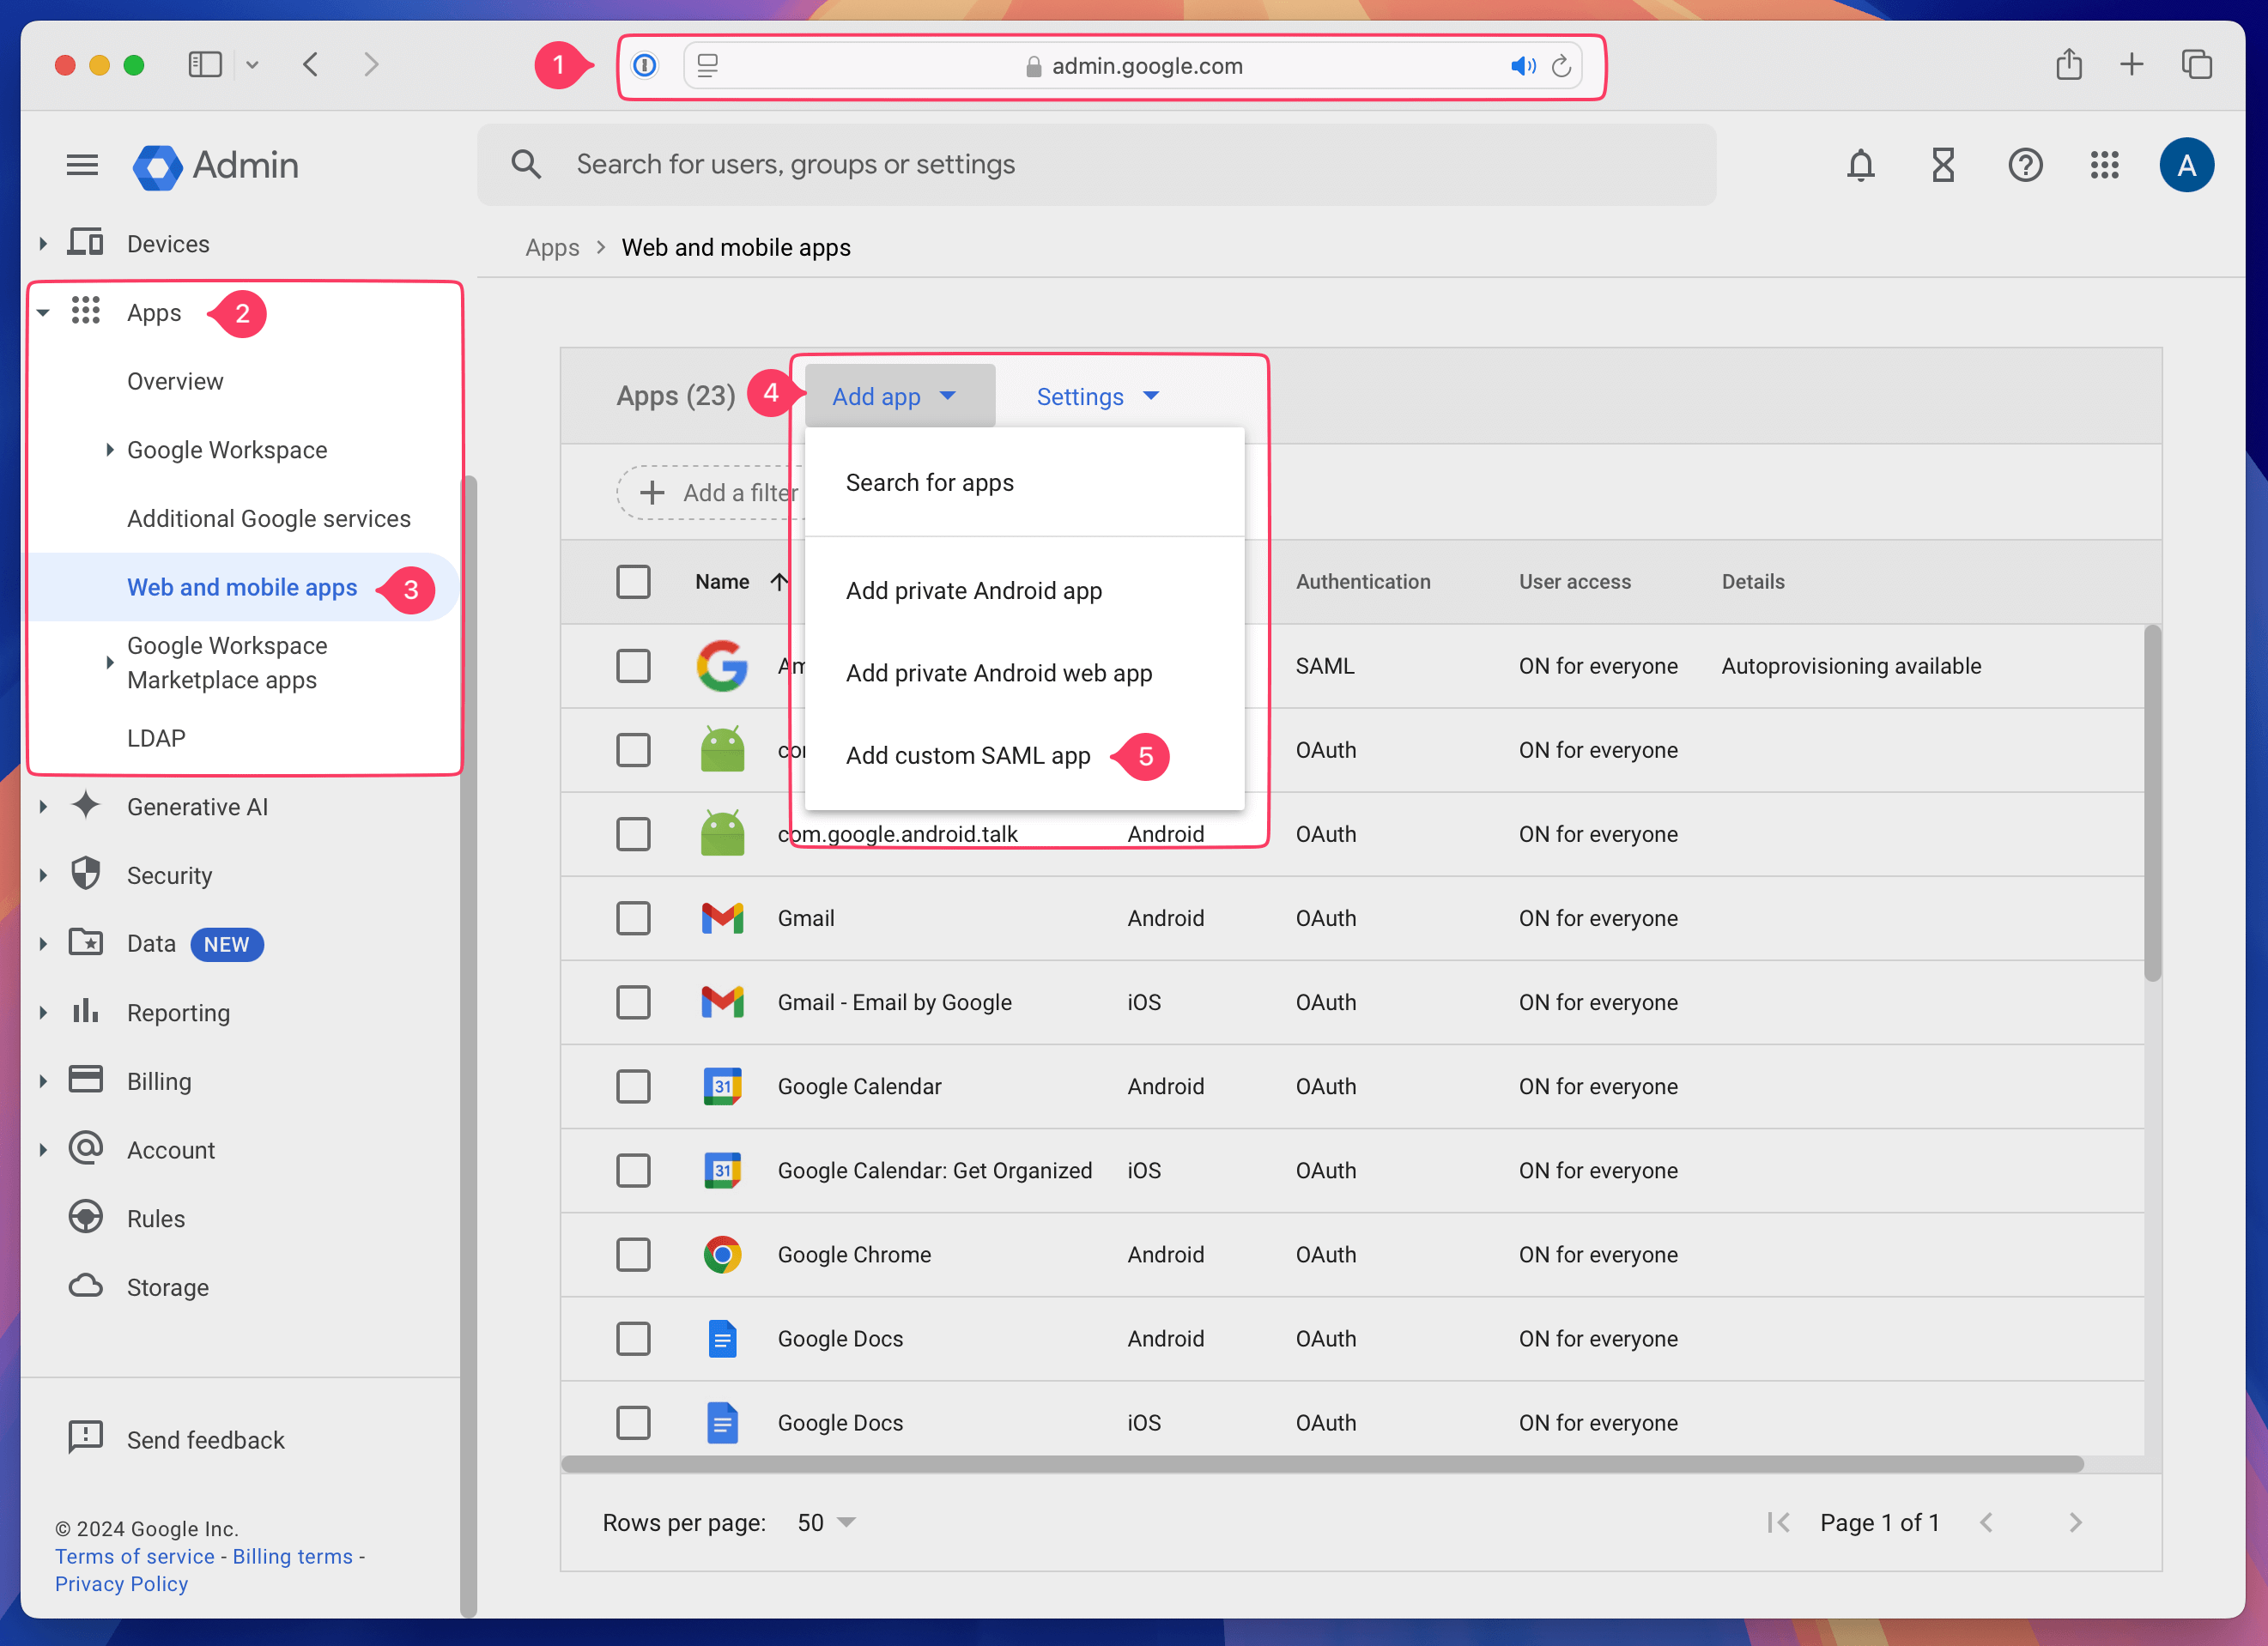
-
In the form that appears, fill it out with the following suggested details:
-
Name:
Kolide -
Description:
Kolide Device Trust - App Icon: For a nice-looking Kolide logo, you can download it here (don’t worry if it looks smushed on this screen; it will look correct elsewhere) Then click Continue
-
Name:
With both windows arranged side-by-side…
- In the Kolide admin tab, click Set Up Single Sign-On Provider
-
On the Google Admin tab, copy the values to the Kolide form as follows:
- Google: SSO URL ➡️ Kolide: Provider SSO URL
- Google: Certificate ➡️ Kolide: Provider X.509 Certificate
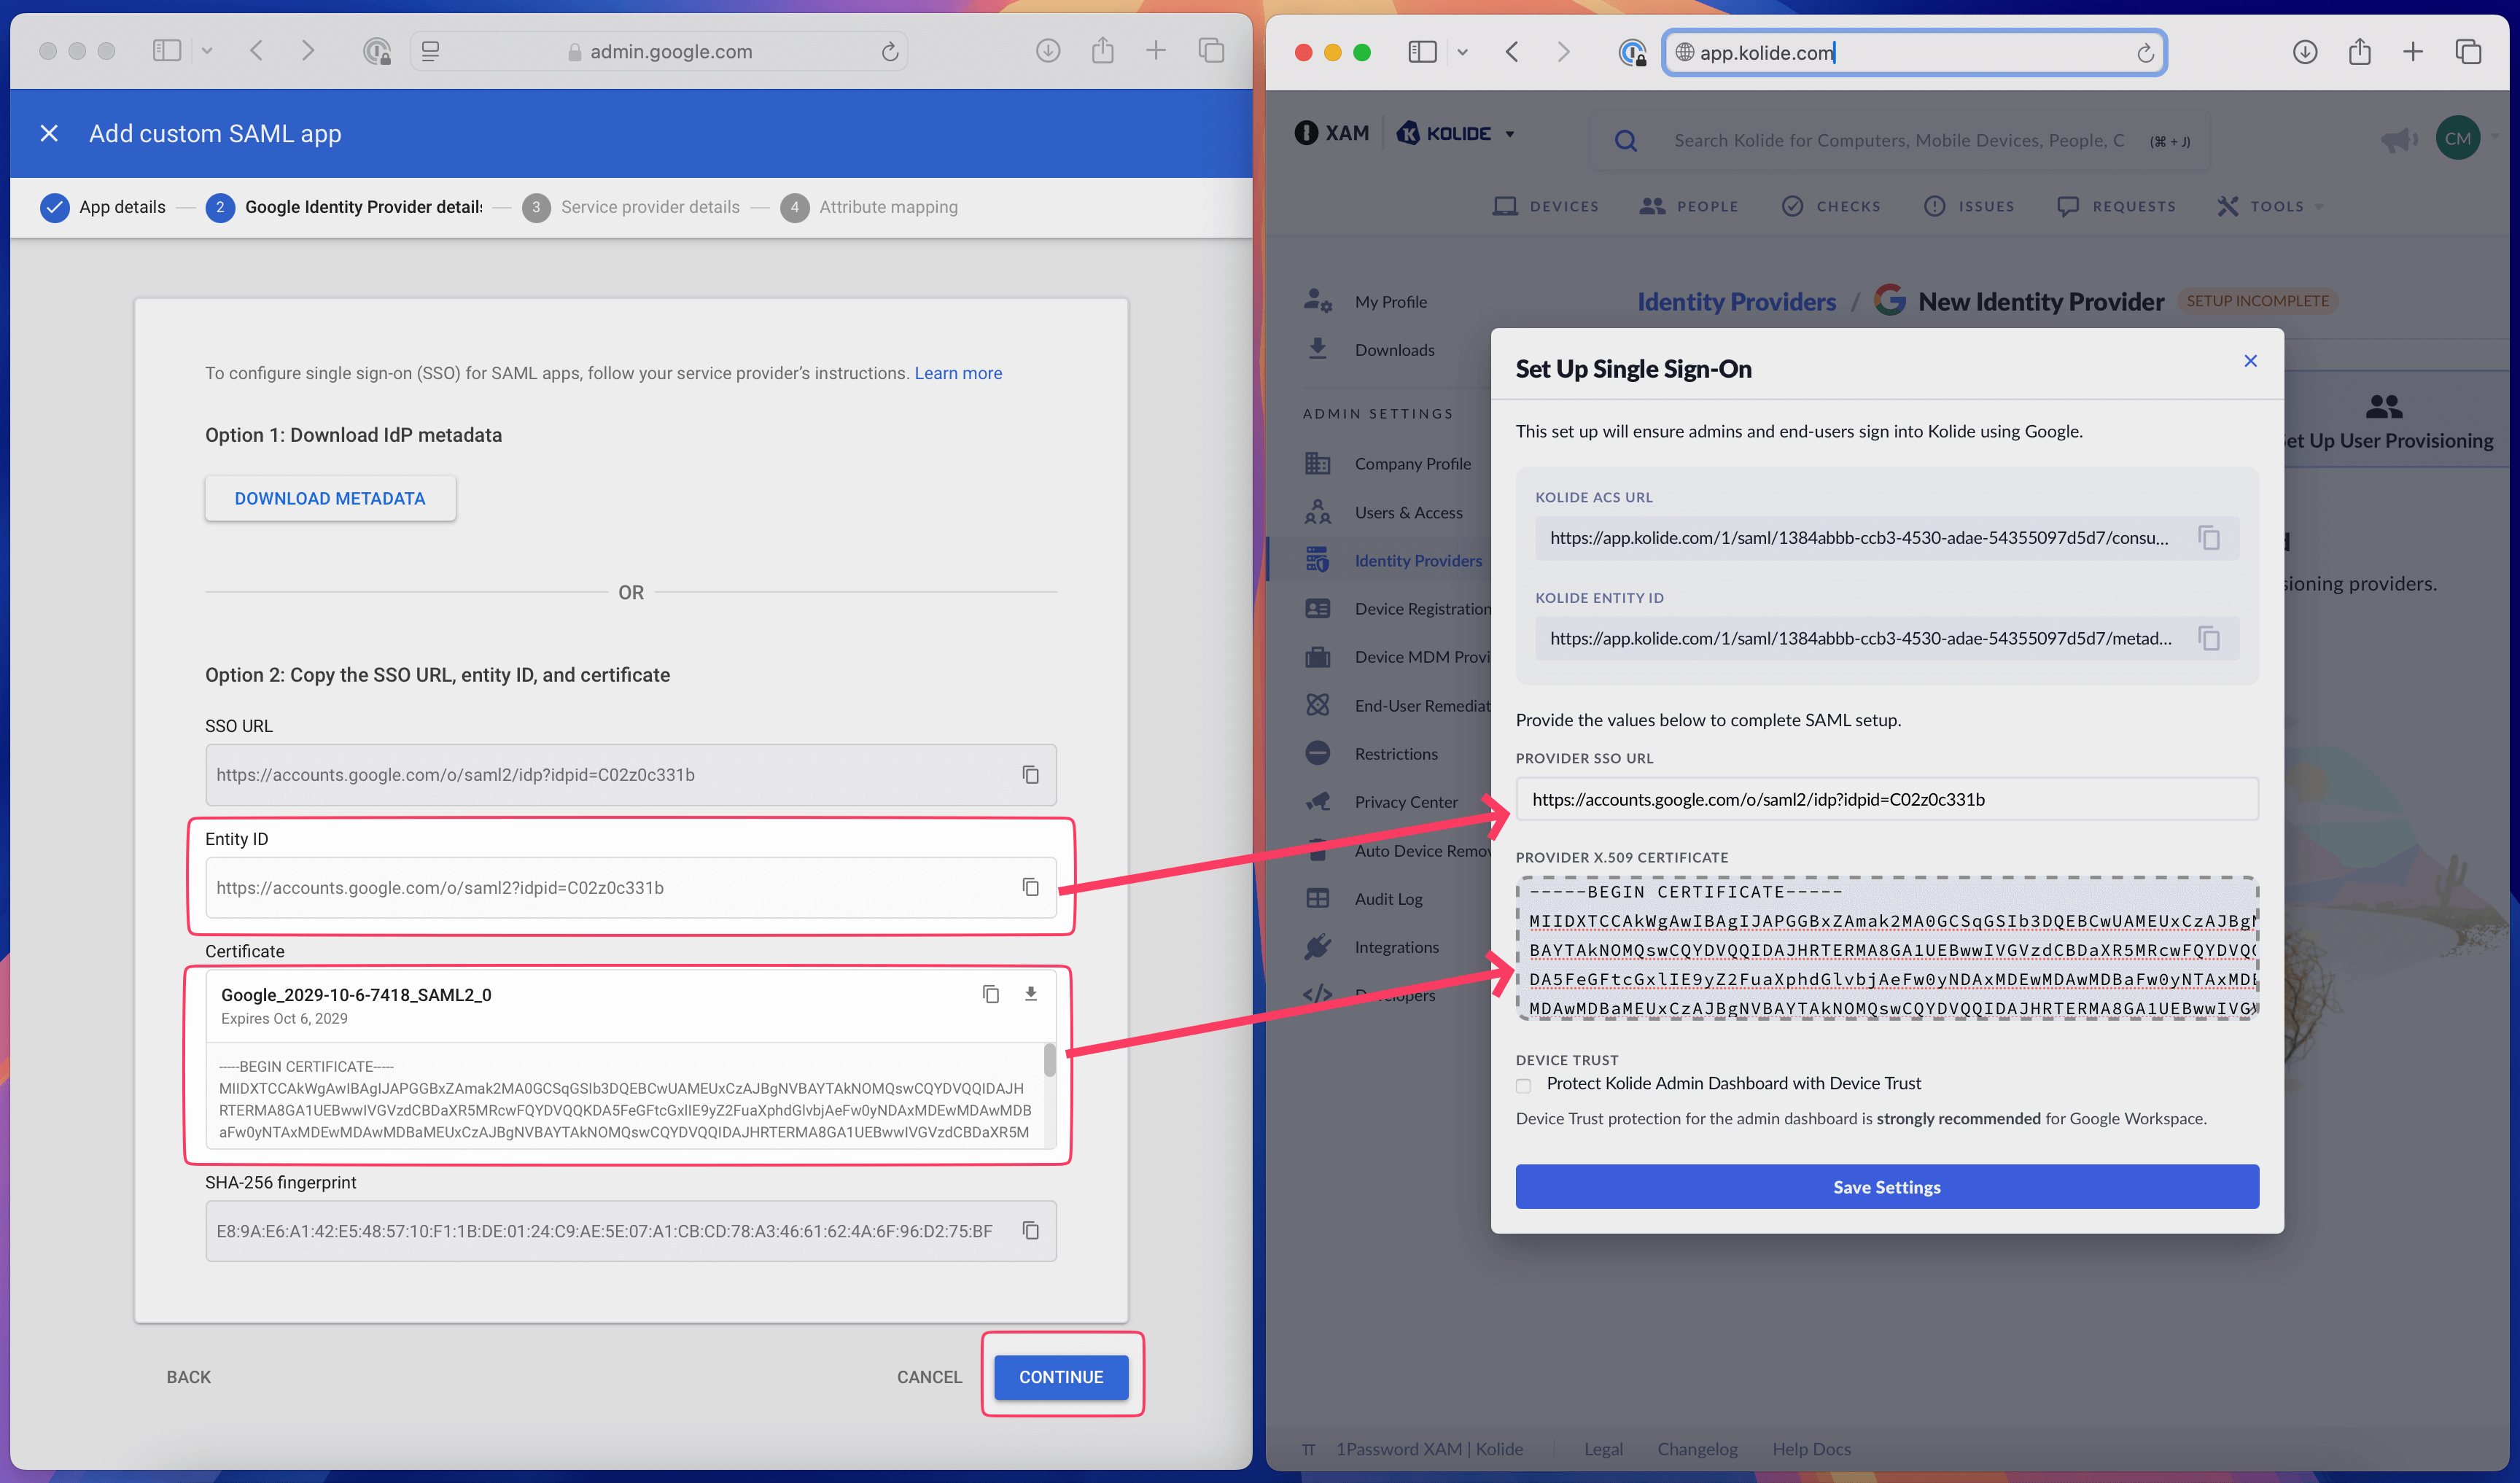 Note:Once you’ve copied the data over, click Continue on the Google Admin interface.If the SAML certificate has expired, you will need to generate a new SAML certificate before proceeding to the next step.
-
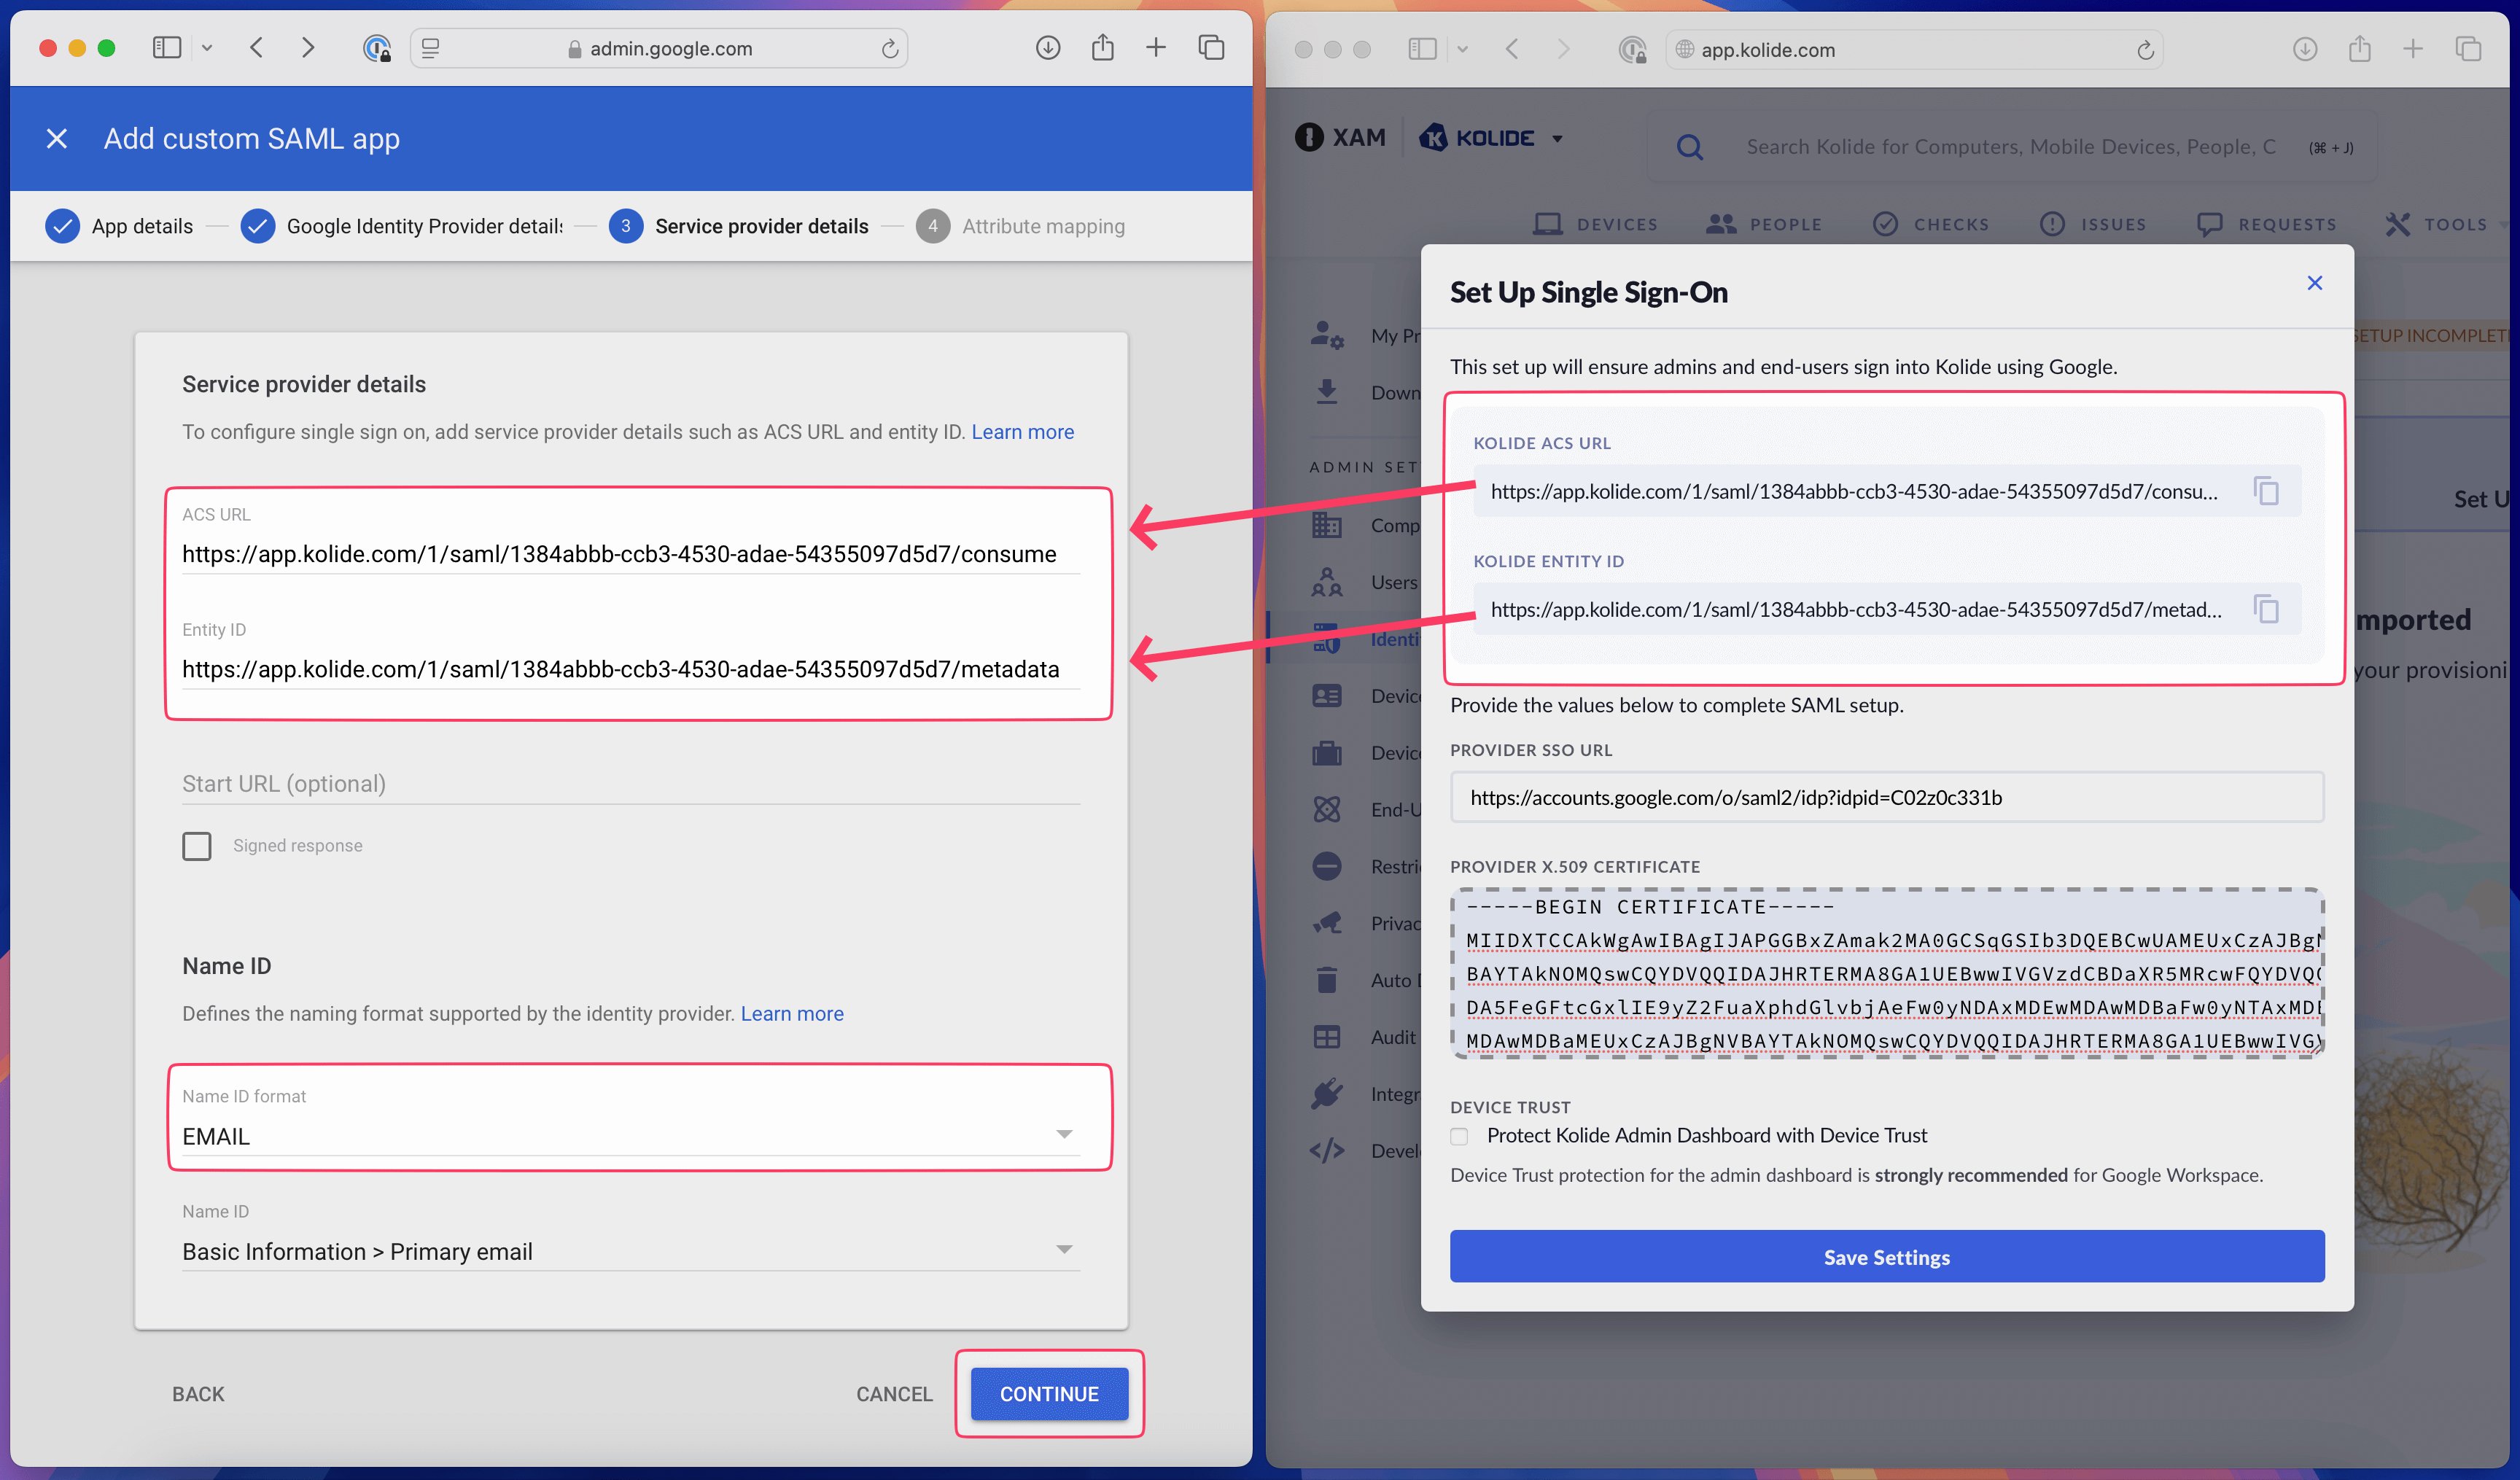
On the Kolide Admin tab, copy the values to the Google form as follows:
- Kolide: ACS URL ➡️ Google: ACS URL
- Kolide: Entity ID ➡️ Google: Entity ID
- On Google: click the Name ID format dropdown and select Email
- Click Continue
On the Attribute Mapping setup, you can leave everything blank (accept all the defaults) and click Finish.
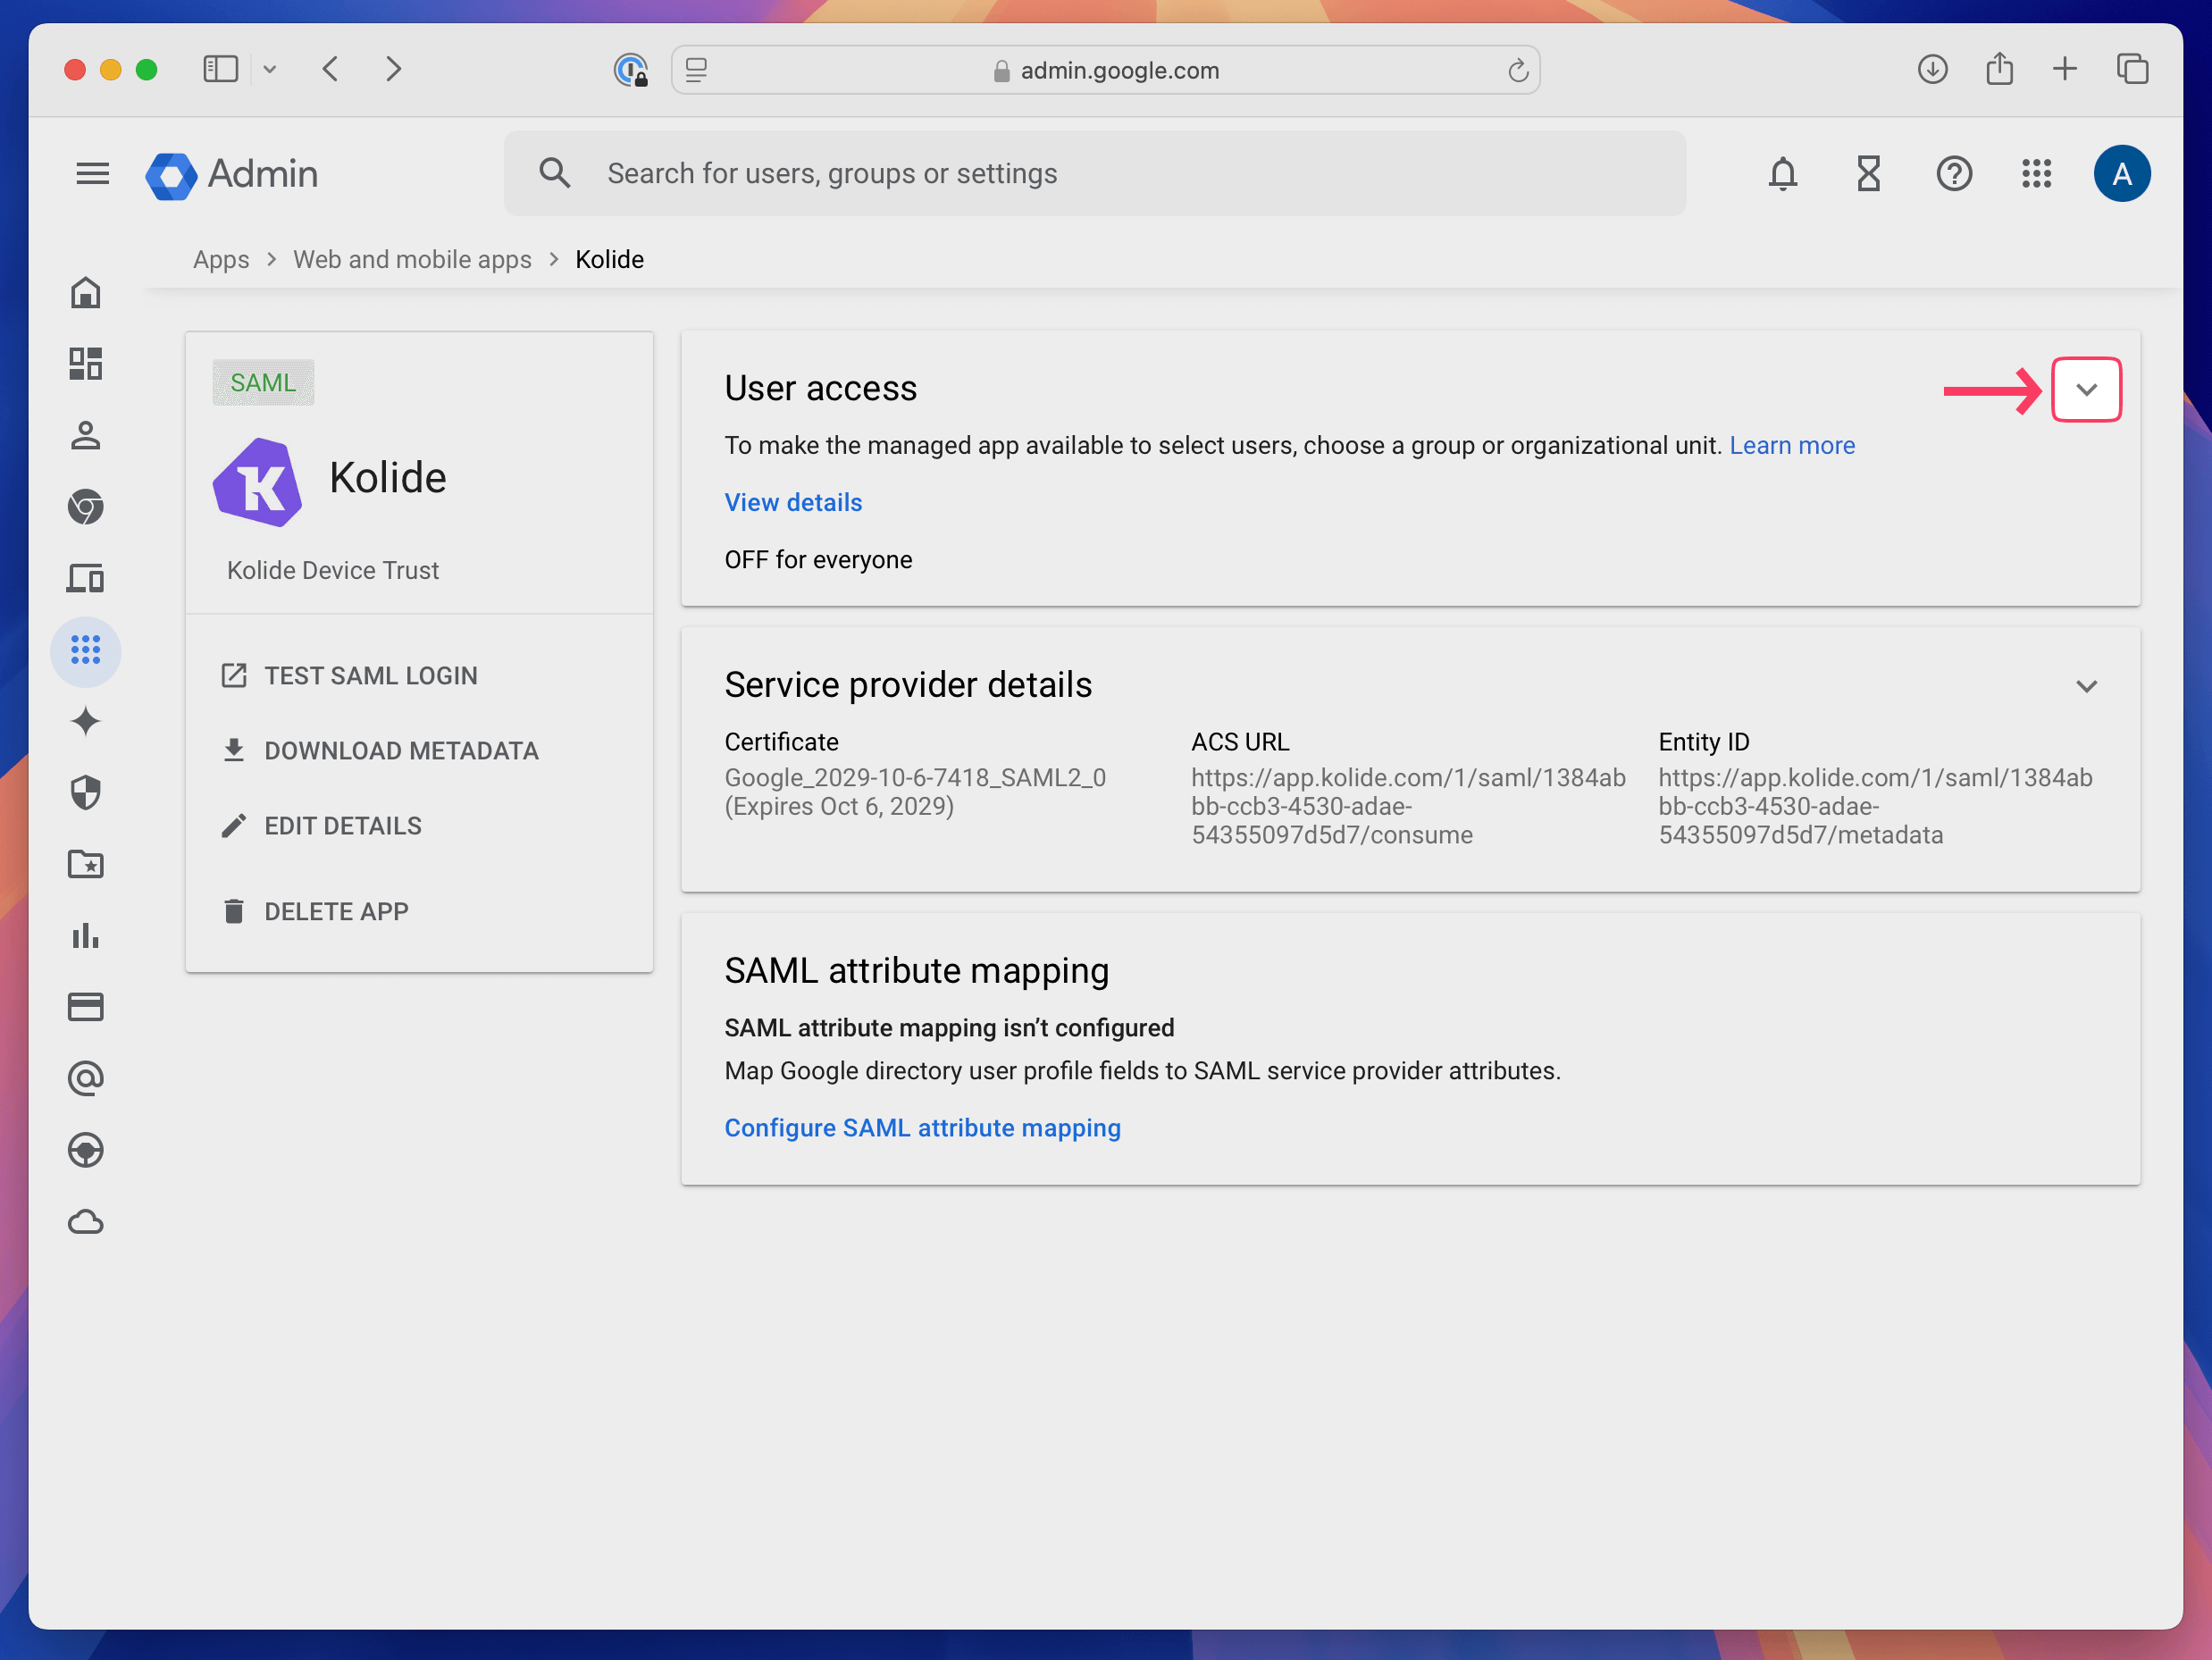
You will be redirected to the app details page. Once there, click the caret next to User access.
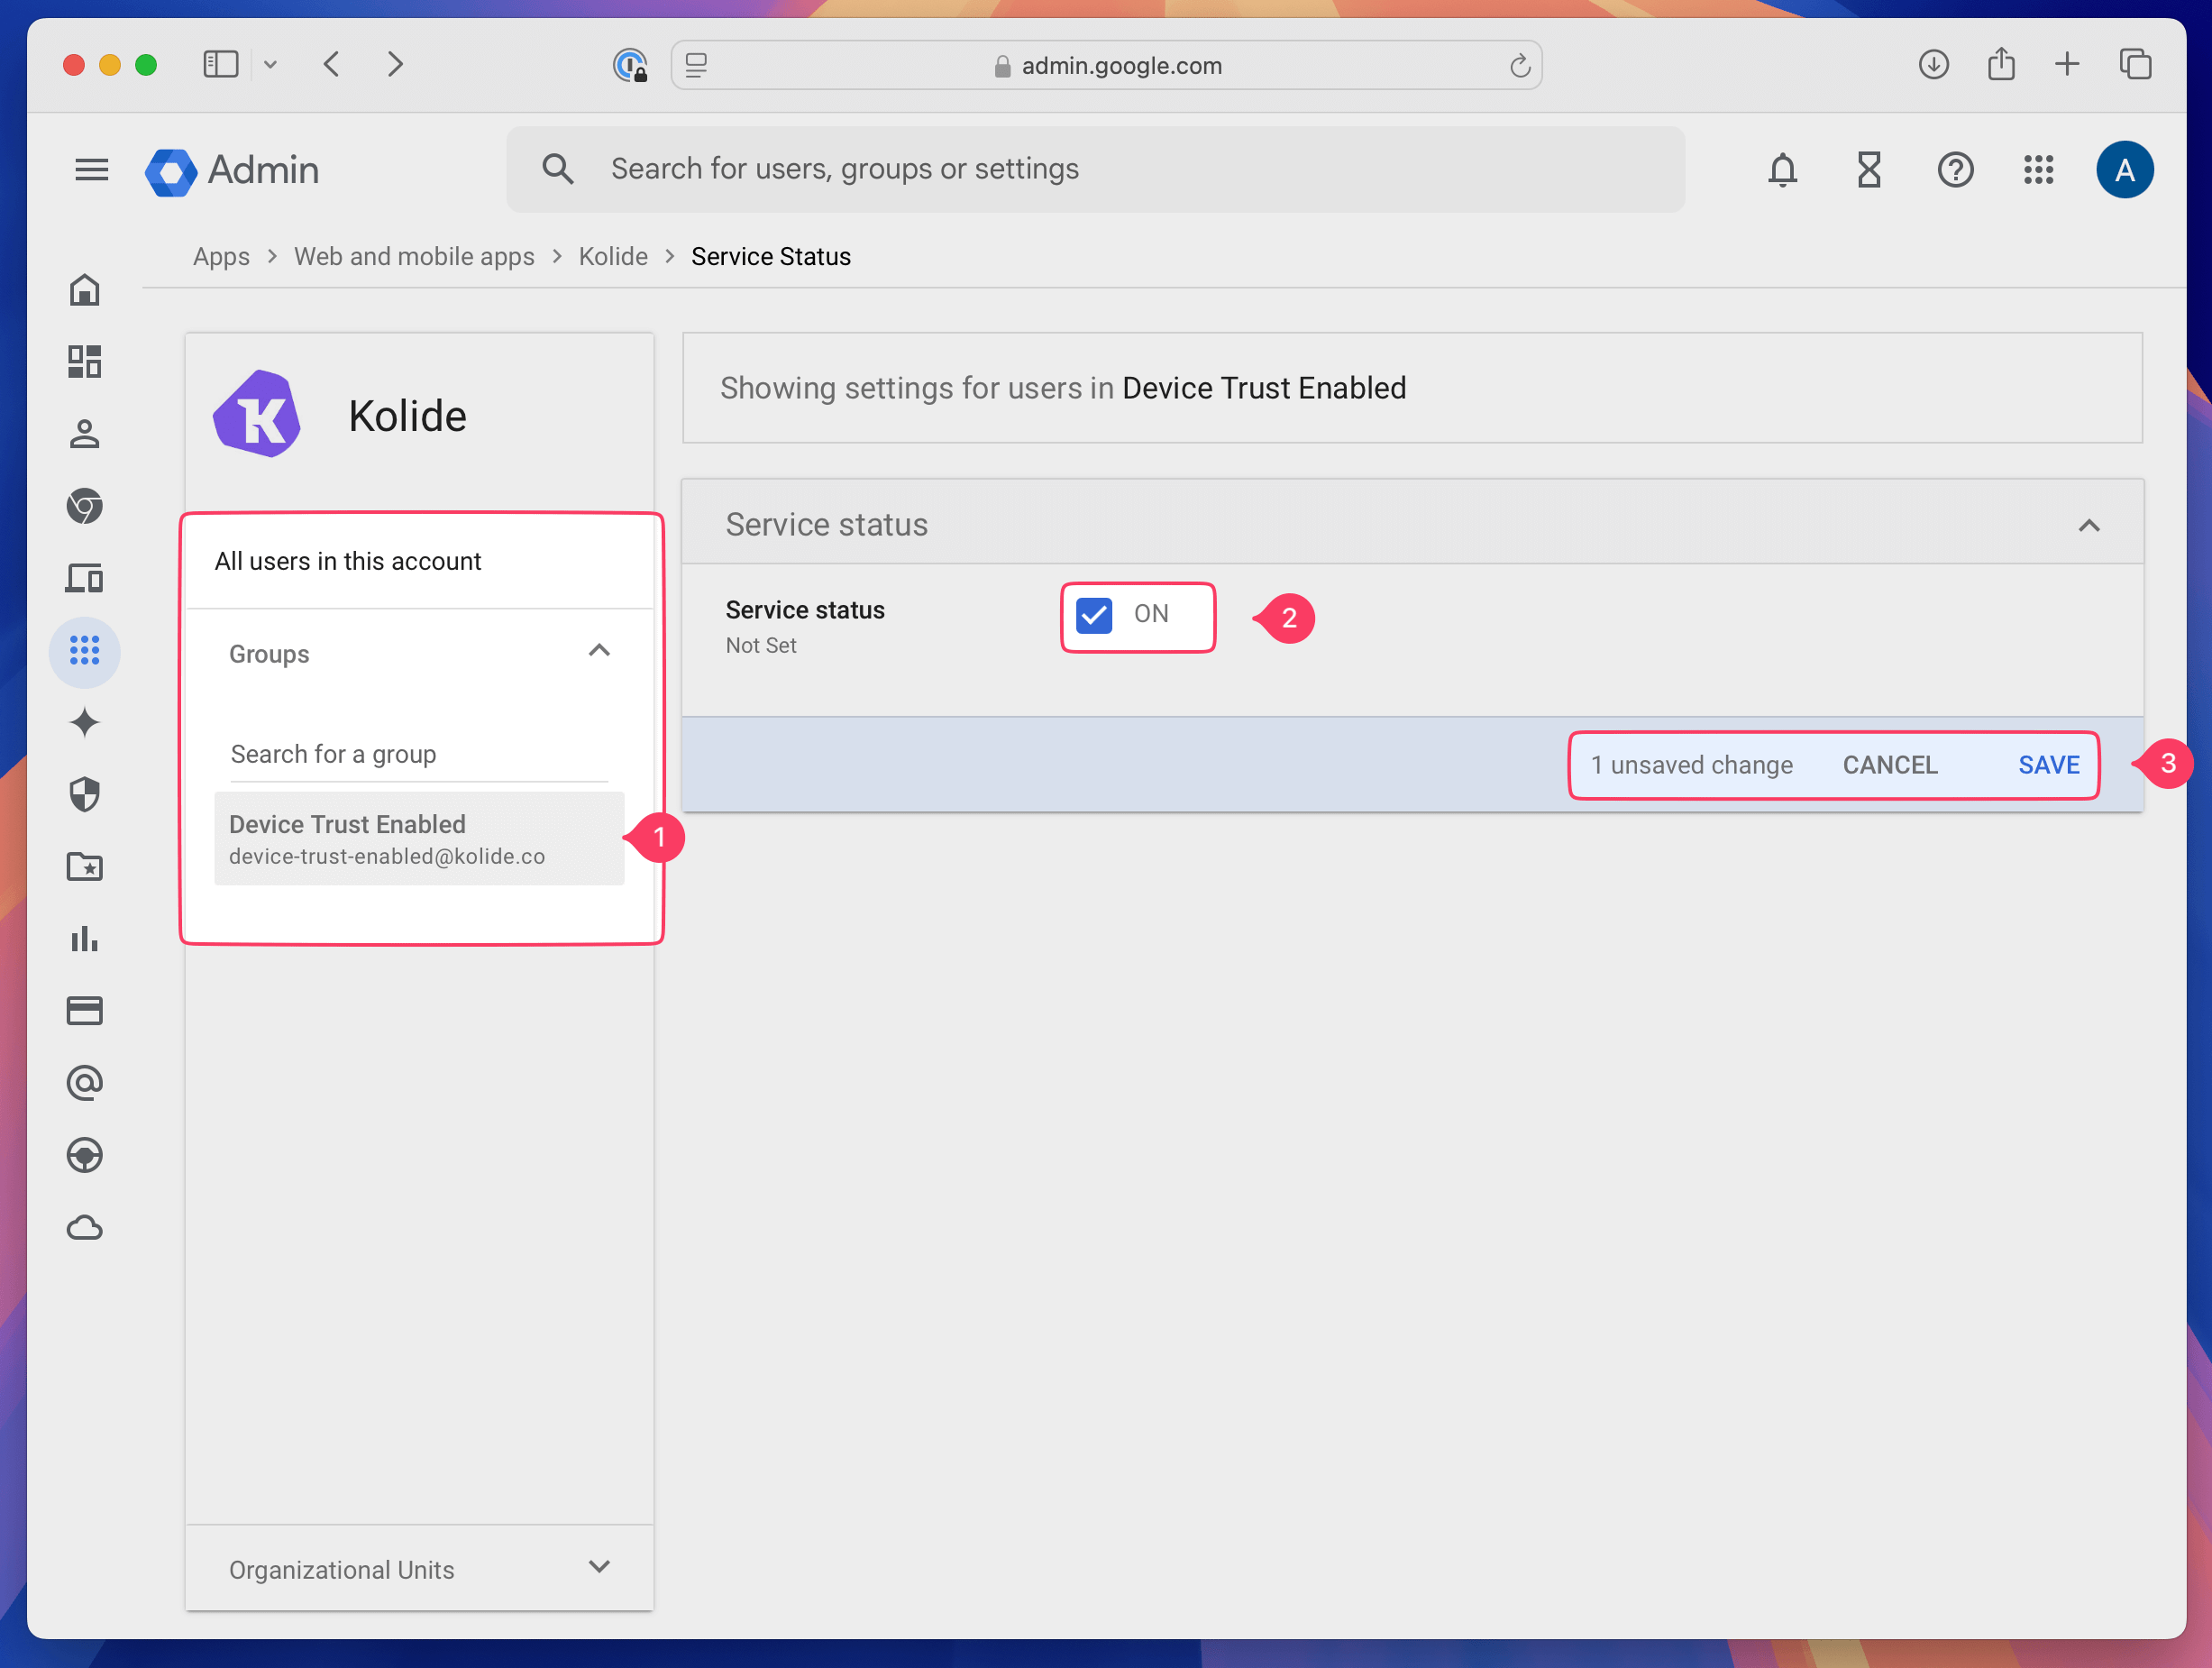
If you made a group in Step 1, use the left sidebar to search and add the Device Trust Enabled group. Then, next to Service status tick the checkbox, and click Save.
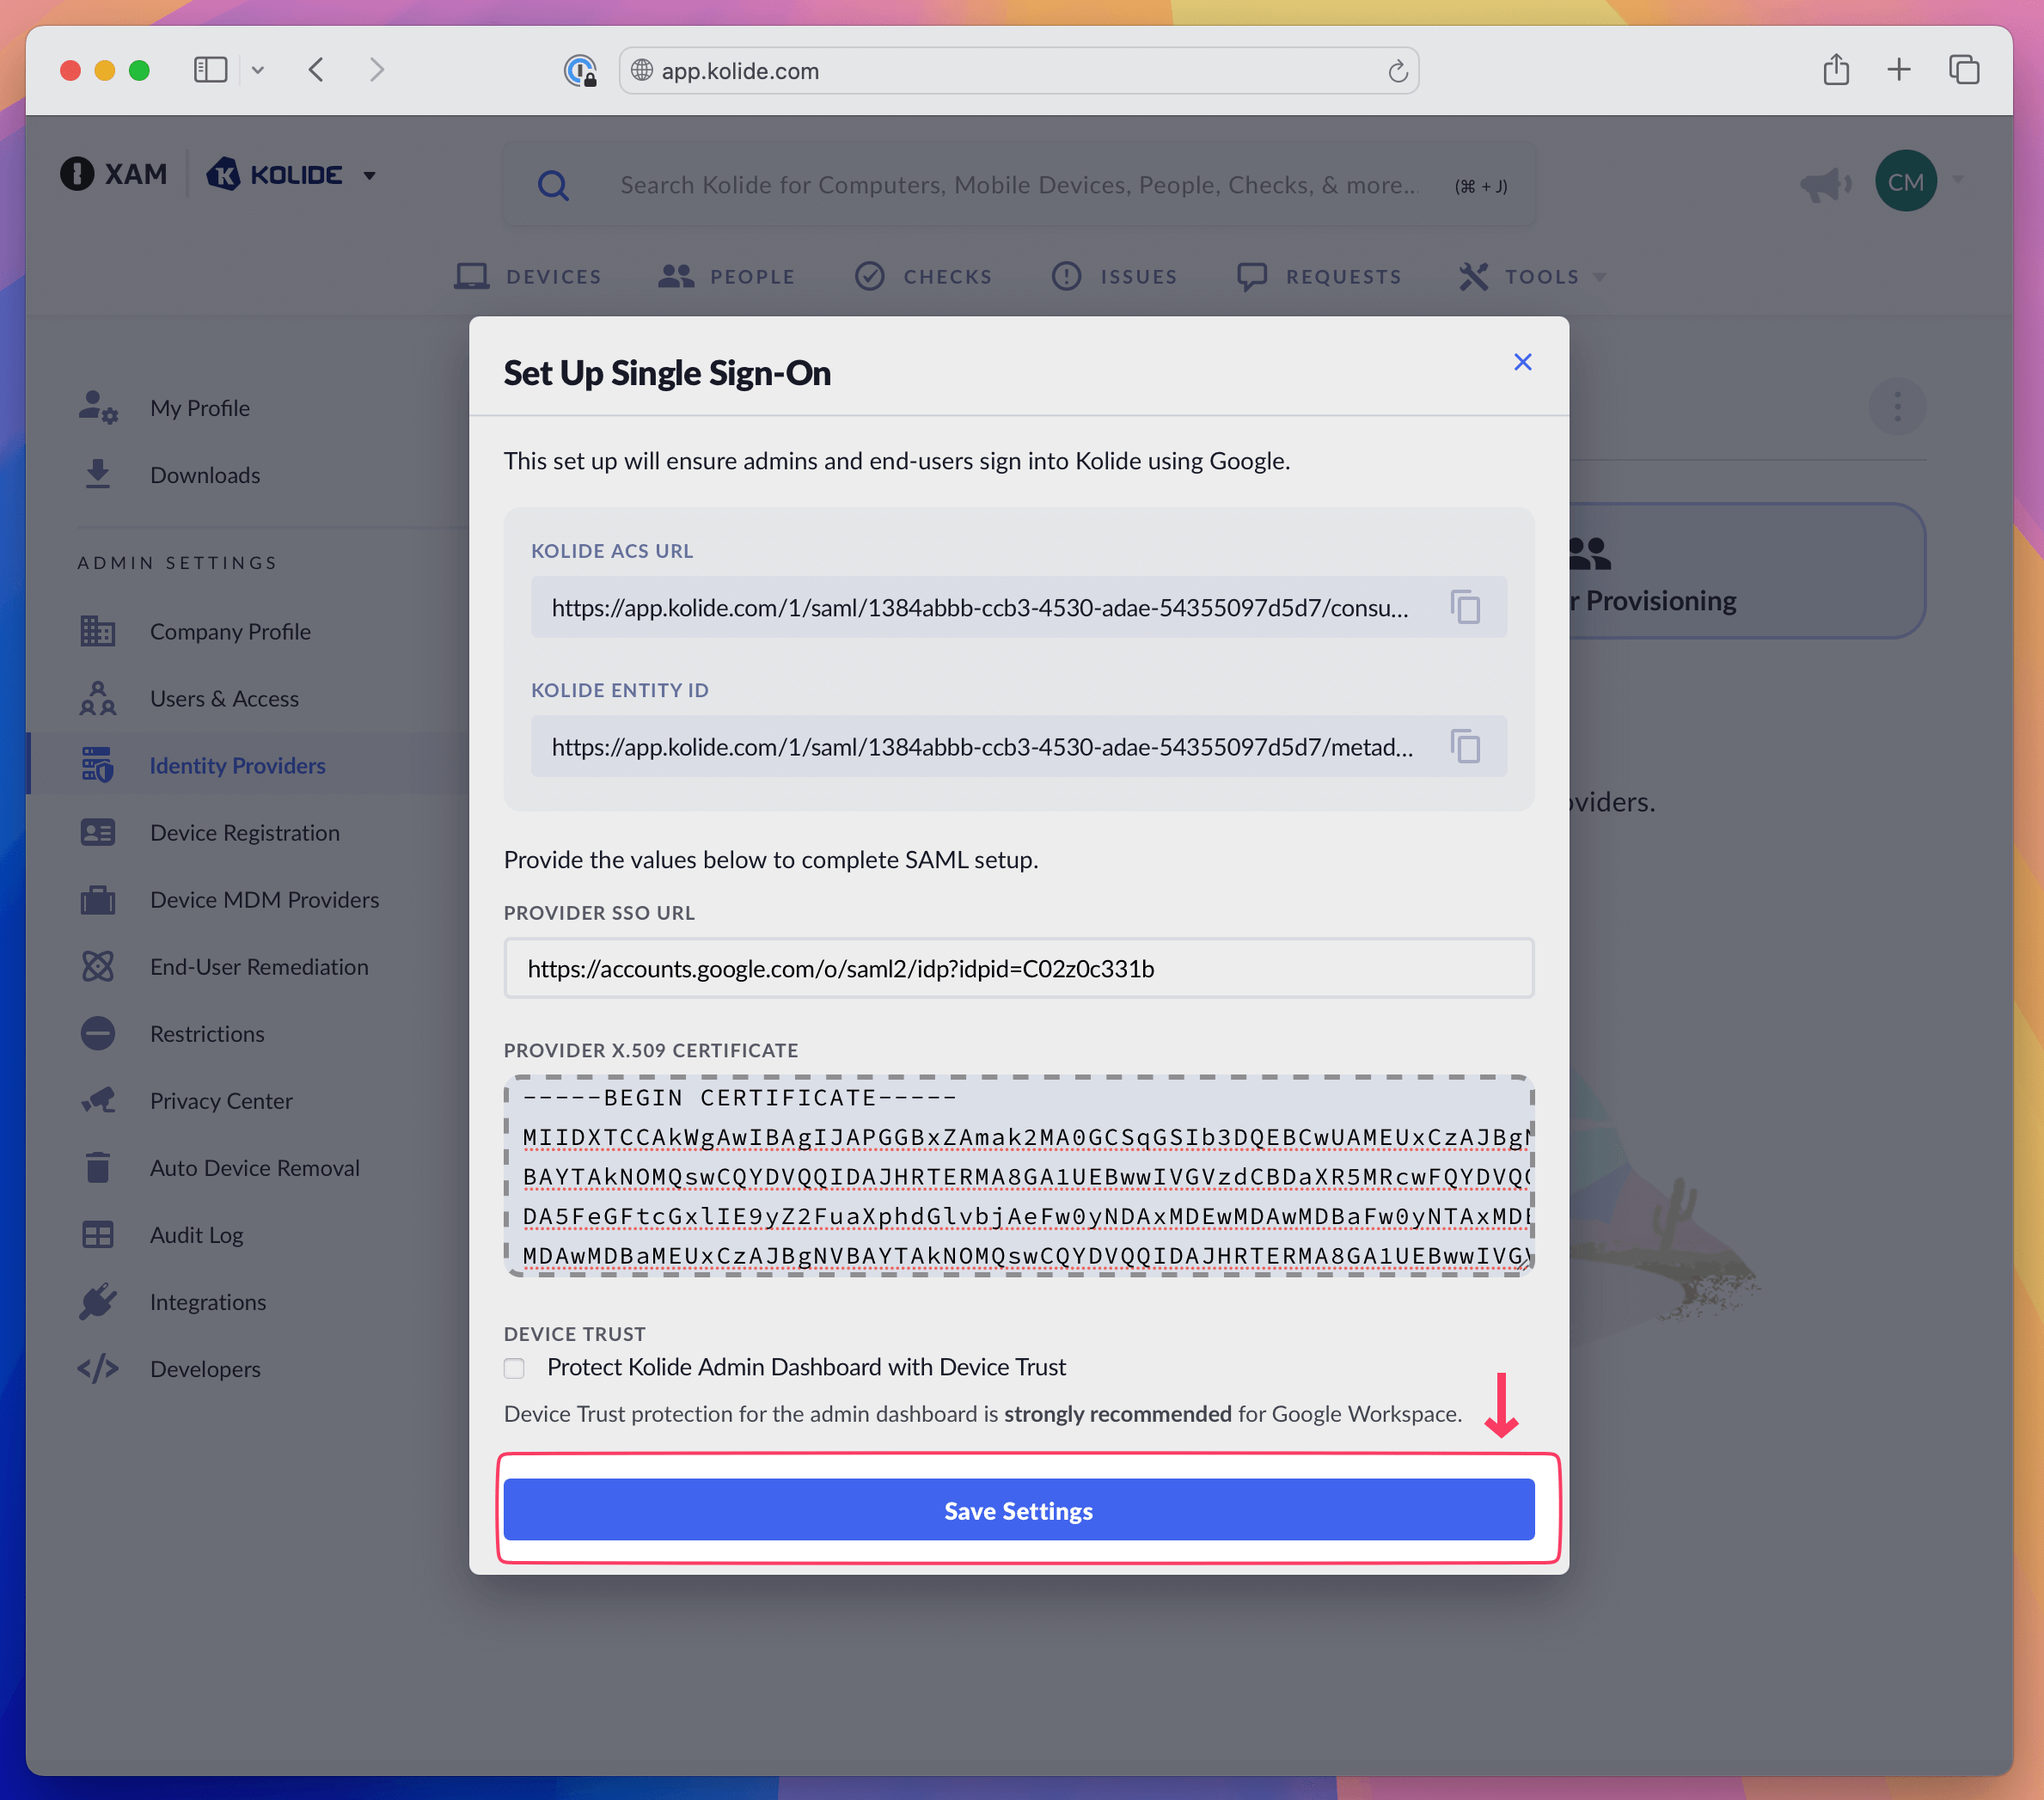
Finally, in the Kolide Admin tab, click Save Settings
Step 3: Set Up User Provisioning
In this step, we will set up Kolide so that your organization’s Google Workspace users and groups are regularly imported and synchronized into Kolide.
- https://www.googleapis.com/auth/admin.directory.user.readonly
- https://www.googleapis.com/auth/admin.directory.group.readonly
Sign into https://app.kolide.com
Click the avatar in the upper-right
Click Settings
In the left-hand navigation menu, click Identity Providers.
Select the Google Identity Provider you created in Step 2
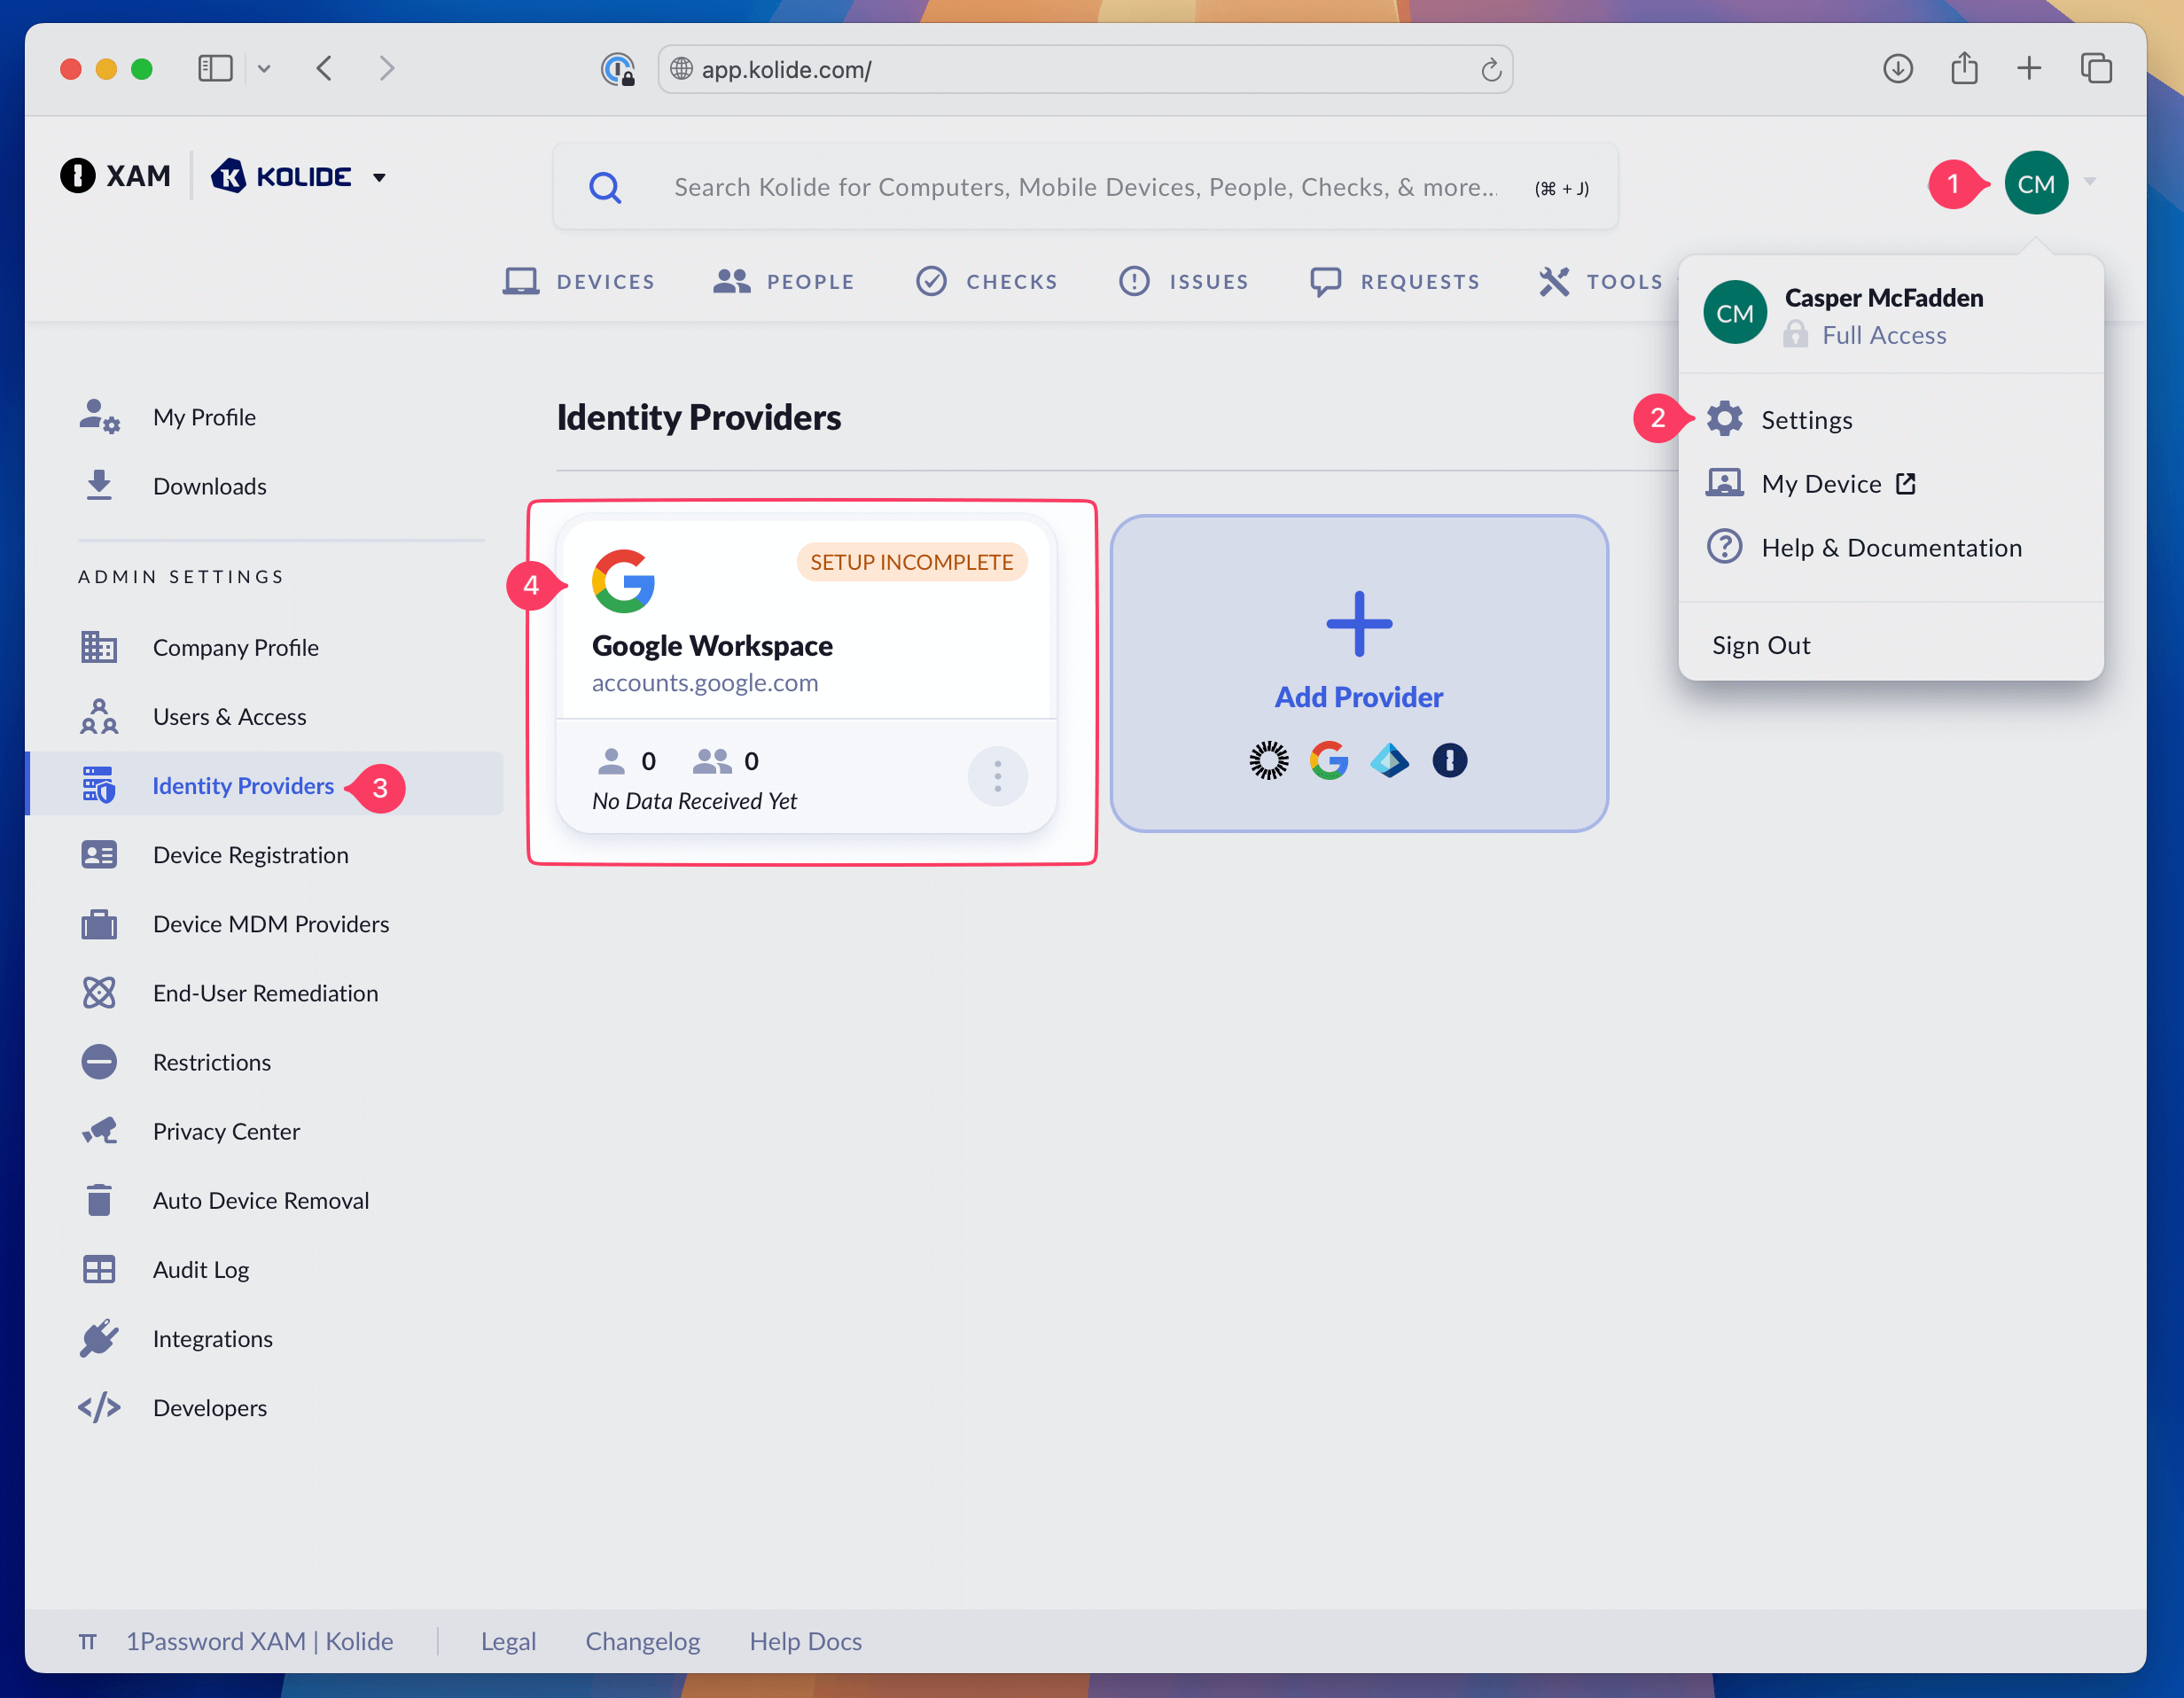
In the overview page of your Google IdP, click Set Up User Provisioning and in the pop-up window that appears, click Login with Google Workspace.
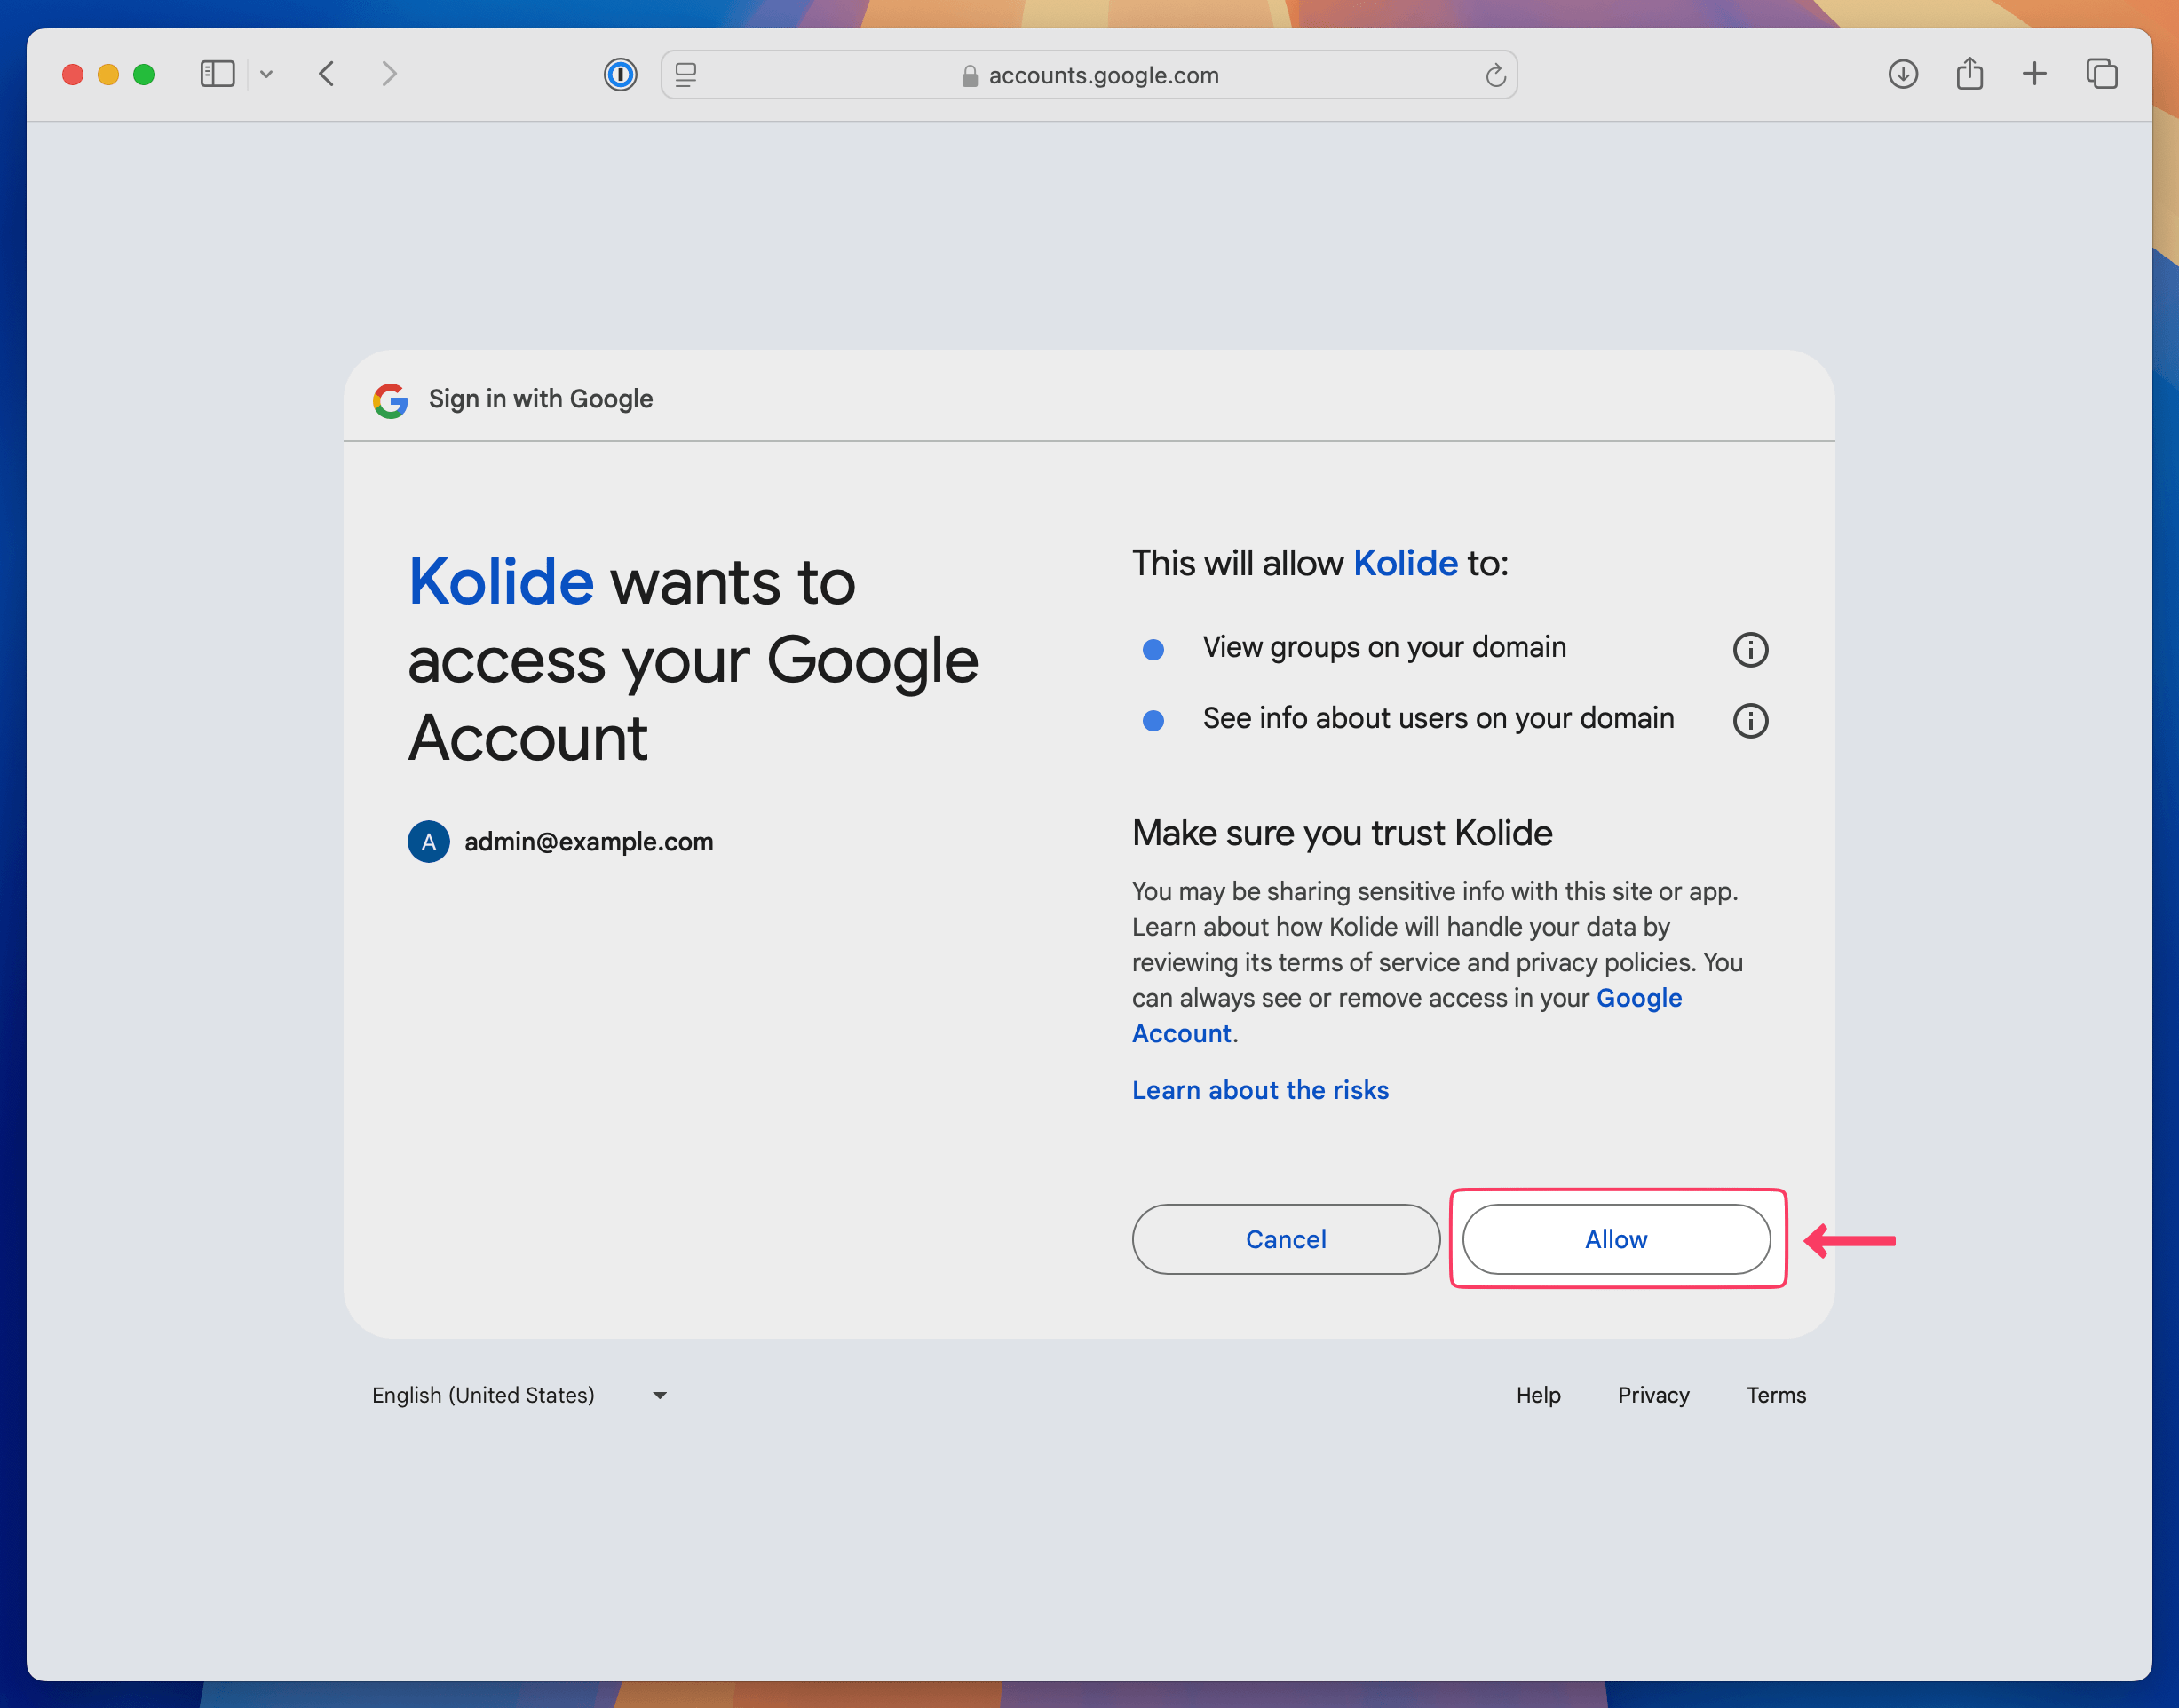
When prompted, sign in with the Google Account associated with the same Workspace you used to add the SAML app in Step 2 and click Allow when prompted to accept the permissions.
Once redirected back to Kolide, you will be asked if you want to import groups (highly recommended), and if you’d like to also include suspended accounts. Once your selections are made, click Update Google Workspace Integration.
Note:Regardless if you choose to import suspended users, Kolide will never attempt to import archived accounts.Importing will commence immediately, and you can verify both people and groups were correctly imported by viewing them in the People top-level menu item
Step 4: Activate Google as the Primary IdP
In this step, we will ensure Google is activated and set as the primary IdP. By setting Google Workspace as your primary IdP, Kolide admins will be required to sign in via Google Workspace to access the admin dashboard.
Sign into https://app.kolide.com
Click the avatar in the upper-right
Click Settings
In the left-hand navigation menu, click Identity Providers.
On the Google Identity Provider you created in Step 2, click the ellipsis options button and select Activate from the dropdown menu.
After activation, press the ellipsis options button again, and press Make Primary.
Enable Device Trust for Kolide’s Admin Dashboard
In Okta or Microsoft Entra, Kolide’s Device Trust capability is integrated as a multi-factor authenticator. In this mode, Kolide’s administrative dashboard is accessed through those services, and using those platforms’ policies, SSO admins can require users go through Kolide Device Trust checks prior to accessing the dashboard.
In Google, however, no such capability exists. Therefore, once you’ve tested SSO, we highly recommend you protect Kolide’s admin dashboard with Device Trust. Not only is it more secure, but it also allows you to test Device Trust capabilities and features before you decide to add additional third-party apps.
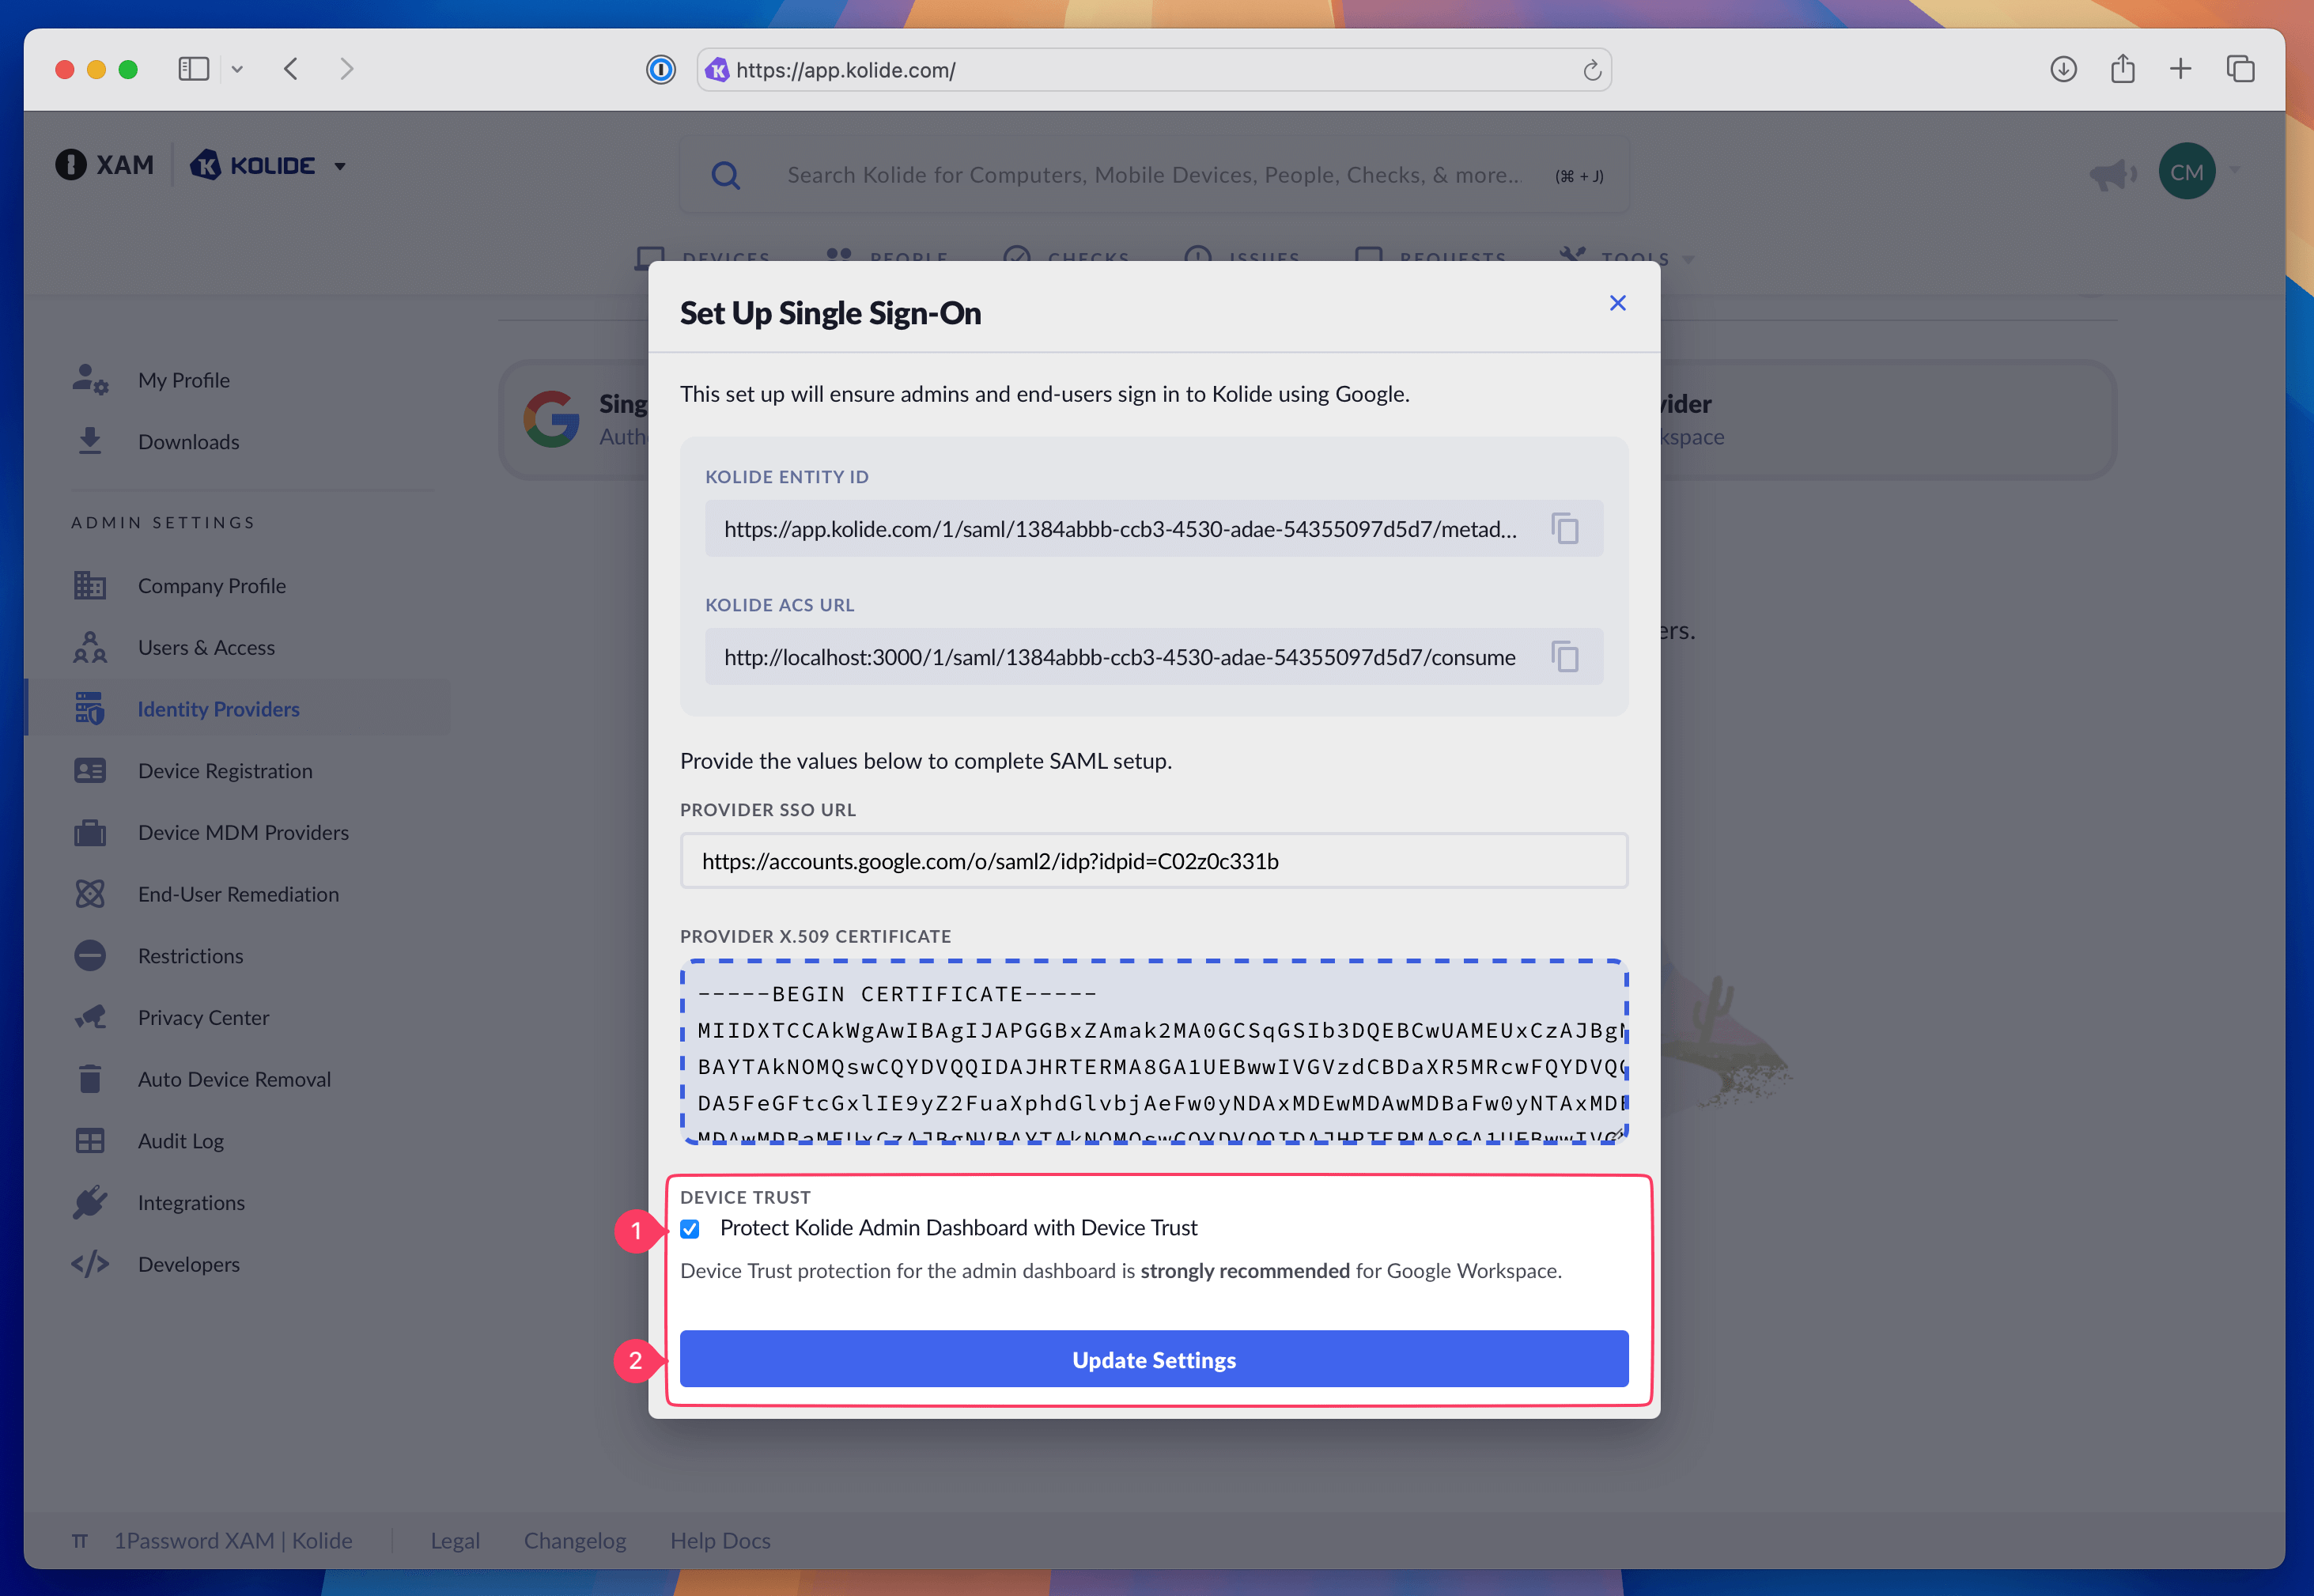
To do this, simply click into the Google IdP, select Single Sign-On Provider and in the popup window that appears, select the Protect Kolide Admin Dashboard with Device Trust checkbox and select Update Settings.
Test Sign In
Once you’ve activated Google and set it as the primary IdP, you should test signing into Kolide.
In a private browsing window, log into https://app.kolide.com. After entering your email address, you should be redirected to Google Sign In where you should be able to complete authentication and sign into the Kolide admin dashboard.