Device Registration
Device registration is the process that, when completed, allows a device to be used for Kolide’s device trust authentication. Registration establishes a trustworthy link between the device, the Kolide service, and a person associated with your organization.
Goals / Objectives
The goal of device registration is for the Kolide service to establish a way for a customer’s device to prove its identity during future authentication attempts. To accomplish this, Kolide uses registration to bootstrap public-key-based authentication between the two parties.
In addition to the above, Kolide uses registration as an opportunity to establish a strong link between an end-user and a device, and inform them about what Kolide is and how it works.
How To Register Your First Computer
Computers (Mac, Windows, or Linux Devices) can be registered to Kolide by following these steps:
Click on the Kolide icon in your system’s menu bar and select Register Device.
 Note:If the Kolide app is missing, you will need to obtain and run the Kolide Launcher Agent installation package for your platform.Warning:Unlike the Kolide Mobile App, Kolide’s Launcher Agent is designed to only allow a computer to be associated with a single customer’s Kolide service.
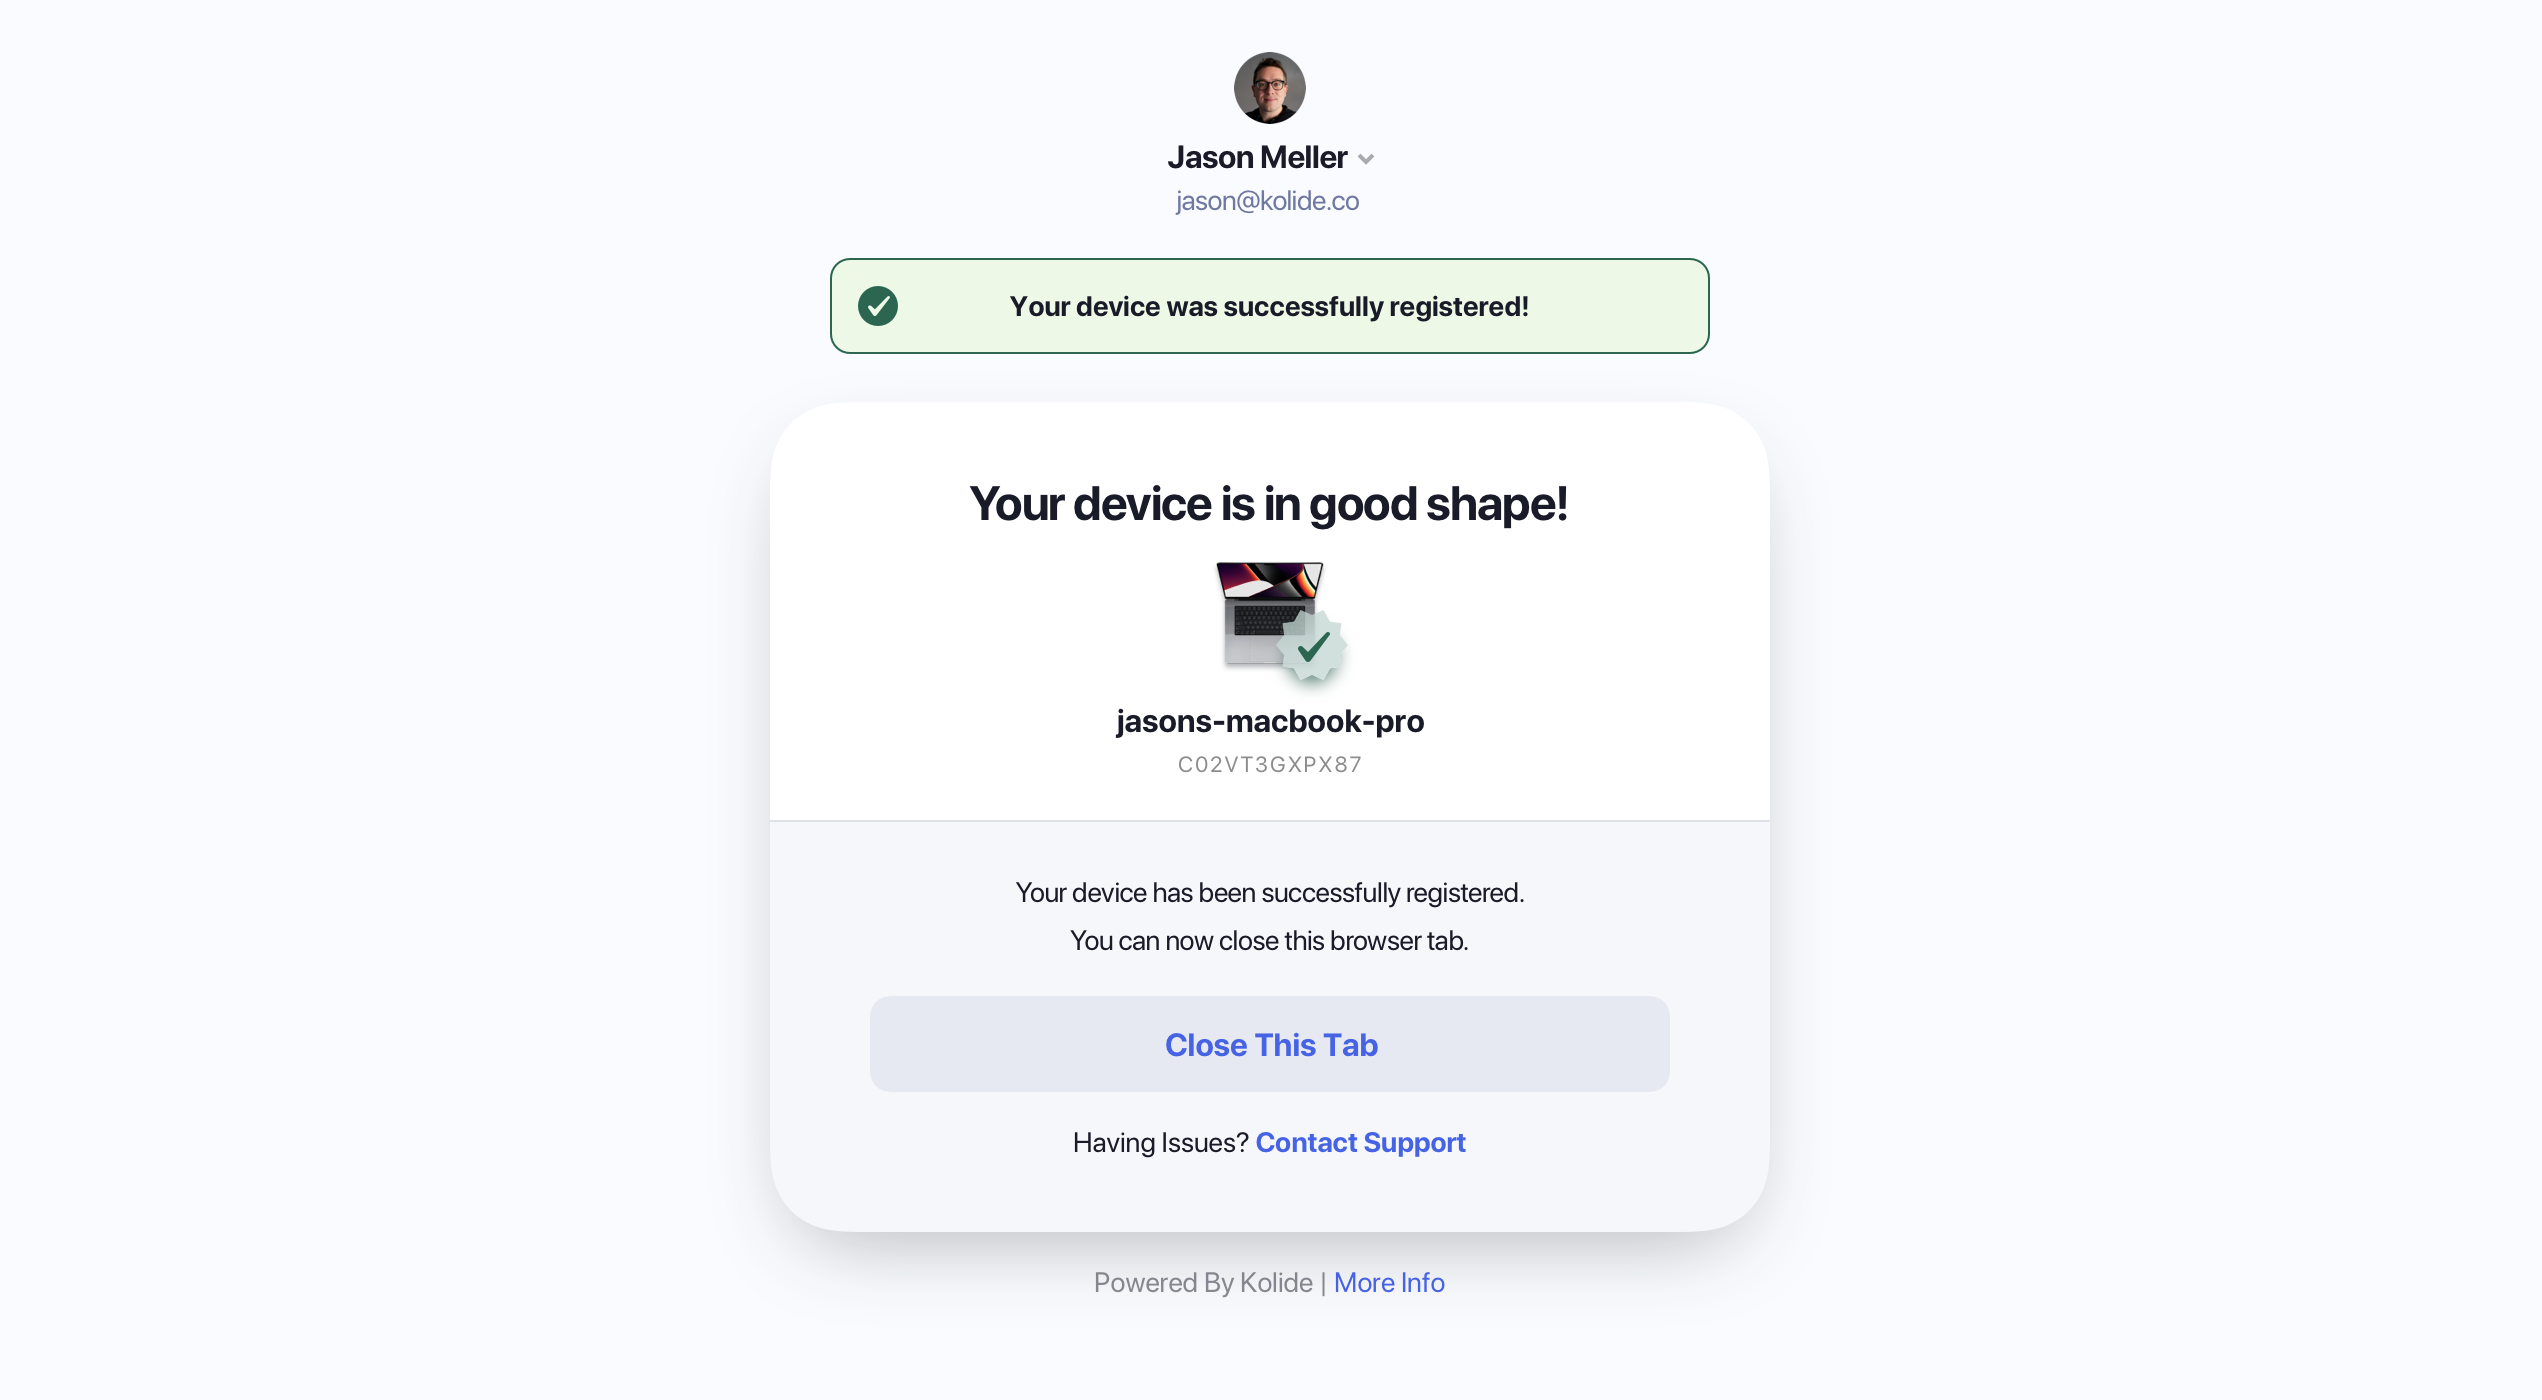
In the browser that opens, you may be asked to authenticate via your authentication provider. Once authenticated, your device will be automatically registered.
You will be redirected to a verification page where your device’s posture will be checked. While Kolide uses this opportunity to ask the user to take care of any issues that may block their device on the next authentication attempt, this step is optional; the device is already registered.
Registering Additional Computers
By default, Kolide “bootstraps” the device trust by allowing an end-user without any registered devices to register their first device by simply proving their identity via their pre-existing SSO authentication. This bootstrapping strategy is referred to in the industry as Trust on First Use (TOFU).
However, once the user registers their first device, Kolide will not allow the user to register any other devices unless they can prove they are in possession of a device that Kolide already trusts, or they must get explicit approval from a Kolide administrator.
To learn more see: Changing the Device Trust Level
Let’s discuss both options below:
Self-Service Registration
To register another device via self-service registration:
First, follow the steps in How To Register Your First Computer. Instead of the device being registered, you’ll receive the following prompt.
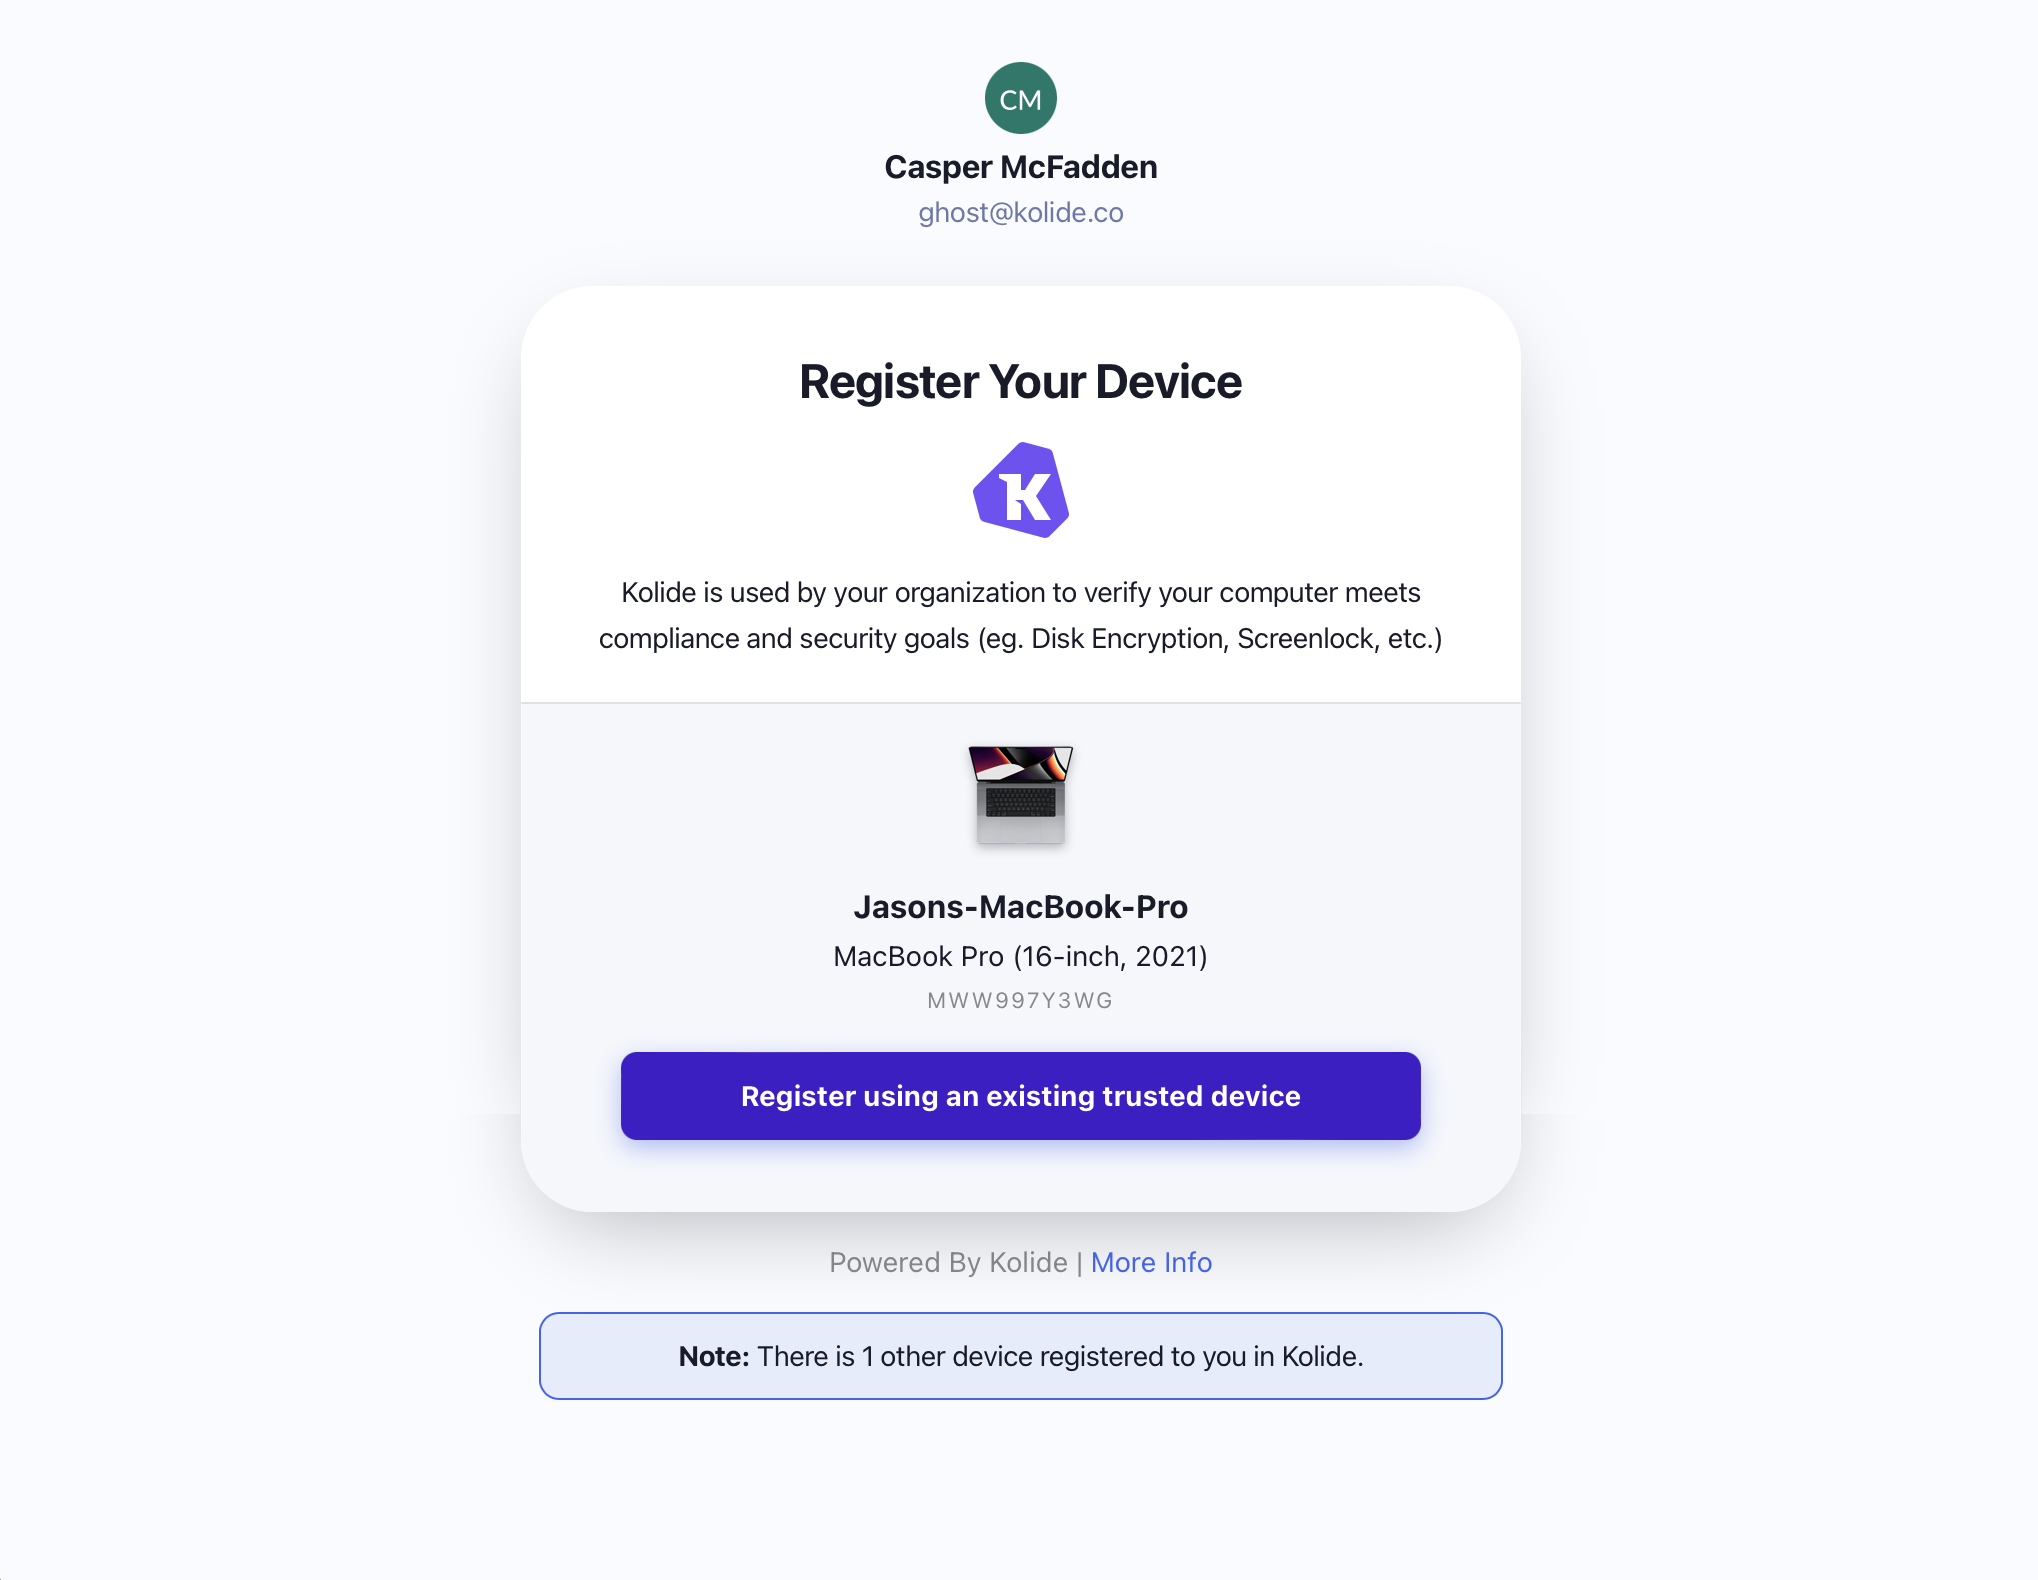
Click Register using an existing trusted device.
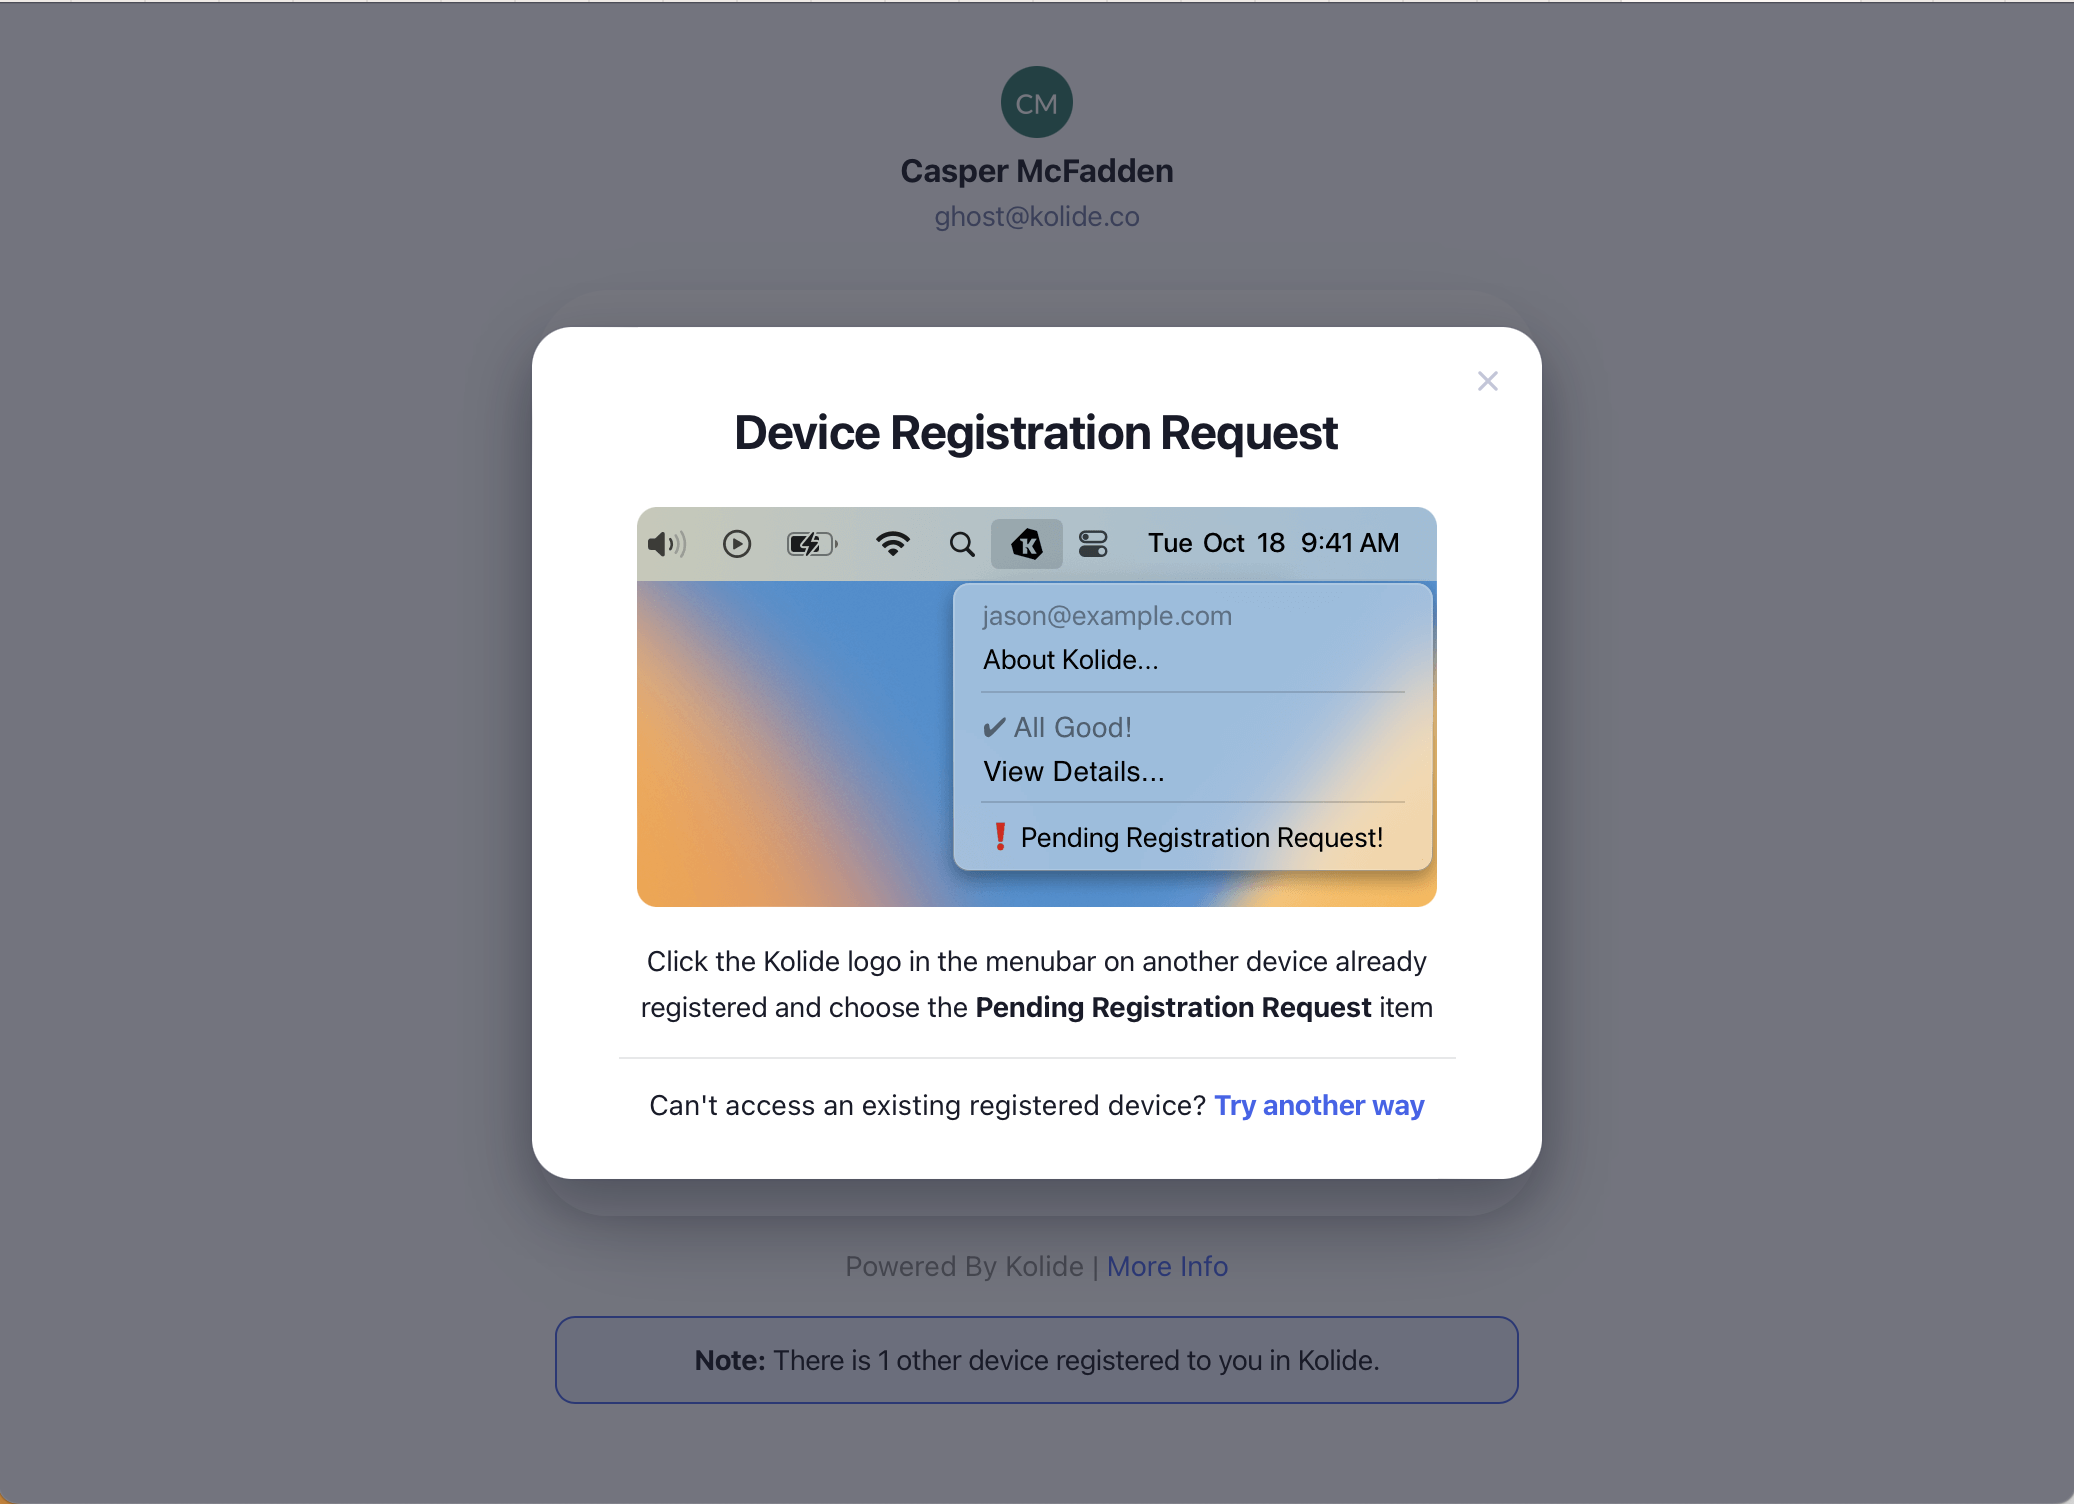
This will open a modal explaining that on an existing registered device you need to click on the Kolide icon in your menubar (or system tray on Windows) and click the Pending Registration Request item.
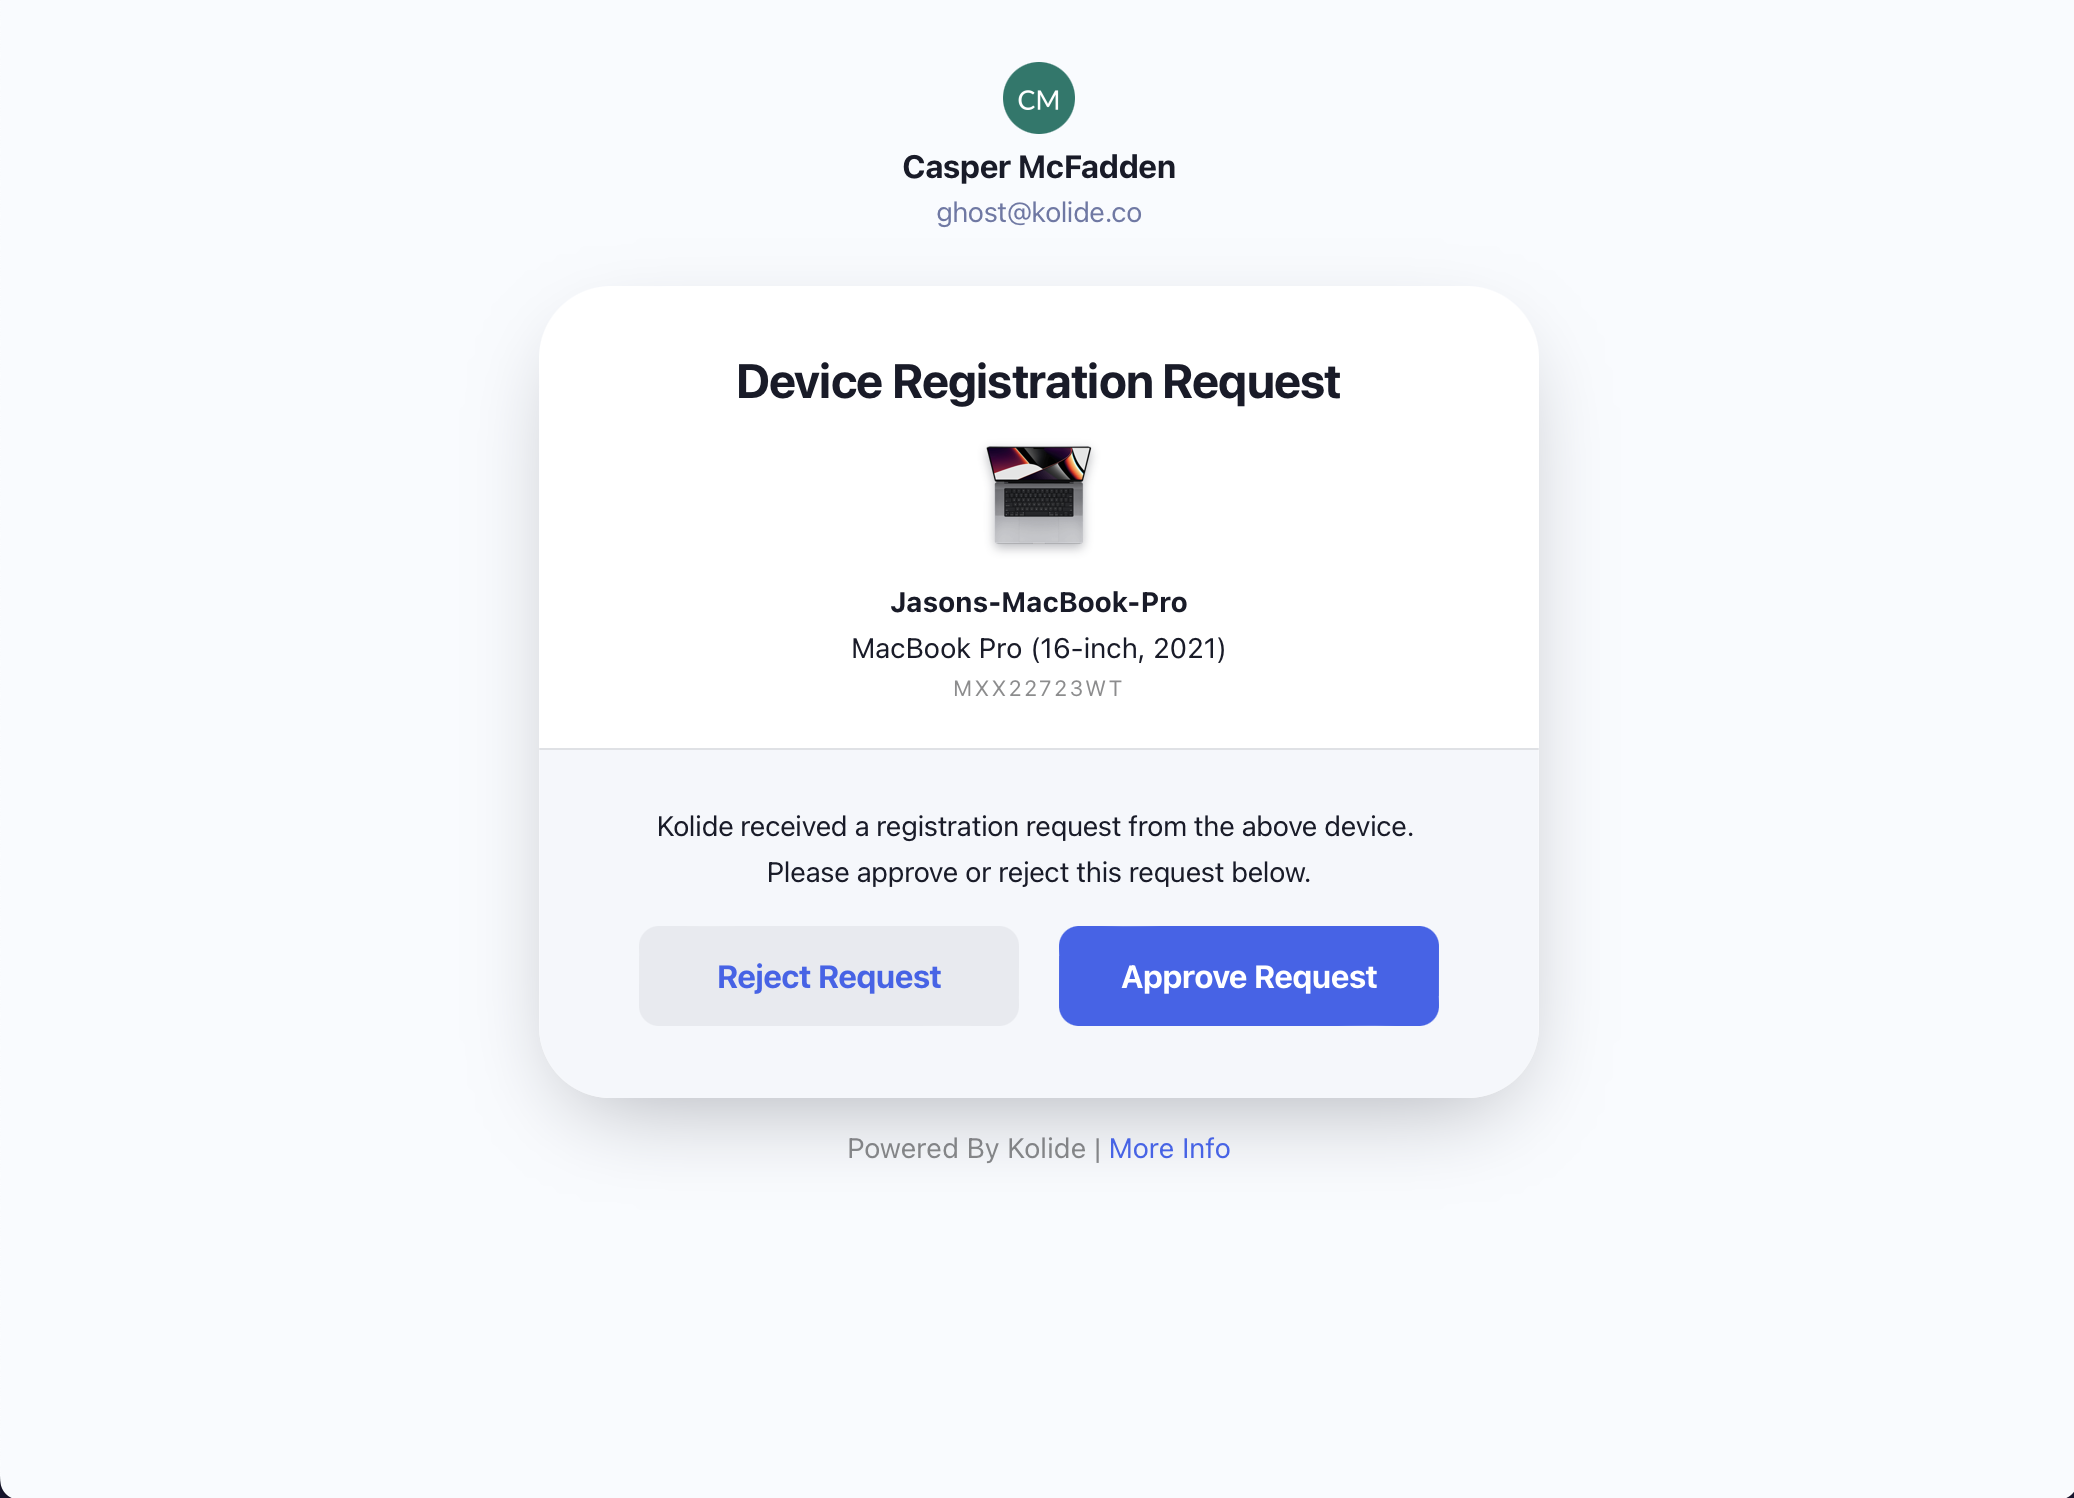
Once clicked, a web browser will open for you to confirm the final approval.
 Note:A record of all self-approvals and self-rejections is available in your organization’s Kolide audit log. These logs are also accessible programmatically.
Once you click approve, the device you are attempting to register will be automatically registered and authentication will proceed as usual.
Admin Approved Registration
If the user explicitly requests it, or does not have any devices that can be used for self-registration, the user will be prompted to request the device be manually registered by an administrator.
Admins should always verify the intent of the requester through secure channels in addition to the details of the device before approving a registration.
To do this, we recommend in-person conversations, video calls, or voice calls, where the identity of an individual can be visually and auditorily confirmed. Verifying a user’s registration attempt by messaging them on Slack is not good enough!
To do so, the end-user first follows the steps in How To Register Your First Computer and then fills out the following form:
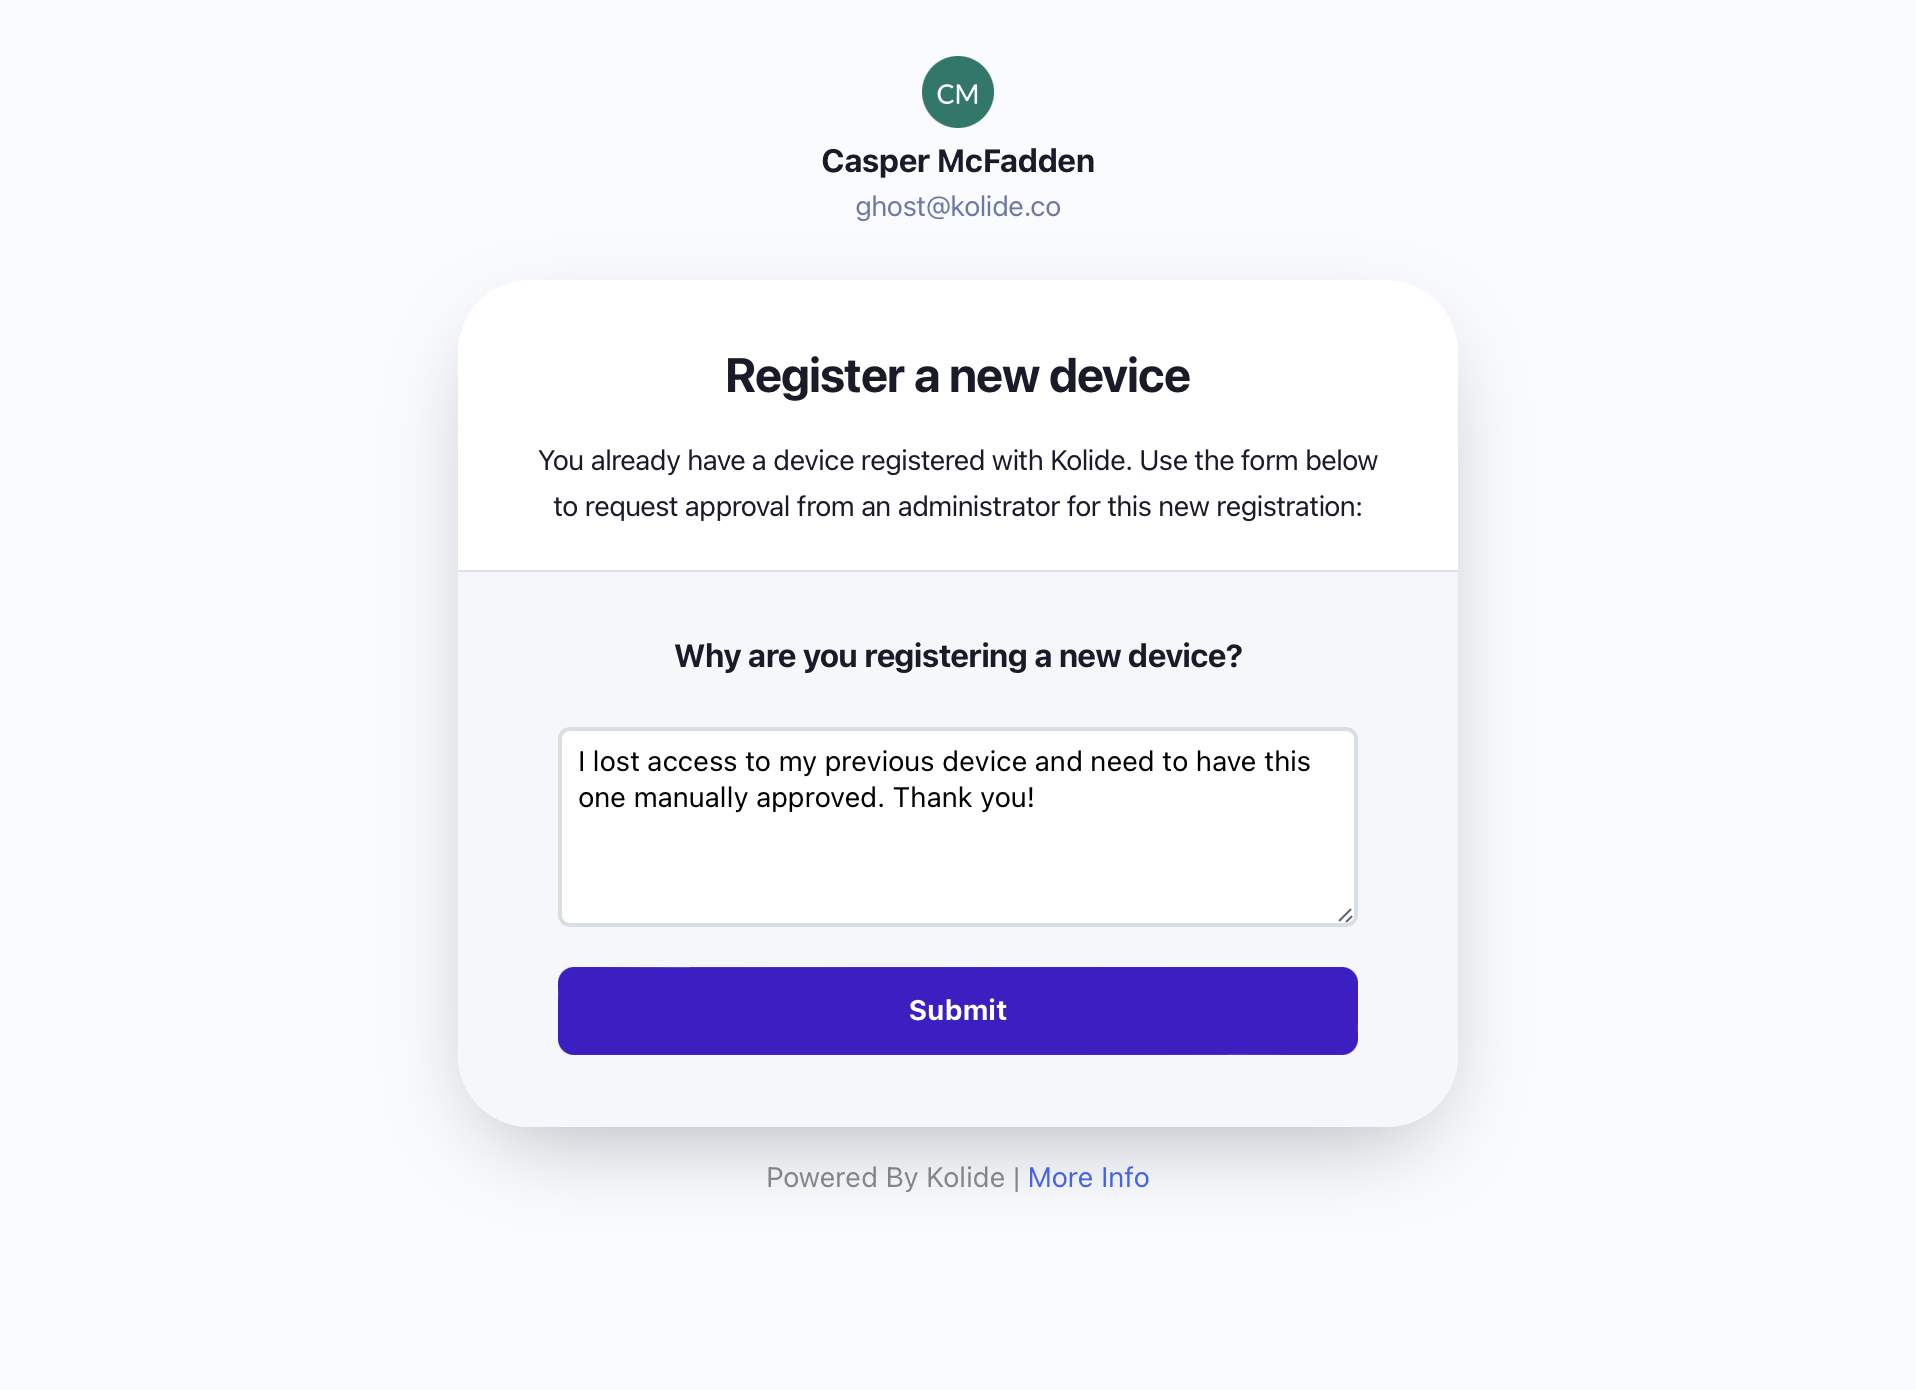
Once complete, all Kolide admins will receive a notification email directing them to go to the Requests top-level menu item and approve the request there as shown below.
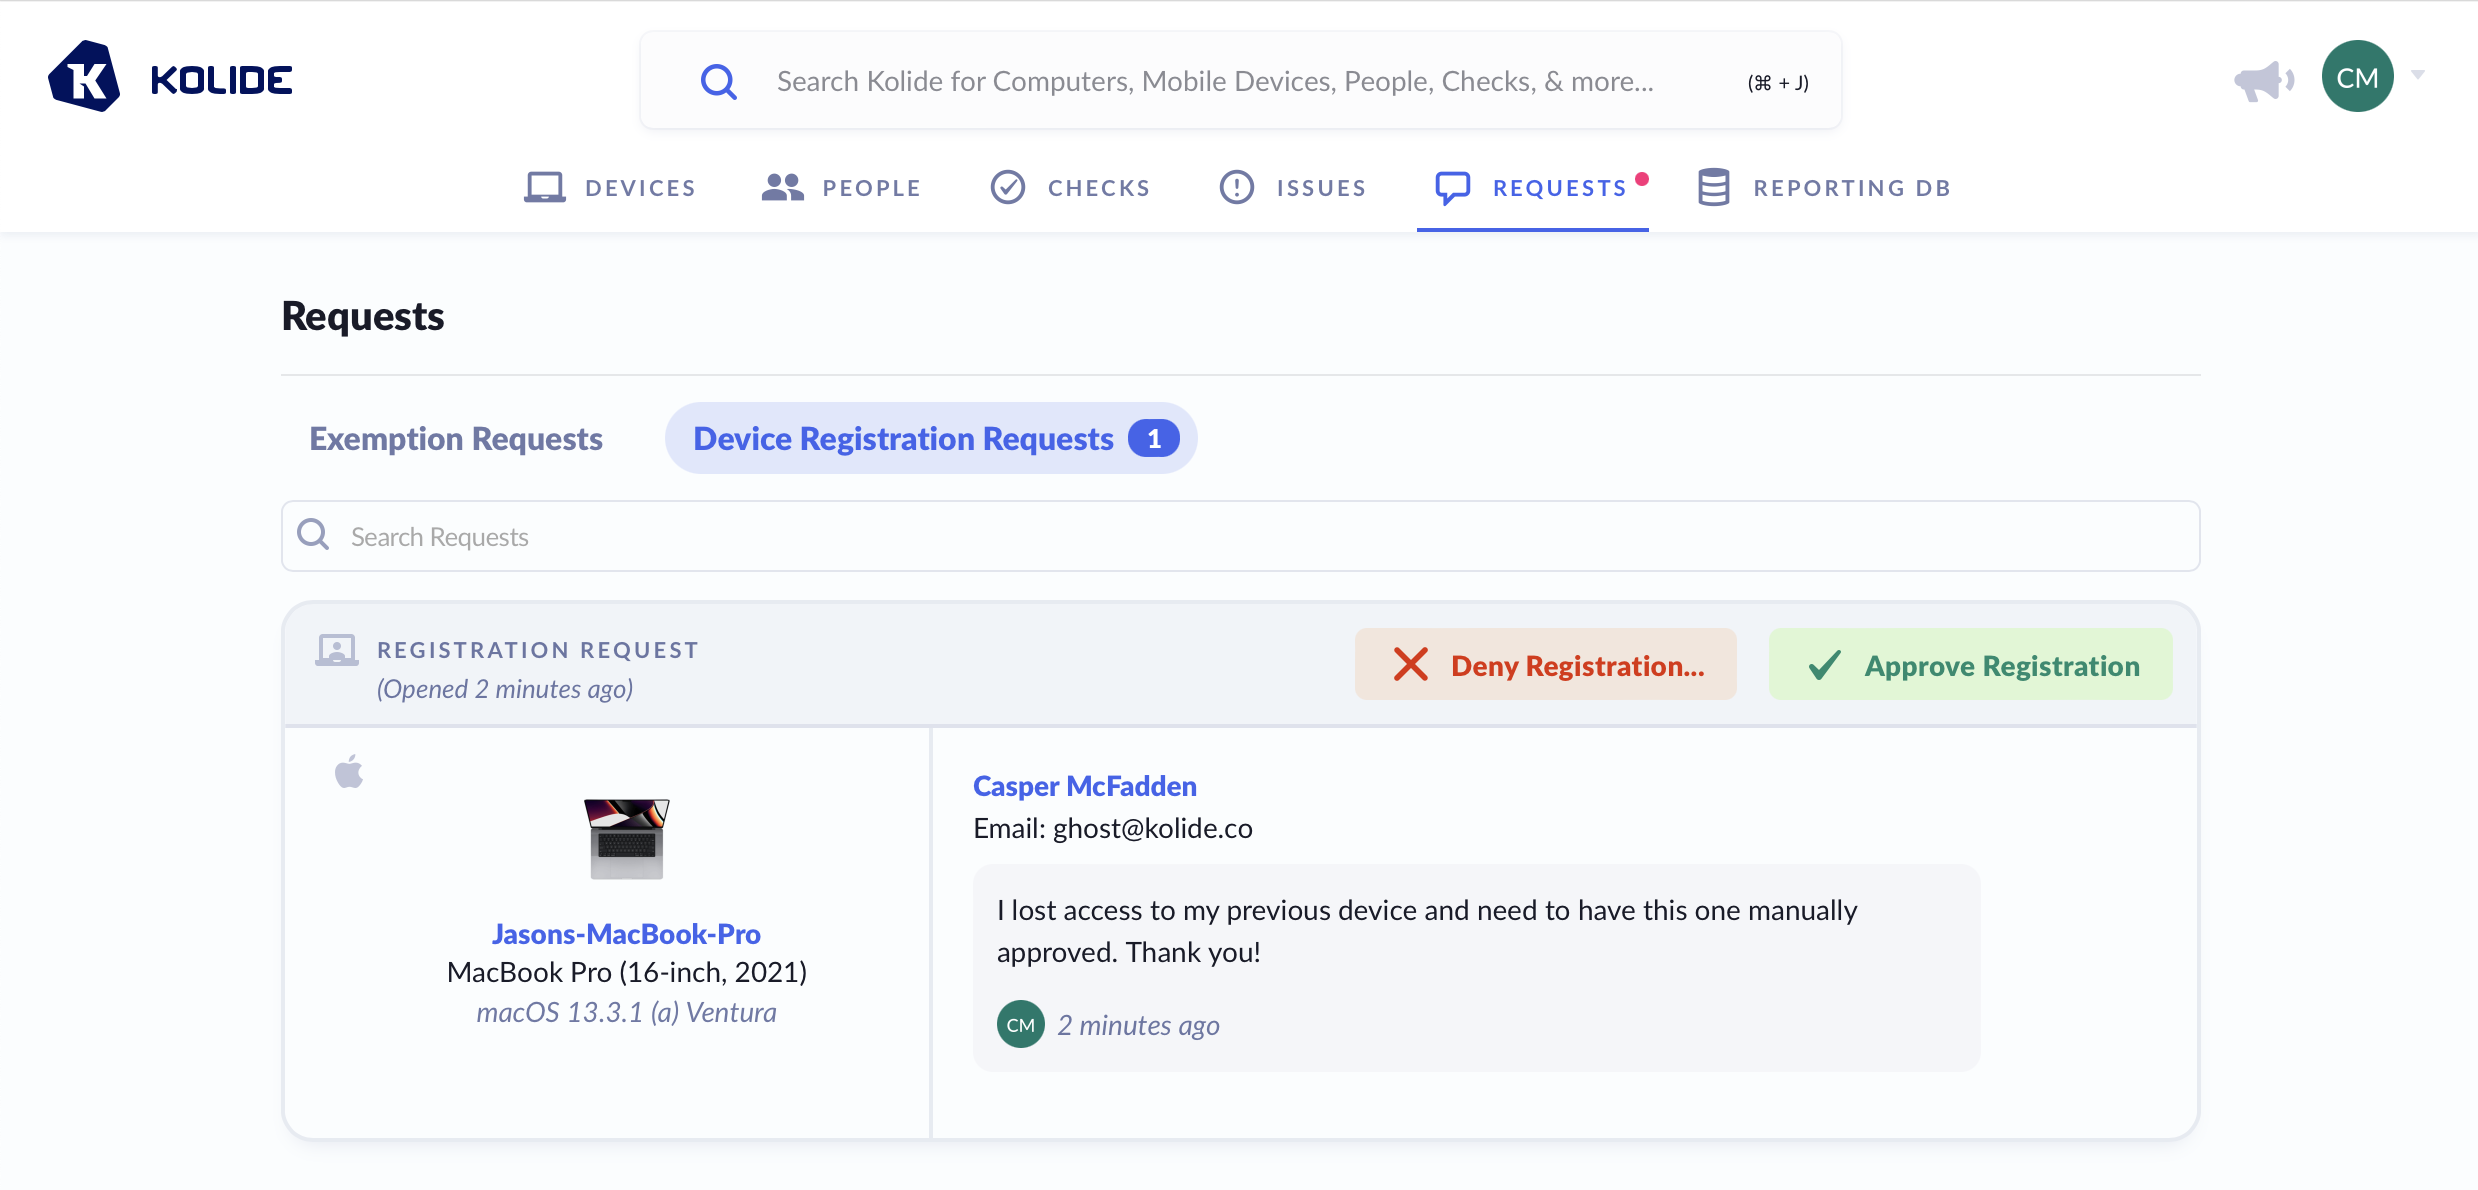
Simply click Approve and the end-user will be notified. Otherwise, click Reject and supply an internal and an end-user visible reason for the rejection.
How To Register Mobile Devices
Mobile Devices (iPhones, iPads, and Android devices) can be registered by following these steps:
-
If you haven’t already, obtain the official Kolide app from your mobile device’s official app store.
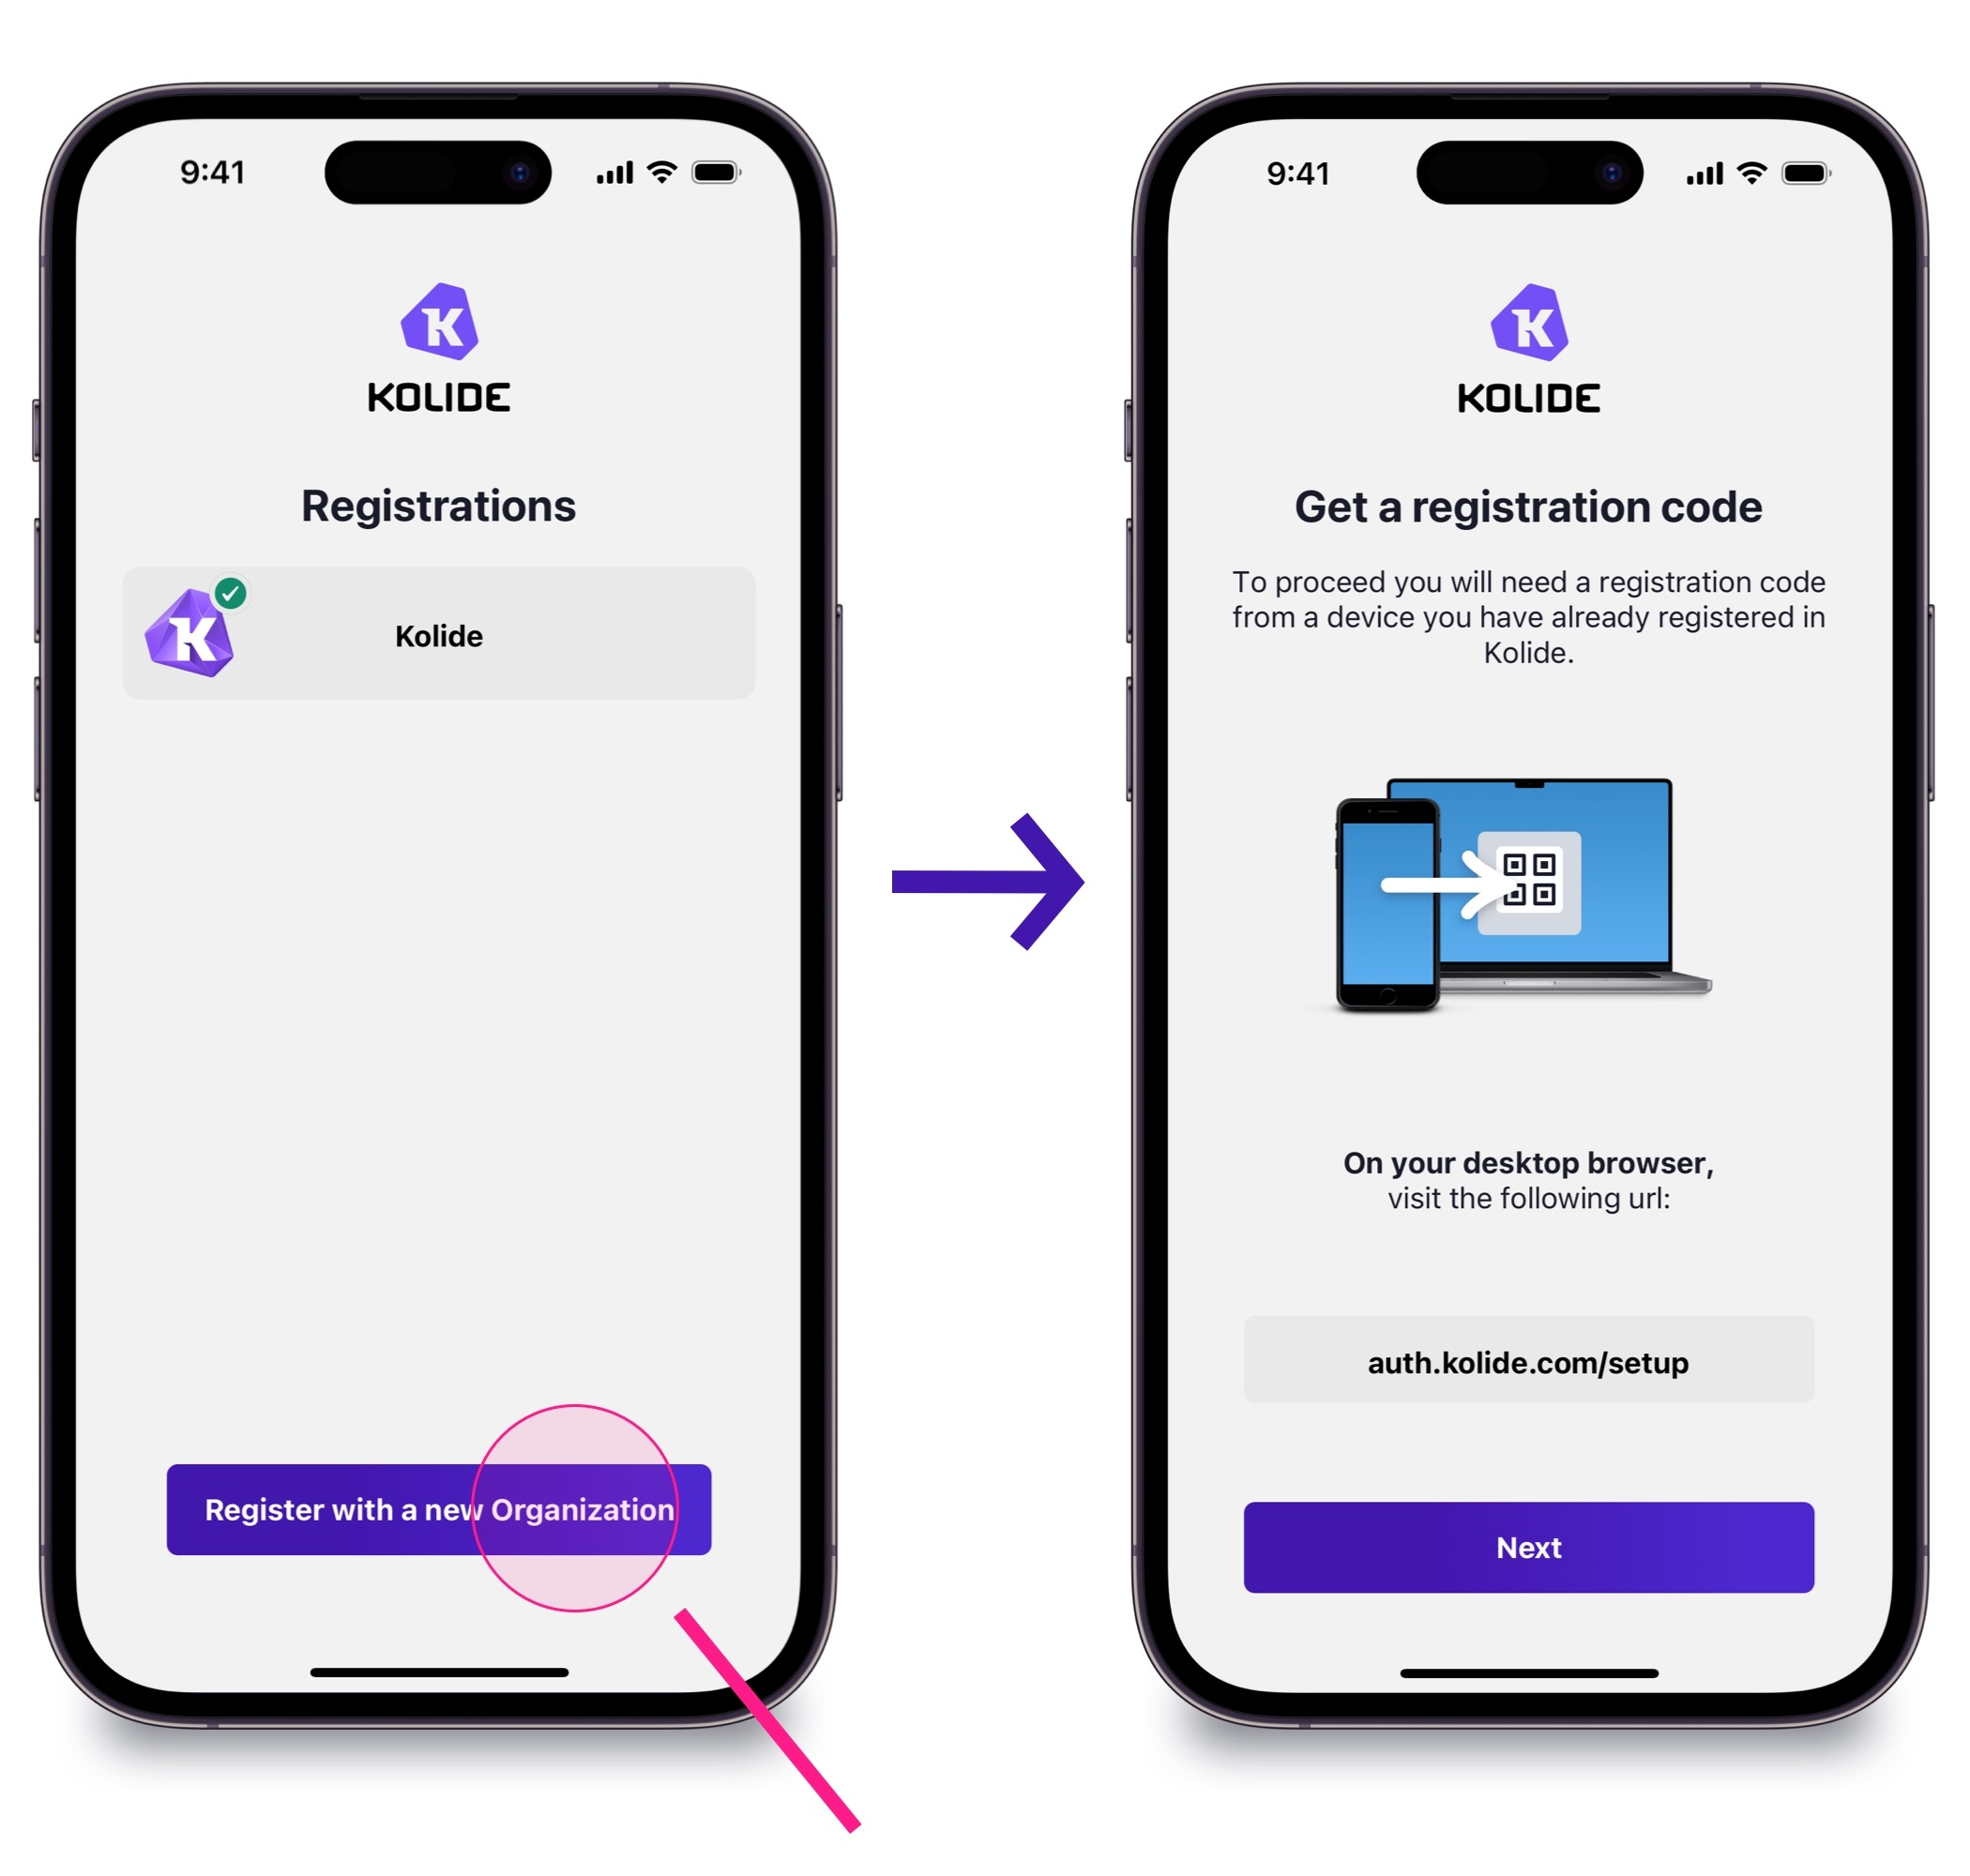
Tap the app to launch it. If this isn’t your first registration on this mobile device, first tap Register with a new Organization. As directed by the app, open the web browser on a computer that is already registered in and visit https://auth.kolide.com/setup.
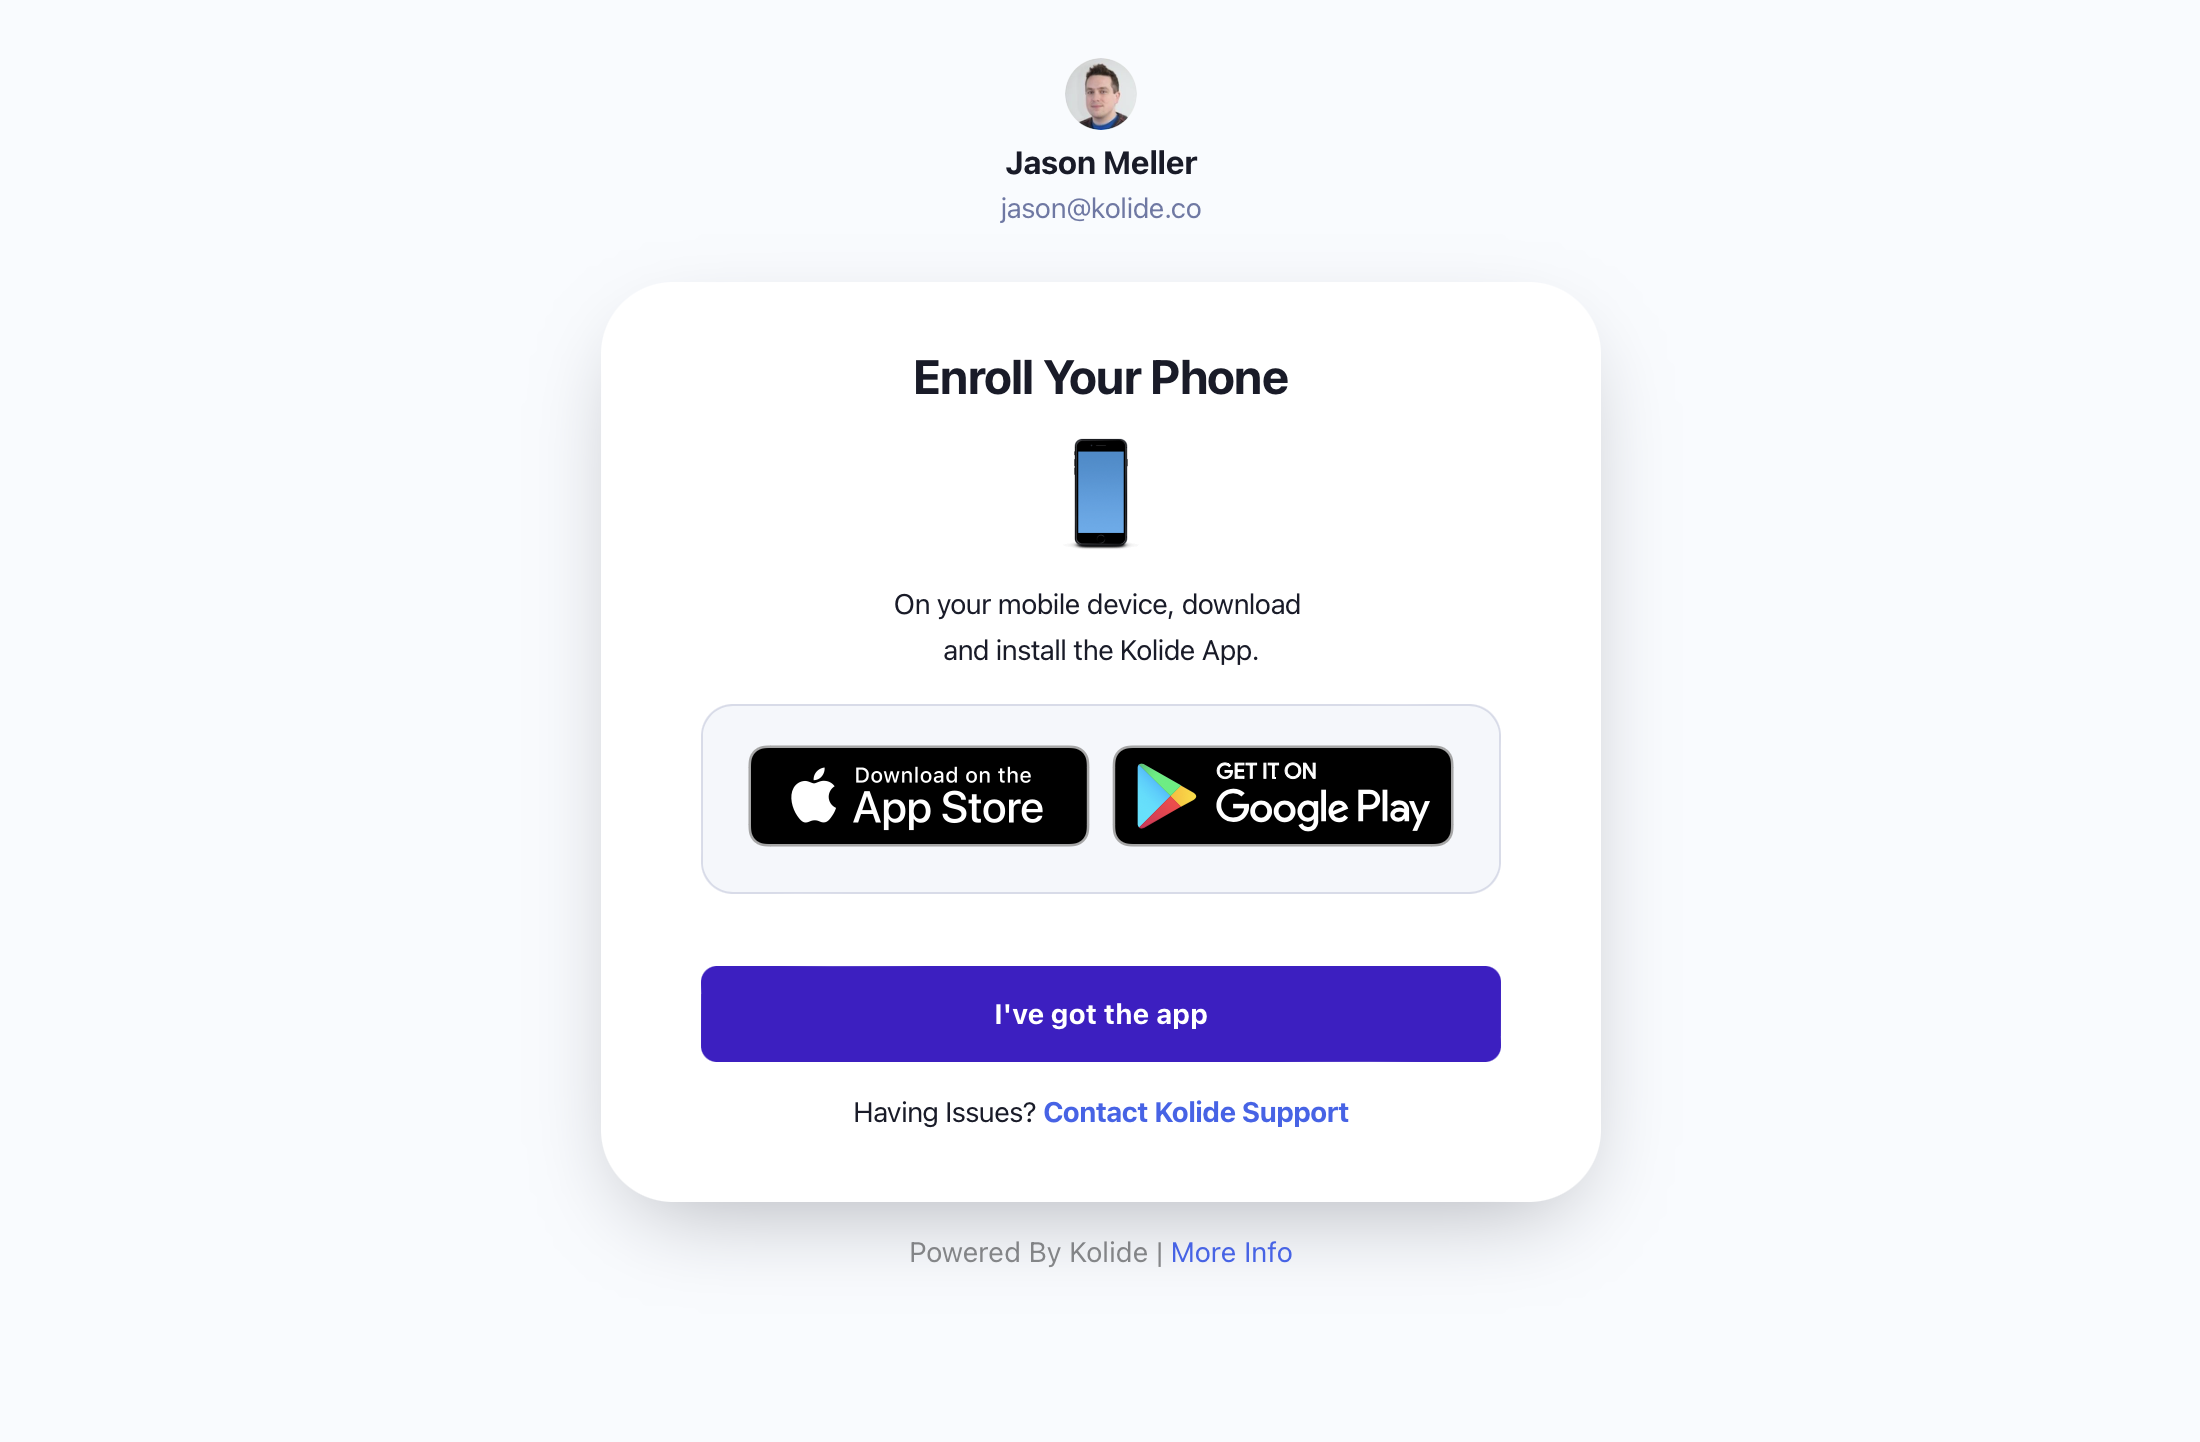
On your previously registered computer, complete any required authentication and then click I’ve got the app. This will reveal a QR code you will scan on your phone.
-
On your mobile device, scan the QR code with your mobile device’s camera. (If your mobile device does not have a camera, you can enter the registration code manually.) Once scanned, the screen will automatically advance and confirm the registration. You can now use this device to authenticate!
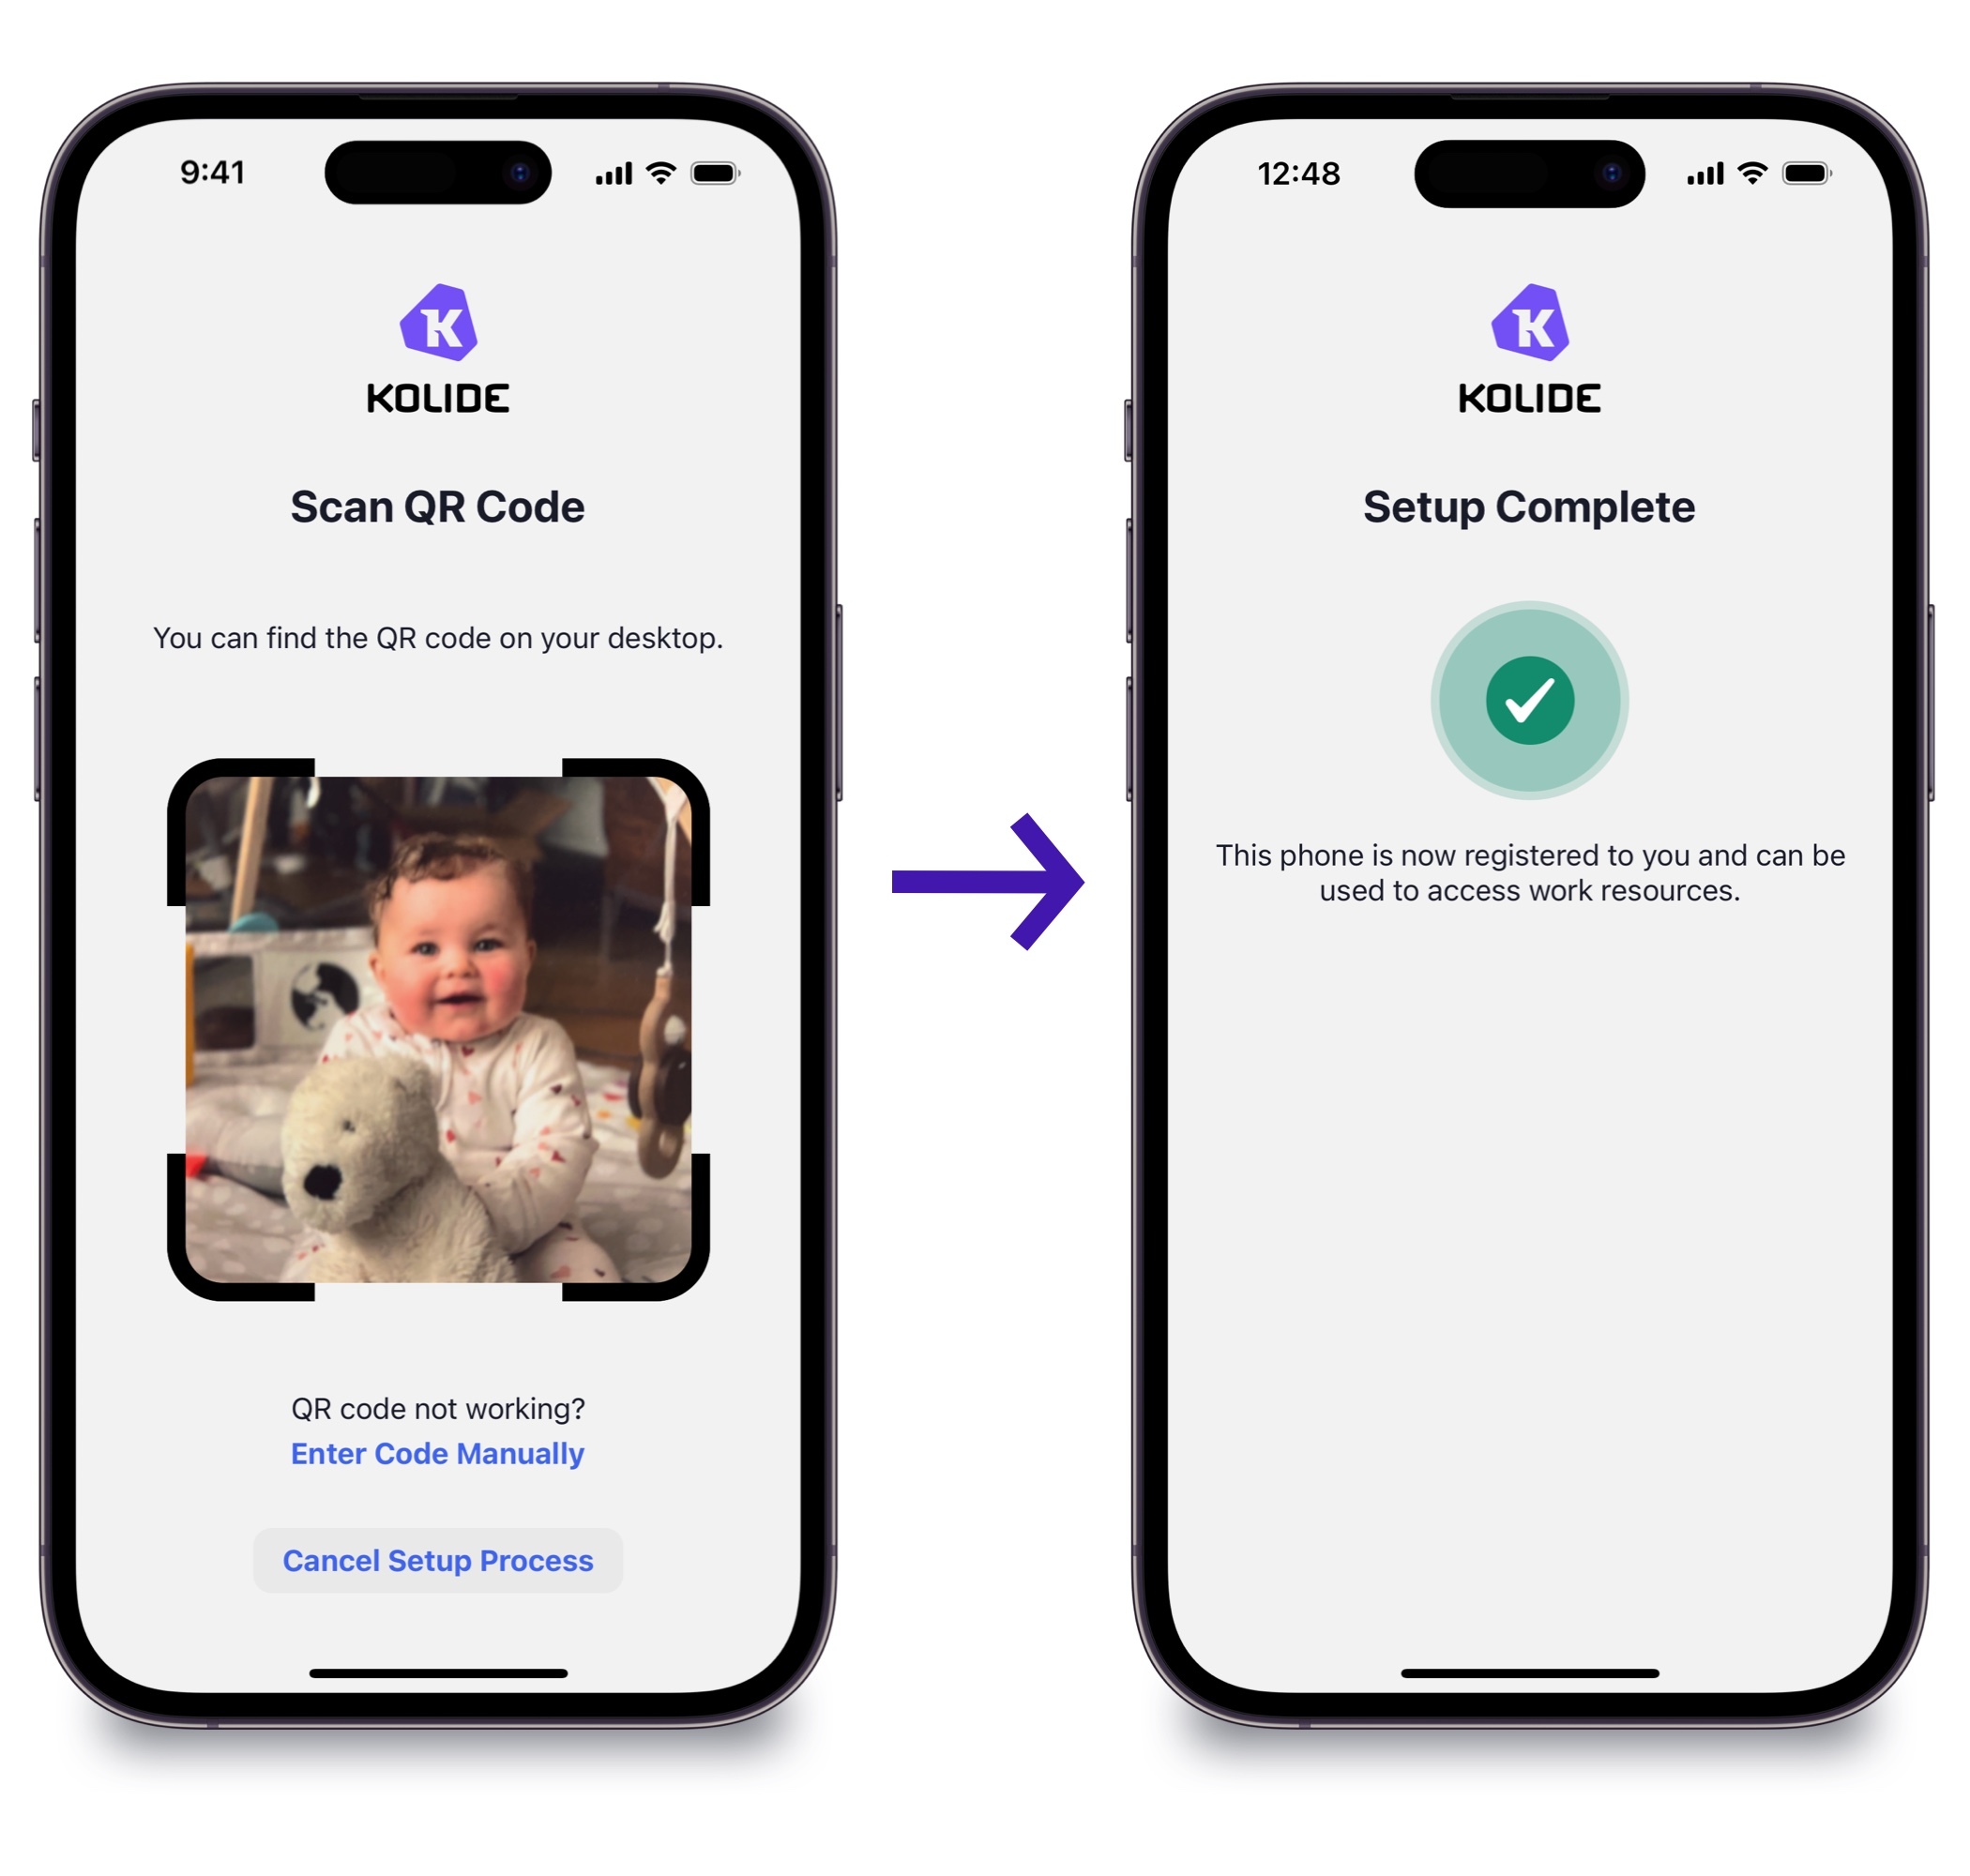
Your QR code will likely look different than shown in the image above.
Changing the Device Trust Level
Kolide is designed to be used both as a tool to encourage end-users to fix problems on their devices and as a strong, phishing-resistant possession-based authentication factor. The latter requires end-users to prove beyond a doubt that they are in control of at least one previously trusted device before being allowed to register any additional devices.
This “proving” requirement can feel onerous for end-users, particularly when they attempt to register devices for the first time away from their usual work location (e.g., a mobile device).
If you do not wish to use Kolide as a possession-based authentication factor, you can make registering additional devices considerably easier by lowering the Device Trust level to None.
To configure your organization’s Device Trust Level, go to Settings > Device Registration (note: you must be an administrator to control these settings).
From there, click None and then the Save button.
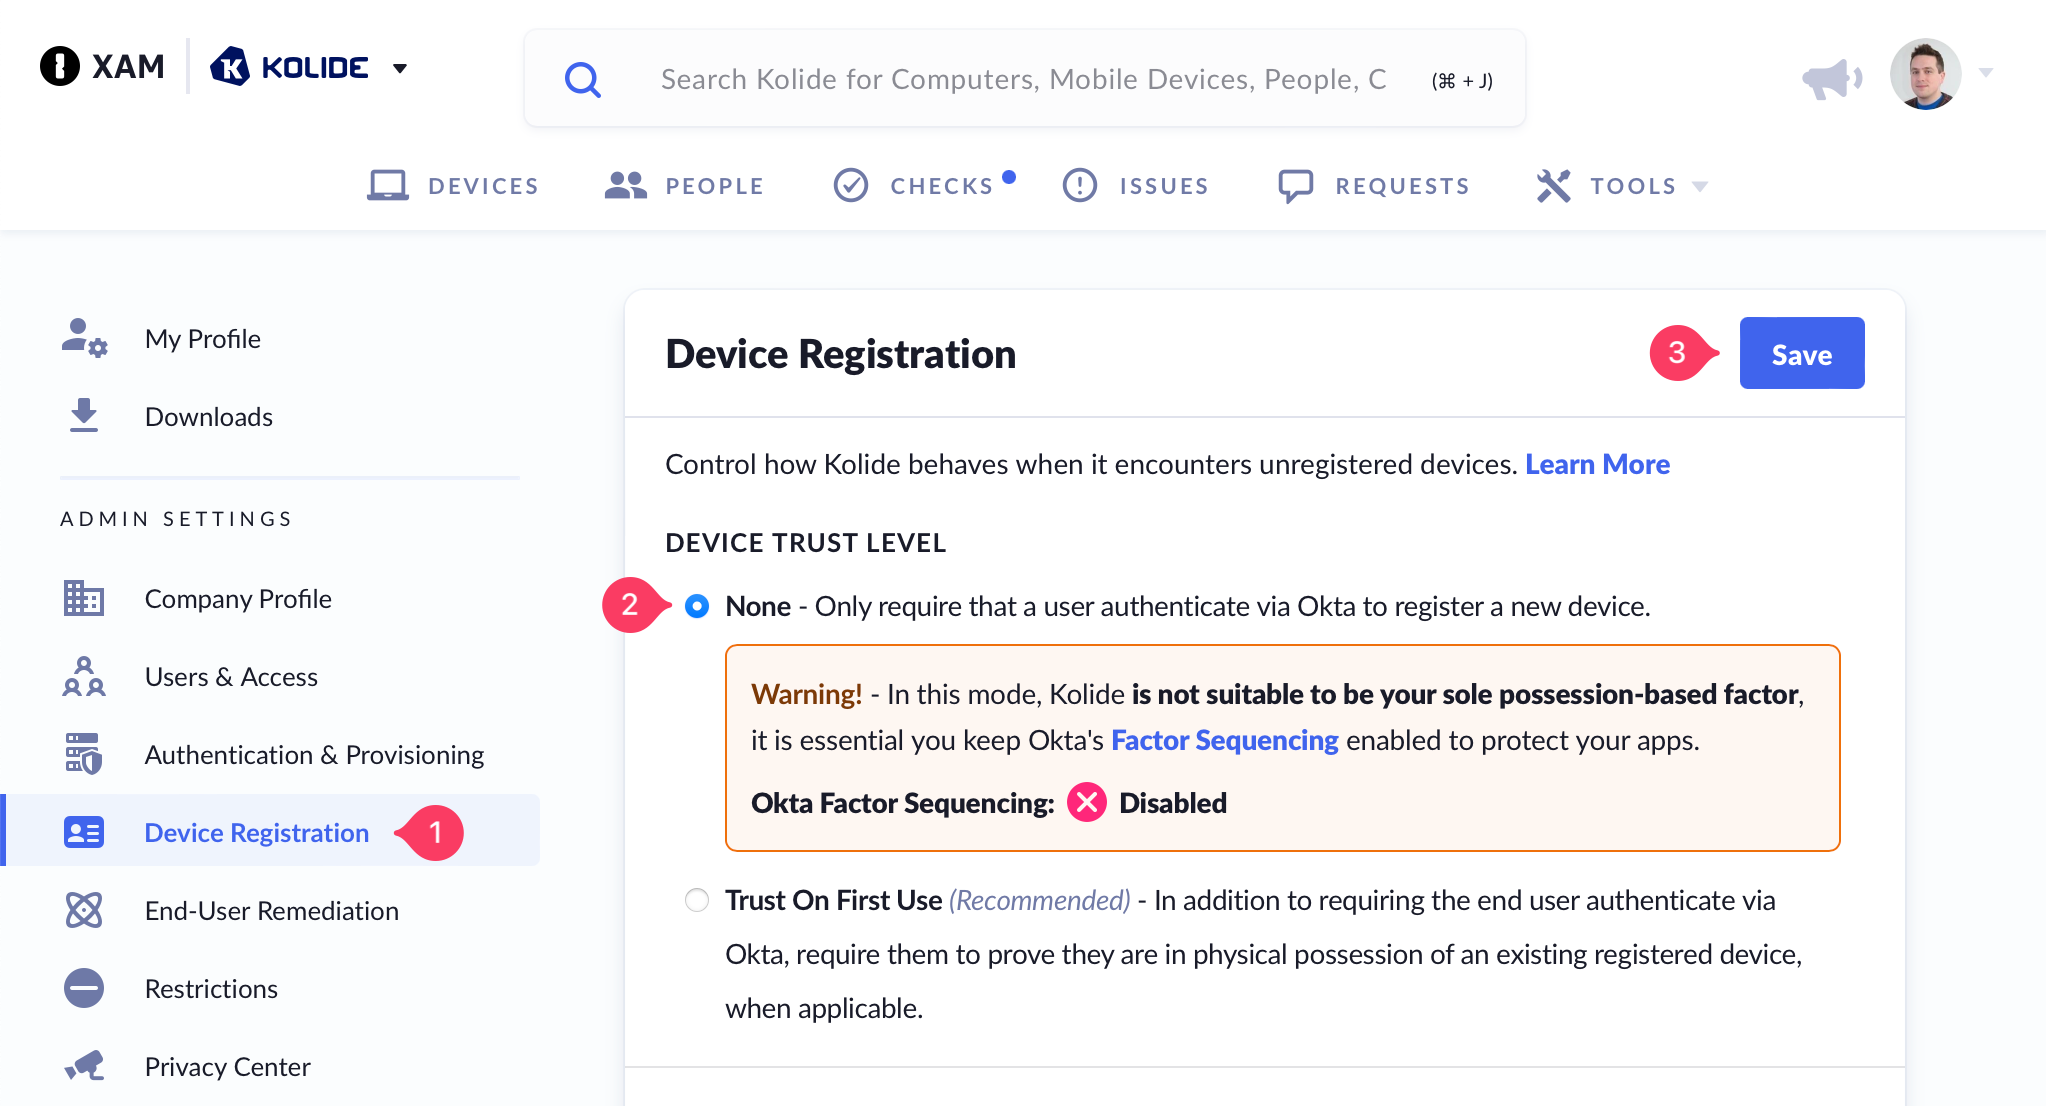
You can always return the setting to Trust on First Use, and any registrations that occurred when the setting was set to None will be automatically grandfathered in as trusted registrations.
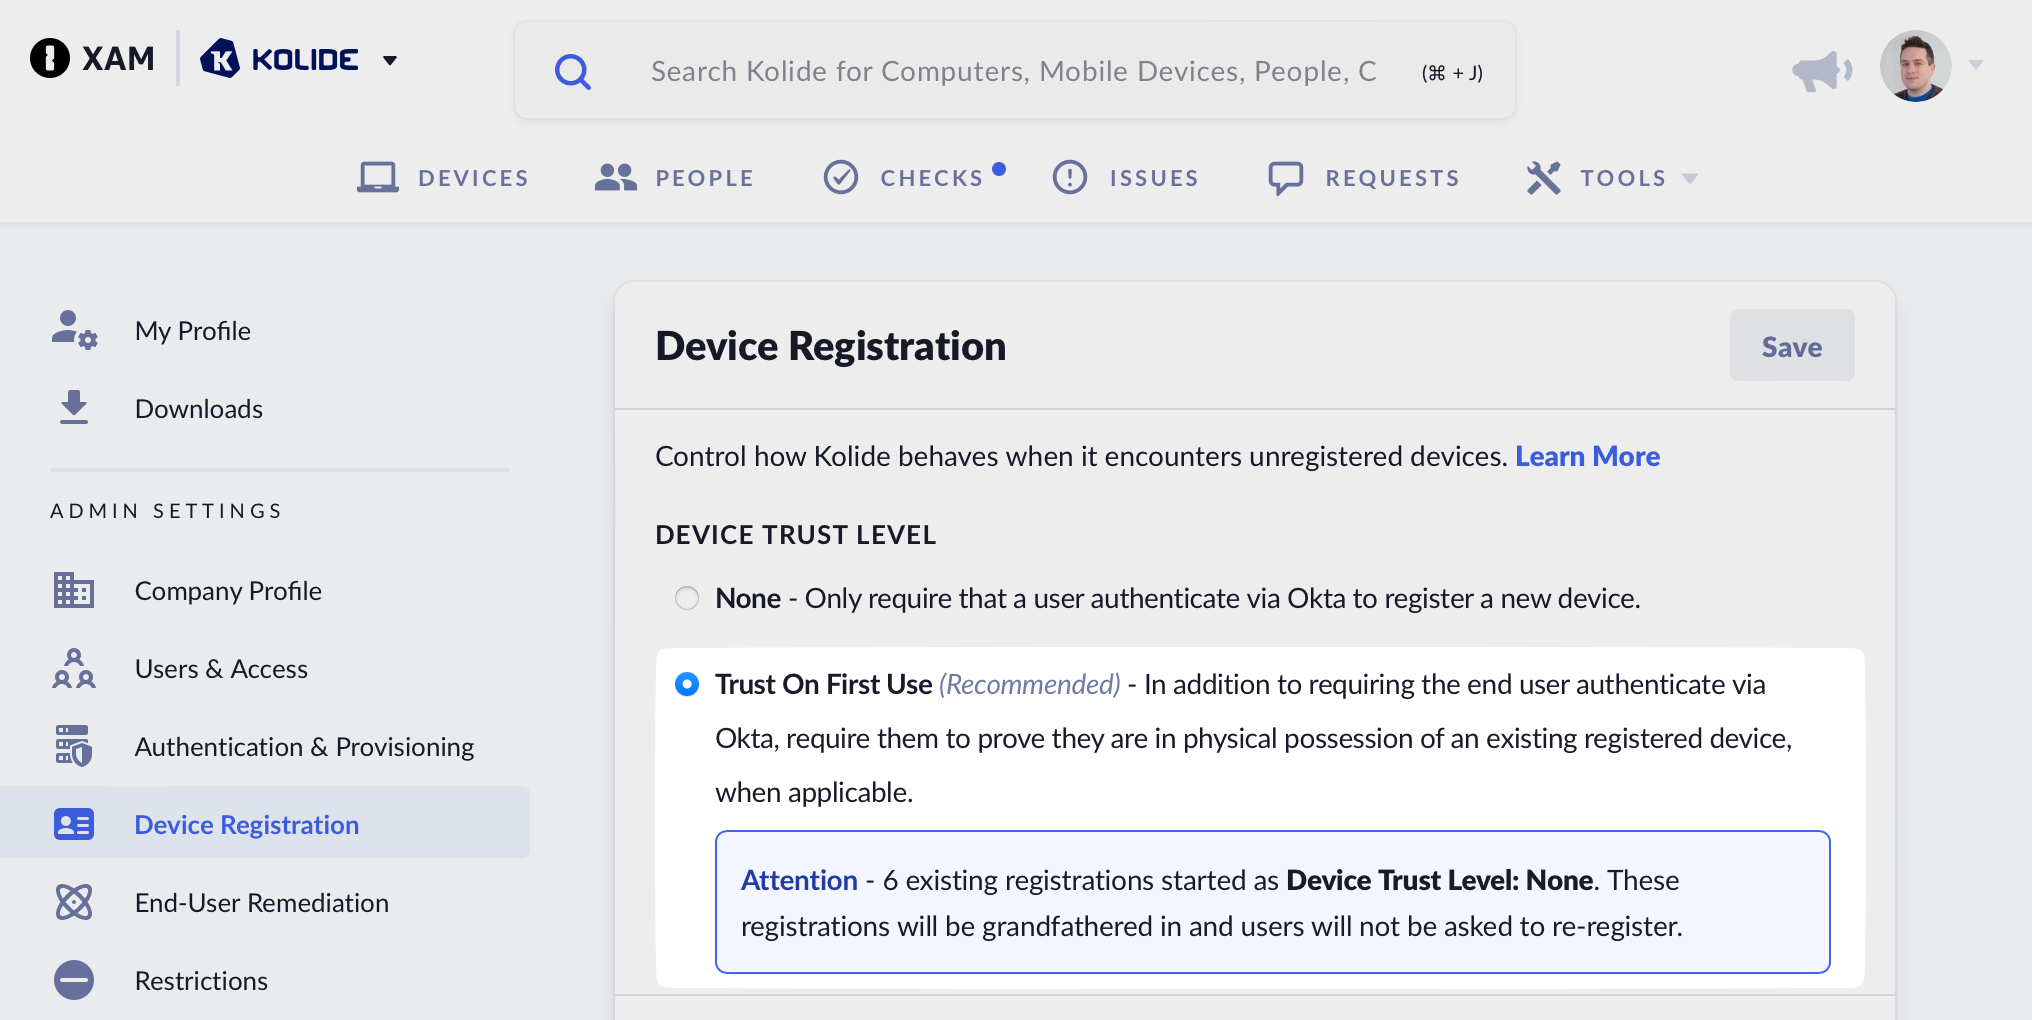
When switching back to a more restrictive mode, Kolide will automatically grandfather in registrations set in a more permissive mode.
How To Control Registration Eligibility
By default, all supported platforms, regardless of their posture or configuration, are eligible to become registered in Kolide’s Device Trust solution.
However, many organizations may wish to limit which devices are allowed to be considered “trusted” in their organization. For example, they may only allow devices that are enrolled in the organization’s MDM solution, or have a special file or certificate on the filesystem. In some situations, an organization may want to disallow an entire platform from being allowed to enroll (e.g., Mobile Devices). To enable this, Kolide supports enacting specific registration requirements.
To remove an existing registration, see this section.
To configure your organization’s registration requirements, go to Settings > Device Registration (note: you must be an administrator to control these settings).
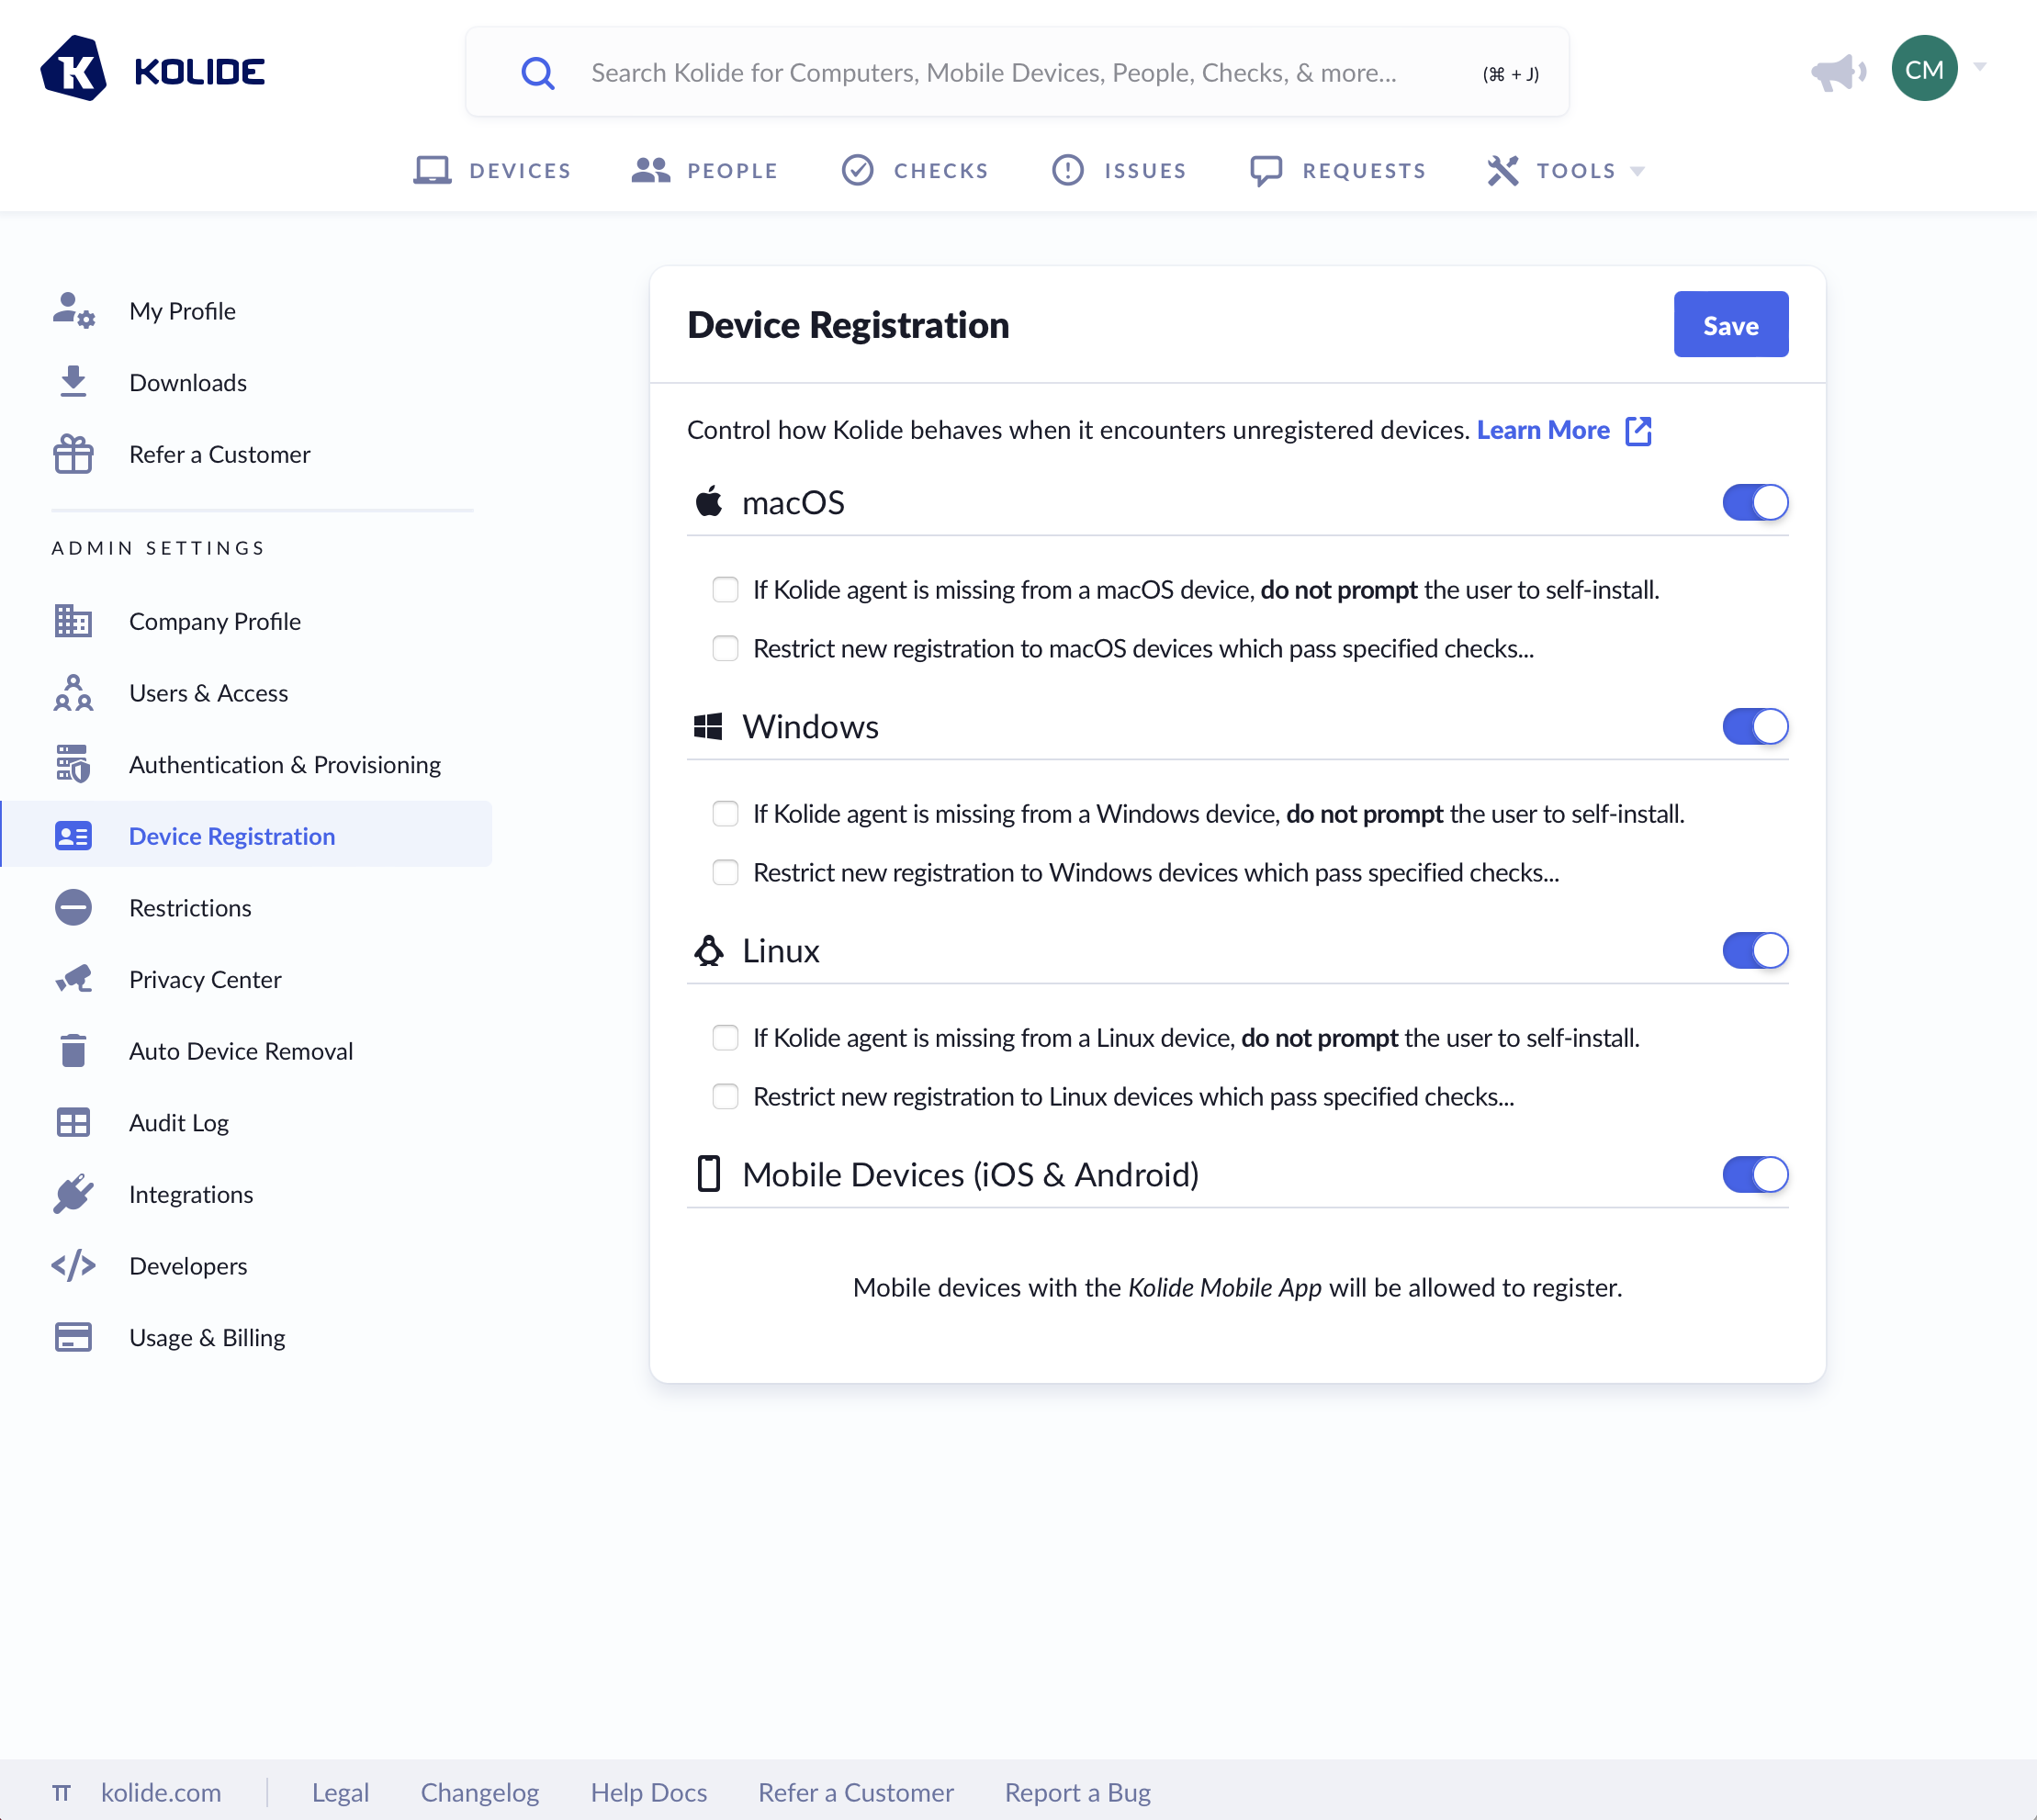
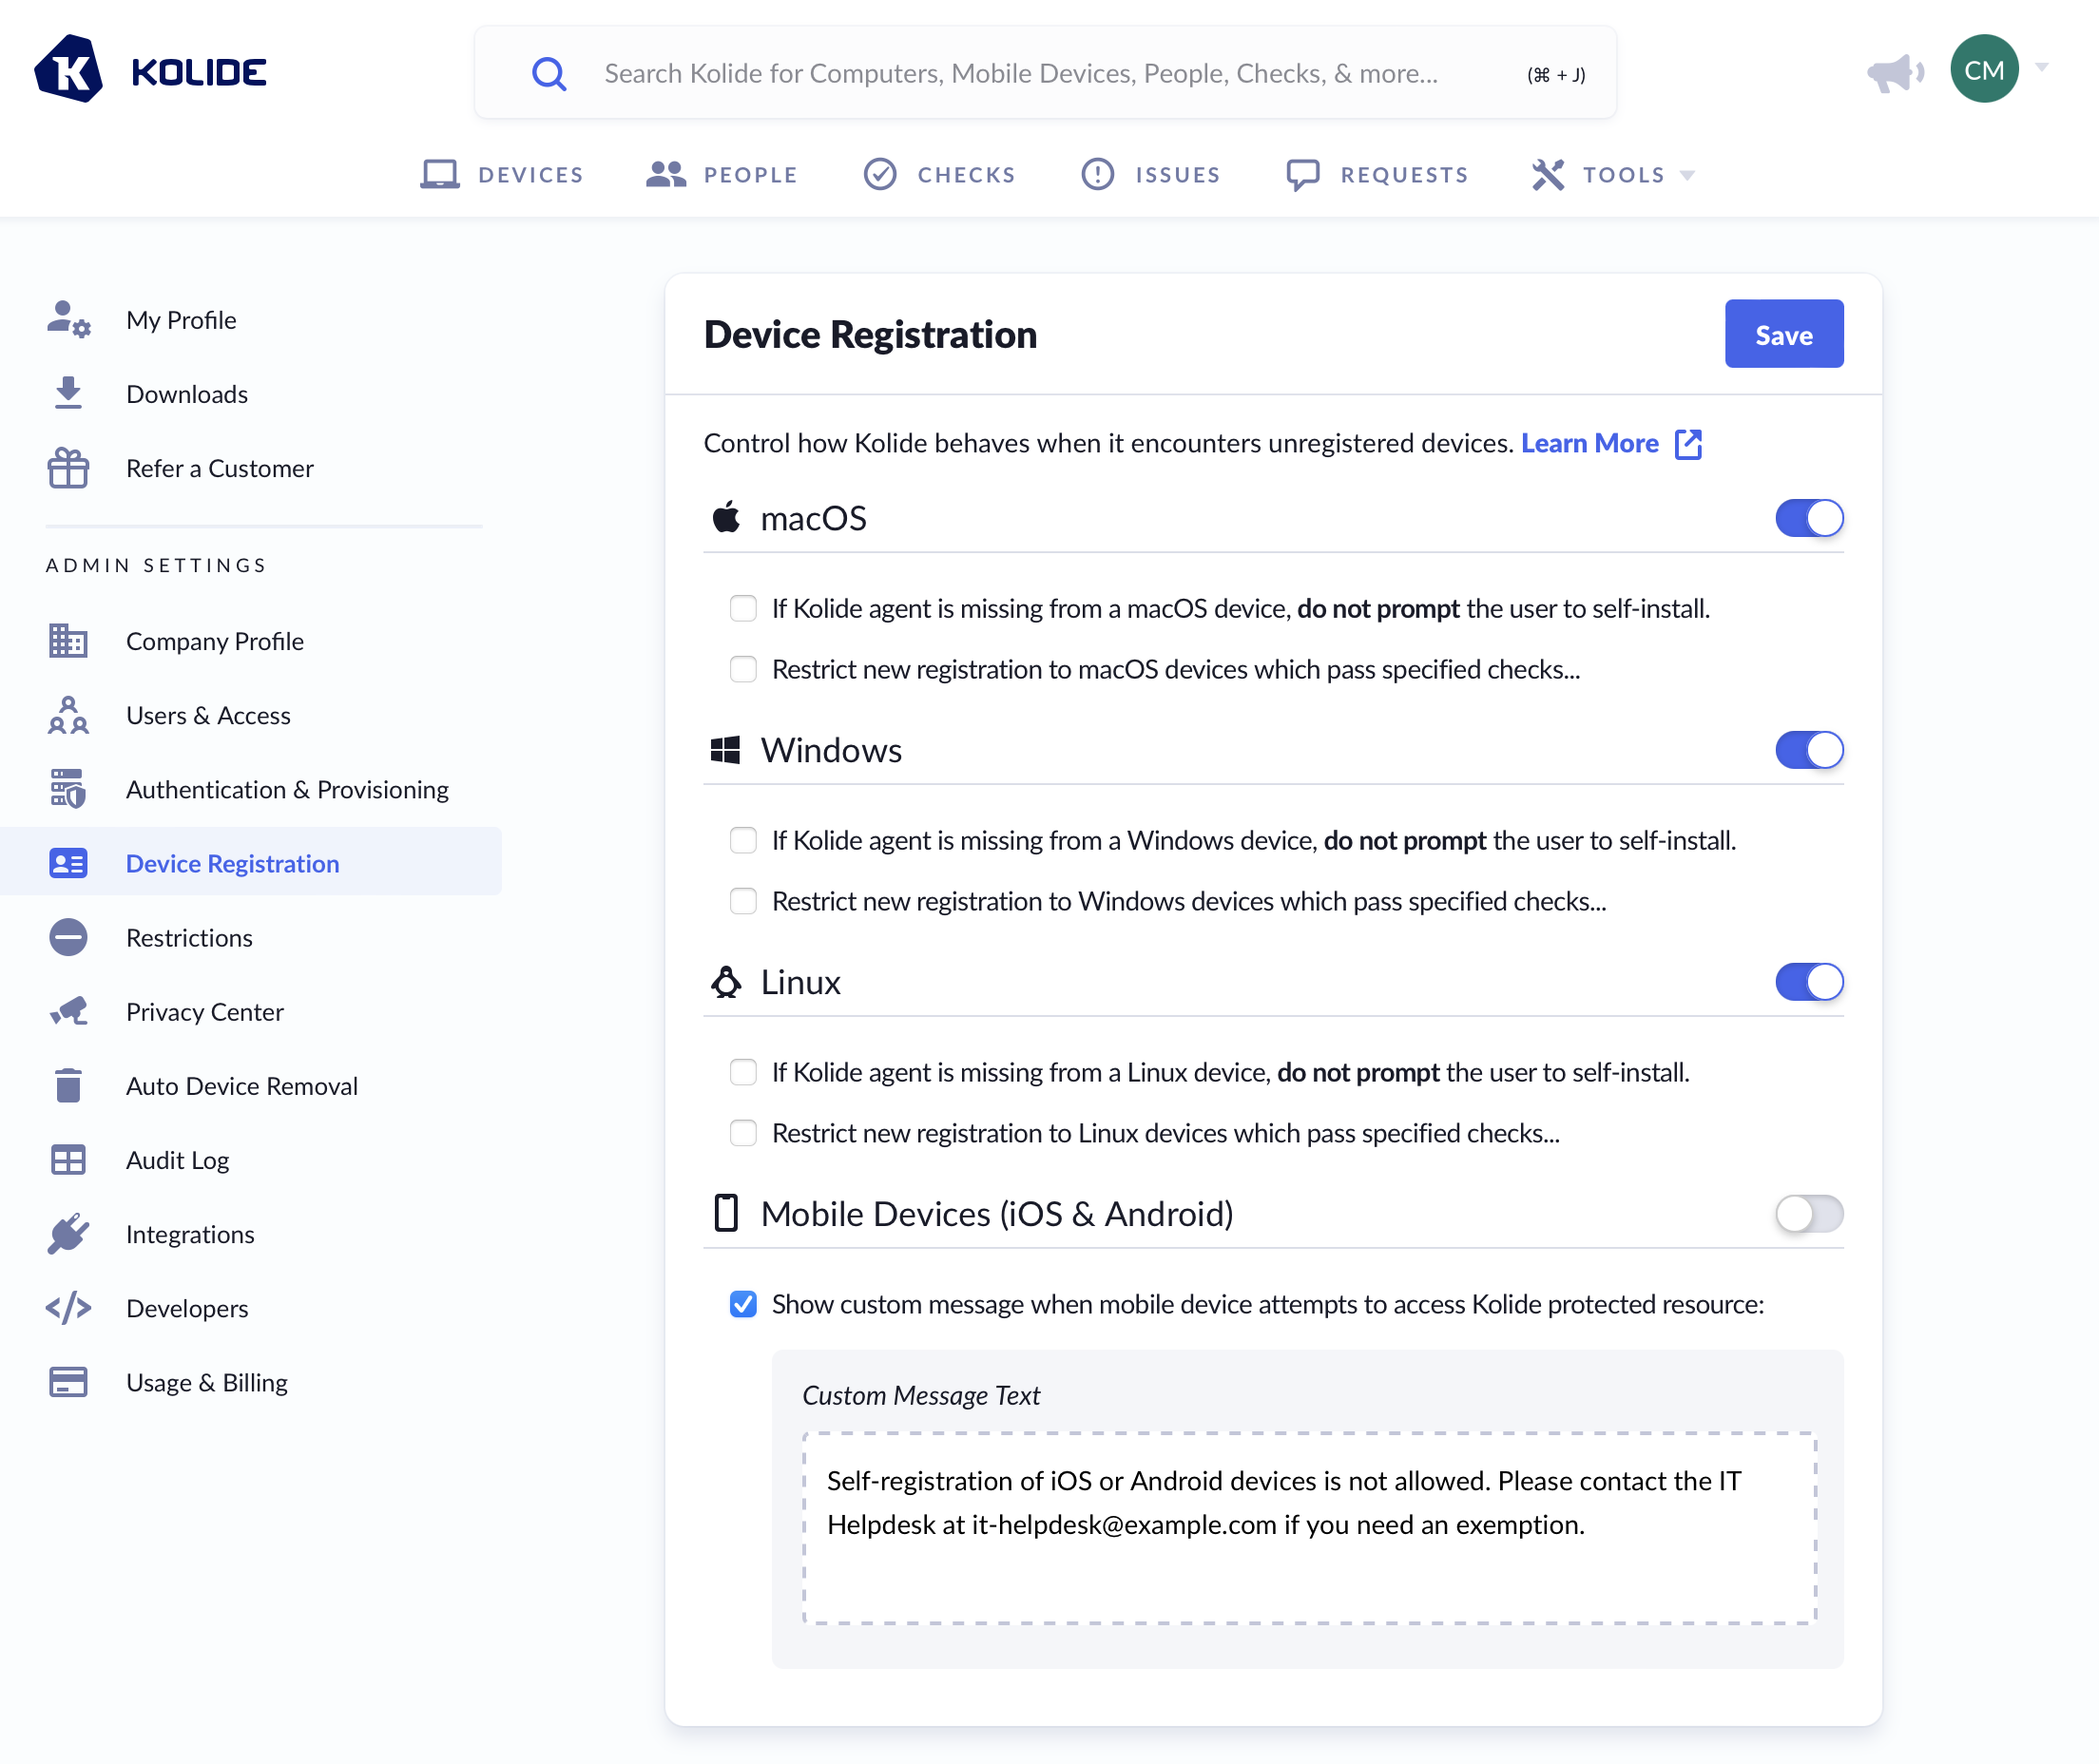
Device Registration requirements. By default, all platforms are allowed.
Disabling a platform
If you wish to prevent an entire platform from registering, click the toggle next to that platform’s section so that it is in the “off” position. If you disable the Mobile Devices platform (shown below), you will also be given the opportunity to provide a message to end-users.
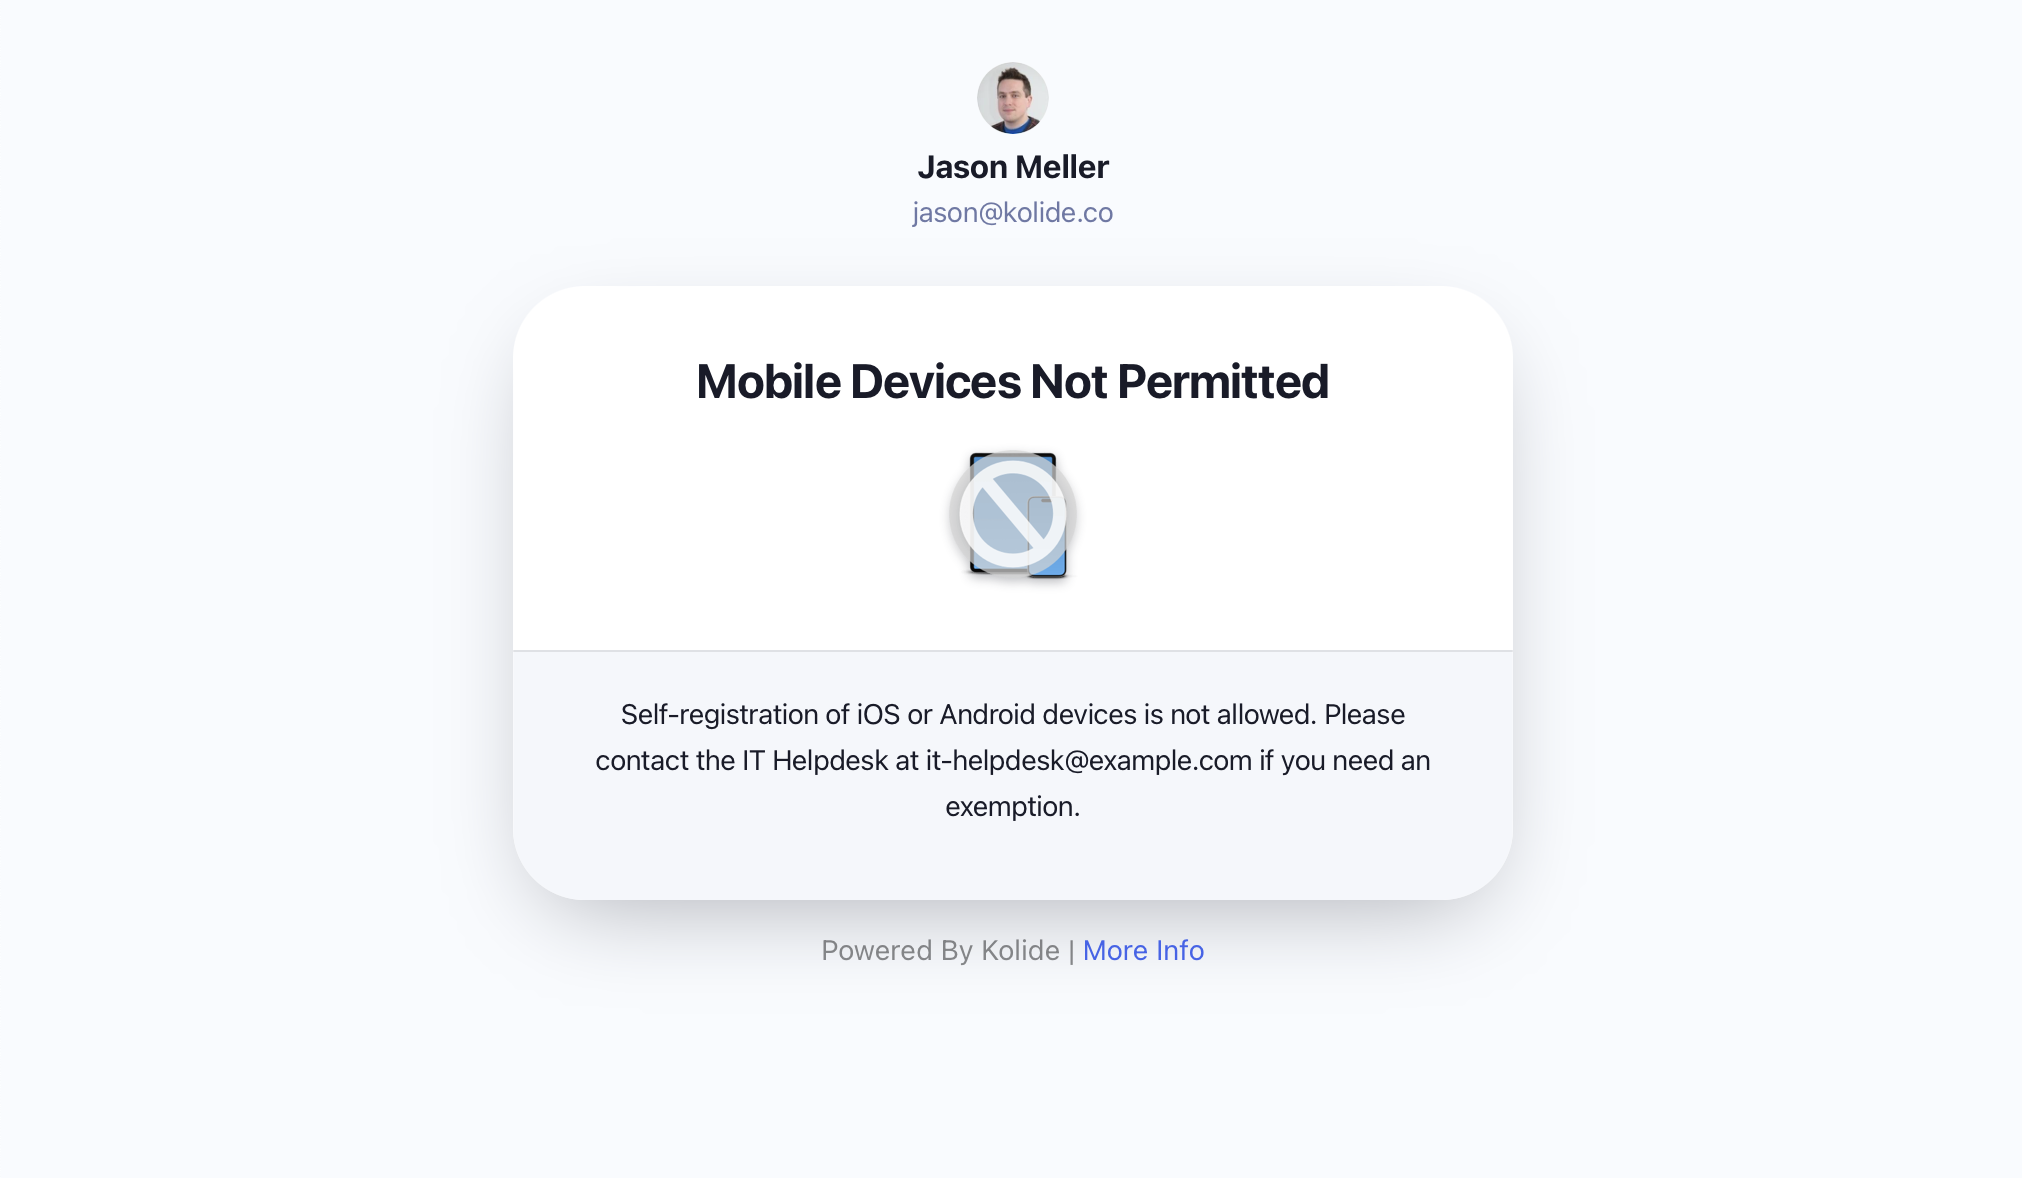
The message shown to the end-user when they attempt to register their mobile device.
Do not offer agent self-service installation
Instead of preventing an entire platform from registering entirely, you may wish to allow devices to register for that platform only when the Kolide agent already installed and running on that device. If the device does not have the agent, instead of guiding the end-user to install it themselves, Kolide will show them an error message that you can customize.
This is helpful in situations where you know you will be distributing the agent to all company owned devices via MDM software and don’t want users to self-register their personal laptops or desktops.
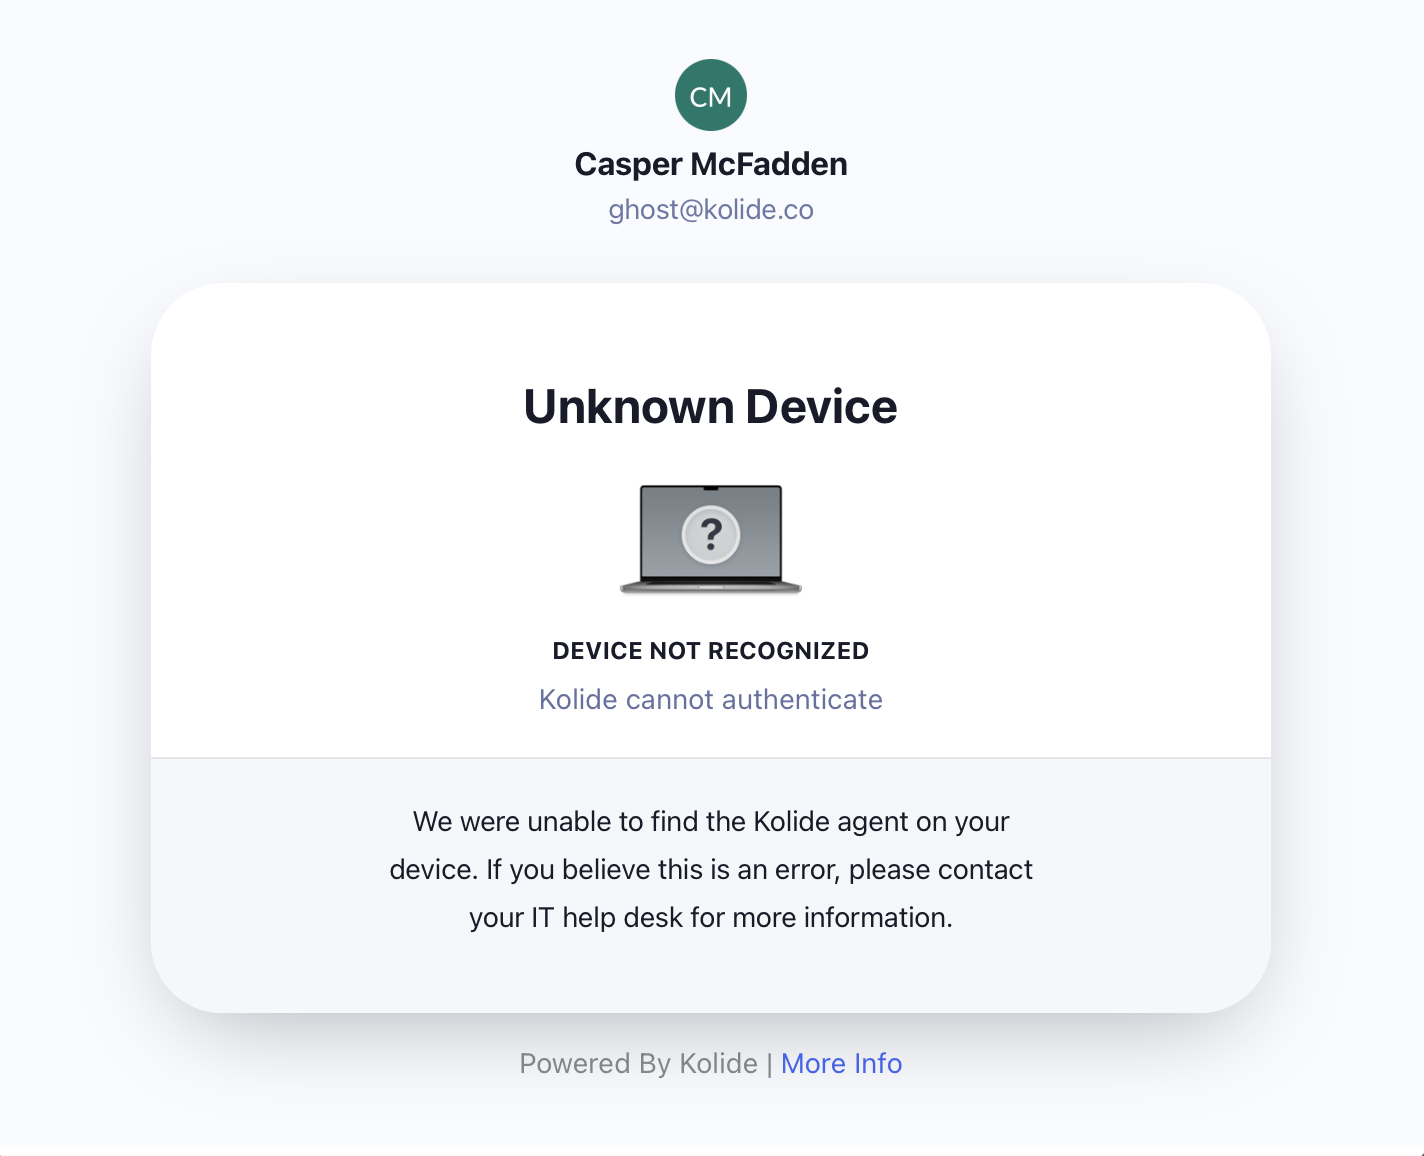
When an agent is not already installed on the user’s device, instead of offering them an installer, you can show them a custom error message. This discourages users from installing Kolide on personal laptops.
You can restrict these agent installer downloads for Mac, Windows, and Linux devices.
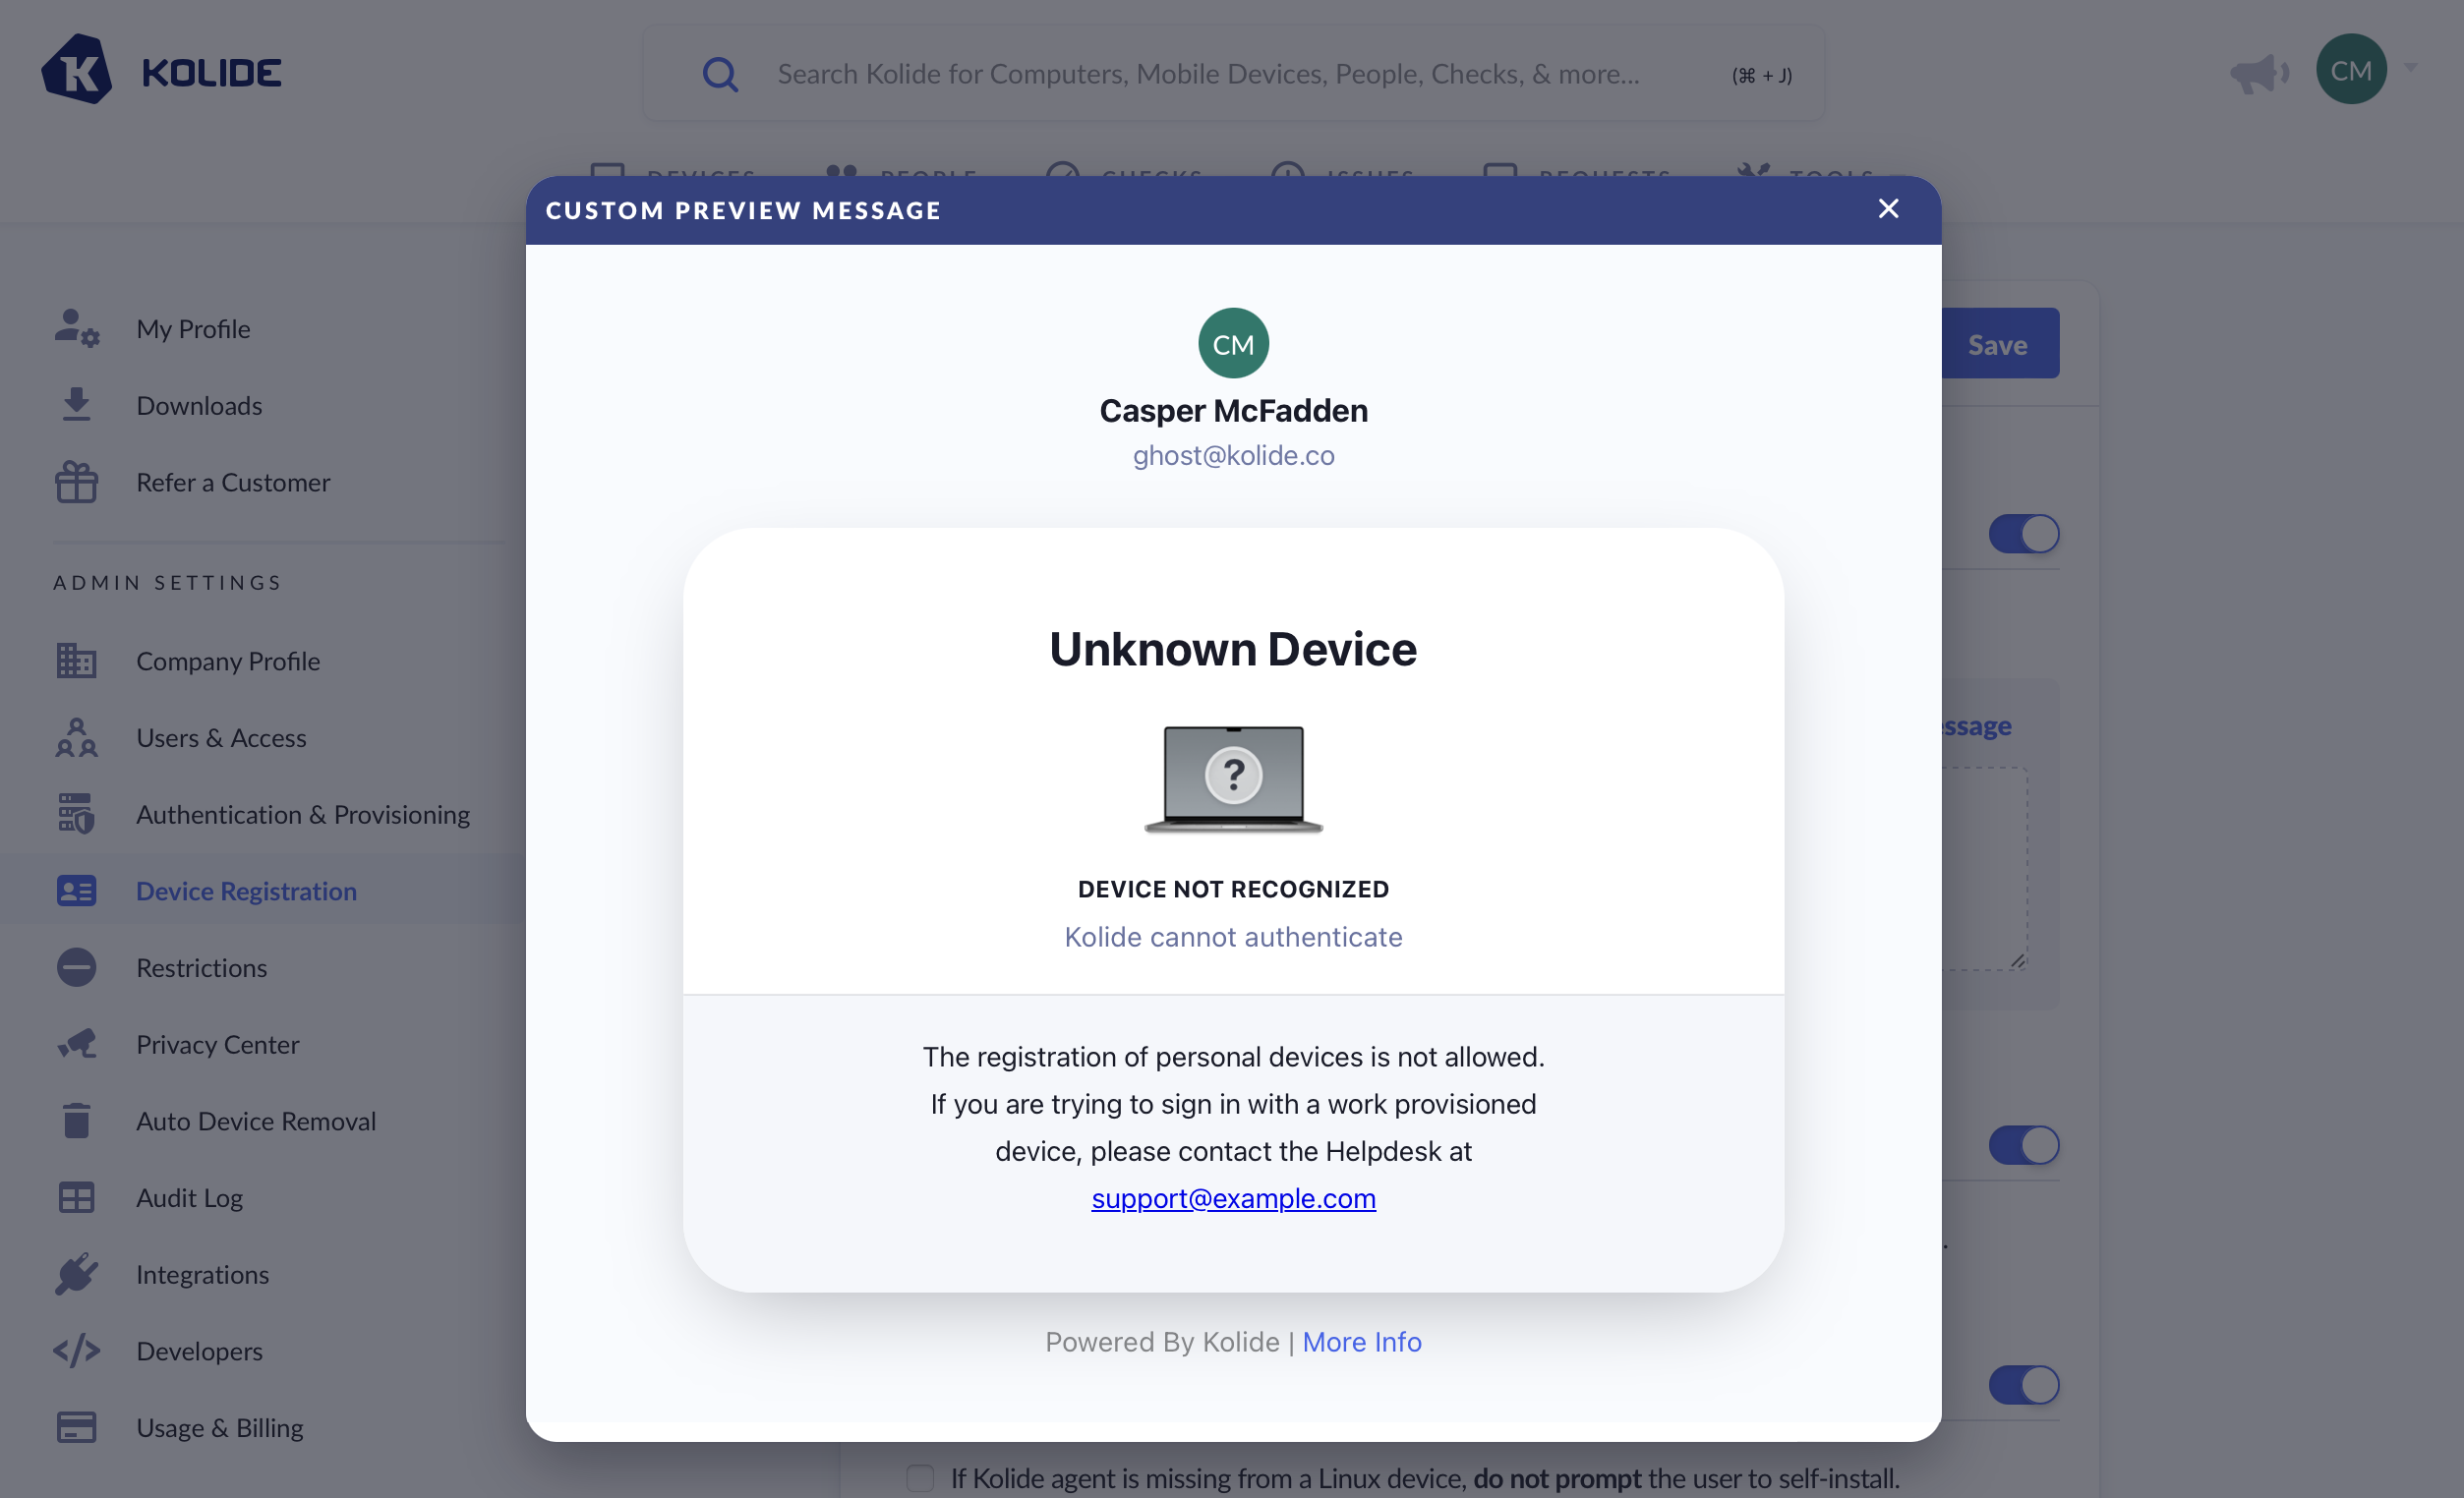
To set this restriction for a platform, check the checkbox labeled If Kolide agent is missing from a macOS device, do not prompt the user to self-install…. Once checked, you may wish you to customize the message shown to end-users who attempt to register an unknown device of that type.
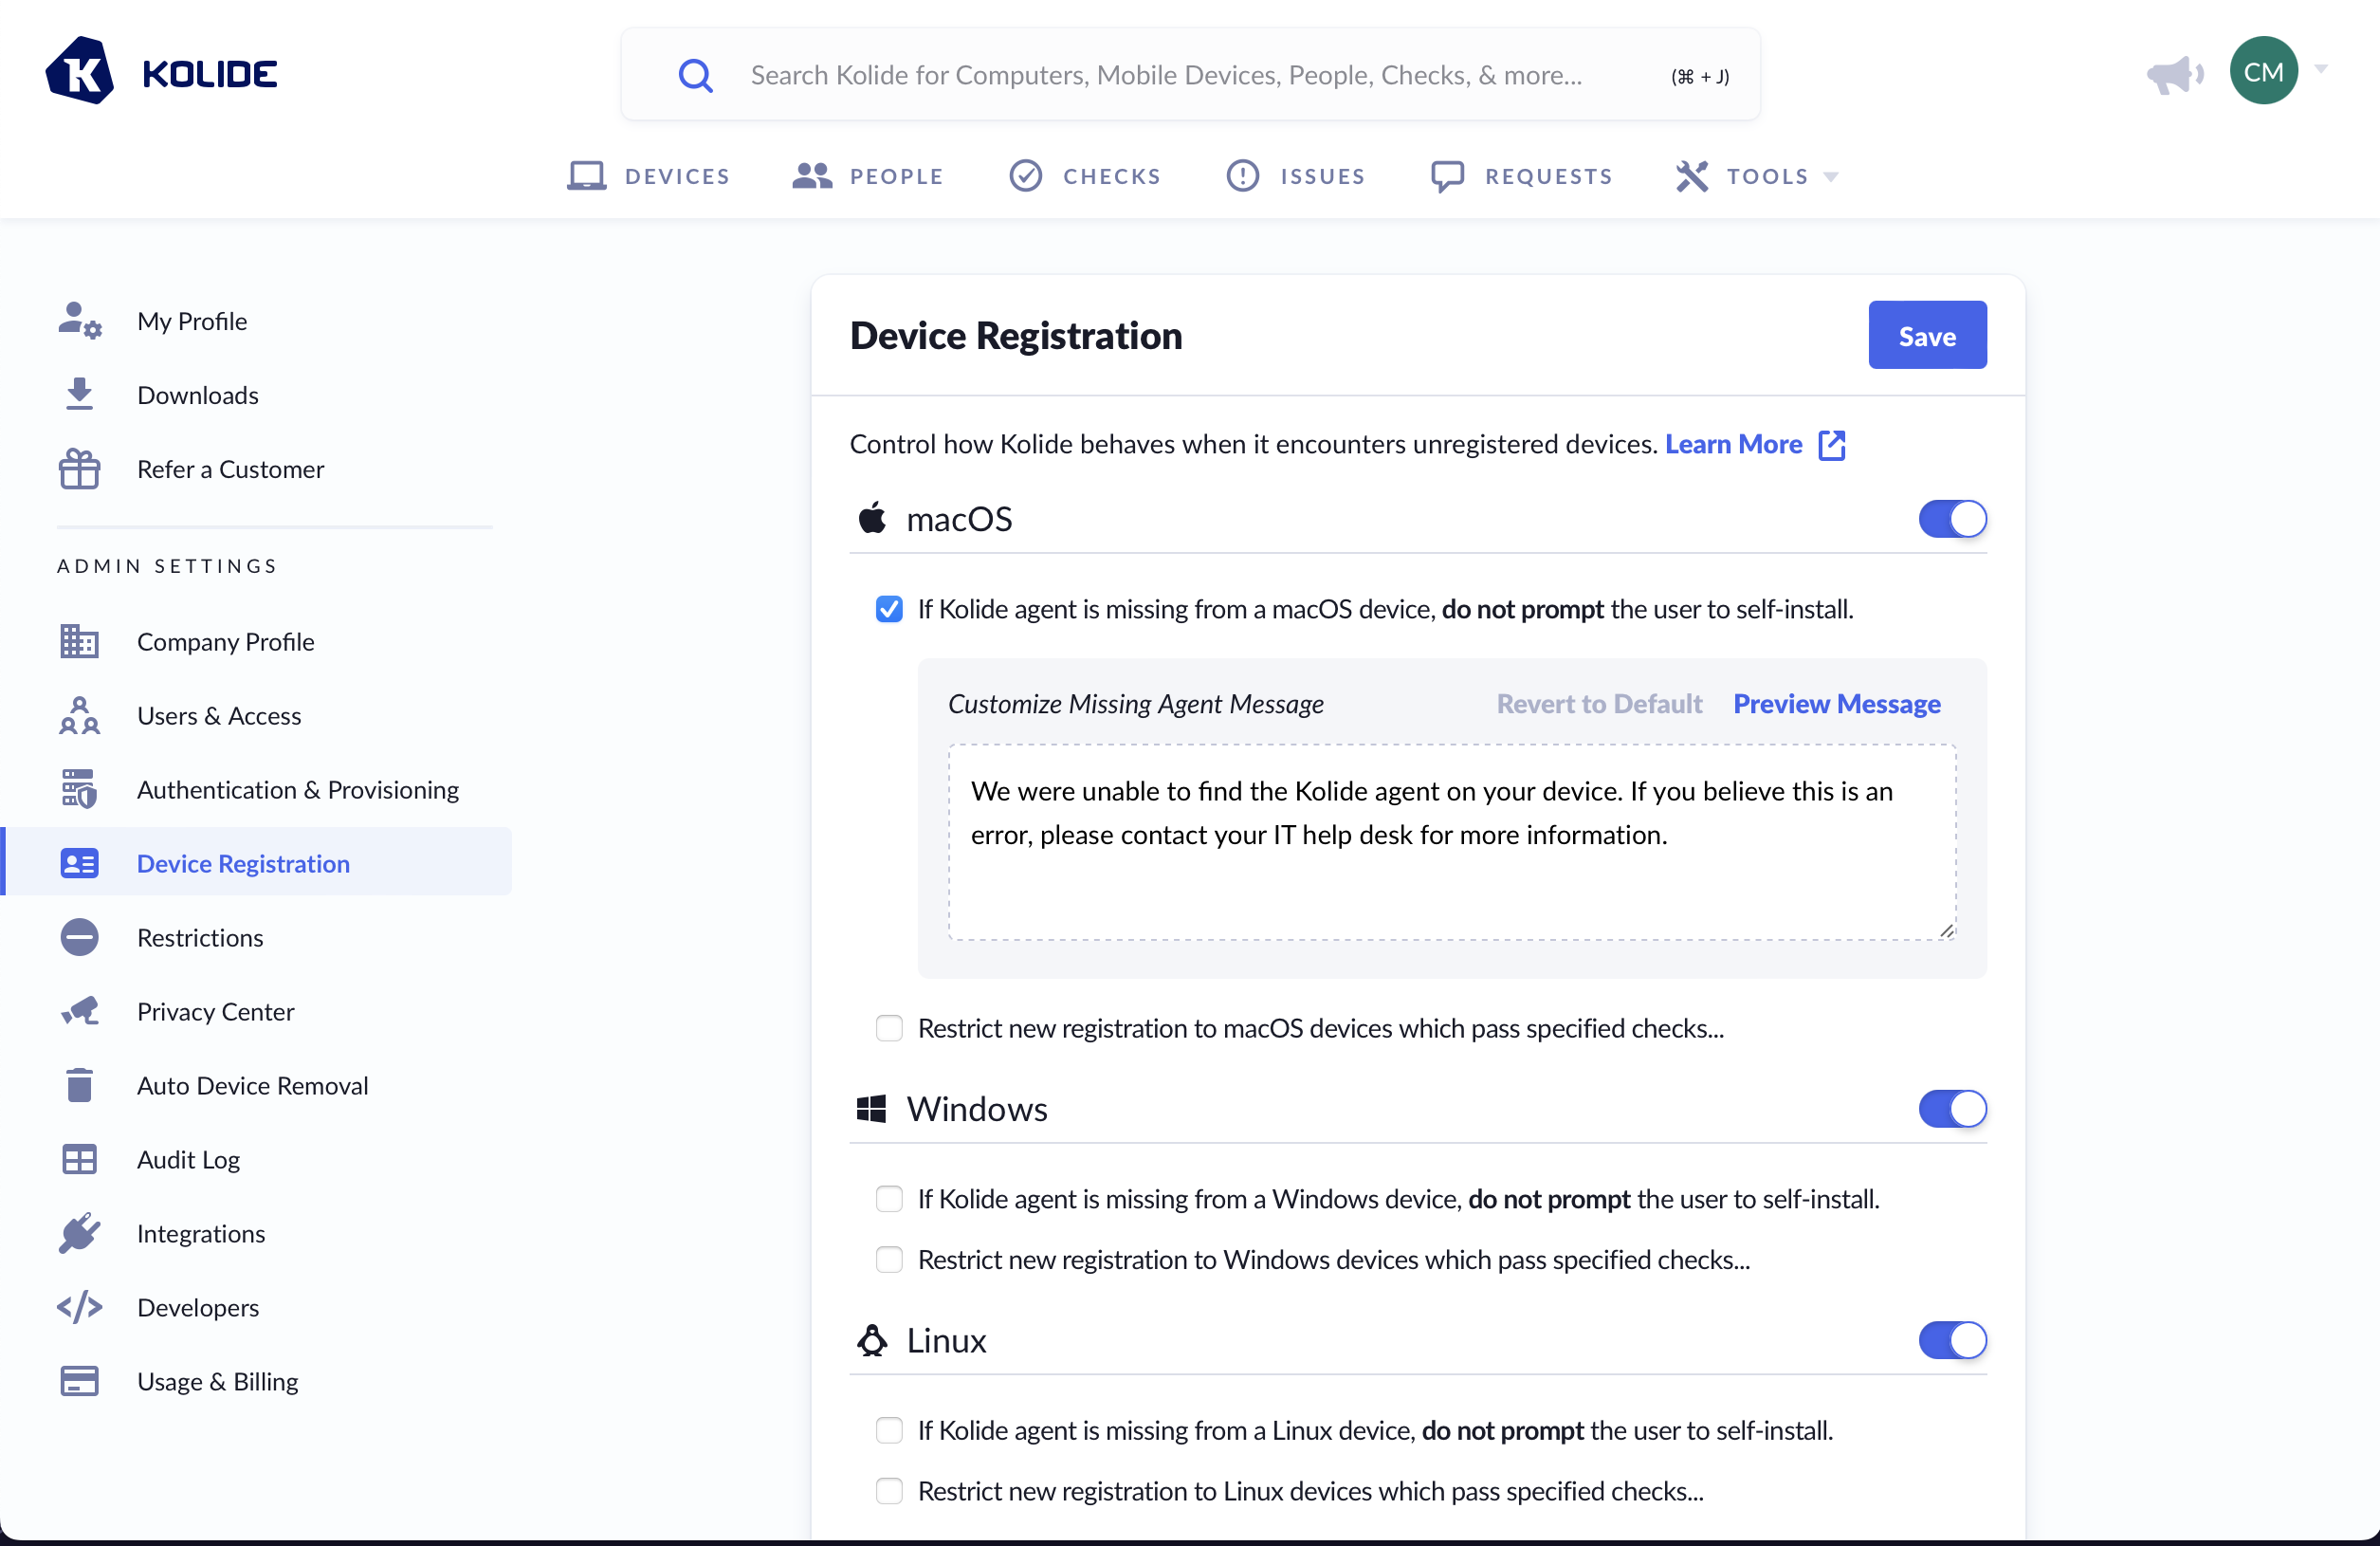
The custom message can be further customized with markdown and any links will open in a new window/tab in the web browser. You can preview what the end-user experience will look like by clicking the Preview Message link above the compose box.
Requiring certain Checks to pass
Instead of preventing an entire platform from registering, you may wish to ensure a device is meeting certain posture requirements. To accomplish this, Kolide uses the same Checks system used to assess the device’s posture and ensure it is eligible to complete authentication.
The reason is that blocking only temporarily impacts an already registered device’s ability to complete authentication. It’s not designed to stop devices from becoming officially associated with the organization via registration.
A good rule of thumb is if you don’t want end-users to self-remediate (or it’s a problem they can’t solve on their own), then you should make it a registration requirement. An example of this would be checking if the device is enrolled in the organization’s MDM provider.
On the other hand, if the device Check is related to the device’s posture and is something the end-user can self-remediate, then it should not be a registration requirement. A good example of this is making sure a device’s web browsers are up-to-date.
To set requirements for a platform, check the checkbox labeled Restrict new registration to macOS devices which pass specified checks… and then, choose the Checks you wish to make requirements. All of the Checks listed here must be in a passing state for the device to be considered eligible for registration.
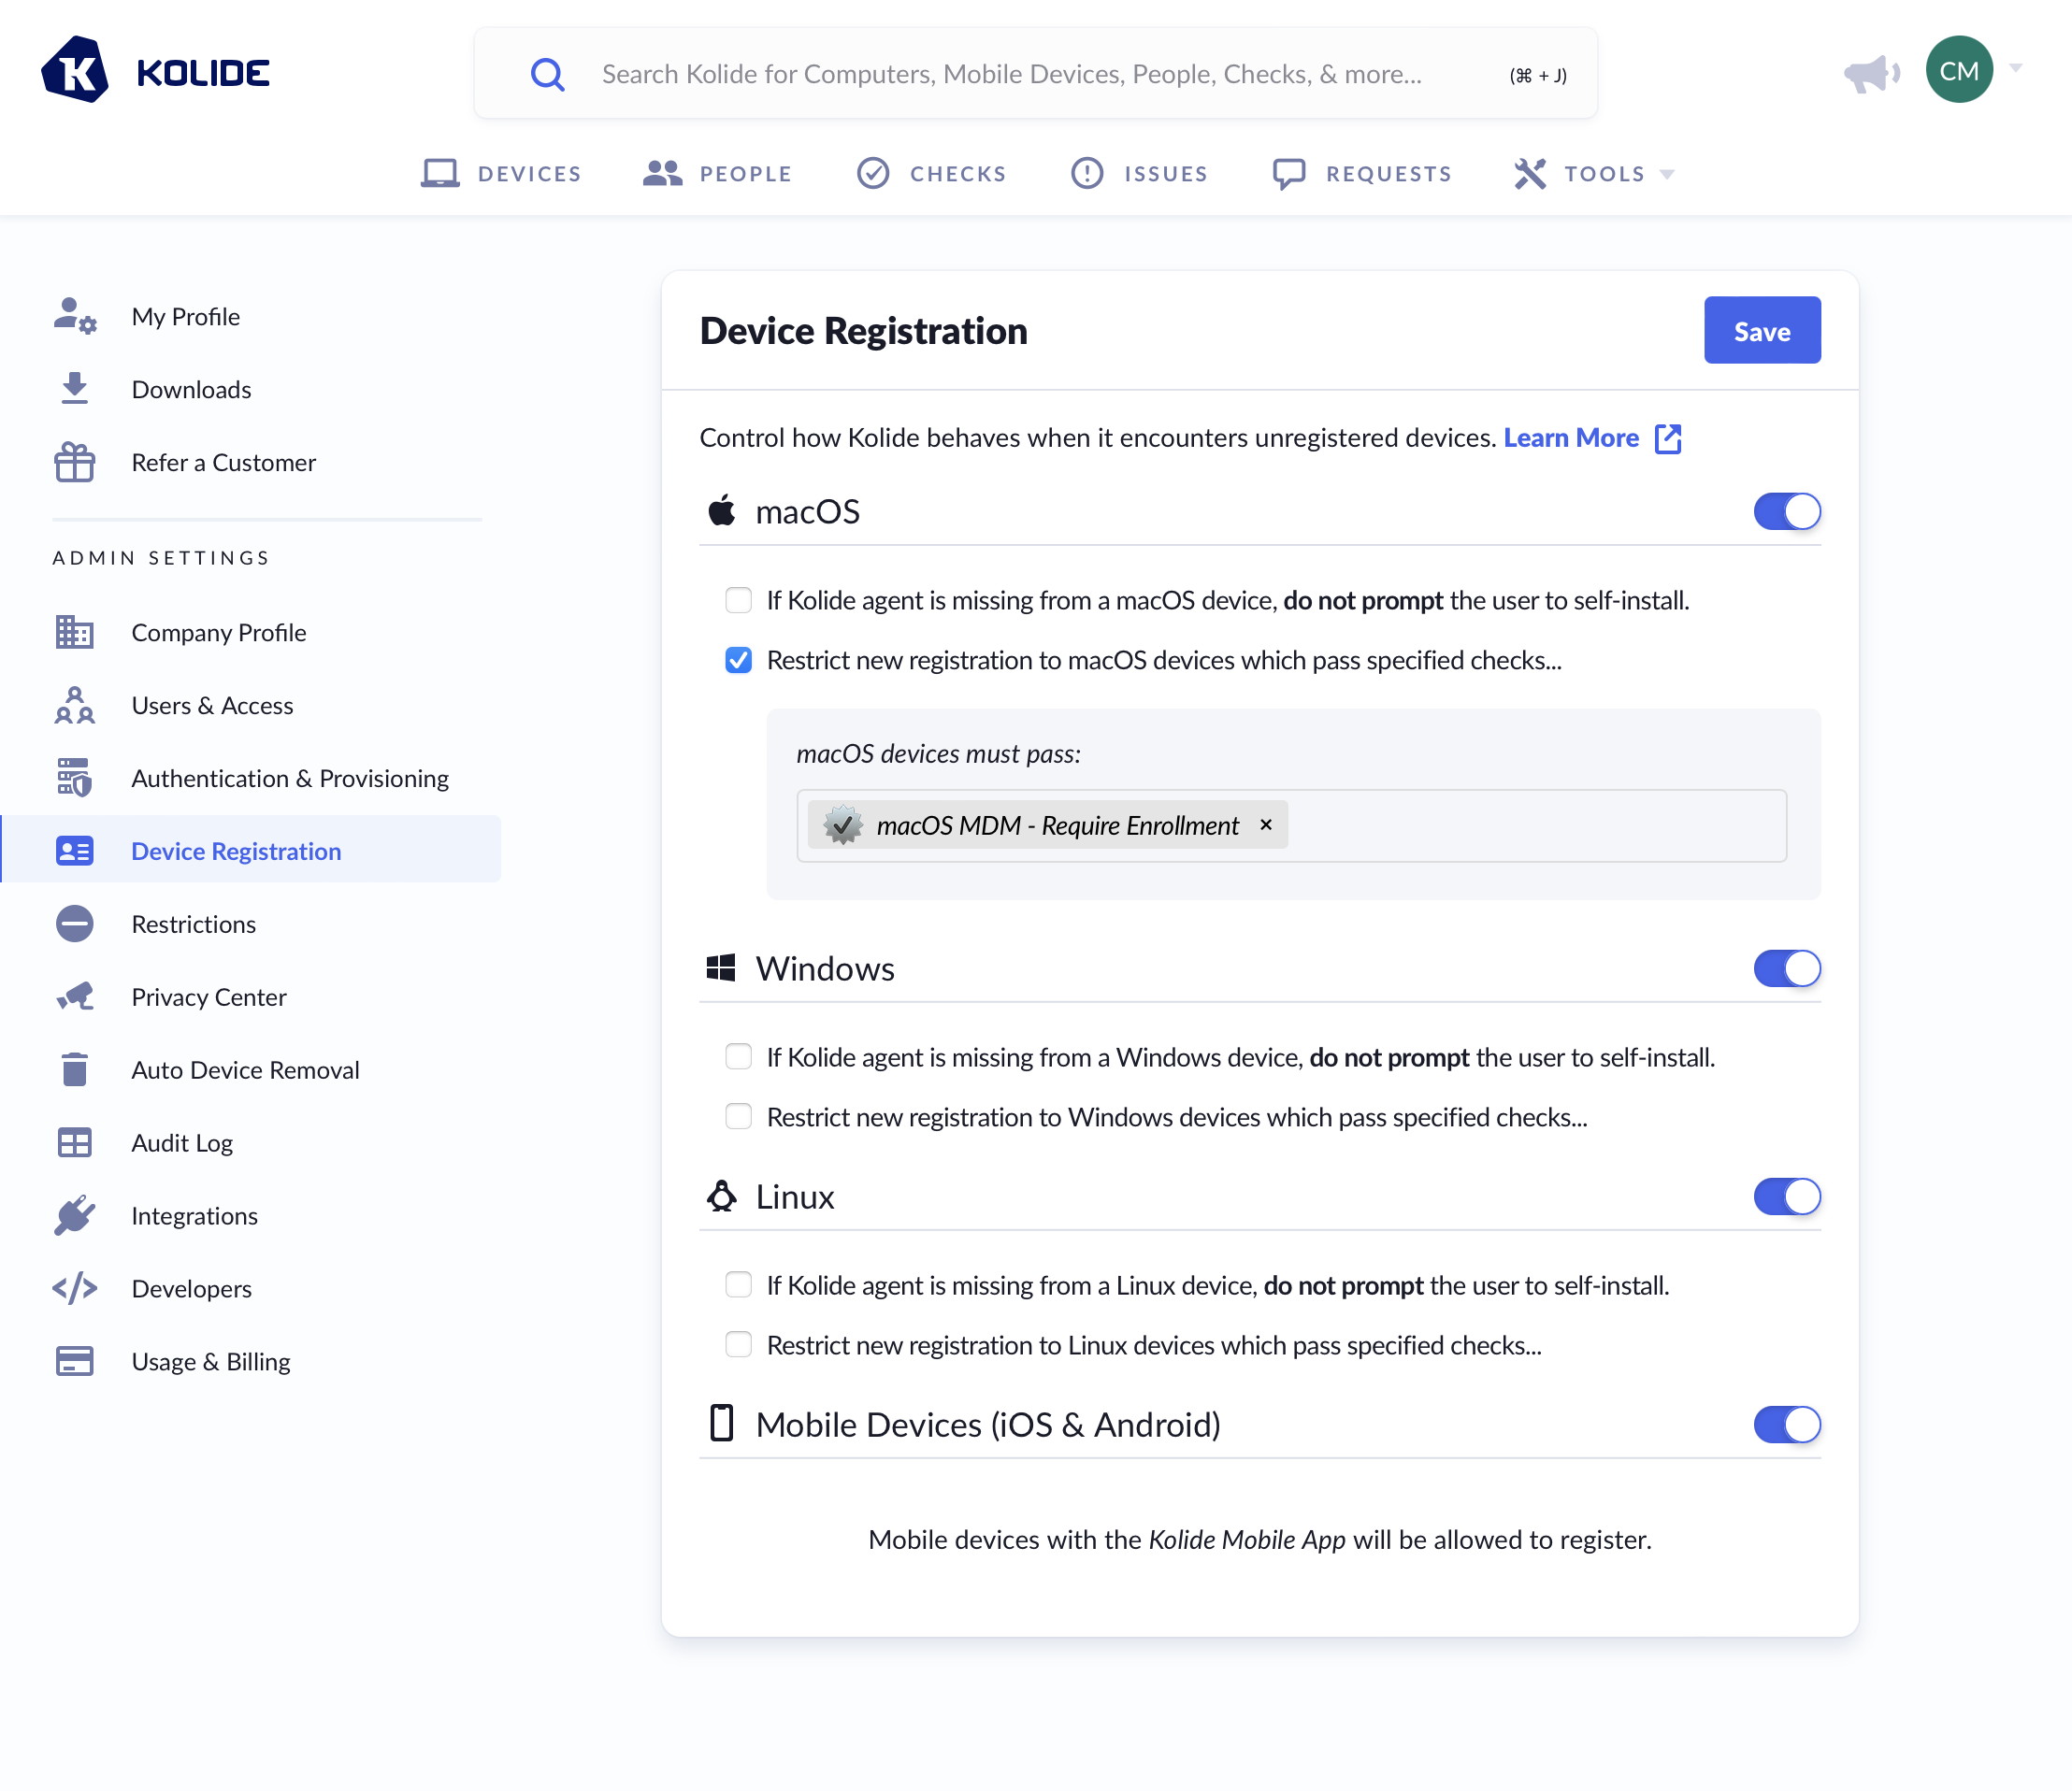
When an end-user attempts to register a device that does not pass all of the listed Checks, they will see a screen like the following:
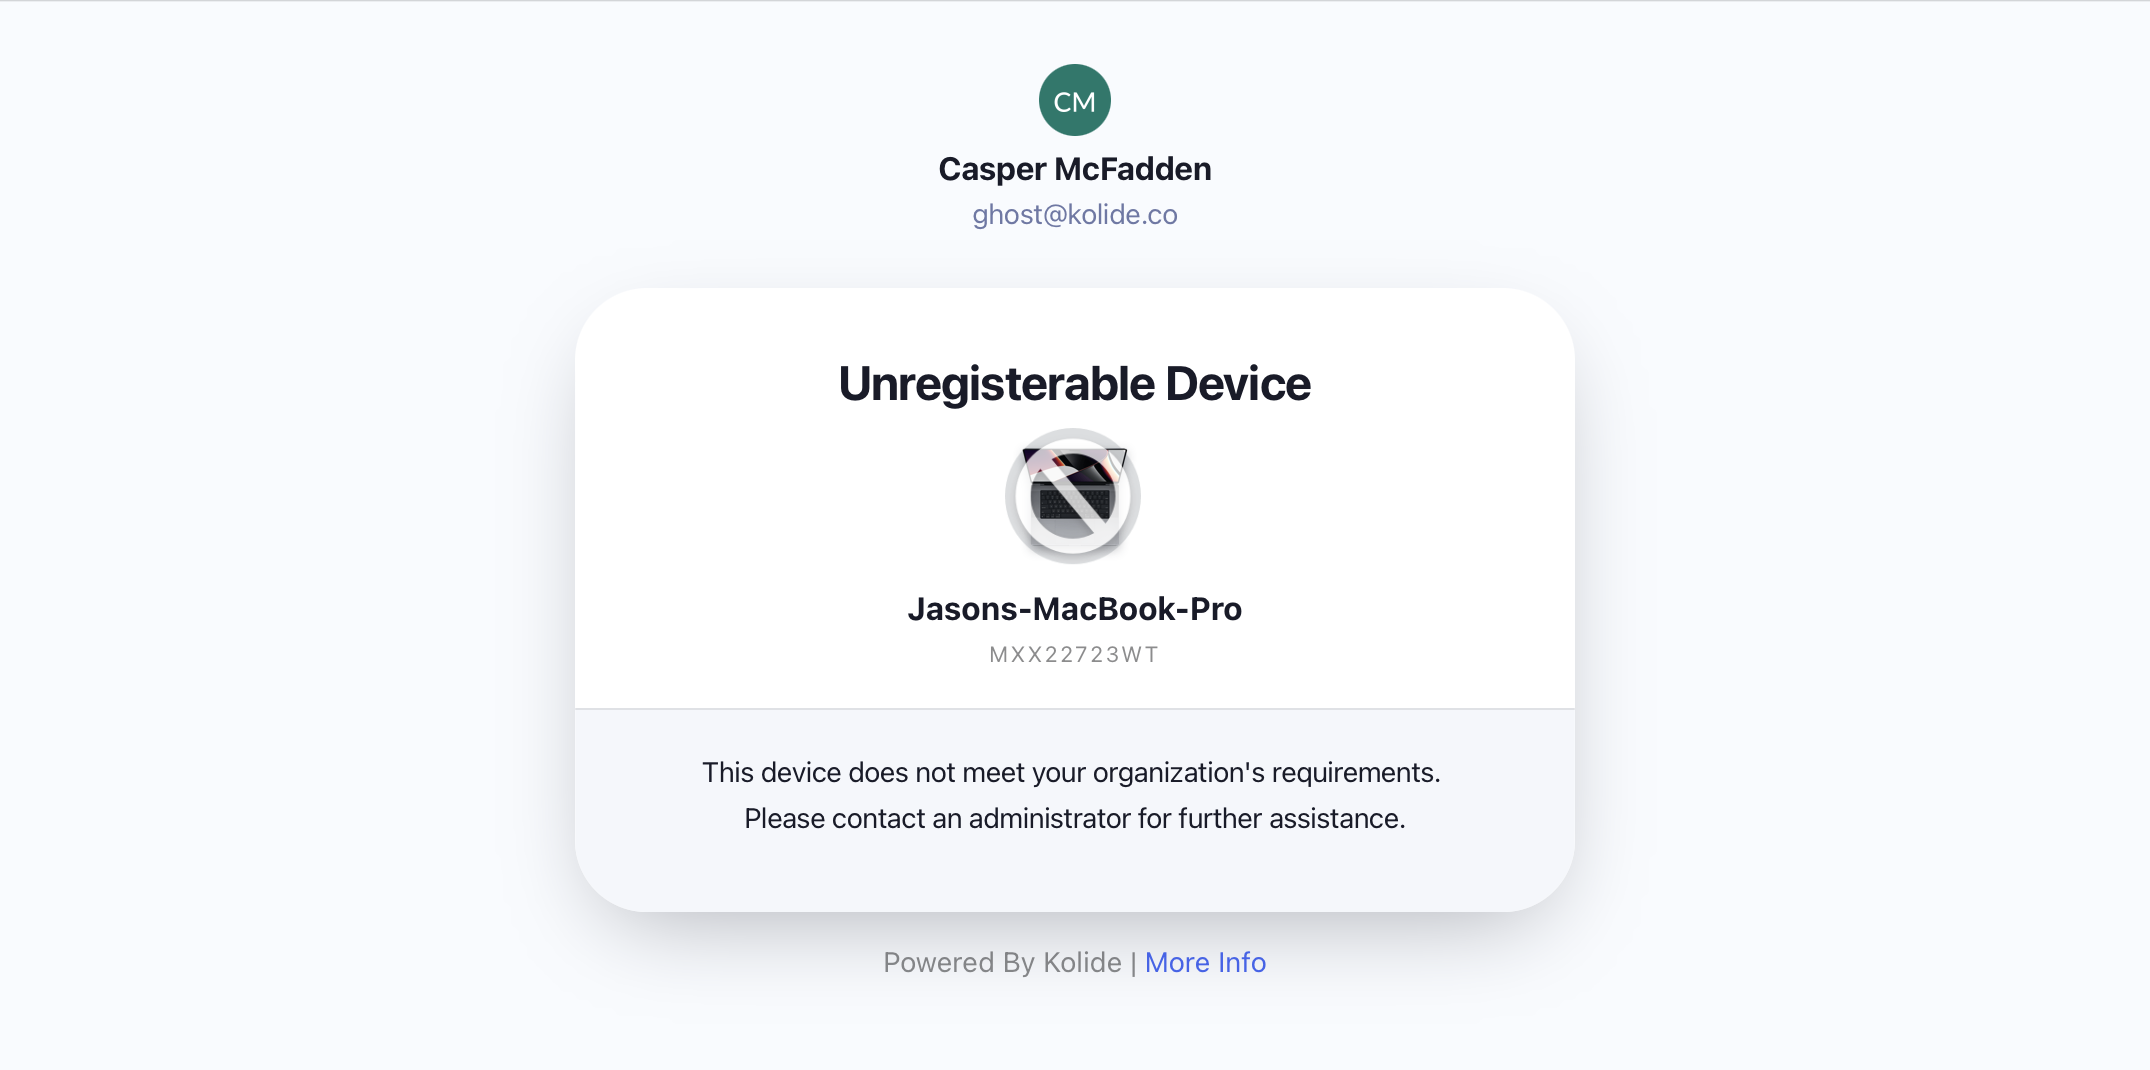
If an end-user asks you why a device wasn’t eligible, you can always see specifically which checks it was failing by finding it under Devices > Unregistered Devices and looking at which Checks it is currently failing and comparing that with the list of registration requirements.
Requiring MDM Enrollment on Mobile Devices
For mobile devices specifically, Kolide supports the ability to only allow registration if the device successfully attests it is enrolled in one of your approved MDM providers.
Configuration
Before you can require MDM enrollment, you will need to prepare your company’s mobile devices so that Kolide can correctly detect the enrollment from its mobile app.
Follow the instructions on the Device MDM Providers page
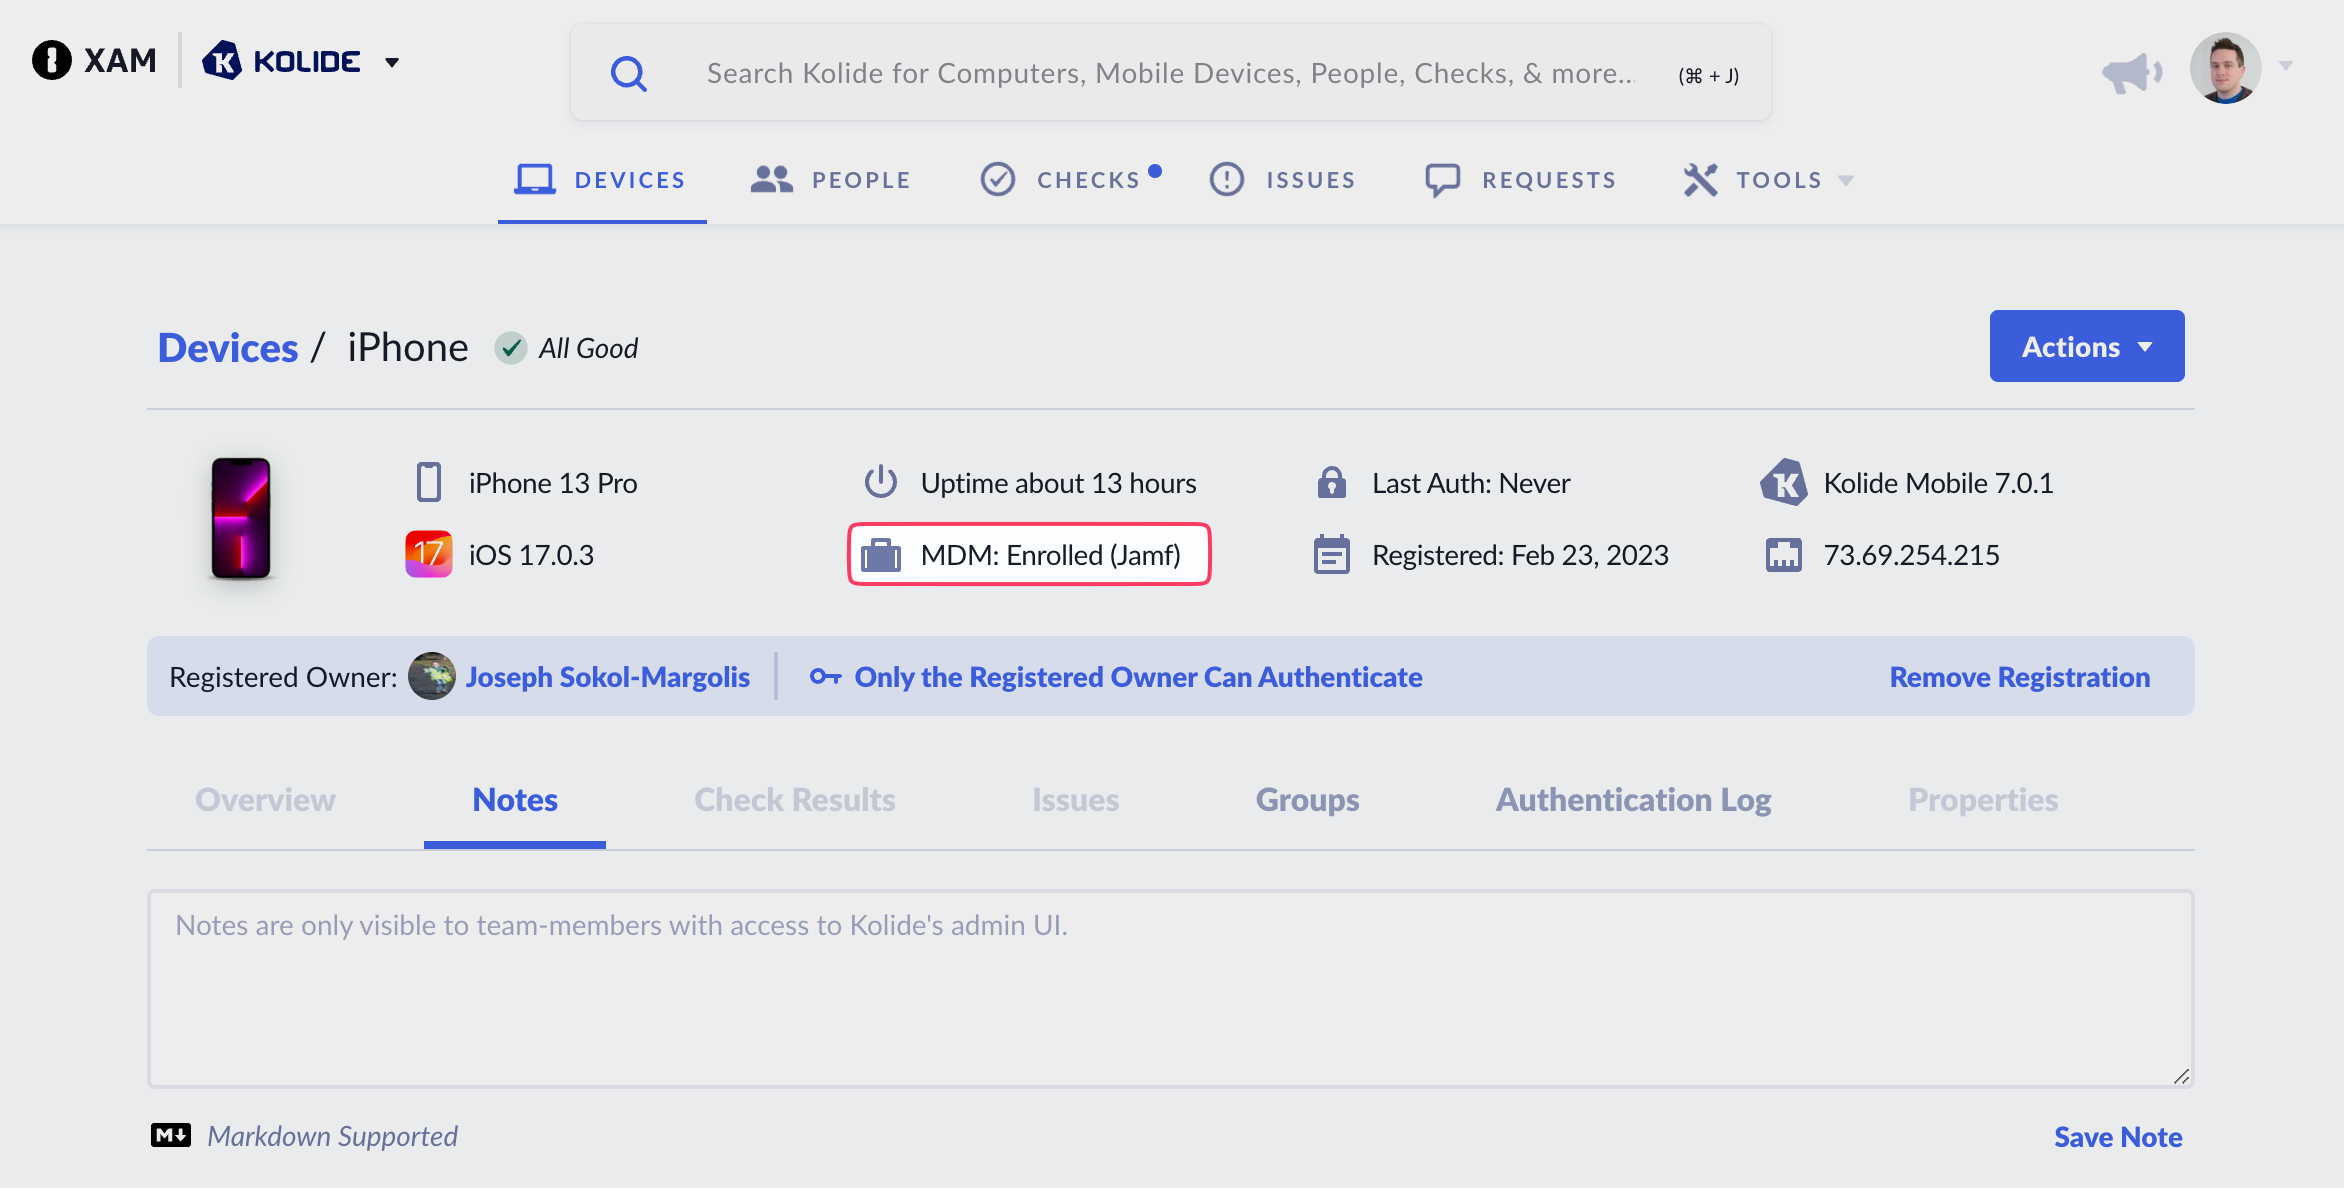
To verify you’ve done the setup steps successfully, authenticate to a protected app using an MDM-enrolled device. Once you’ve completed the authentication, you will see the device’s MDM enrollment information on the device’s detail page, as shown below.
Setting the Requirement
Once you have successfully added your MDM to Kolide and configured the MDM to distribute the Kolide mobile app, you can begin to require that new mobile devices are enrolled in the MDM before they are allowed to register.
To get started, follow these steps:
First, if you haven’t already, enable the Ensure Device Is Enrolled in Organization MDM Check.
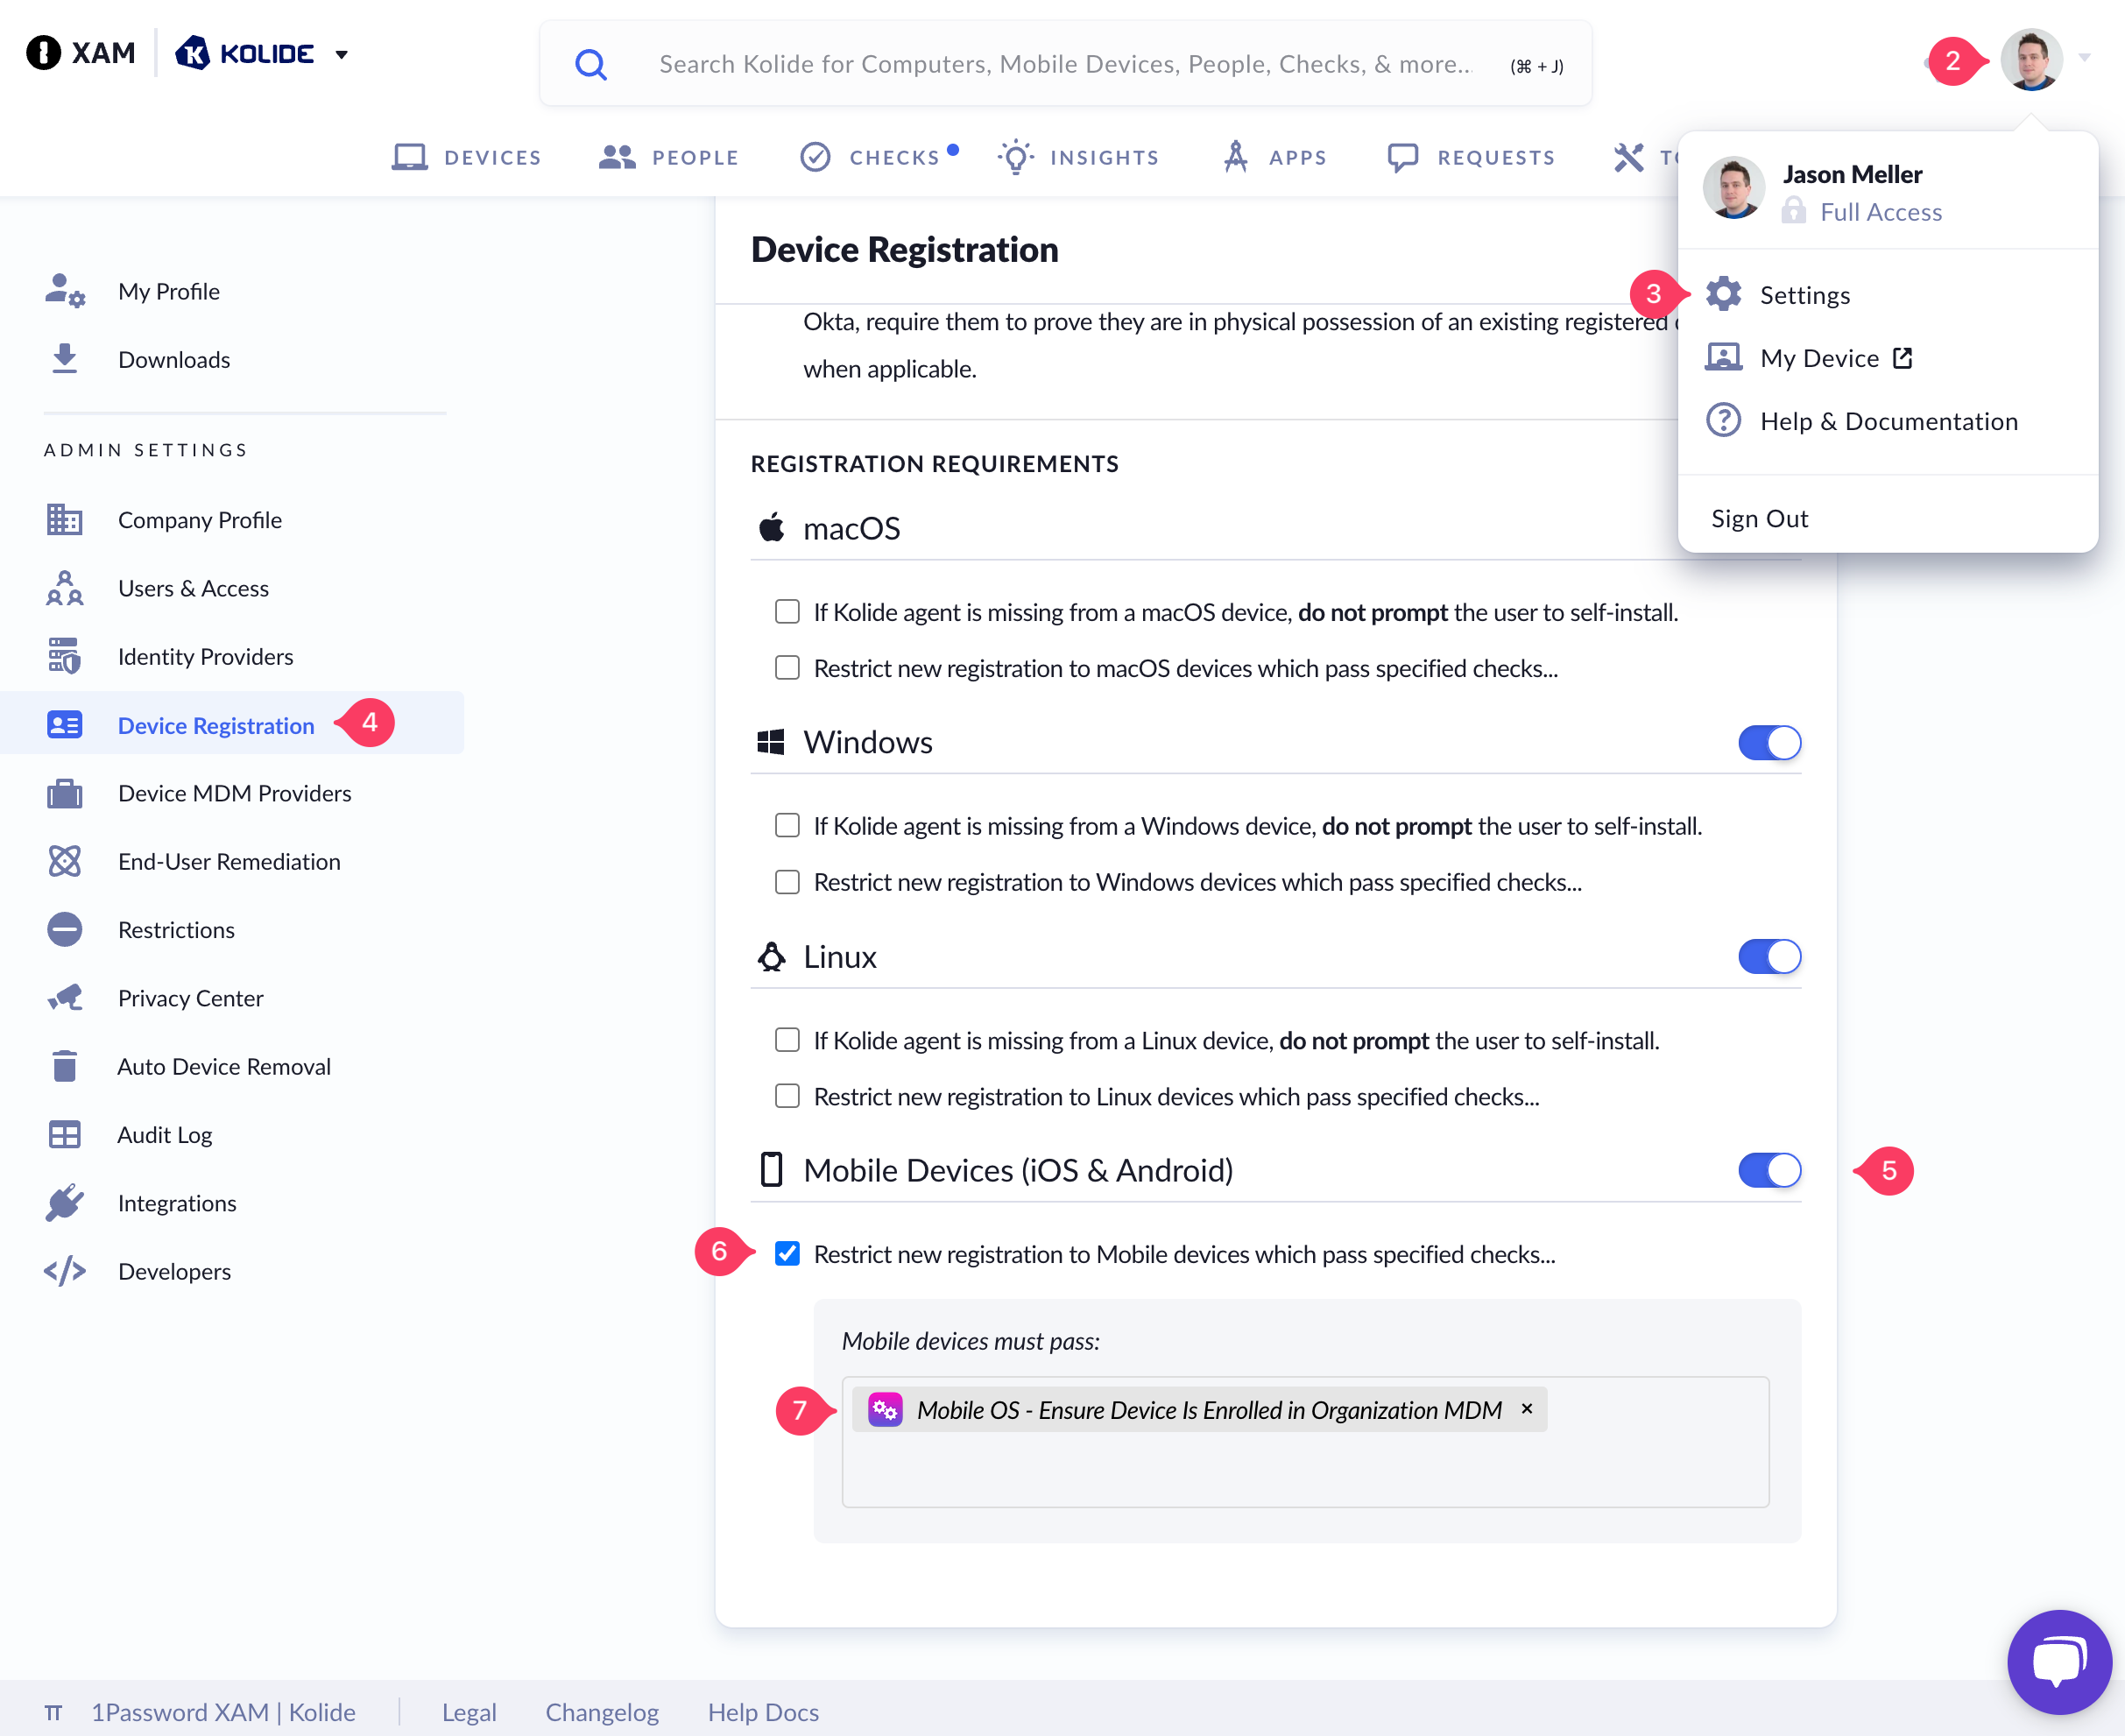
Click your user avatar in the upper-right corner of the Kolide UI.
In the dropdown menu, click Settings.
In the menu on the left, click Device Registration.
Enable the toggle switch next to Mobile Devices (iOS & Android).
In the Mobile section of the Device Registration admin settings screen, check the box with the label Restrict new registration to Mobile devices which pass specified checks….
In the form that appears, select the Ensure Device Is Enrolled in Organization MDM Check.
Click Save.
Once set, if a user attempts to register a new mobile device that is not enrolled in the above MDM provider, they will see an error dialog that reads: This device doesn’t meet the requirements, contact IT for more info.
Authentication Modes
By default, Kolide allows only the person who registered a device to use it for device trust authentication. If a different person attempts to use the device to sign into a protected resource, they will see the following screen:
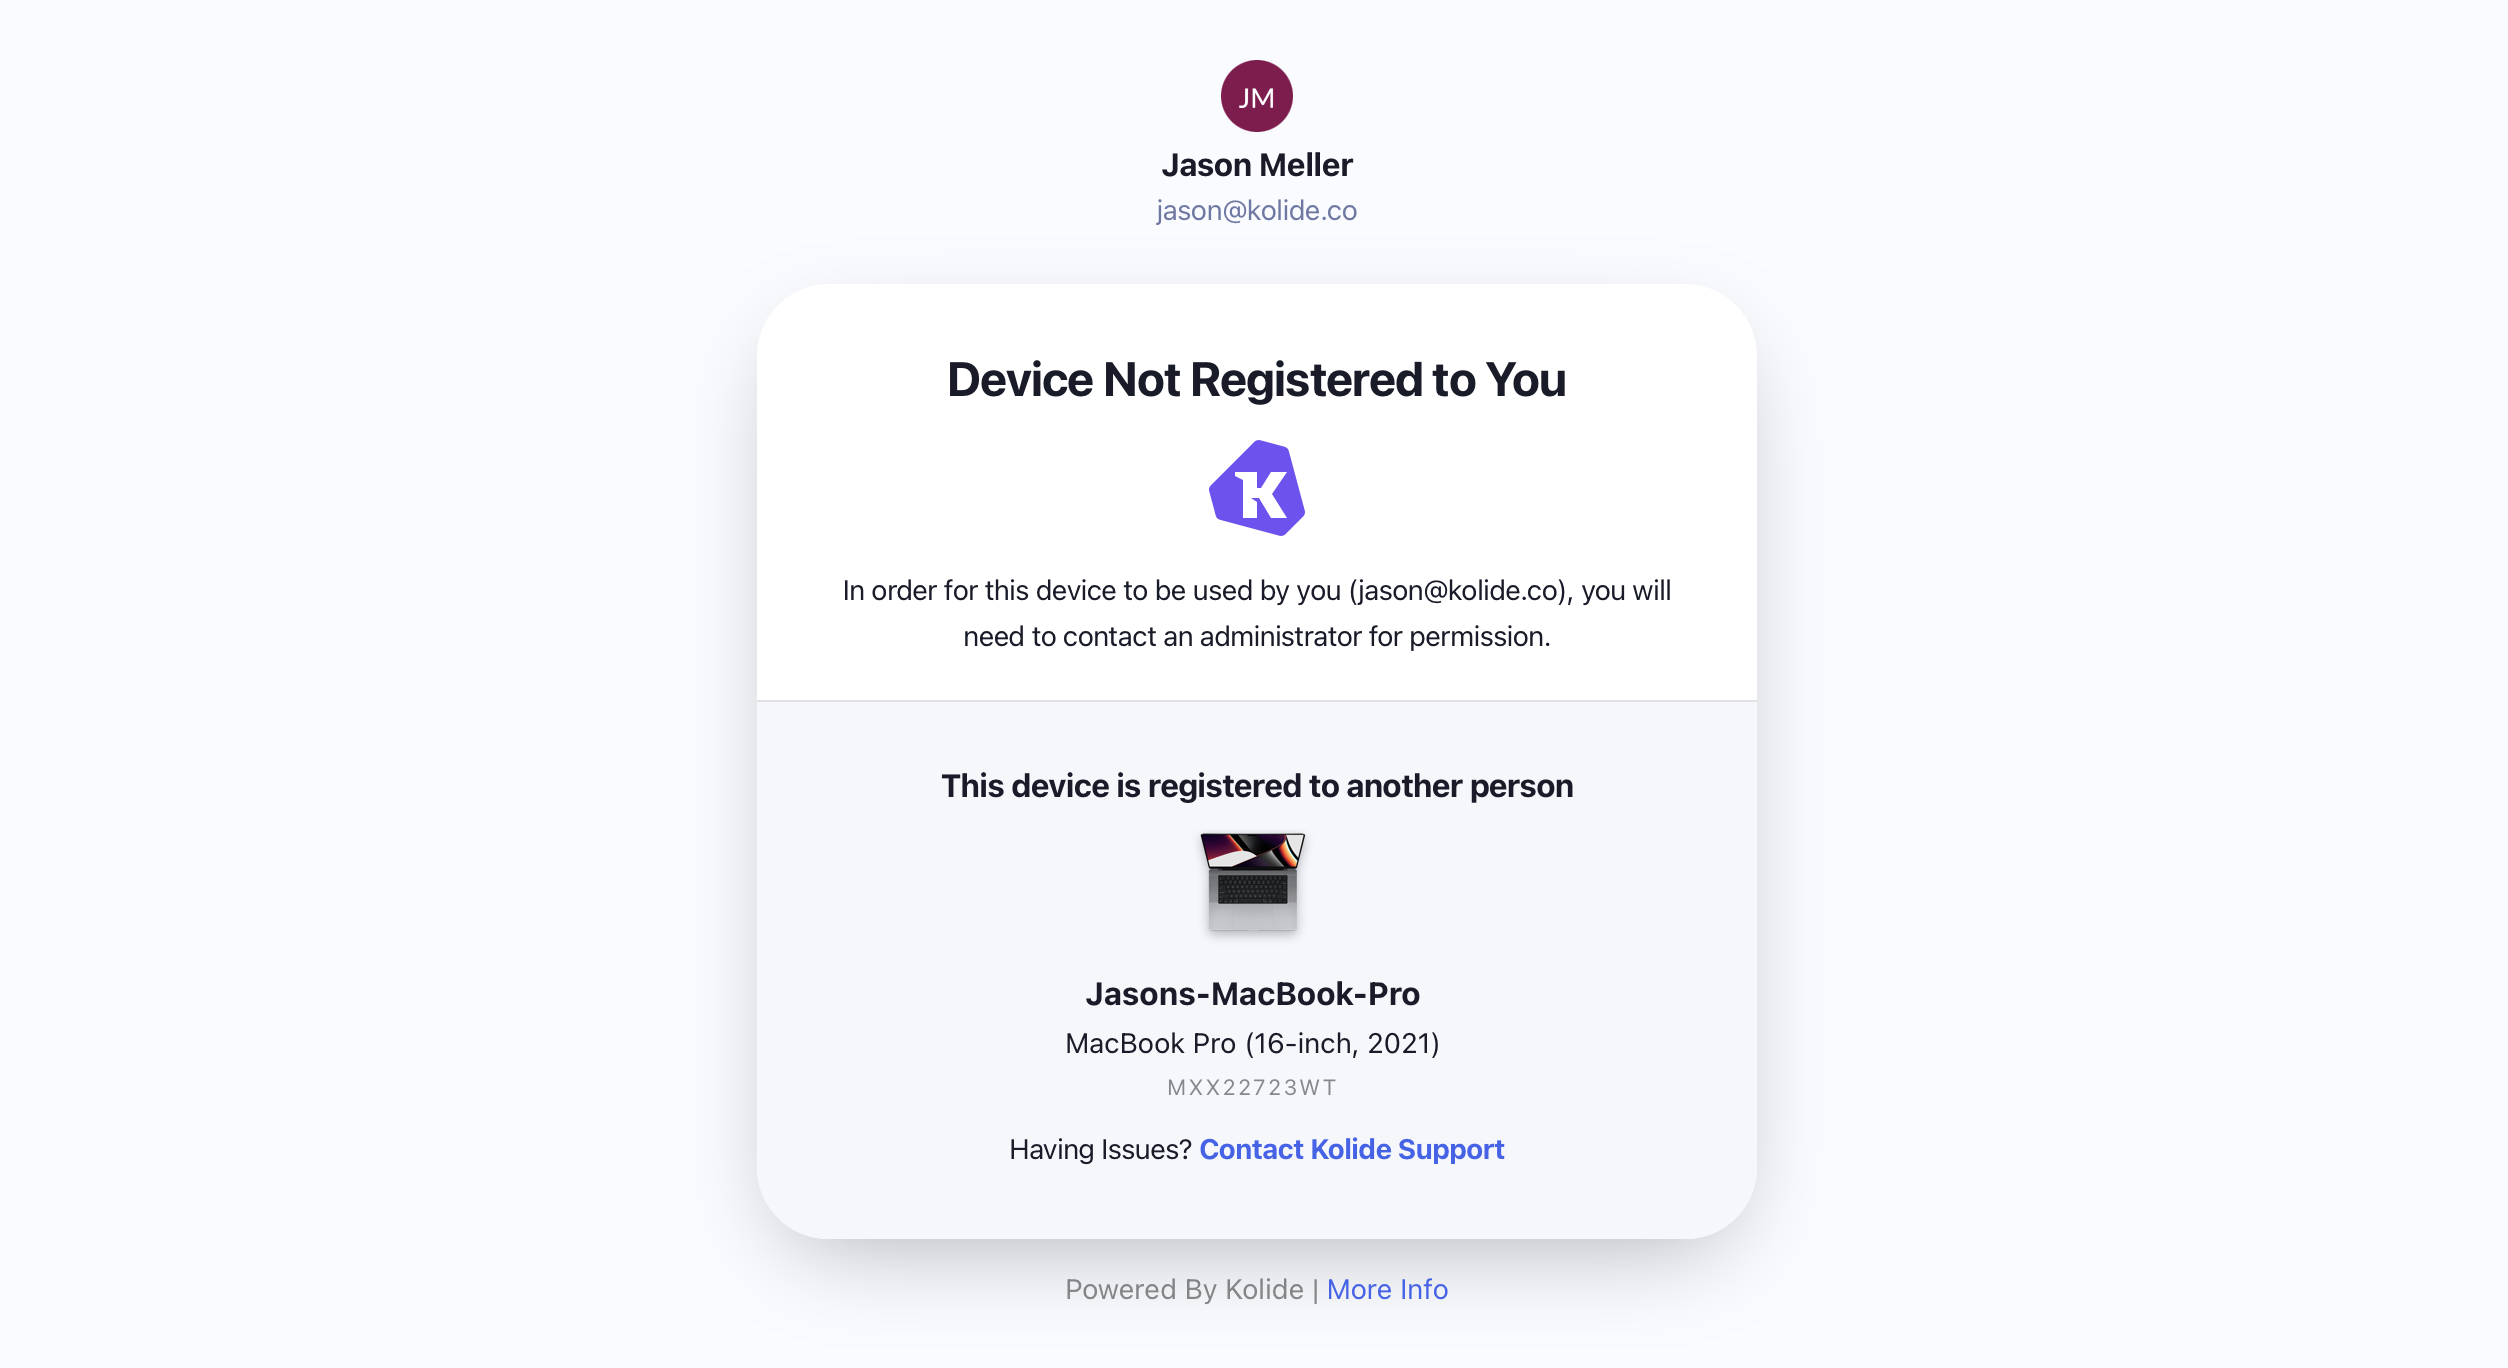
There may be some situations where this behavior is undesirable, for instance, on shared devices, or in cases where an end-user regularly uses multiple identities when logging into services.
You can change this behavior to allow all the individuals imported into Kolide (listed in the People top-level menu item) by performing the following steps:
Click the Devices menu item in the top-level navigation. Locate the device you want to modify and click it to view its details page.
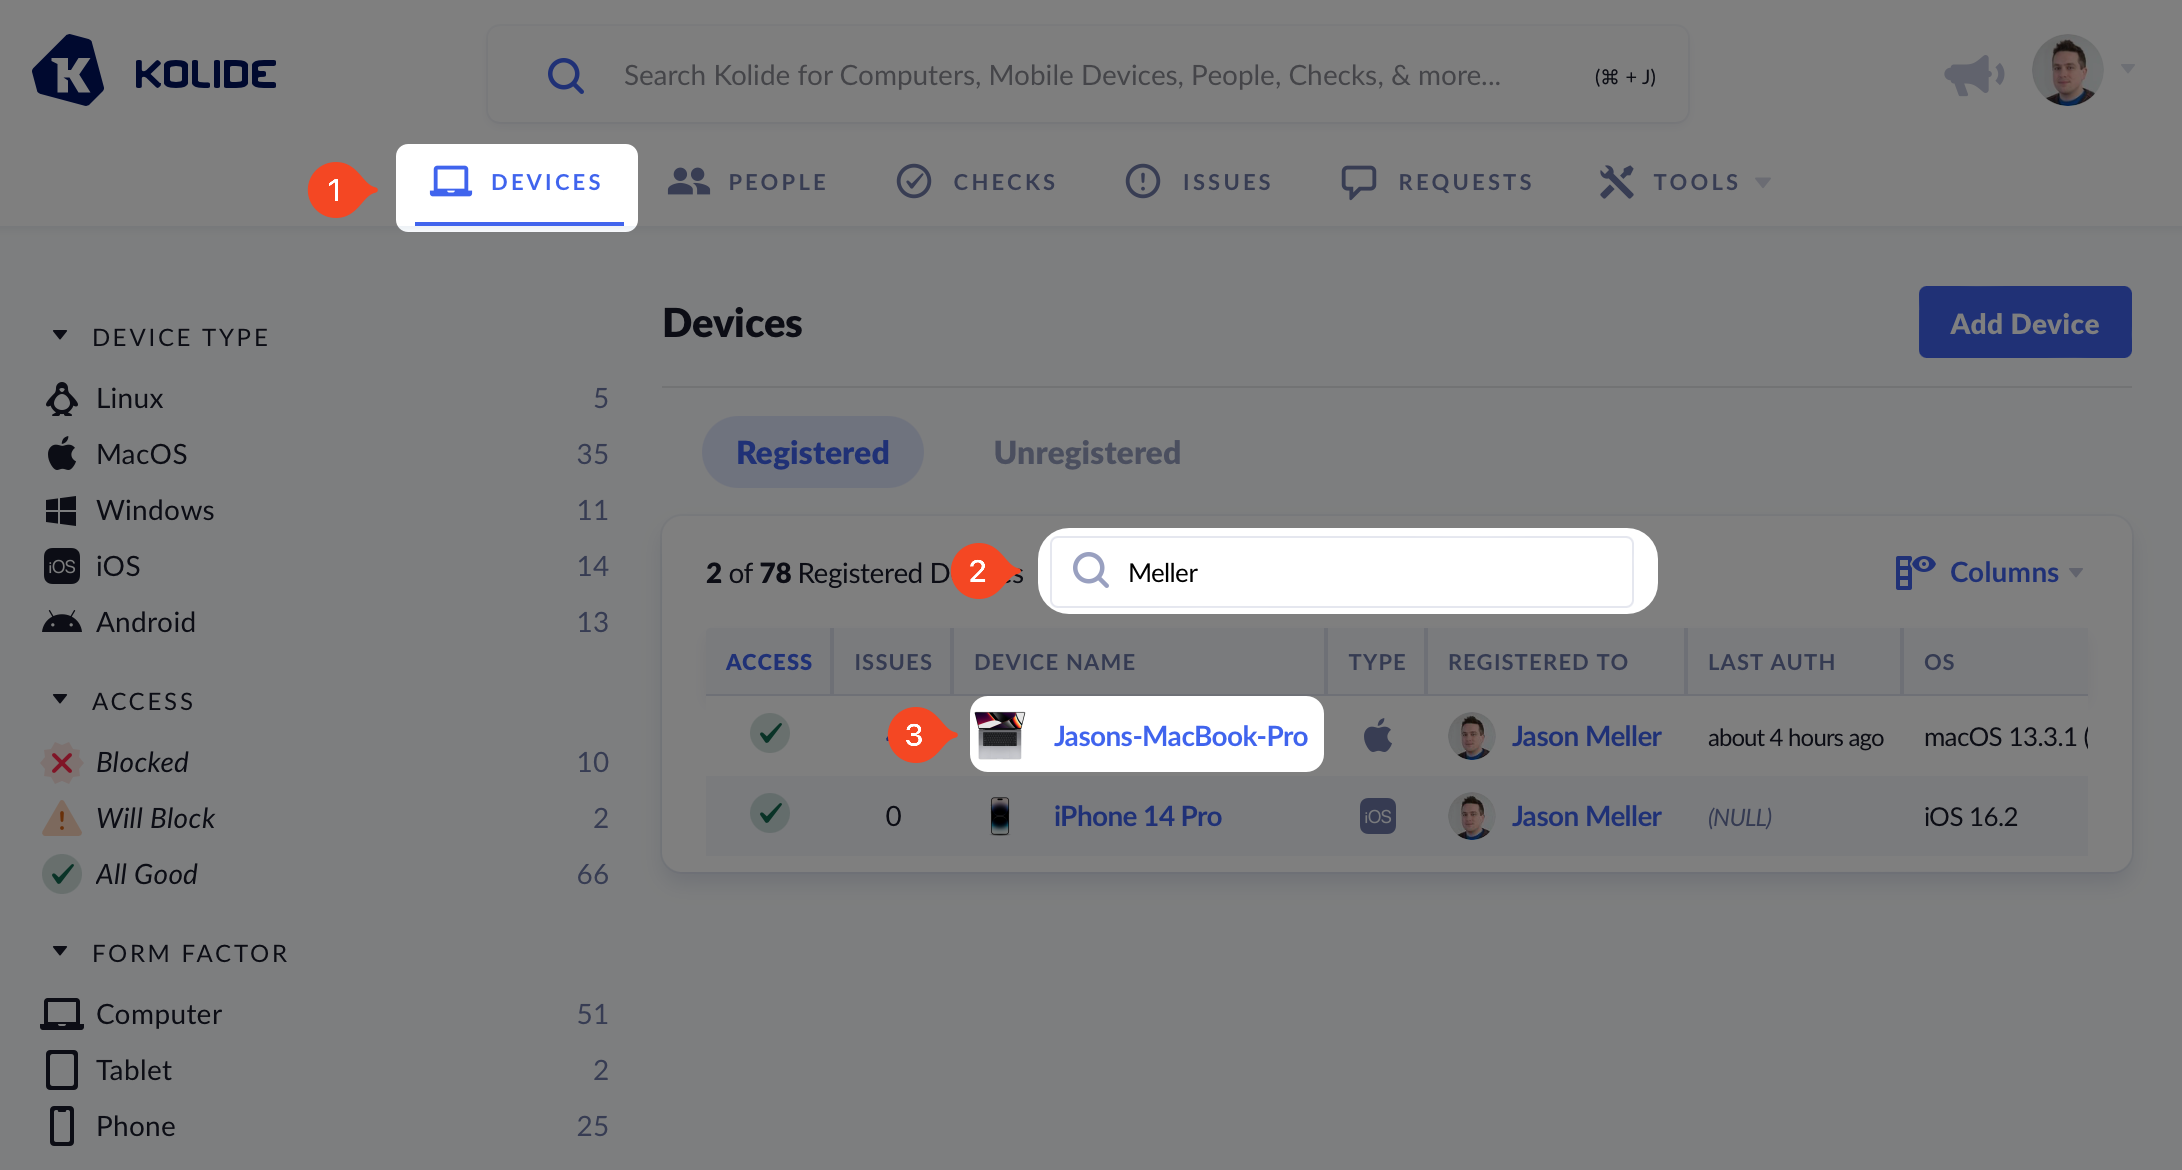
In the registration info bar, click Only the Registered Owner Can Authenticate.
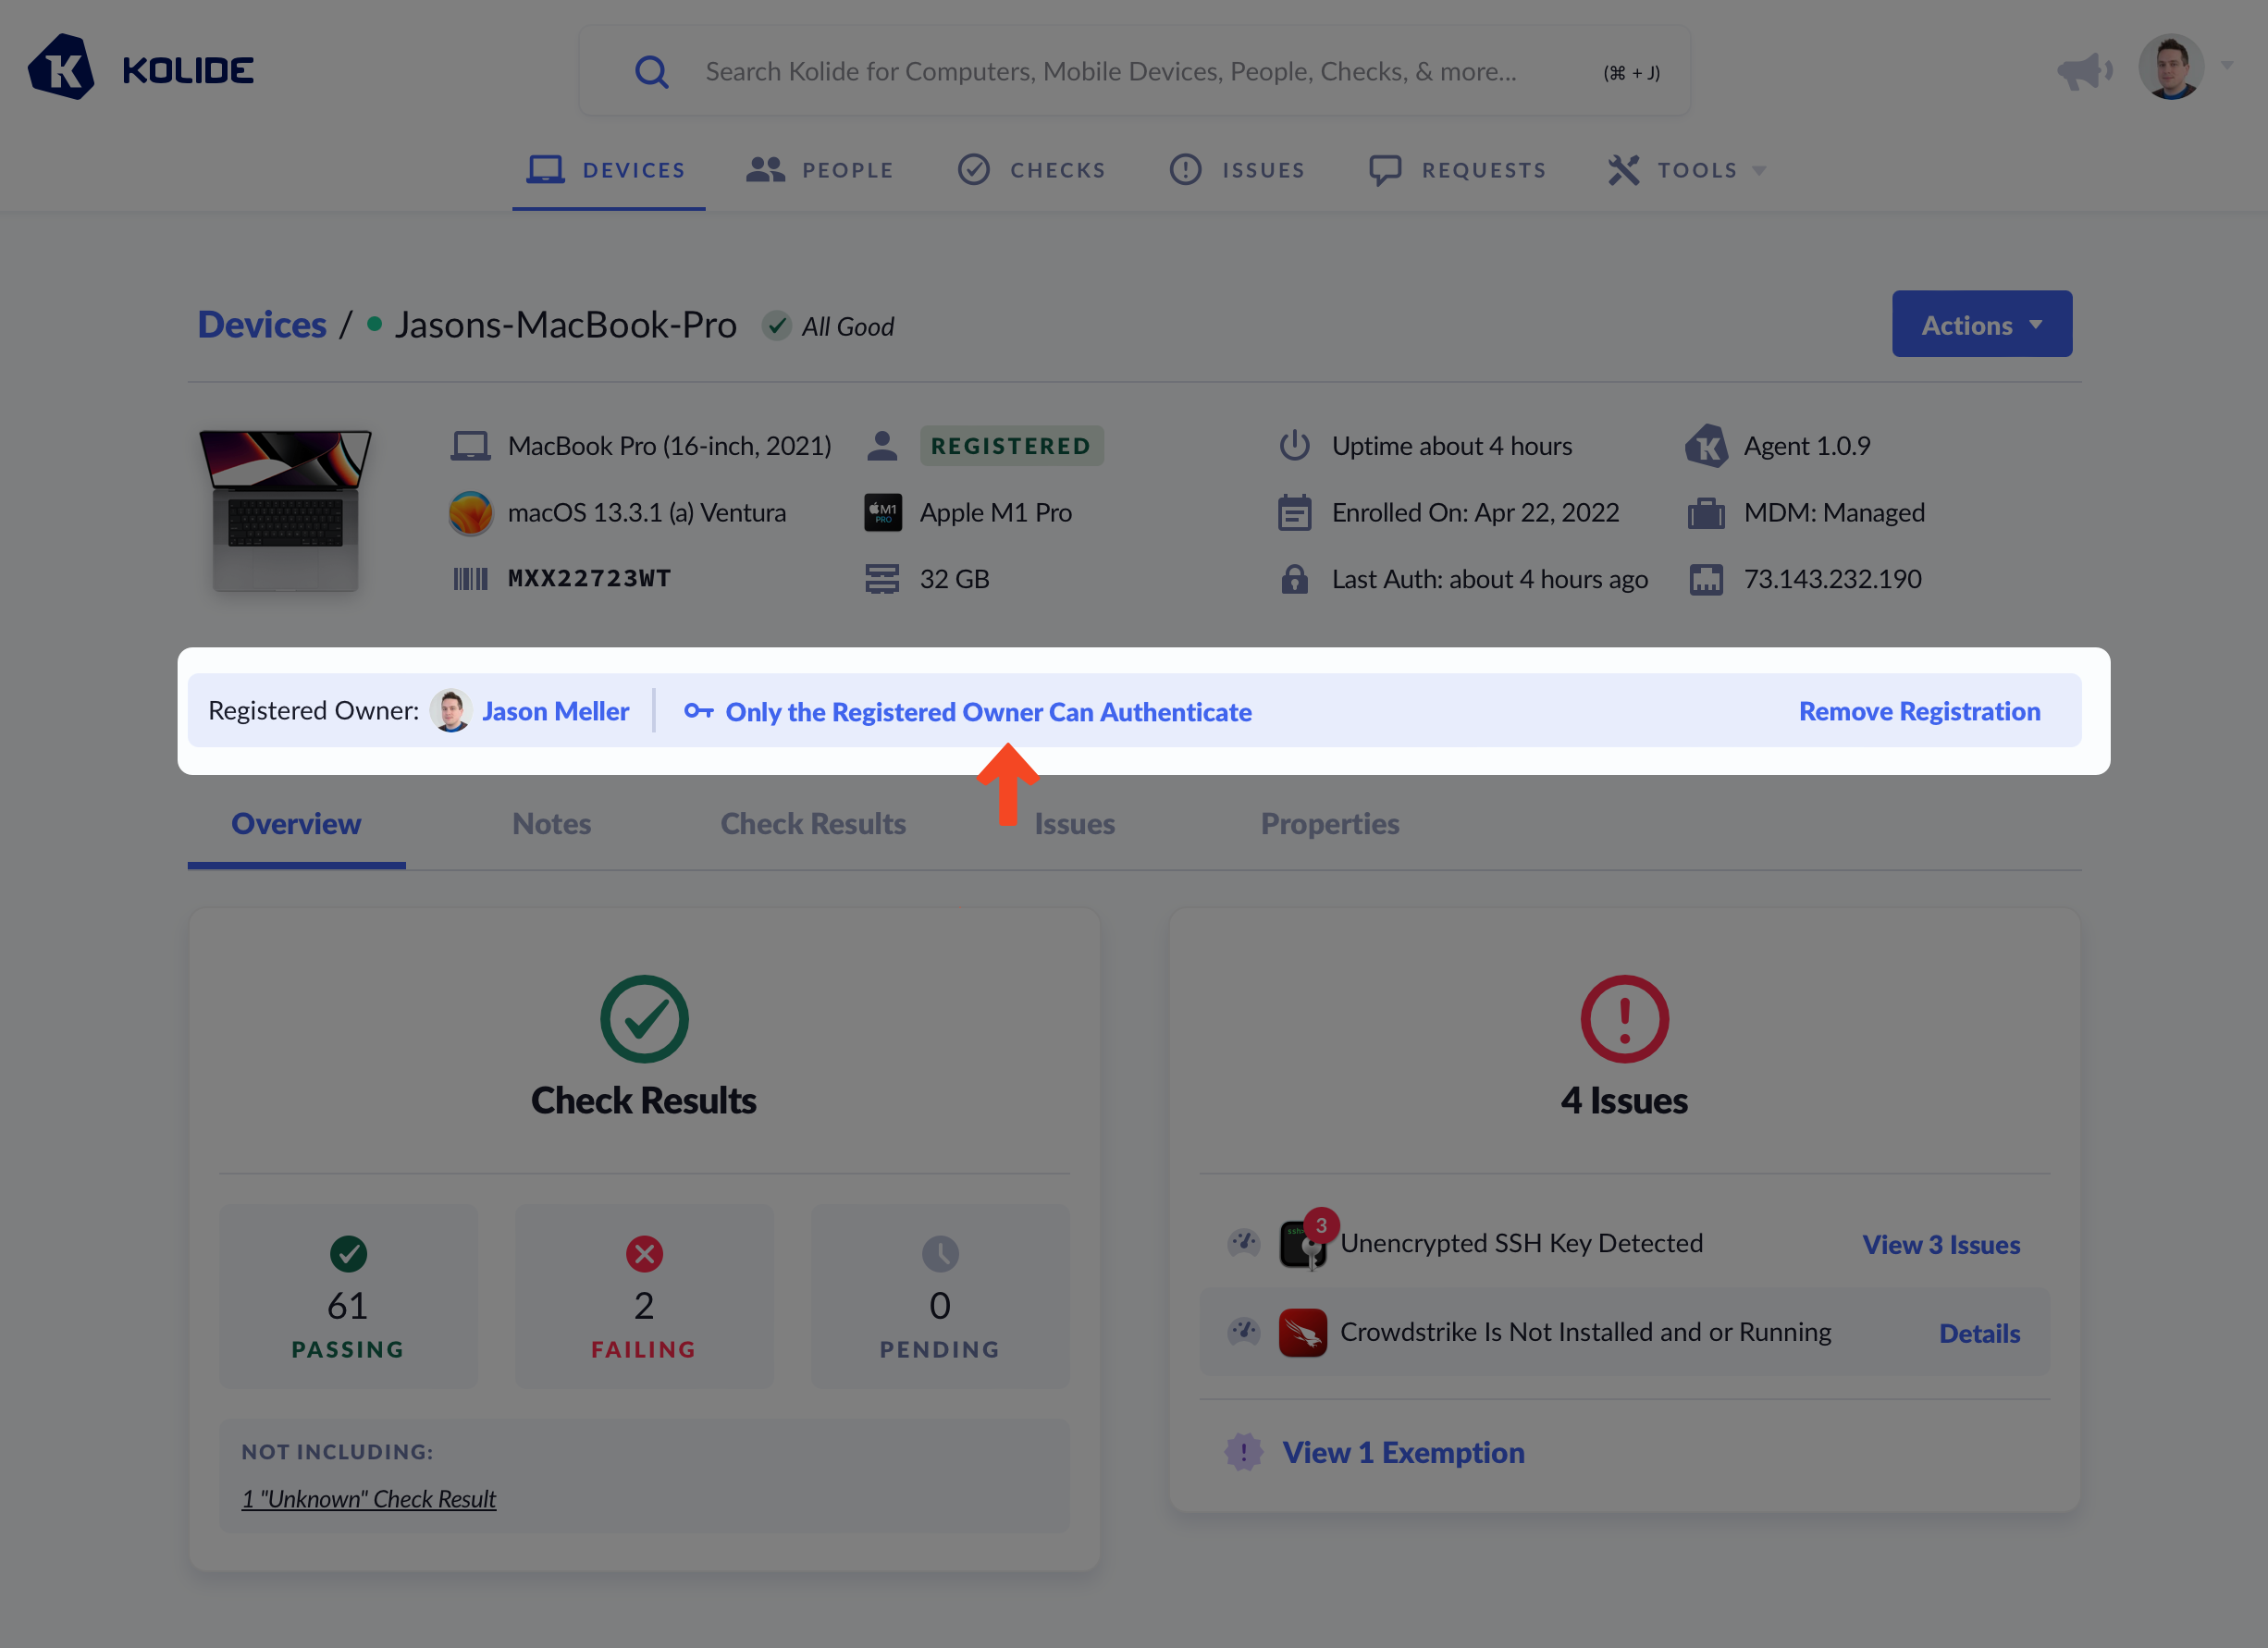
In the modal that appears, select Anyone listed in Kolide/People and then click Save.
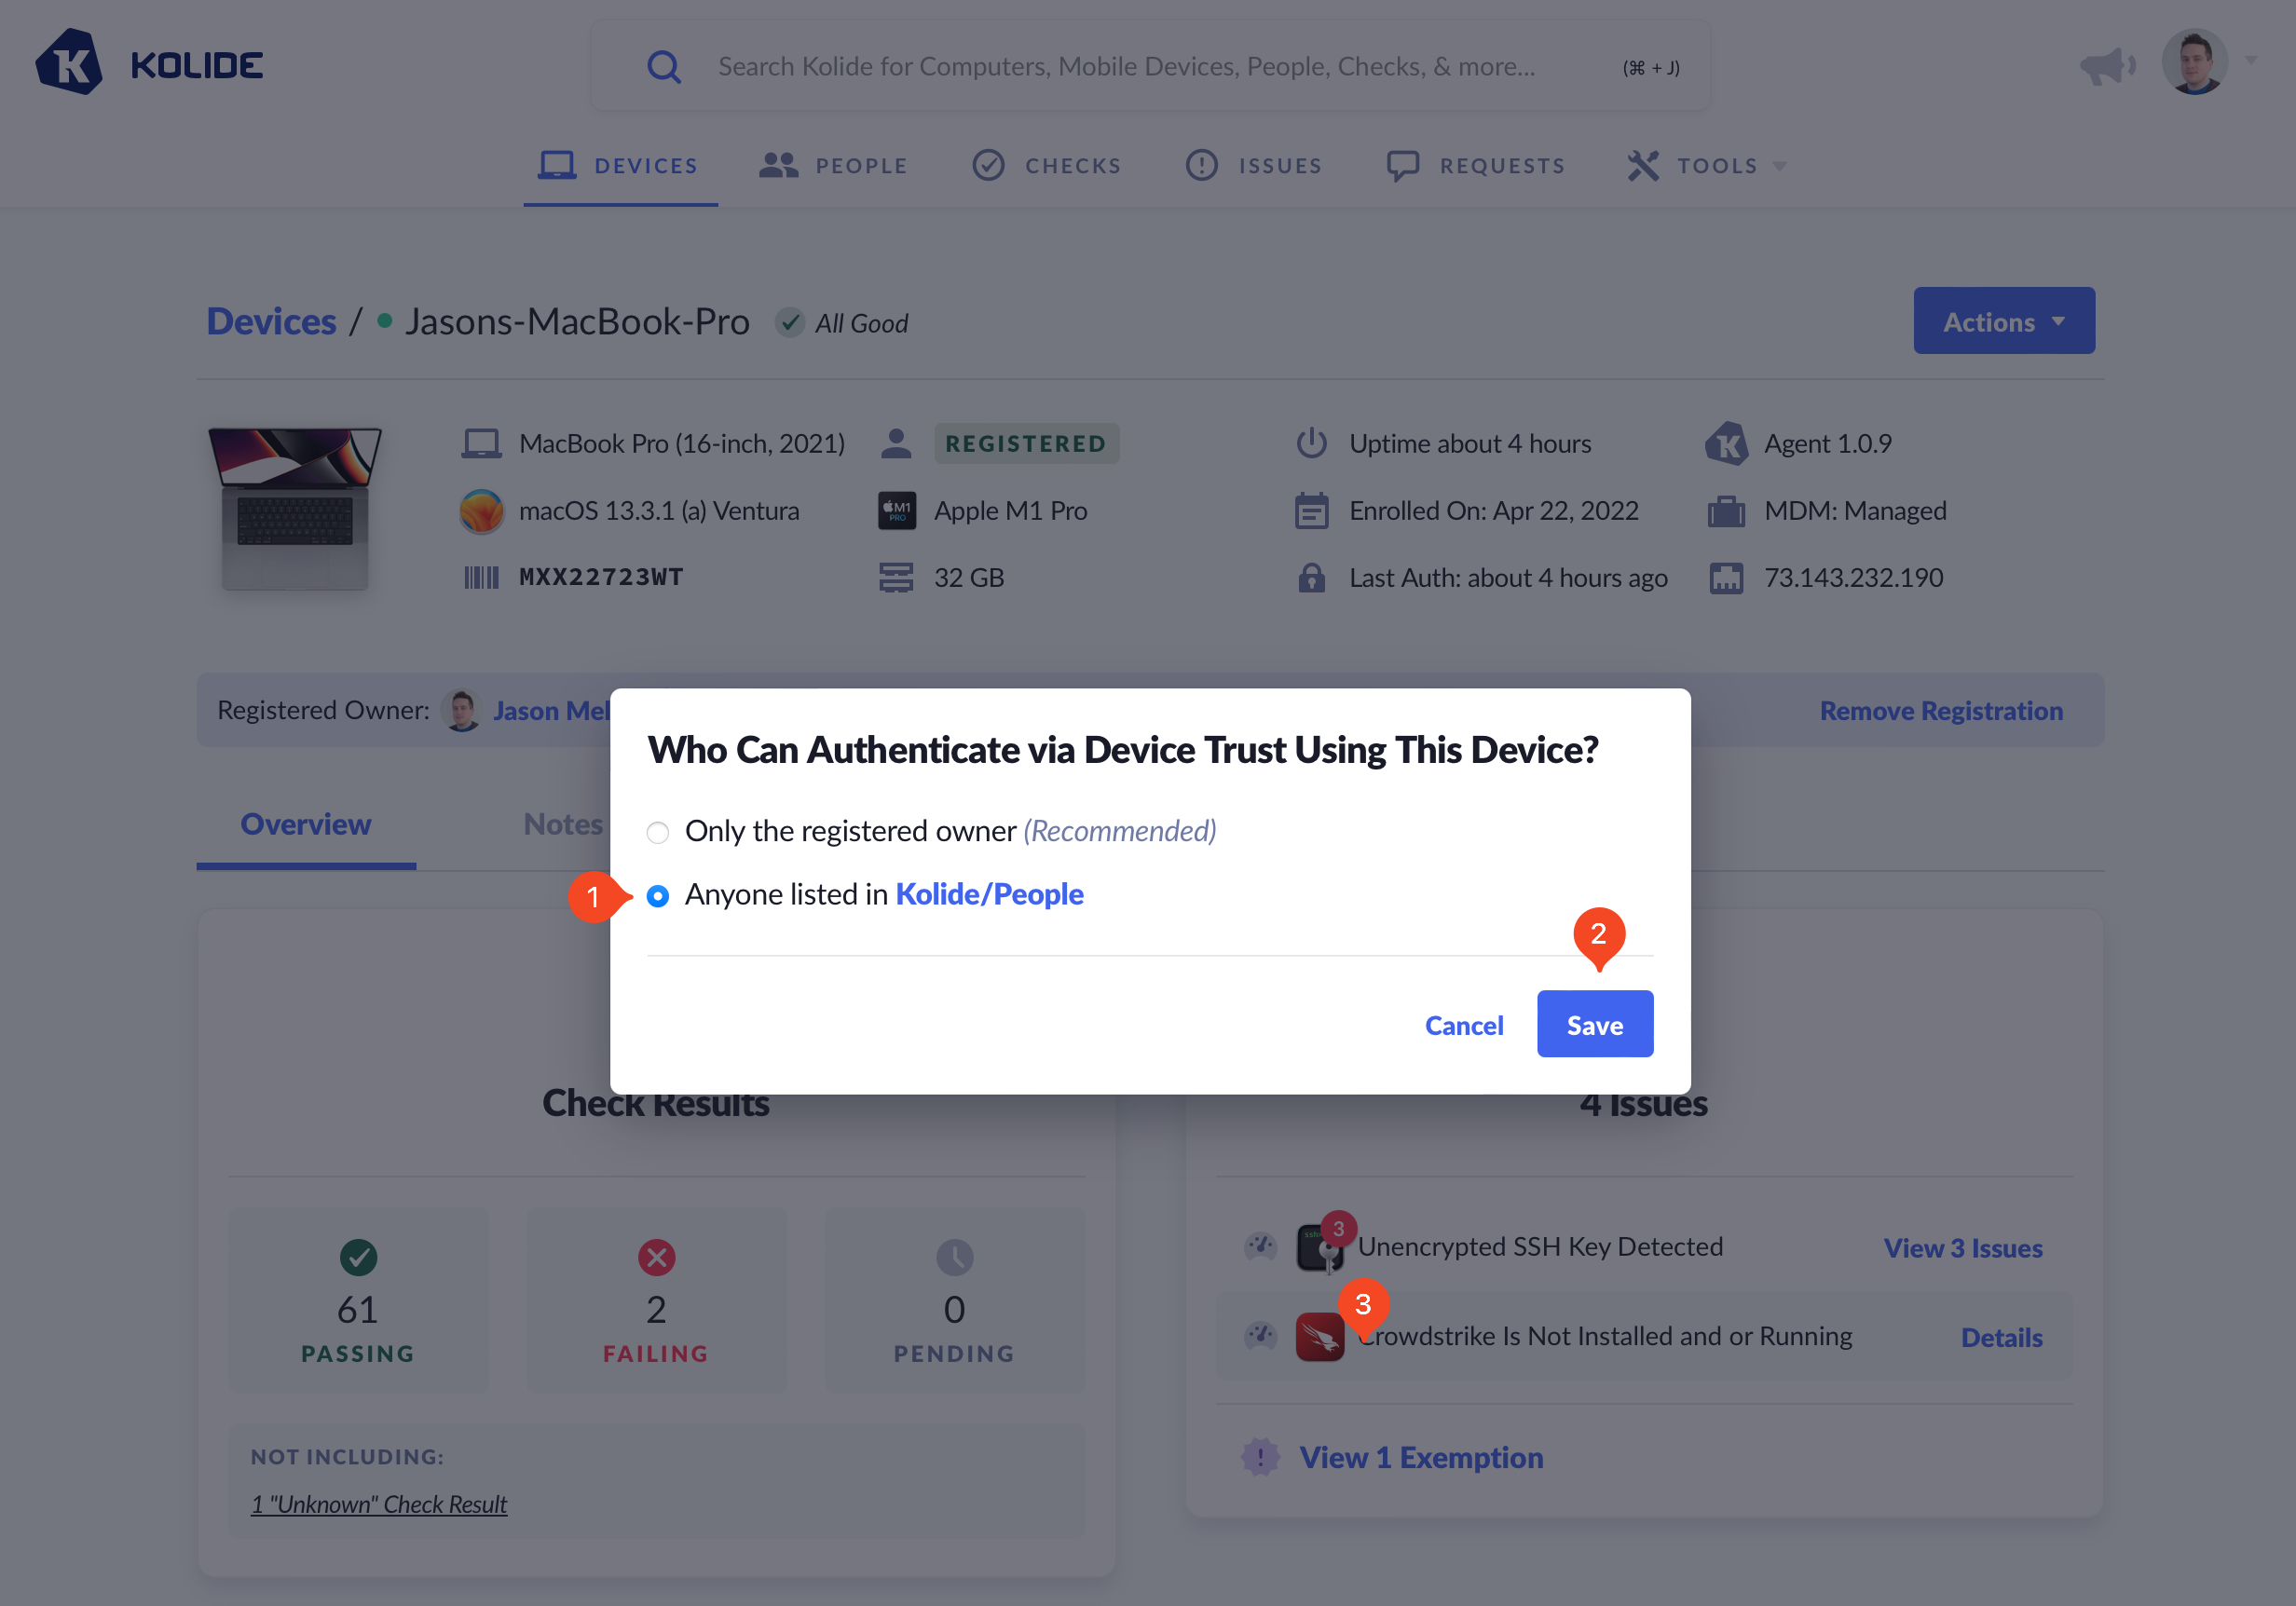
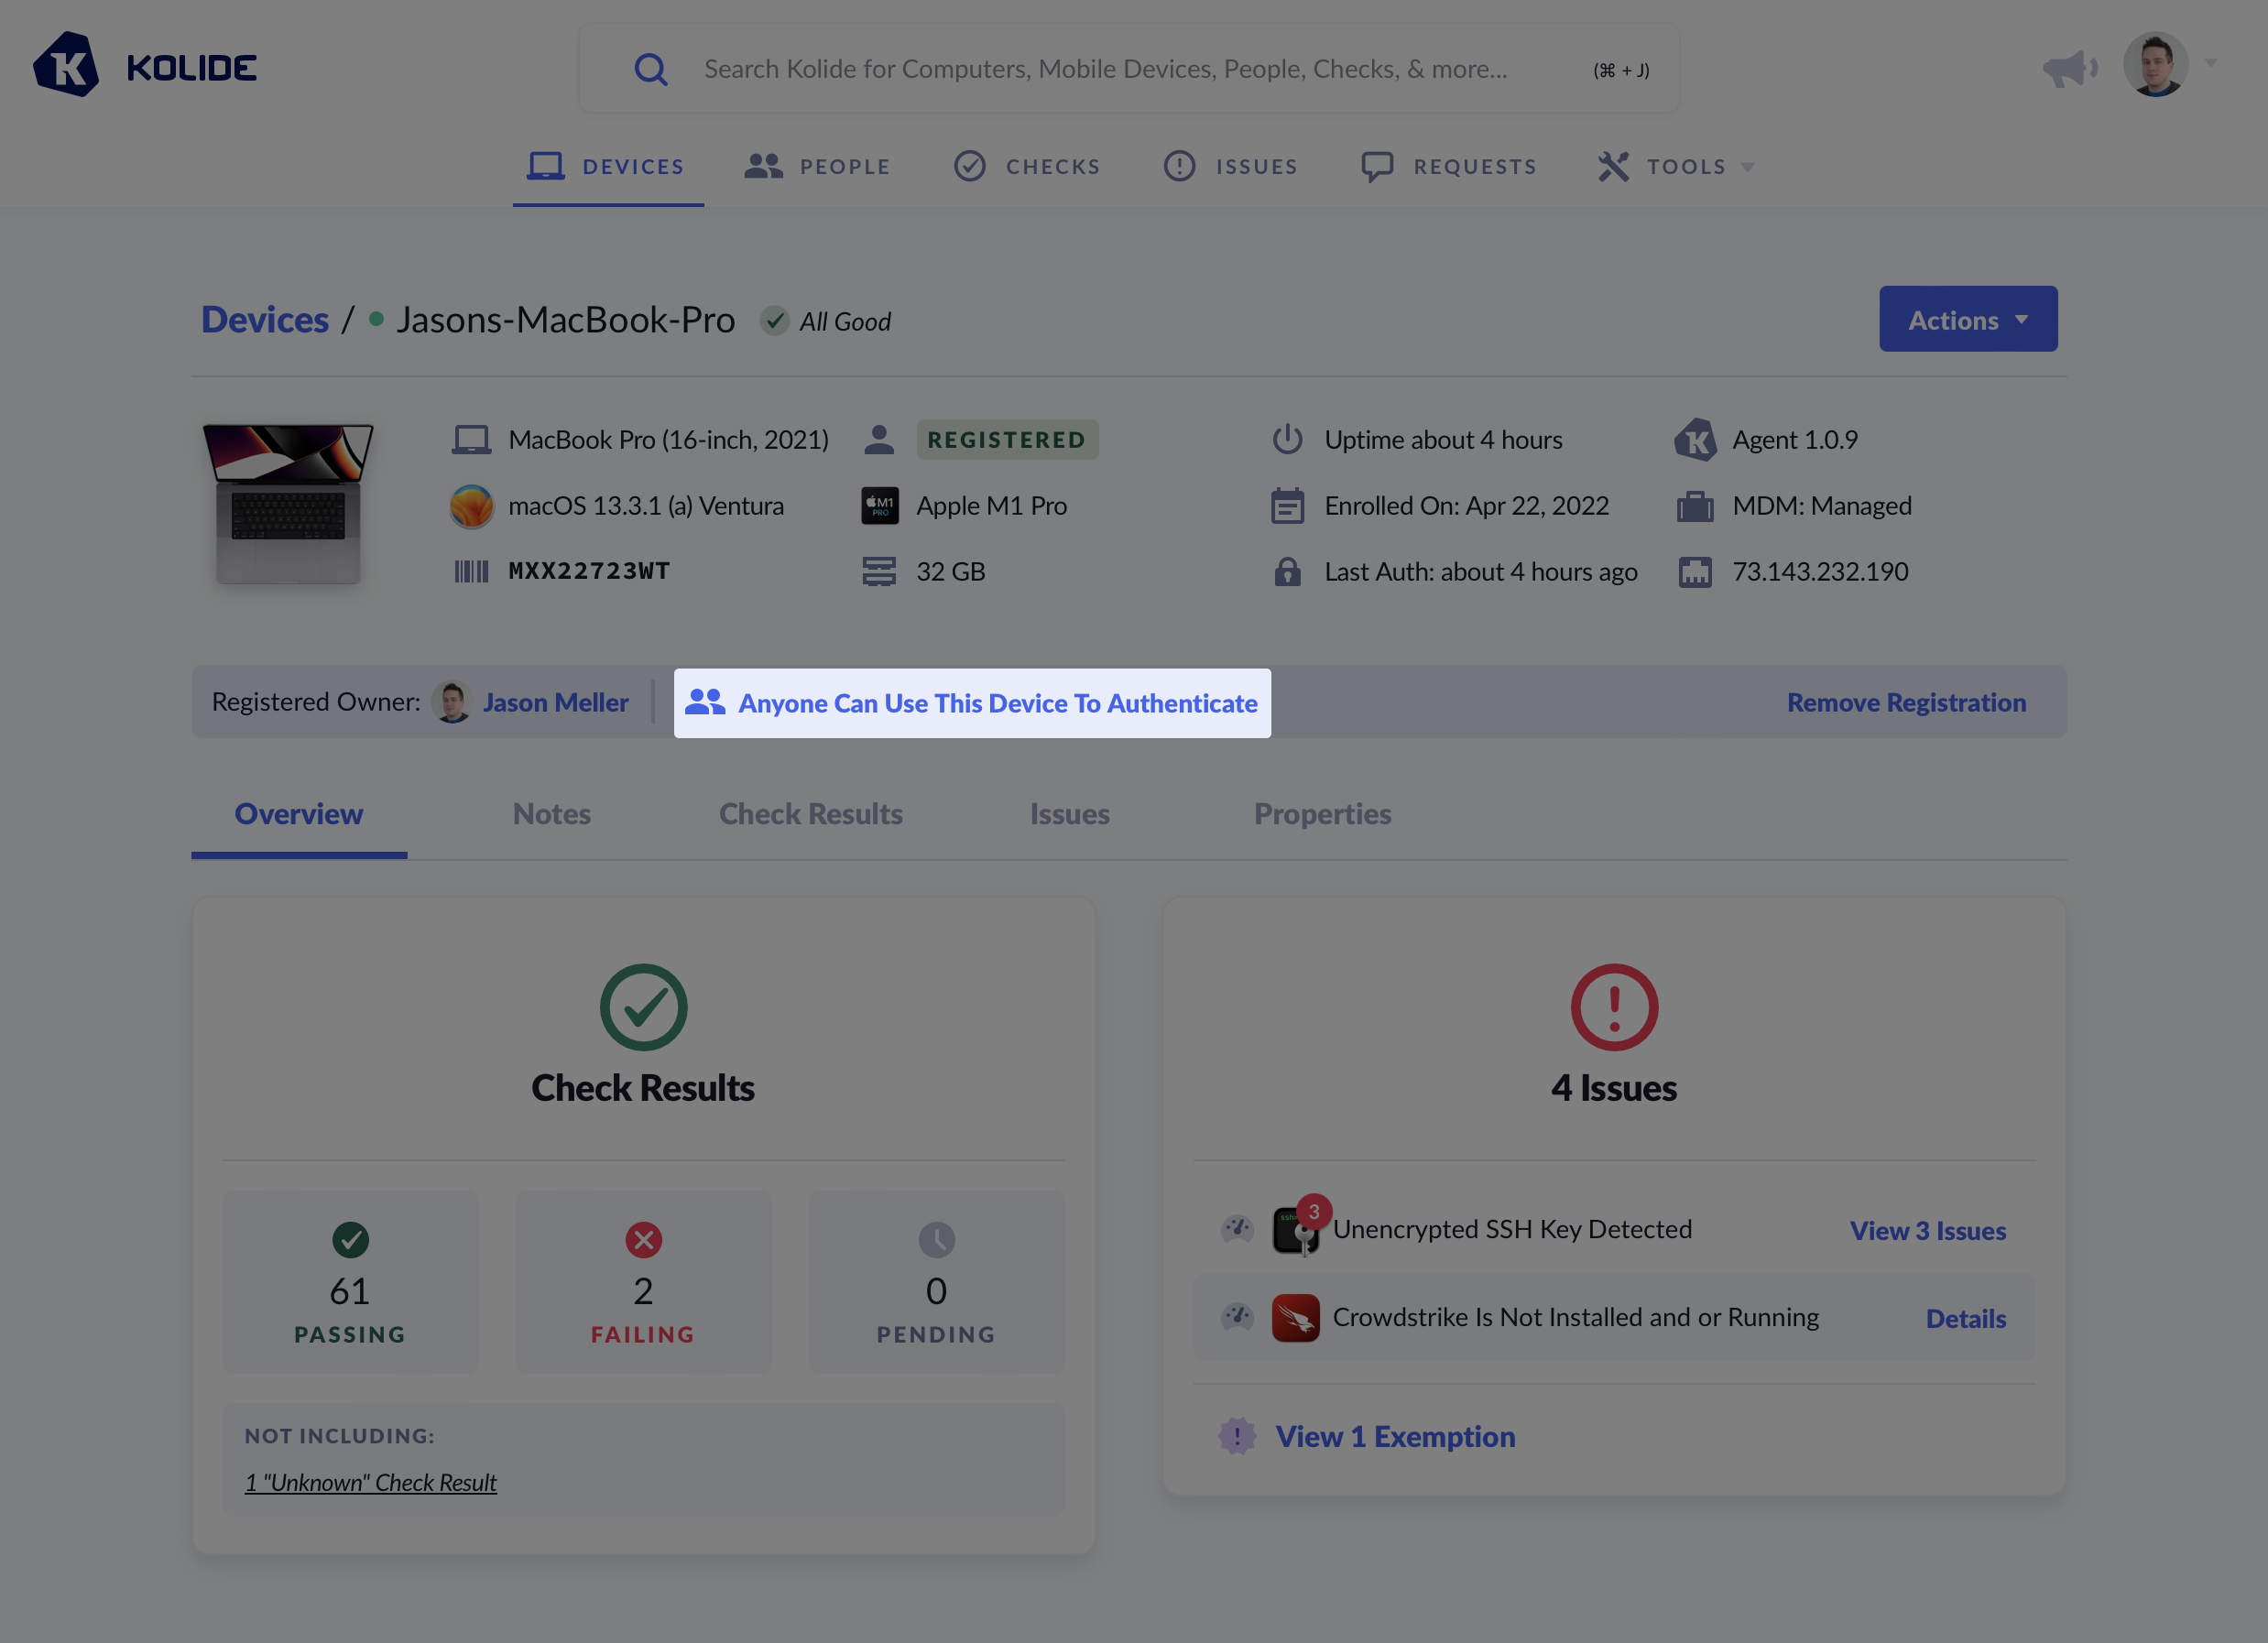
You will see the registration bar change to indicate Anyone Can Use This Device To Authenticate.
If you want to revert to the original behavior, simply follow the procedure above again, but select Only the registered owner in the modal. Each time you change this setting, the action is recorded in your organization’s Audit Log.
Allow Users From Specific Okta Groups Only
If your organization has subscribed to Kolide Max and has pushed at least one Okta Group, Kolide will offer an additional option to allow you to limit authentication to just the registered owner and any members of the specified Okta Groups.
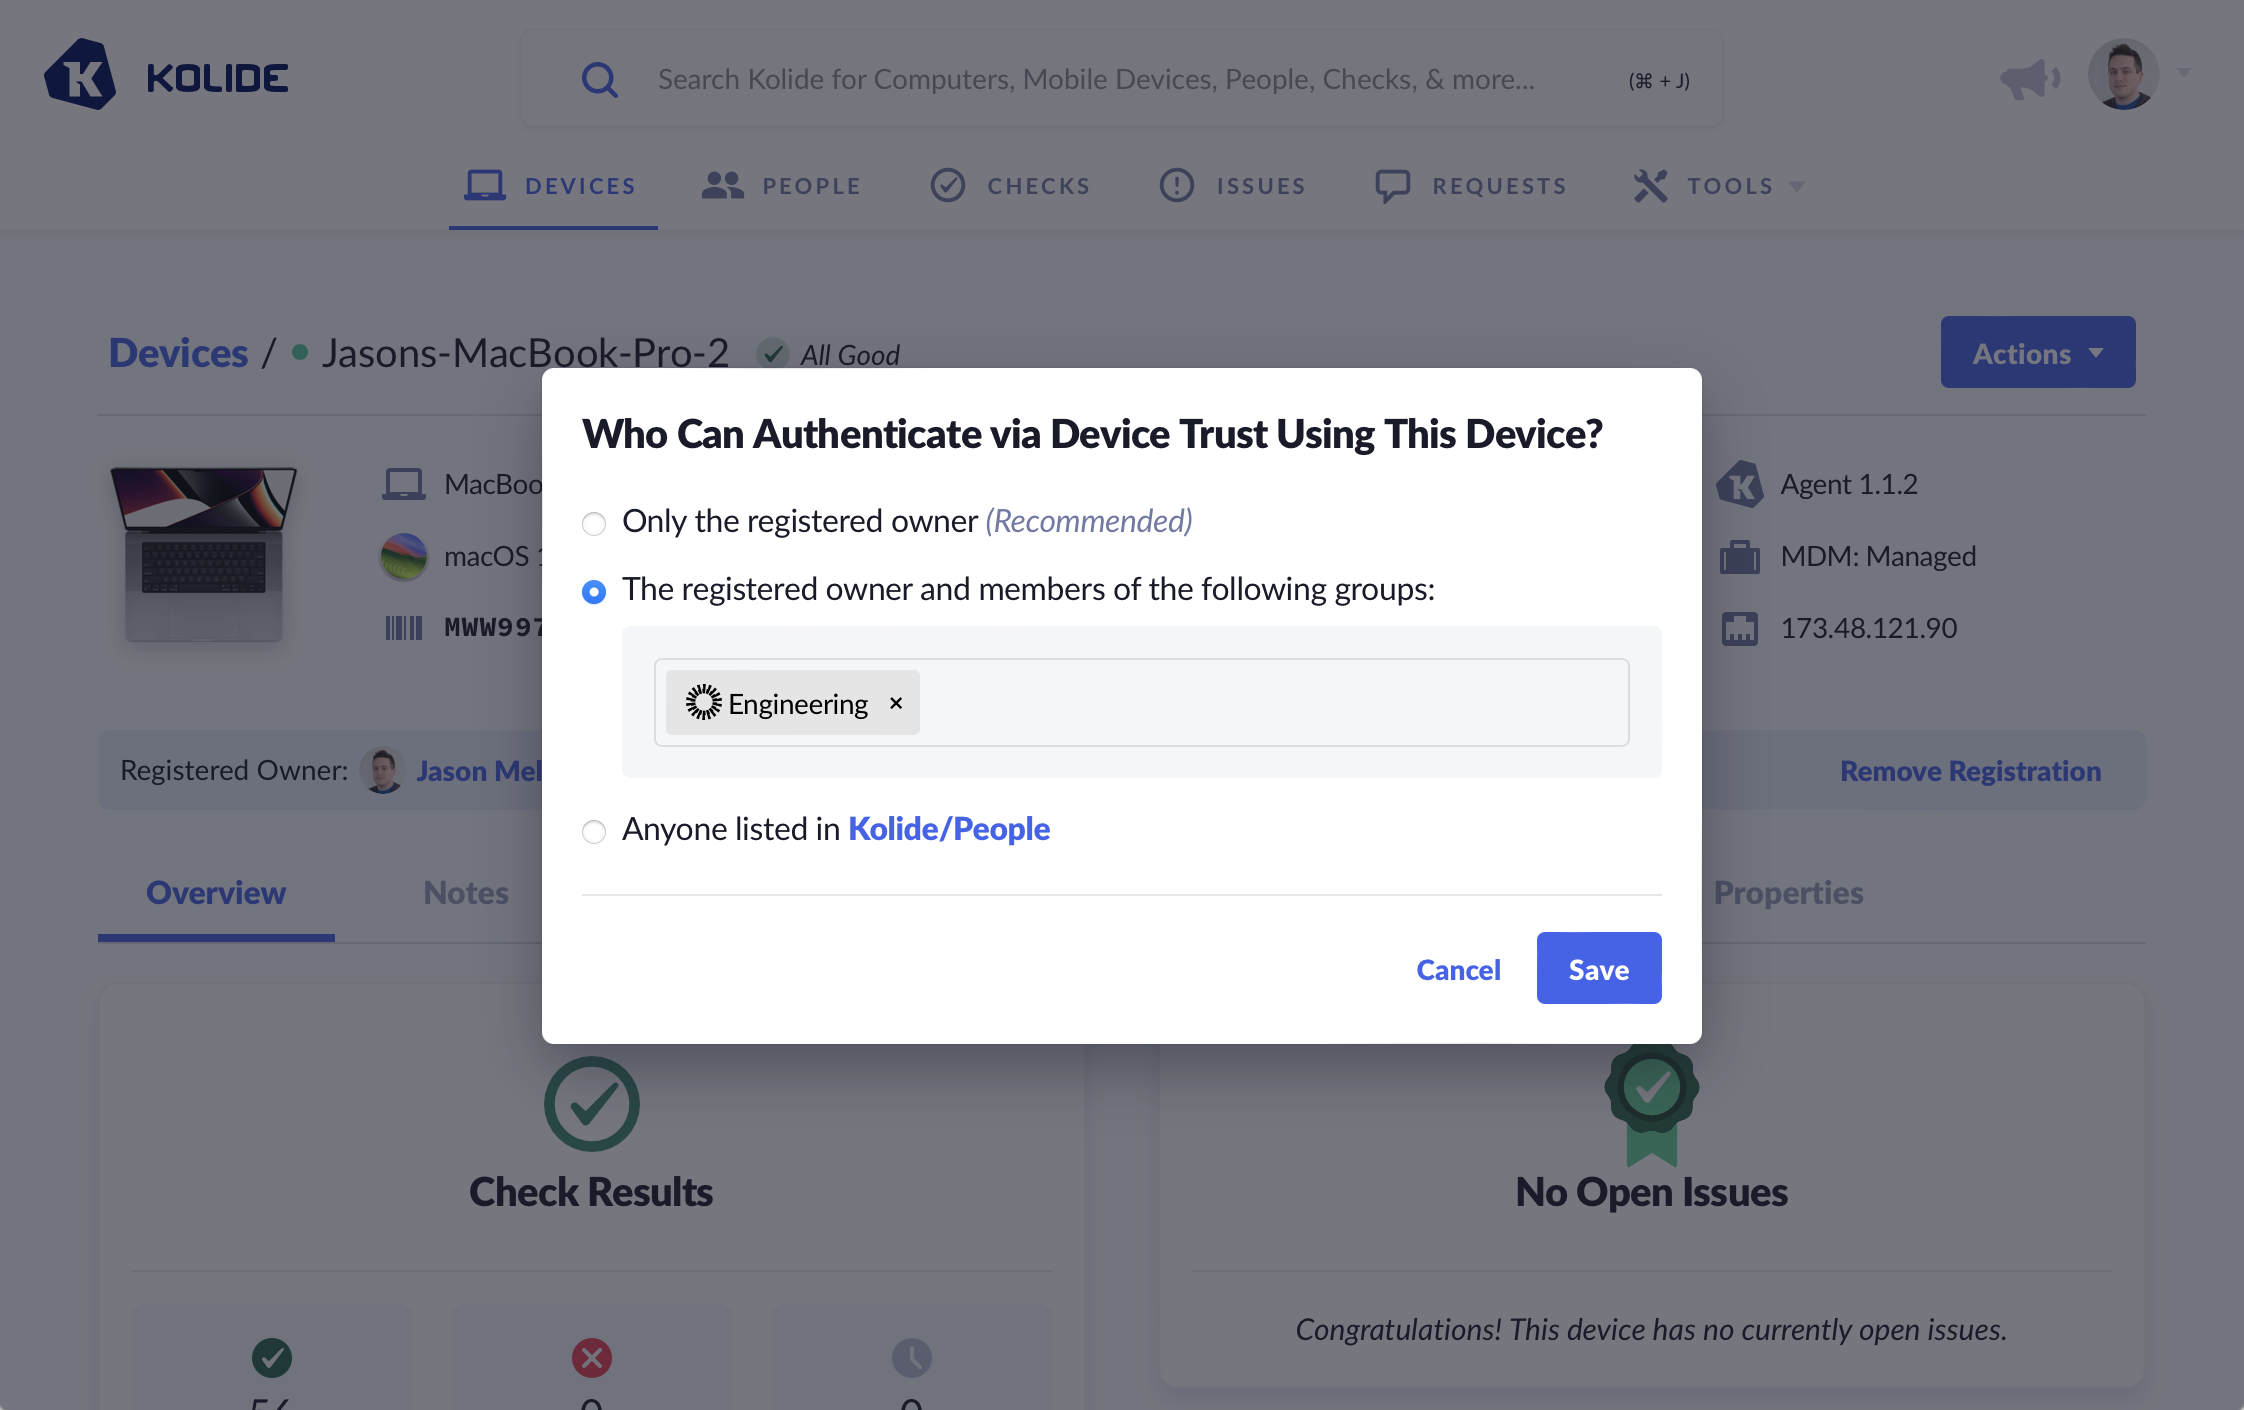
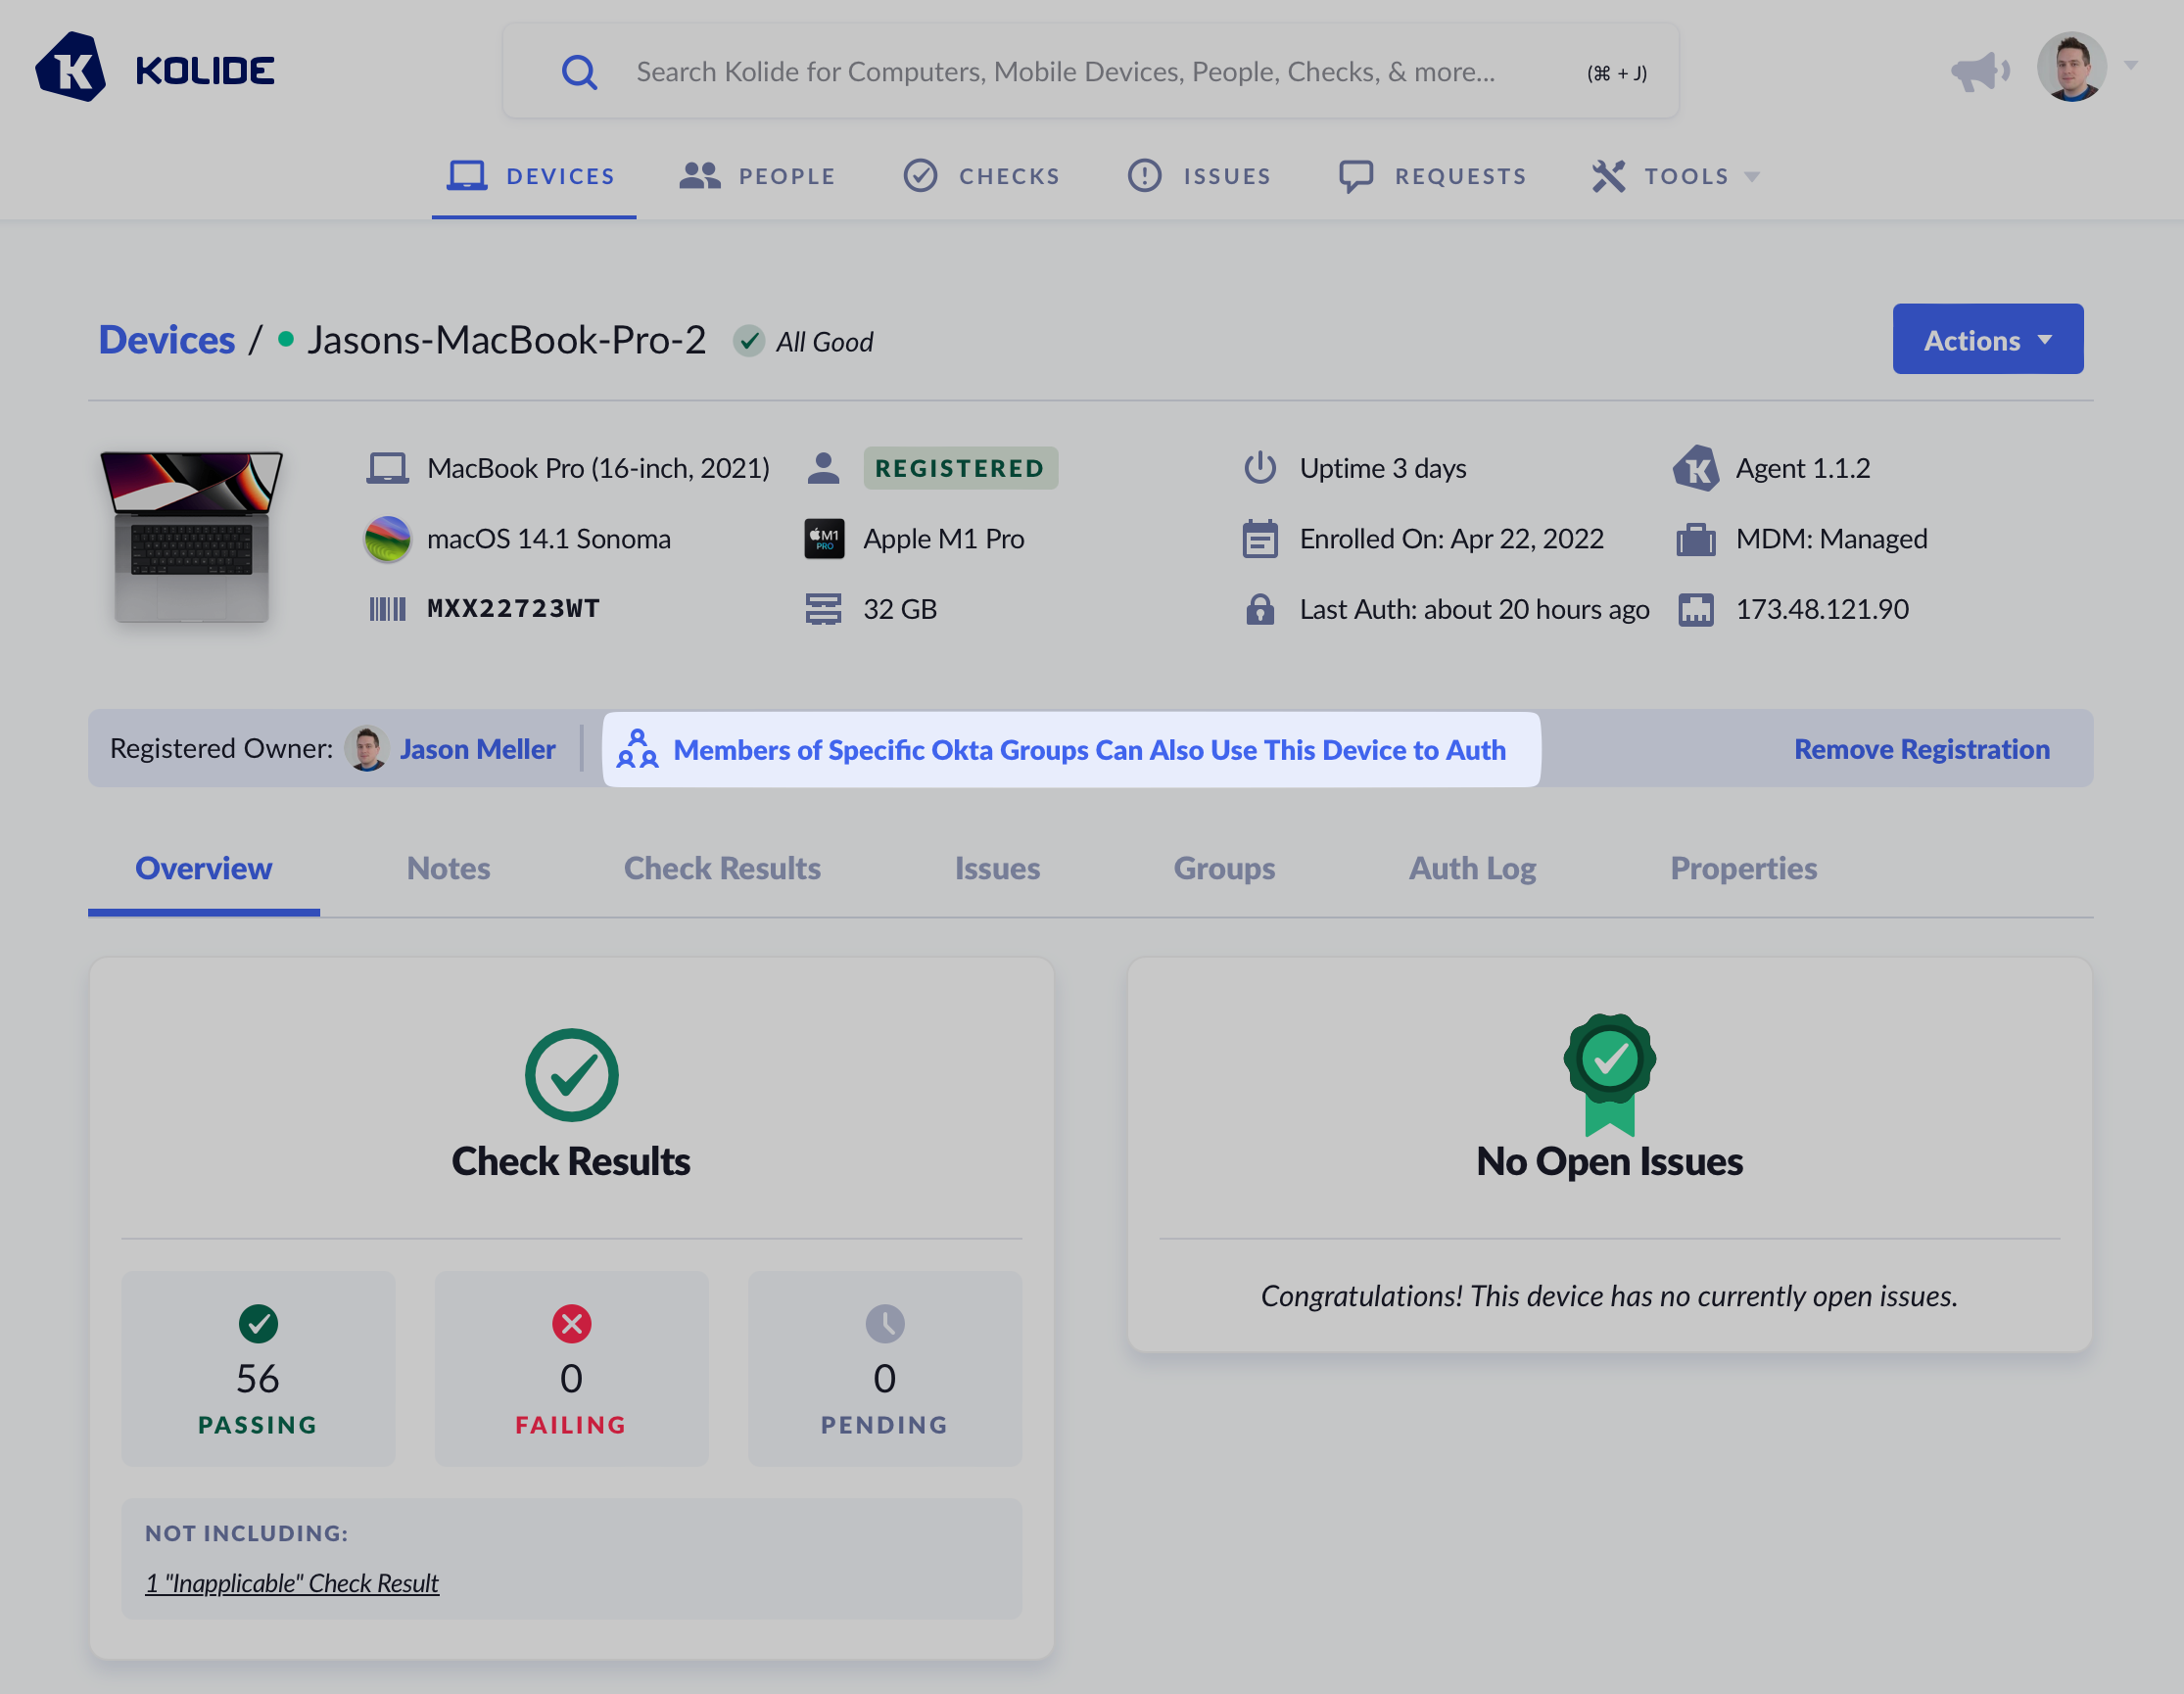
Once you’ve chosen at least one Okta Group, click Save. You will see the registration bar change to indicate Members of Specific Okta Groups Can Also Use This Device to Authenticate.
Removing Registration
Unregistering a device is desirable when you want to make it available for a new user to register, but you want to preserve all the prior data Kolide has collected about the device.
Click the Devices menu item in the top-level navigation. Locate the device you want to unregister and click it to view its details page.

In the registration info bar, click Remove Registration and accept the warning confirmation.

Device registrations can also be removed programmatically via the API. Refer to Kolide’s API Reference for details on how to remove a device registration